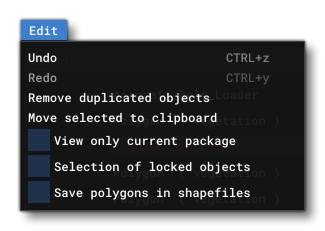
THE EDIT MENU

This menu is where you can use certain tools for editing the in the Scenery Editor, as well as set some options. Each item in the menu is explained below.
-
Undo/Redo
Clicking either of these options will undo or redo the editor states by one state position. For example, if you perform 3 actions in the Scenery Editor then select Undo 3 times, you will take the editor back to the state it was in when you opened it, before making any changes. Clicking Redo 3 times would then take you back to last state it was in after making changes.
You can perform these actions using the following keyboard shortcuts
Ctrl+ "Z": UndoCtrl+ "Y": Redo
You can also open the Undo History window from The View Menu to see all of the stored undo/redo states and then skip directly to the one you want to be at.
-
Remove Duplicated Objects
This option is specifically for Taxiway Parking and Scenery object types, and will remove any object elements of the given type that share the same position within the world.
-
Move Selected To Clipboard
This option will copy the selected object element(s) to the clipboard, and a new option will be present in this menu to paste them at the current position. In this way you can copy/paste objects within the scene.
-
View Only Current Package
Checking this means that only objects in the currently selected package will be shown in the simulation.
-
Selection Of Locked Objects
When this option is checked, you will be able to select object elements that have been "locked" in The Scenery Contents List by clicking on them or by using the multi-select (
Shift+ Left Mouse Button + Drag).
-
Save Polygons In Shape Files
When you select this option, clicking the
Save Scenerybutton will not only save any edits to the project, it will also open a file explorer for you to select a location to save all the polygon objects as shape (*.shp) files. Before saving you should have created a new asset group (of the BGL type) in the Project Editor, and the files should be saved to this folder in PackageSources. These files can then be edited in an external editor and imported again as part of the scenery project by selecting the asset group in the project editor then using theLoad This Asset Groupbutton from the Scenery Editor.