TAXIWAY SIGN OBJECTS
A Taxiway Sign object is an object element that is used to add signposts to TaxiwayPath Objects. When you select this object type the Objects window will not show any object elements as the type of sign created will depend on the properties:
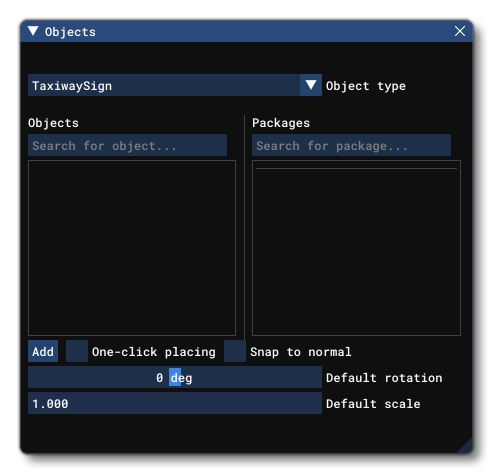
When you click the Add button, the Taxiway Sign object will be added to the scene and can be edited in the world using the Gizmo. Once positioned, the taxiway sign can be edited from the properties window.
IMPORTANT! Taxiway Sign objects require one or more Airport Objects to be present in the scene, and must be added to an airport group in The Scenery Editor. If no airport is present then they cannot be used. Also note that if they are placed too far away (ie: outside the airport Object Test Radius) then they will not be rendered.
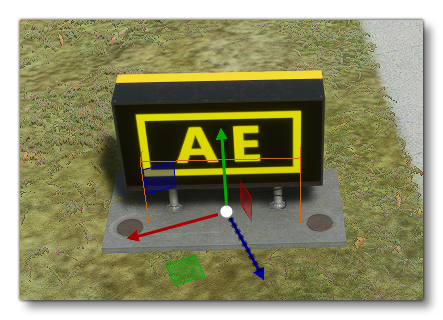 When placed in the world, the sign will be displayed along with a wireframe box - which is always the "size 3" option so you can get an idea of scale for the sign - and you can use the Gizmo to not only place the taxiway sign, but to rotate it. Note that if the airport that the sign belongs to is not configured correctly, then only the wireframe will be shown and there will be an error message shown in the The Scenery Contents List.
Once the sign has been added and positioned, you can then define the text that it is to display. This is done by either editing the Raw Label section of the properties directly, or by using the visual controls in the Properties Editor. The actual contents of these sections are explained in full below. Note that there is a limit to the amount of information that single sign can hold, but it will depend on the actual characters and symbols that you use.
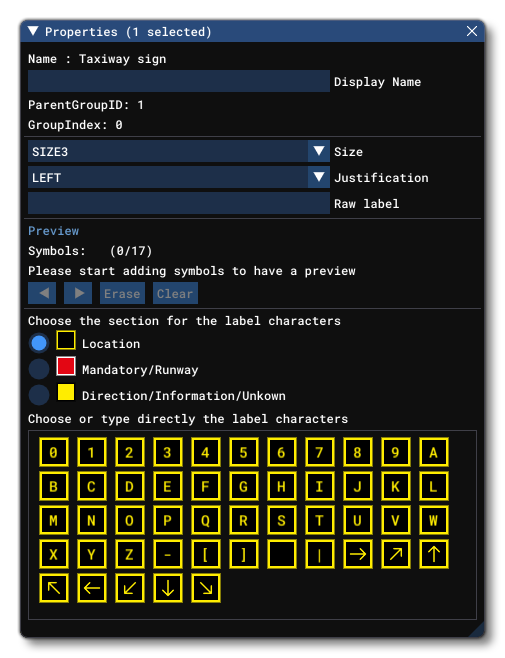
Properties
The Properties window for a Taxiway Sign looks like this:
-
Name
This is the name of the element as defined by its object type properties.
-
Display Name
This is the name of the element as it will be displayed in the The Scenery Contents List. This can be edited and is helpful for identifying elements when you have a lot of items in the content list.
-
Size
This is the physical size scalar used for the sign. This will simply scale the model used for the sign up or down depending on the selected value, where 1 is the smallest and 5 is the largest. The default size is 3.
-
Justification
This option lets you pick the side of the taxiway path that the sign is going to be placed on. When you change this the sign information will be flipped so it can be read either by vehicles coming from the left or from the right.
-
Raw Label
This is a text input box that will show the complete "label" text for the sign. If you add information to the sign using theAdd New Sectionbutton, then this will be filled out automatically for you. However, if you know what you're doing you can directly input the sign details here too. The actual contents of the raw label is a string comprised of at least one sign-type symbol (a lower case letter) and one or more characters to define the sign contents.
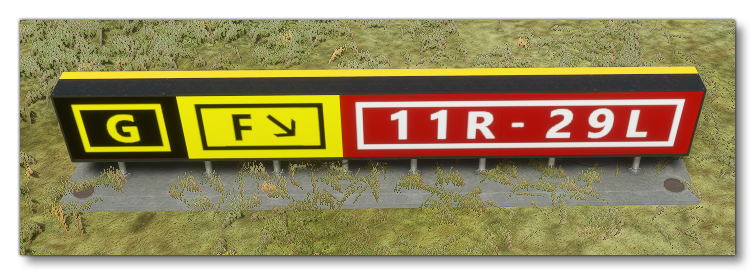
IMPORTANT! The maximum permitted number of symbols for a single sign is 17, and this limit does not include the sign-type identifier. For examplel[G]d[F\]would be 7 symbols as thelanddare not included in the character count.A simple example would be "l[G]" which creates a location sign for taxi "Golf". The sign-type symbols are as follows:Sign-type Identifier Description Colours lLocation Yellow text on black dDirection Black text on yellow mMandatory White text on red iInformation Black text on Yellow rRunway White text on red uUnknown Black text on Yellow The following characters describe the content of the sign. The characters can be any upper case letter (
A-Z), any numerical digit (0-9), or any one of the following special characters:Character Symbol Description _orspaceSpace -Dash >Right Arrow <Left Arrow ^Up Arrow vDown Arrow '(apostrophe)Up-right arrow `(backwards apostrophe)Up-left arrow /Back-left arrow \Back-right arrow [Left border ]Right border |Vertical Line Here are a couple of examples:
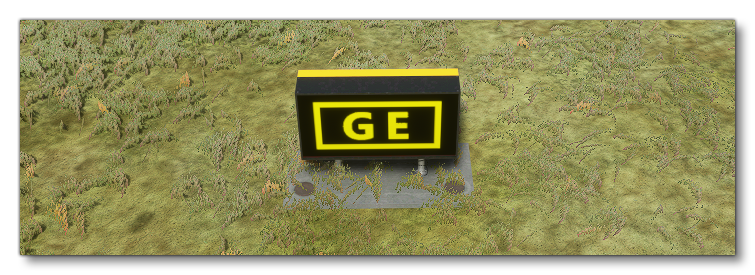
l[GE]- This sign indicates to the pilot that they are on taxiway "golf-echo"
l[G]d[F\]m[11R-29L]- This sign will tell a pilot that they are located on taxiway Golf at the intersection with runway 11R/29L and that taxiway Foxtrot is back and to their right
Note the use of brackets in these examples. Brackets create the black outline around the letter on many of the signs, and if you omit the brackets the letter will have no "box" around it. You can also use brackets on direction and runway signs to increase the spacing at either end of the segment.
IMPORTANT! A sign with incorrect label formatting will not be rendered!
-
Preview
This section will show a preview of the graphics that will be used to generate the Taxiway Saign in the scene. The preview can be created using either the Raw Label or by using the visual editor below the preview:
 This visual editor permits you to input the characters that make up the sign, as well as select the category for each section of the sign using the Location, Mandatory/Runway and Direction/Information/Unknown options at the top. Note that to create boxes you can use the square bracket buttons [].
IMPORTANT! When you use the visual editor, the Raw Label may show the "wrong" text descriptor (but visually the sign will look correct). For example, You may want to designate a Runway and expect the Raw Label to use "r" but it uses "m" instead. This is because visually the Mandatory and Runway options are identical and so only one identifying character is required, in this case "m" (and it will be "d" for Direction, Information, and Unknown sections).When using the visual editor, the Preview will fill in:
 When you have any characters int he visual editor, you can click anywhere to place the cursor there, or use the arrow keys
 ◀▶to move the cursor around. You can also delete a character at the cursor position using theErasebutton, or clear the entire input using theClearbutton.