VFXAircraft
The VFXAircraft includes the GaugeAircraft base project, modified to show the use of the WebAssembly VFX API.
This sample can be built and added to Microsoft Flight Simulator (which is explained further down this page) so you can see how this API works. Note that when testing this sample, we recommend you start your flight at LXGB (Gibraltar AB).
You can expand the link below to see the VFXAircraft file and folder structure:
+ VfxAircraft
|---+ PackageDefinitions
|   |---+ mycompany-aircraft-wasm-vfx
|   |   |---+ ContentInfo
|   |   |   |---- Thumbnail.jpg
|   |   |---+ MarketplaceData
|   |   |   |---- Marketplace.json
|   |   |   |---- ContentInfo_Thumbnail.jpg
|   |   |   |---- Thumbnail.jpg
|   |   |   |---- thumbnail3840x2160.jpg
|   |   |---- PackageMetadata.json
|   |---- mycompany-aircraft-wasm-vfx.xml
|---+ PackageSources
|   |---+ Data
|   |   |---- Roboto-Regular.ttf
|   |---+ SimObjects
|   |   |---+ Airplanes
|   |   |   |---+ MyCompany_Vfx_Aircraft
|   |   |       |---+ model
|   |   |       |   |---- model.cfg
|   |   |       |   |---- GaugeAircraft.xml
|   |   |       |   |---- GaugeAircraft_Interior.xml
|   |   |       |   |---- GaugeAircraft_Interior_LOD00.bin
|   |   |       |   |---- GaugeAircraft_Interior_LOD00.gltf
|   |   |       |   |---- GaugeAircraft_Interior_LOD01.bin
|   |   |       |   |---- GaugeAircraft_Interior_LOD01.gltf
|   |   |       |   |---- GaugeAircraft_Interior_LOD02.bin
|   |   |       |   |---- GaugeAircraft_Interior_LOD02.gltf
|   |   |       |   |---- GaugeAircraft_Interior_LOD03.bin
|   |   |       |   |---- GaugeAircraft_Interior_LOD03.gltf
|   |   |       |   |---- GaugeAircraft_Interior_LOD04.bin
|   |   |       |   |---- GaugeAircraft_Interior_LOD05.gltf
|   |   |       |   |---- GaugeAircraft_LOD00.bin
|   |   |       |   |---- GaugeAircraft_LOD00.gltf
|   |   |       |   |---- GaugeAircraft_LOD01.bin
|   |   |       |   |---- GaugeAircraft_LOD01.gltf
|   |   |       |   |---- GaugeAircraft_LOD02.bin
|   |   |       |   |---- GaugeAircraft_LOD02.gltf
|   |   |       |   |---- GaugeAircraft_LOD03.bin
|   |   |       |   |---- GaugeAircraft_LOD03.gltf
|   |   |       |   |---- GaugeAircraft_LOD04.bin
|   |   |       |   |---- GaugeAircraft_LOD05.gltf
|   |   |       |---+ panel
|   |   |       |   |---- panel.cfg
|   |   |       |   |---- SampleWasmModule.wasm
|   |   |       |---+ sound
|   |   |       |   |---- MyCompany_Gauge_Aircraft.PC.PCK
|   |   |       |   |---- sound.xml
|   |   |       |---+ soundAI
|   |   |       |   |---- MyCompany_Gauge_Aircraft_AI.PC.PCK
|   |   |       |   |---- soundAI.xml
|   |   |       |---+ texture
|   |   |       |   |---- < various PNG files >
|   |   |       |   |---- texture.cfg
|   |   |       |---+ texture.01
|   |   |       |   |---- GaugeAircraft_FUSELAGE_albd_000.png
|   |   |       |   |---- GaugeAircraft_WINGS_albd_000.png
|   |   |       |   |---- texture.cfg
|   |   |       |---+ texture.02
|   |   |       |   |---- GaugeAircraft_FUSELAGE_albd_000.png
|   |   |       |   |---- GaugeAircraft_WINGS_albd_000.png
|   |   |       |   |---- texture.cfg
|   |   |       |   |---- thumbnail.jpg
|   |   |       |   |---- thumbnail_small.jpg
|   |   |       |---+ texture.base
|   |   |       |   |---- < various PNG files >
|   |   |       |---- ai.cfg
|   |   |       |---- aircraft.cfg
|   |   |       |---- Approach.flt
|   |   |       |---- apron.flt
|   |   |       |---- cameras.cfg
|   |   |       |---- Climb.flt
|   |   |       |---- cockpit.cfg
|   |   |       |---- Cruise.flt
|   |   |       |---- engines.cfg
|   |   |       |---- Final.flt
|   |   |       |---- flight_model.cfg
|   |   |       |---- gameplay.cfg
|   |   |       |---- hangar.flt
|   |   |       |---- runway.flt
|   |   |       |---- systems.cfg
|   |   |       |---- taxi.flt
|   |---+ VisualEffectsLibs
|       |---+ aircraft-wasm-vfx
|           |---+ VisualEffectLib
|               |---- smoke.xml
|               |---- smoke_edition.xml
|               |---- VisualEffectLibrary.vfxlib
|---+ Sources
|   |---+ Art
|   |   |---+ Max
|   |       |---- < various PNG files >
|   |---+ Art
|       |---- EmissionControl.cpp
|       |---- MoveVfx.cpp
|       |---- SampleWasmModule.sln
|       |---- SampleWasmModule.vcxproj
|       |---- SampleWasmModule.vcxproj.filters
|       |---- Spawn.cpp
|---- VfxAircraftProject.xml
Loading and building the project
In order to load and build the project in Microsoft Flight Simulator, you must have previously enabled Developer Mode (see here for more information). Once enabled, simply follow these steps:
- Use the Open project... command from the File menu.

- Select the file
VfxAircraftProject.xmlfrom theVFXAircraftsample project.

- The Project Editor should open automatically and show you the project
mycompany-aircraft-wasm-vfx(if the Project Editor doesn't open, then you can open it from the Developer Mode Editors menu)

- Clicking on the project in the Project Editor will open the Inspector Window, and here you need to click the
Build Packagebutton (if the Inspector Window does not open automatically, go to the View menu in the Project Editor and open it from there).

- This will build a package from the files specified in your project. This package will be named
mycompany-aircraft-wasm-commbusand will be output in the Packages folder created in the same directory asCommBusAircraftProject.xml:

- Building the package will also install it into Microsoft Flight Simulator and so you can now proceed to the aircraft selection screen and see your newly created plane:

- Once you have selected the aircraft we recommend that you start a Free Flight at LXGB (Gibraltar AB) airport, as one of the showcase effects is designed to be spawned there.

- When you start the flight, you will see the following three displays in the aircraft cockpit:
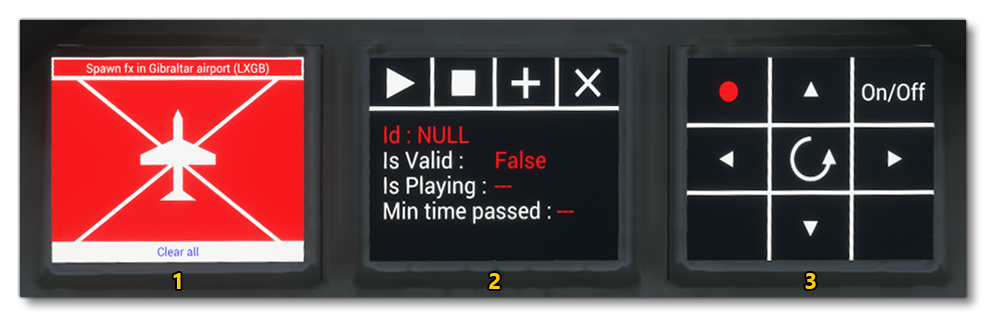
- This display permits you to spawn particles at a specific location in the world, or at specific locations on the aircraft. If you click on the text at the top - "Spawn FX In Gibraltar" - a blue particle will spawn above the position of the aircraft on the runway. Pressing this repeatedly will move up the position of the spawn point for the VFX. You may need to change to the external camera to be able to see it. If you click any of the segments around the aircraft diagram, particles will spawn in those areas of the aircraft. You can click on the "Clear All" button to clear all particles and reset the buttons.
NOTE: The "Spawn FX In Gibraltar" button, will only work or be visible if you are actually on the Gibraltar AB airport runway, at the start. - The second screen gives you direct control over a single particle instance, and shows information regarding that instance. Clicking the add button "🞥" will spawn the particle (which will play automatically). Clicking the stop button "◼", will stop the particle emitting but not remove the instance. Pressing the play button "▶" start the instance emitting particles again (unless it has been destroyed). Finally, clicking on the destroy button "✖" will remove the particle instance. Note that if you add a particle instance then - after the "Is Playing" parameter shows false - leave it for a few seconds, you can see how the simulation removes the instance automatically to save memory.
- This screen shows you how you can create a particle instance in the world then manipulate its position and rotation. Click the "On/Off" button to toggle the effect on or off (the light in the corner will be green if it's on, and red if it's off), then press and hold any of the directional buttons to move the particle instance around on a 2D plane. Pressing and holding the rotate button "↺" will cause the particle instance rotation to occilate between set angles.