ANIMATIONS OVERVIEW
When it comes to animating cockpit elements, much of the initial setup and general guidlines used for airframes can be used. You can find those on the following page:
IMPORTANT! As you work on animations, you will need to add them into the Babylon JS Animation Groups window for them to be exported correctly. Please see here for more information: Animation Groups.
The following pages discuss specific cockpit controls and how to best set them up for animation:
General
Keep in mind that all of the movable parts of the cockpit should be animated, and as such they should be modeled with this in mind. Care must be taken to ensure that the various component parts are modeled in such a way so as not to expose missing backfaces or clip through other objects when they shouldn't.
Animations should use the minimum amount of frames necessary to communicate the action and to save on file sizes. For example, most elements with a simple A to B animation (like buttons, switches and levers) can be done with just 2 frames – a start frame and an end frame. For example, this throttle lever:

NOTE: All animations should be linear (eg: not ease in/out, which allows the animation to accelerate or decelerate progressively over the range)
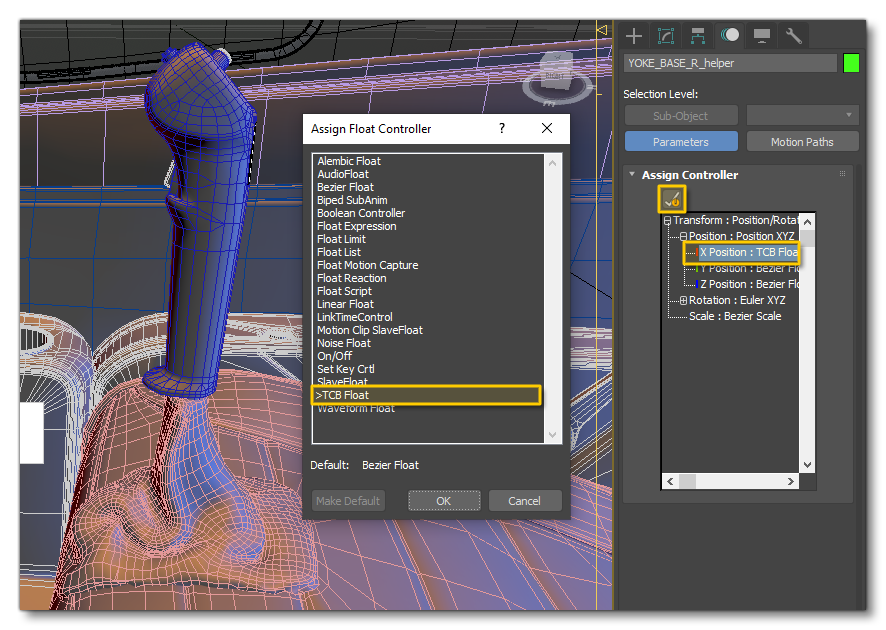
For objects that are not at 90° angles, the animation will sometimes not correctly follow the local axis that you set and as a result there will be a "wobble". To avoid this happening you might need to delete your keyframes and go to the animation tab then set the axis being animated to a TCB float, instead of the default Bezier Float, then recreate the keyframes:
Animation Groups
When setting up the animation groups for the cockpit, you should name them the same as the corresponding meshes without the x0 / x1 LOD identifier. The exception to this may be the Yoke and Pedal animations, which are often visible from outside the cockpit and may require multiple LODs.
When creating the animation groups be sure to add in any additional objects that move at the same time as the object being animated. For example, for pedals there may be links and/or bars that move along with them, so these should be animated and added into the same animation group.
Skinning
To skin the objects, the nodes used in the skin must be in the same hierarchy. For a yoke bag for example, you can use the cockpit floor as well as the handle. On the other hand, it may be necessary to put the child handle off the ground for the export to work without any non-exported skin error. Note that skinned items do not need to be added to animation groups.
For more information see the following section: