NetworkAircraft
The NetworkAircraft sample includes a minimal set of files - based on the GaugeAircraft sample - that define an aircraft that has three different screens, each one using a specific method of working with the WASM Network API. This sample can be built and added to Microsoft Flight Simulator 2020 (which is explained further down this page) so you can see how the process works, and it's simplicity makes it an ideal study subject for those of you using WASM to create glass cockpits.
You can expand the link below to see the NetworkAircraft file and folder structure:
+ NetworkAircraft
|---+ PackageDefinitions
|   |---+ mycompany-aircraft-wasm-network
|   |   |---+ ContentInfo
|   |   |   |---- Thumbnail.jpg
|   |   |---- Business.json
|   |---- mycompany-aircraft-wasm-network.xml
|---+ PackageSources
|   |---+ Data
|   |   |---+ Images
|   |   |   |---- < 12 JPG images >
|   |   |---- entypo.ttf
|   |   |---- images.txt
|   |   |---- LICENSE_OFL.txt
|   |   |---- NotoEmoji-Regular.ttf
|   |   |---- Roboto-Bold.ttf
|   |   |---- Roboto-Light.ttf
|   |   |---- Roboto-Regular.ttf
|   |   |---- screenshot-01.png
|   |   |---- screenshot-02.png
|   |---+ SimObjects
|       |---+ Airplanes
|           |---+ MyCompany_Network_Aircraft
|               |---+ model
|               |   |---- GaugeAircraft.xml
|               |   |---- GaugeAircraft_Interior.xml
|               |   |---- GaugeAircraft_Interior_LOD00.bin
|               |   |---- GaugeAircraft_Interior_LOD00.gltf
|               |   |---- GaugeAircraft_Interior_LOD01.bin
|               |   |---- GaugeAircraft_Interior_LOD01.gltf
|               |   |---- GaugeAircraft_Interior_LOD02.bin
|               |   |---- GaugeAircraft_Interior_LOD02.gltf
|               |   |---- GaugeAircraft_Interior_LOD03.bin
|               |   |---- GaugeAircraft_Interior_LOD03.gltf
|               |   |---- GaugeAircraft_Interior_LOD04.bin
|               |   |---- GaugeAircraft_Interior_LOD04.gltf
|               |   |---- GaugeAircraft_LOD00.bin
|               |   |---- GaugeAircraft_LOD00.gltf
|               |   |---- GaugeAircraft_LOD01.bin
|               |   |---- GaugeAircraft_LOD01.gltf
|               |   |---- GaugeAircraft_LOD02.bin
|               |   |---- GaugeAircraft_LOD02.gltf
|               |   |---- GaugeAircraft_LOD03.bin
|               |   |---- GaugeAircraft_LOD03.gltf
|               |   |---- GaugeAircraft_LOD04.bin
|               |   |---- GaugeAircraft_LOD04.gltf
|               |   |---- model.cfg
|               |---+ panel
|               |   |---- SampleWasmModule.wasm
|               |   |---- SampleWasmModule.wat
|               |   |---- panel.cfg
|               |---+ sound
|               |   |---- MyCompany_Gauge_Aircraft.PC.PCK
|               |   |---- sound.xml
|               |---+ soundAI
|               |   |---- MyCompany_Gauge_Aircraft_AI.PC.PCK
|               |   |---- soundai.xml
|               |---+ texture
|               |   |---- < 22 PNG files >
|               |   |---- texture.cfg
|               |---+ texture.01
|               |   |---- GaugeAircraft_FUSELAGE_albd_000.png
|               |   |---- GaugeAircraft_WINGS_albd_000.png
|               |   |---- texture.cfg
|               |---+ texture.02
|               |   |---- GaugeAircraft_FUSELAGE_albd_000.png
|               |   |---- GaugeAircraft_WINGS_albd_000.png
|               |   |---- texture.cfg
|               |   |---- thumbnail.jpg
|               |   |---- thumbnail_snmall.jpg
|               |---+ texture.base
|               |   |---- < 27 PNG files >
|               |---- ai.cfg
|               |---- aircraft.cfg
|               |---- Approach.flt
|               |---- apron.flt
|               |---- cameras.cfg
|               |---- Climb.flt
|               |---- cockpit.cfg
|               |---- Cruise.flt
|               |---- engines.cfg
|               |---- Final.flt
|               |---- flight_model.cfg
|               |---- gameplay.cfg
|               |---- hangar.flt
|               |---- runway.flt
|               |---- systems.cfg
|               |---- taxi.flt
|---+ Sources
|   |---+ Art
|   |   |---+ Max
|   |       |---- < 51 files (PNG / Max) >
|   |---+ Code
|       |---- GetCallback.cpp
|       |---- GetGauge.h
|       |---- GetLoop.cpp
|       |---- SampleWasmModule.sln
|       |---- SampleWasmModule.vcxproj
|       |---- SampleWasmModule.vcxproj.filters
|       |---- SampleWasmModule.vcxproj.user
|       |---- Upload.cpp
|---- NetworkAircraftProject.xml
Loading and building the project
In order to load and build the project in Microsoft Flight Simulator 2020, you must have previously enabled Developer Mode (see here for more information). Once enabled, simply follow these steps:
- Use the Open project... command from the File menu.

- Select the file
NetworkAircraftProject.xmlfrom theNetworkAircraftsample project.

- The Project Editor should open automatically and show you the project
mycompany-aircraft-wasm-network(if the Project Editor doesn't open, then you can open it from the Developer Mode Tools menu)

- Clicking on the project in the Project Editor will open the Inspector Window, and here you need to click the
Build Packagebutton (if the Inspector Window does not open automatically, go to the View menu in the Project Editor and open it from there).

- This will build a package from the files specified in your project. This package will be named
mycompany-aircraft-wasm-networkand will be output in the Packages folder created in the same directory asNetworkAircraftProject.xml:

- Building the package will also install it into Microsoft Flight Simulator 2020 and so you can now proceed to the aircraft selection screen and see your newly created plane:

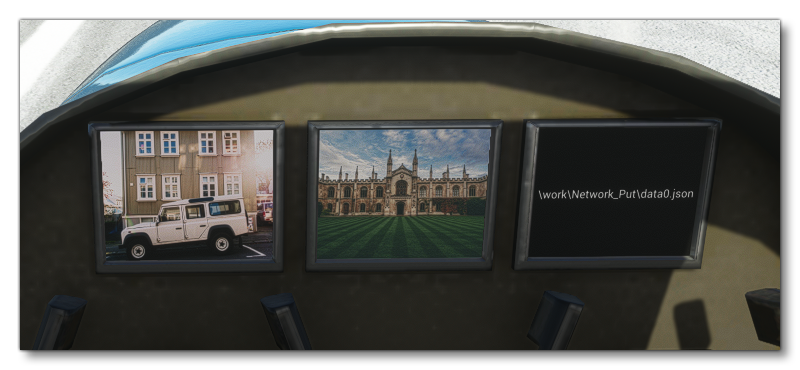
Once you have built the aircraft and selected it, you can go into a Free Flight and see three panels in the cockpit. These three panels all follow the same format, with a simple text saying "Click here":

Each screen is for showing a seperate principle component of the Network API. These are (from left to right):
- HttpGet (Loop): When you click on the screen, the gauge will make a request (GET) to an online website to get a random image and display it. It will also copy the image to the work folder, and you can click again and again to get a different image every time. Conceptually this gauge shows how to use the Network API using the "Loop" technique.
- HttpGet (Callback): This gauage has the exact same behaviour as the previously described gauge. However this gauage is conceptually different as it uses the "Callback" technique.
- HttpPut: For this last gauge, clicking will make a request (PUT) to an online website and then copy the returned JSON file into the work folder. Once done, the gauge will display the path to the last JSON downloaded.