SimvarWatcher
The SimvarWatcher sample is Microsoft Visual Studio project that shows how to connect to Microsoft Flight Simulator 2020 from a C# application in order to retrieve simulation variables (generally known as SimVars). This page outlines how to use the sample project, and you can study the project in Visual Studio for yourself to see how it works.
You can expand the link below to see the SimvarWatcher file and folder structure:
|---+ SimvarWatcher
    |---+ bin
    |   |---+ x64
    |       |---+ Release
    |           |---- Microsoft.FlightSimulator.SimConnect.dll
    |           |---- SimConnect.cfg
    |           |---- SimConnect.dll
    |           |---- Simvars.exe
    |           |---- Simvars.exe.config
    |           |---- Simvars.pdb
    |---+ Properties
    |   |---- AssemblyInfo.cs
    |   |---- Resources.Designer.cs
    |   |---- Resources.resx
    |   |---- Settings.Designer.cs
    |   |---- Settings.settings
    |---+ Simvars
    |   |---- airspeed.simvars
    |   |---- all.simvars
    |   |---- altimeter.simvars
    |   |---- attitude.simvars
    |   |---- dr400.simvars
    |   |---- electrical_amp_volt.simvars
    |   |---- engines.simvars
    |   |---- exterior.simvars
    |   |---- fuelpumpswitch.simvars
    |   |---- lights.simvars
    |   |---- pct.simvars
    |   |---- radio.simvars
    |   |---- SimvarTokens.simvars
    |   |---- starter.simvars
    |   |---- turb_eng.simvars
    |   |---- turb_start.simvars
    |---- App.config
    |---- App.xaml
    |---- App.xaml.cs
    |---- MainWindow.xaml
    |---- MainWindow.xaml.cs
    |---- SimConnect.cfg
    |---- Simvars.csproj
    |---- Simvars.sln
    |---- SimvarsViewModel.cs
    |---- textsimvars.cs
    |---- units.cs
    |---- ViewModel.cs
Loading And Building The Project
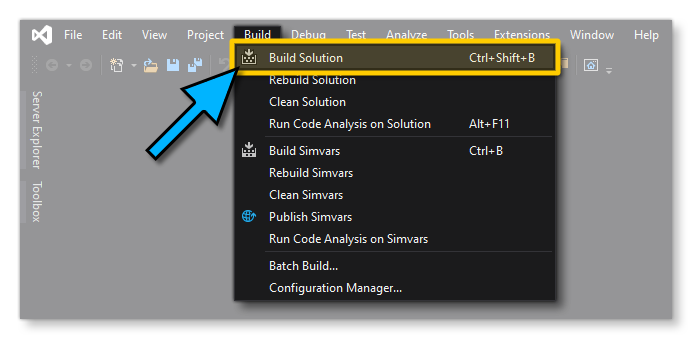
The supplied sample requires a minimum of Visual Studio 2017 to be installed on your machine (any edition of this product can be used, including the free Community edition). To load the project into Visual STudio, simply double click on the file Simvars.csproj in the SimvarWatcher sample folder. Once open in VS, go to the Build menu and select Build Solution:
Running The Project
Once the project has been built it can be run by clicking the Start button in Visual Studio. This will open the Simvar Watcher app:

The first thing to do is to connect the app to the simulation, which requires Microsoft Flight Simulator 2020 to be running (if it's not, then start it now before continuing). You should start a mission so that the app can retrieve and set the SimVars that you want, and then in the Simvar Watcher app click on the Connect button in the top left of the window. The red indicator should now become a flashing green/blue to indicate that the app has connected correctly to the simulation:

Note that the light flashes between blue and green based on the update frequency, which you can set using the Frequency slider beside the Connect/Disconnect button.
Simvar Watcher Menus
Here we'll give a brief overview of the controls in the Simvar Watcher so you know what they do and can see the code in Visual Studio. To start with we'll explore the menu options at the top of the app:
File
This menu has the following options:
- Load File: Loads a previously saved simvar data file. There are examples of these that can be loaded in the
Simvarssubfolder of theSimvarWatchersample folder. Please note that this does NOT overwrite any exisiting SimVars, and loaded data will be added to the currently watched vars. - Save File: Saves out any defined simvar watches (SimVar + Units) as a
*.simvarfile. - Save File With Values: Saves out any defined simvar watches (SimVar + Units + Values) as a
*.simvarfile. This can be helpful to revise values when the app is disconnected from the simulation. - Exit: Exit the Simvar Watcher app.
Options
This menu has the following options:
- Use FX Compatibility Configuration: This option is intended to permit you to use the SimVar Watcher with the legacy Microsoft Flight Simulator X (FSX). When checked the SimVar Watcher should be able to connect to this legacy product.
- Show All Units: For many SimVars, by default, the watcher app will only show the applicable units that can be selected. However, when this option is checked, all units will be shown.
About
This menu has the following options:
- SimConnect Reference: This will open the documentation on the SimConnect API Reference page.
- Simulation Variables Reference: This will open the documentation on the Simulation Variables page.
Using The SimVar Watcher
The SimVar Watcher app is split into the following main sections:
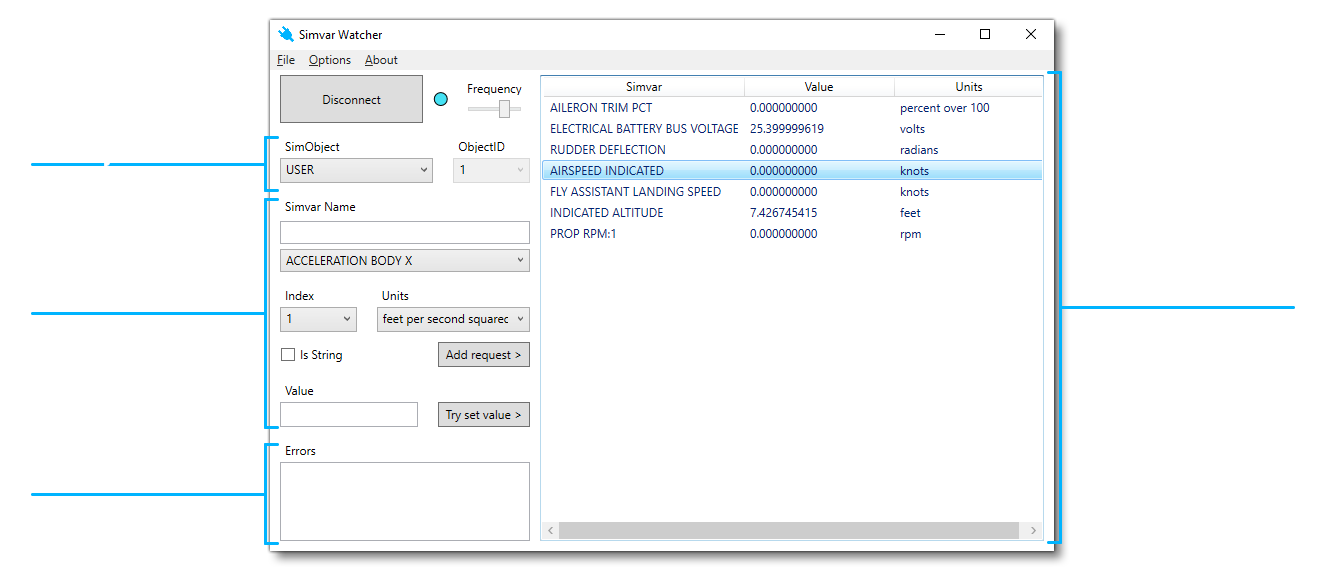
The general process for using the tool is to select an object that you want top get/set the SimVars for, then select the SimVar itself, paying attention to the units and the index (if no index is specified or required for the SimVar then it should be 0). Once selected you click the Add request > button to add it to the SimVar Watches. If you want to set the SimVar, then you select it from the SimVar Watches list, place an appropriate value in the "Value" input, and click on the Try set value > button.
The sections below explain each item of the app interface in more detail.
Sim Object
- SimObject: Permits you to choose from a subset of
SimObjectswhich one to target. - ObjectId: shows a list of the available
SimObjectIDs.
SimVar Selection
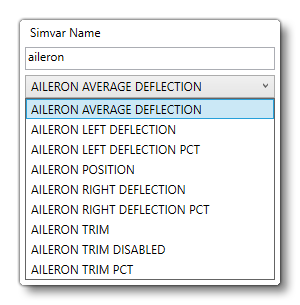
- Simvar Name: Opens a drop-down list of all the different
Simvarnames so you can choose one to watch or set. Above this option you have an input field that can be used to filter the available SimVars and help you to find the exact one you are looking for.
- Index: Used when indexing a
Simvarthat could refer to multipleSimObjects(like the the engine SimVars, for exampleENG ANTI ICE). - Units: The unit of measurement to use for the
Simvarwatch. By default this will be filtered - where possible and applicable - to show the units appropriate to the selected SimVar, but this behaviour can be changed from the Options menu. You can find an explanation for each of the possible units on the Simulation Variable Units page. - Add Request: Adds the selected
Simvarto the watch list on the right:

- Is String: Checking this option tells the SimVar watcher that the return value for the requested SimVar is a string, for example, when using something like
TACAN STATION IDENT. - Value: The new value to set the currently selected
Simvarto. - Try Set Value: Clicking this will take the set value from the input above and try to set the selected
Simvarto it in the simulation. A large majority of Simvars cannot be set, however this is listed as part of the documentation for each SimVar.
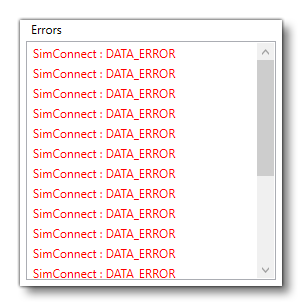
Errors
Any errors will be shown in this window, for example when you try to set a value on a SimVar that doesn't permit it:
SimVar Watches
The SimVar Watches is the part of the app that shows all the different SimVars that you have requested to be added. The SimVars shown will update their values in real time based on what is currently happening in the simulation. You can also click on the different variables listed and then use the Try set value button to set the value of the SImVar (if permitted).
You can right click on any of the listed SimVars to get the following menu:
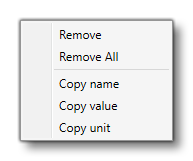
- Remove: This will remove the selected SimVar from the watch list.
- Remove All: This will clear the watch list, removing all SimVars from it.
- Copy Name/Value/Unit: This option will copy the name/value/unit of the selected SimVar to the clipboard