ADVANCED AUDIO EFFECTS
The audio that you've created for the simulation so far can be used "as is", however it will greatly benefit from some simple tweaks and effects that can done in Wwise. These will bring your audio up the same level as original Microsoft Flight Simulator audio experience, and as such we recommend that you take the extra time required to add these things.
NOTE: This section of the audio tutorial assumes that you have gone through and understood the page on Engine Audio Setup, as the information given here expands on that.
Spatialization
Wwise permits the creation of virtualised spatial audio - also known as 3D audio - which is used to give the end user the impression that sound is coming from different directions based on things like the relative position and orientation of the audio emitter with respect to the listener, all the while using only the standard "stereo" output. This is an important feature for something as immersive as Microsoft Flight Simulator, and as such you should definitely be setting up your audio to implement this system.
To set things up, you'll be using the Positioning tab in the Property Editor. This is found by going to the Audio tab in the Project Editor and selecting the Blend Container that you want to edit. In this example we'll be editing the combustion_outside container. Once selected, you can go to the Positioning tab and set the following values:
- Set Override Parent
- Set the Center Channel to 100%
- Set 3D Spatialization to use the "Position + Orientation" setting
- Ensure that the Speaker Panning / 3D Spatialization Mix value is set to 100
- Check Attenuation and then click on the
>>button and navigate to the "aircraft_player_outside_piston_1500m_exhaust" ShareSet
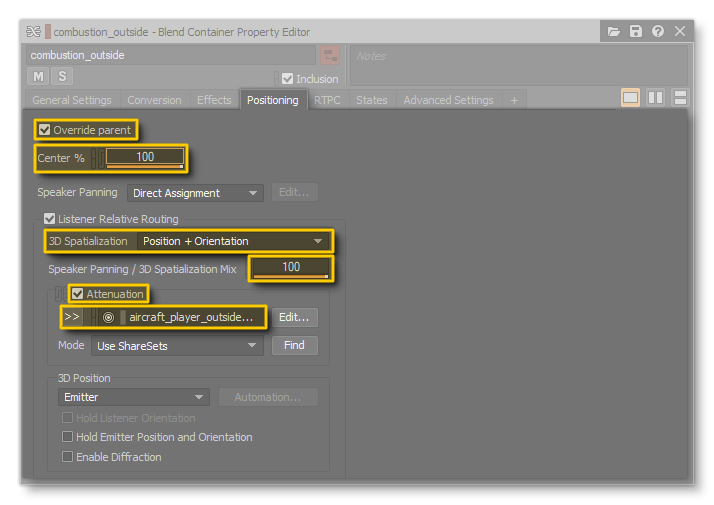
With that done, you should set up the positions for the other audio containers following these basic rules (note that all of them use Position + Orientation for the 3D Spatialization setting):
- "combustion_start_outside", "shutdown_combustion_outside" and "starter_outside"
- played in the center channel at 100%
- use "100" as a Speaker Panning / 3D Spatialization mix value
- attenuation ShareSet: "aircraft_player_outside_piston_1500m_exhaust"
- "combustion_inside", "combustion_start_inside" and "shutdown_combustion_inside"
- played in the center channel at 100%
- "25" as a Speaker Panning / 3D Spatialization mix value
- attenuation ShareSet: "aircraft_player_inside_3m_spread50_focus70"
- "propeller_outside", "propeller_start_outside" and "shutdown_propeller_outside"
- played in the center channel at 100%
- "100" as a Speaker Panning / 3D Spatialization mix value
- attenuation ShareSet: "aircraft_player_outside_piston_1500m_propeller_01"
- "propeller_inside", "propeller_start_inside" and "shutdown_propeller_inside"
- played in the center channel at 100%
- use "100" as a Speaker Panning / 3D Spatialization mix value
- attenuation ShareSet: "aircraft_inside_3m_spread15"
- "starter_inside"
- played in the center channel at 100%
- use "50" as a Speaker Panning / 3D Spatialization mix value
- attenuation ShareSet: "aircraft_player_inside_3m_spread40_focus70"
Reverb
This next example is how we'd add reverb to certain sounds to simulate how the sound would behave in a closed space like the cockpit. We'll be doing this on the "propeller_inside" blend container, but you may want to consider adding reverb to all the sound effects (to a greater or lesser degree) to make them "fit" into the simulation world better. In this section we'll be showing you how to do this in two different ways, as well as how to create your own convolution reverb using an impulse response file.
Game Defined Auxiliary Sends
By setting up a game defined auxiliary send, you are telling Wwise that you will let the simulation decide the ShareSet that will be used for the reverb using information added in the sound.xml file. For this example, you will want to select the "propeller_inside" blend container, and then in the Event Editor go to the General Settings tab and tick the Override Parent option in the Game Defined Auxiliary Sends section. Once that's ticked, select "Use game-defined aux sends":
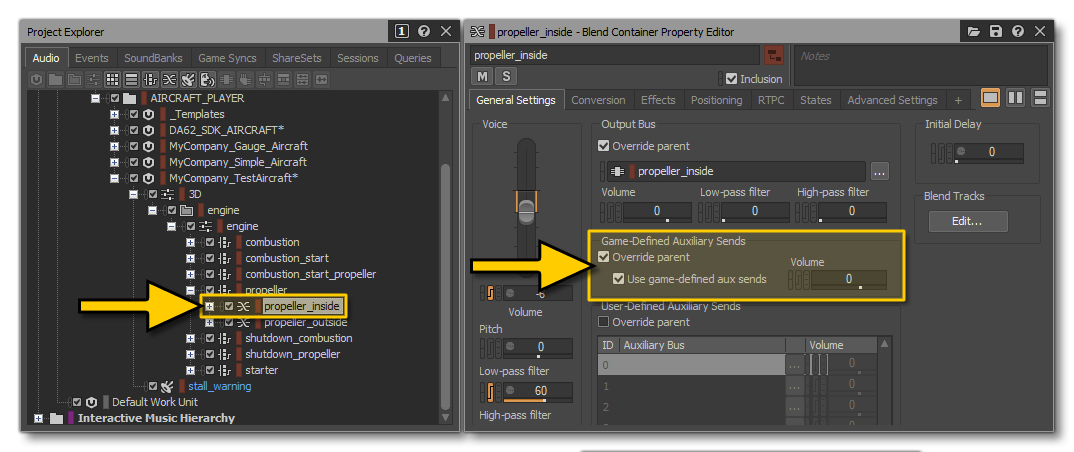
IMPORTANT! By selecting Game Defined Auxiliary Sends, you are telling Wwise that you will specify the Aux Send in the sound.xml of your aircraft. This is explained in more detail on the Engine Audio Sound.xml page.
If you now go to the Project Explorer and expand the Master Mixer Hierarchy you will see that there are a number of audio buses available related to auxiliary sends and reverb, for both inside and outside audio. The one we are interested in for this particular case is the "aux_inside" group, specifically the "rev_inside_custom" auxiliary bus within that group. If you select that and then go to the Effects tab in the Event Editor, you will see that there is already a generic ShareSet loaded with a Wwise Convolution Reverb called "rev_inside_generic_custom":
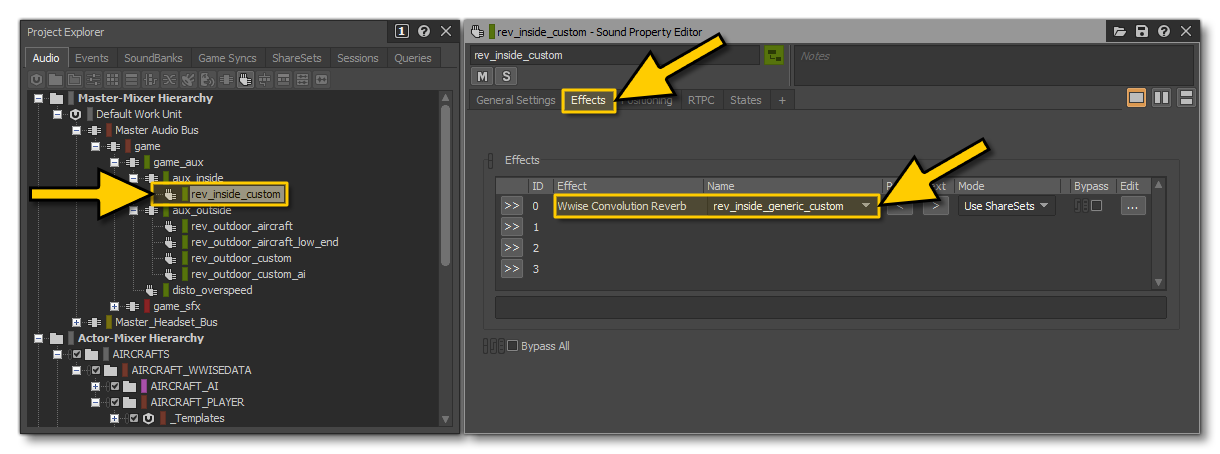
This generic effect is fine, but it's often better to create your own custom effects based on the impulse response audio file from the aircraft in question.
NOTE: The rev_inside_custom and rev_outside_custom ShareSets are specifically designed for you to supply your own impulse response audio samples.
Create A Custom Convolution Reverb Using Impulse Response
To create the custom reverb effect, you will first need to create a new ShareSet in the Project Explorer. For that, go to the ShareSets tab and select the "Effects" folder, then right-click and select New Child > Work Unit. Name it with the name of your company, eg: MyCompany_MyEffects.
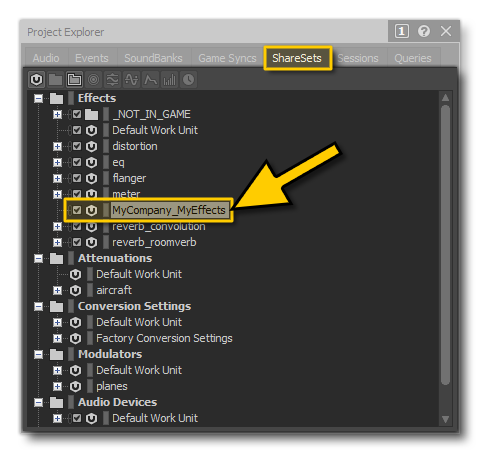
You will now want to right-click on the new work unit and select New Child > Wwise Convolution Reverb. Make sure to name it with your company name and the name of the aircraft as well as any other identifying information (in our example we have used rev_inside_MyCompany_TestAircraft). If you double click on this new effect it will open the Effect Editor window, and here you can go to the Effect Settings tab and click on the ... button to browse to the impulse response file and add it to the audio file:
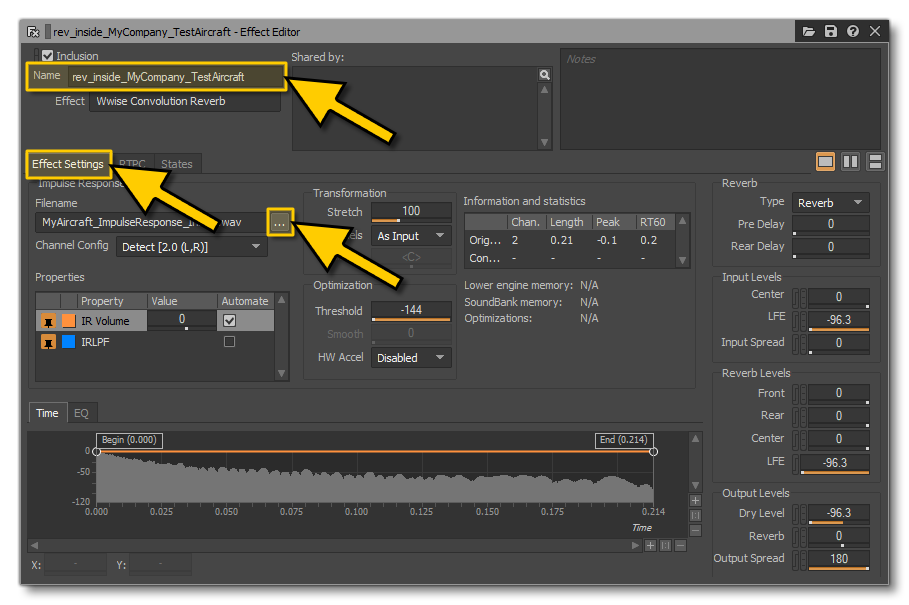
Once you have added the file, you can tweak the different available parameters in the Effects Editor to achieve the results that you wish within the simulation.
User Defined Auxiliary Sends
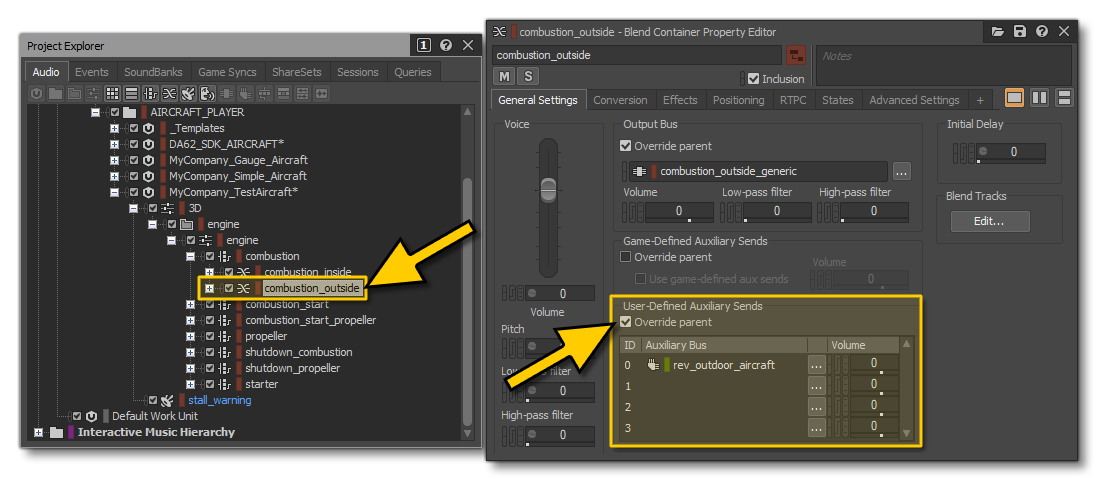
If you do not wish to go through this process, it should be noted that you can also re-route any blend container to use any auxiliary effects bus. This is done by selecting the blend container and then in the General Settings of the Property Editor, checking the Override Parent option in the User Defined Auxiliary Sends section, then selecting the auxiliary bus you want to use. In the image below, we have routed the combustion_outside container through the rev_outdoor_aircraft bus:
Doppler Effect
The final effect that should be applied to your sounds is the Doppler effect. This adds that final touch of realism to the sonic environment and is also the easiest to set up, since it is only applied to an actor mixer, and uses "hard coded" values.
To add Doppler effects to your audio, you first need to select the actor mixer to apply it to. In this example, we'll be applying it to the Engine actor mixer (and in general this is the only one that needs it), so we select that and then go to the RTPC tab in the Property Editor. From this tab you click on the >> button for the Y axis to create a new Voice Pitch curve, and then click on the >> button for the X axis to add the game parameter ENV_ DOPPLERCENTS (found in Game Parameters > Environment > Common):
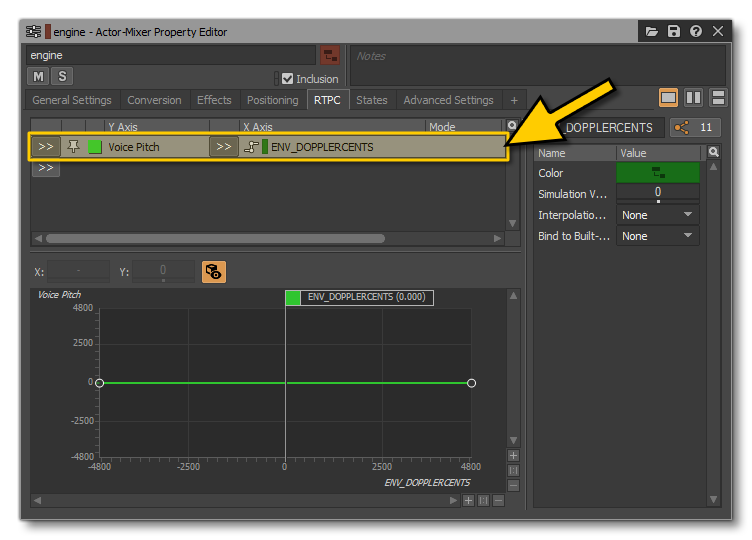
The only thing that you need to do now is to set the voice pitch curve to be linear, from -4800 to 4800:

This linear curve will allow the most realistic audio within the simulation, and there is nothing else that needs to be done for this effect to be applied to all the engine sounds.
NOTE: When the user has the chase camera enabled, Doppler effects will be disabled.
Summary
This page has concentrated on the most important and generally "universal" effects that should be applied to your engine audio. These effects should always be applied to maintain consistency within the simulation between your aircraft and the ones supplied by default and by other third party developers.
However, it should be noted that Wwise offers a wide range of effects and other tools that should also be explored when creating your audio, since things like instruments, pumps, weather sounds, etc... will all require their own setup. As such, we encourage you to explore the main documentation where you can find information on the following:
Between this tutorial, those pages in the main SDK documentation, and the Wwise Sample project, you should have no problems creating fantastic audio for your add-ons. All that remains after creating your PC.PCK is to hook it all up in the sound.xml file, which explained here: