CHECKLIST BEST PRACTICES
This section aims at outlining the minimum requirements for your aircraft checklists to be in compliance with general standard used by the aircraft that are part of Microsoft Flight Simulator by default. The checklist system is a powerful tool with many features to use, and as such the minimum quality level attempts to use as much of these features as possible. These expected features can be divided in the following categories: text, evaluation, auto complete, and visual helpers. We'll cover each of these in turn and explain what is expected from you when creating your checklists using these features.
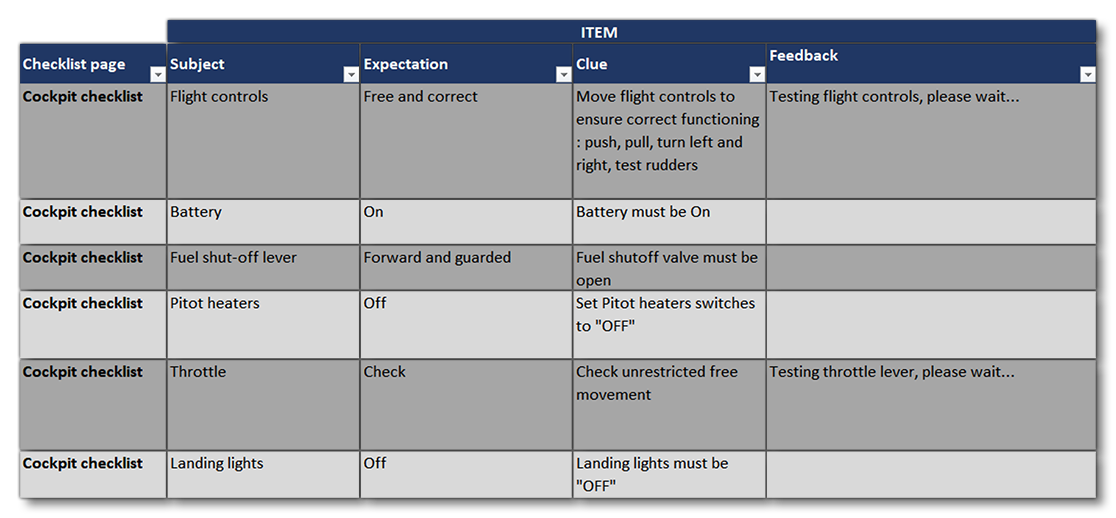
The following chart should help you to understand better how checklists should be developed:

Research Procedures
Before implementing the checklist in the simulation, you should take time to do some research about the aircraft and how to operate it. Gathering documents is an essential step of design work and the checklist creation is no exception. Usually the Pilot Operating Handbook (POH) will contain a lot of information about the aircraft, and one or more specific sections dedicated to procedures - it is in these sections that the checklists can be found. The checklists in the POH are usually designated by "NORMAL PROCEDURES" and "EMERGENCY PROCEDURES", with the former roughly being the checklist used when the aircraft is working as expected and the latter being the one used when one or several systems have failed.
Note too, that there may be other sources of information available to you for the aircraft that may highlight things that are typically expected in the pre-flight procedures but not specifically documented in the POH. Things like articles, photos and videos can be found that may contain this additional information and context.
One way we recommend for extracting the real aircraft procedures from the POH and simplifying them into a working checklist schematic is to register every checklist step of the real aircraft into a spreadsheet. In the spreadsheet, the whole procedure can be divided into different flight phases - which will become checklist pages in the simulation - and given a logical order. It's at this point that you can also decide which items to omit (because the aircraft is designed for novices, or because the aircraft model doesn't have the precise level of detail, etc...).

Prepare Base XML
This step is where you would create the base XML files that you need, and link to any existing checklist libraries. In general, we recommend that you have at least two XML files for the base files:
- one is a specific library that will include fully implemented checkpoints that are specific to the aircraft. In other words, there is no need to add them into a default checkpoint library because of their specificity to the aircraft type. This would be called simply
[Aircraft]CheckpointLibrary.xmlor something similar. - the other one is the checklist itself and it will refer to checkpoints from the aircraft specific library and from the
DefaultCheckpointsLibrary.xml(which is a file that is provided in the simulation for all aircraft to use, as explained here: Default Checkpoint Library). It can greatly help readability - especially for complex aircraft - if the checklist XML file only includes the flow of steps > pages > blocks > checkpoints and to have the actual checkpoint implementations in a separate file. This file is usually called something like[Aircraft]Checklist.xml.
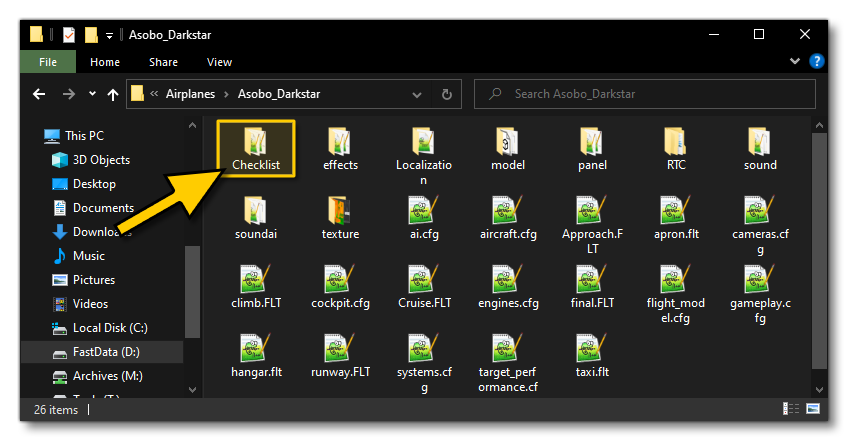
These files must go in a folder named Checklist within the aircraft source files, for example:

Implement Checkpoint
This is part of the iteration cycle, and is where you would start to define the individual checkpoints for the checklist. The normal process for this is to add the checkpoint into the aircraft library file and then call it in the checklist. The Creating A Checklist page goes into this in more detail.
Implement Extras
This is part of the iteration cycle, and is where you would add in the required clues and feedback items for a checkpoint, as well as set up any required cameras. The normal process for this is to add the checkpoint into the aircraft library file and then call it in the checklist. The Creating A Checklist page goes into this in more detail.
Test
This is the final part of the iteration cycle, and is where you simply build the aircraft in the simulation and test that the checklist actually functions as designed and responds to user input correctly. Once you have finished testing and everything is correct, you would then go back to the start of the iteration cycle and add in further checkpoints to your checklist.
Requirements for text
The following lists the recommended requirements for all text that is to be used within the checklist:
- Checkpoints must have a subject, an expectation and a clue.
- While feedback sections are not mandatory for "quick-to-be-evaluated" checkpoints, there should always be one when the checkpoint last more than a few seconds and/or what happens during evaluation is difficult for the player to perceive (e.g. RPM adjustment, APU starting sequence, waiting for X minutes, etc...).
- Text should be localized to work correctly with the different languages supported by the simulator.
Requirements for Evaluation
The following lists the recommended requirements for all checkpoint evaluations that are to be done within the checklist:
- Checkpoints should be "auto-evaluated" as much as possible. Auto evaluation means that when the checkpoint is being evaluated, the player only has to perform the required action to validate the checkpoint. On the contrary, manual validation means that to complete the checkpoint the player has to manually click the "Tick Item" button to validate the checkpoint.
- In some cases, auto-evaluation is not applicable (e.g. when the expectation of the checkpoint is "as desired" or "as required"). In these cases, manual validation is acceptable.NOTE: Checkpoints that do not include a test automatically expect manual validation.
- Evaluation tests must be able to validate when conditions are met, even when the conditions are met in an unexpected way. Basically, a checkpoint cannot be "failed". For example, let's consider the following checkpoint: "Touchdown: Three-point":
- This checkpoint expects a three-point touchdown meaning, all three wheels (in a conventional landing gear design) must touch the ground at the same time.
- However, checking that all the wheels touched the ground at the same time could be problematic if the player does not manage a three point landing. Indeed this would lead to the checklist being blocked with the checkpoint not validating.
- Therefore such a test should be implemented by just checking that all wheels are on ground. This will allow for the checkpoint to validate even in the case of a failed three-point touchdown.
Requirements for Auto complete
The following lists the recommended requirements for all checkpoint to auto-complete:
- Checkpoints must have auto-complete capability. The auto-complete feature - also called the copilot action - allows the player to "wait" for the copilot to complete the checkpoint by performing the required action(s).
- For some checkpoints, auto-complete will not be applicable:
- if the checkpoint is manually validated as presented above then no auto-complete is necessary as the "Auto-complete item" button will be replaced by a "Tick item" button.
- if the checkpoint is auto-evaluated but completion does not require actions in the cockpit or cannot be done using these (e.g. some speed checks, temperature checks) then the action to implement should be "WaitUntilTestValueValidated".
- Copilot actions must be reliable as their inability to validate would lead the player to being blocked in the checklist process and having to force validate the checkpoint or reset the page.
Requirements for visual helpers
The following lists the recommended requirements for the creation and implementation of visual helpers in the checklist:
- All checkpoints must make use of highlights and cameras (except for the situation outlined here).
- All controls, gauges, or screens that need to be operated (or monitored) for a checkpoint to be validated need to be highlighted to guide the user.
- The minimal expected highlights per object type are as follows:
- For gauges, a highlight is expected on the needle or the gauge frame when possible
- For switches/buttons, a highlight is expected on the switches/buttons.
- For stick/yoke, a highlight is expected on the whole stick
- For rudder pedals :
- a highlight is expected on the whole set of pedals if the checkpoint asks to use the rudder
- a highlight is expected on the brake part if the checkpoint asks to use the brakes and if brakes have a dedicated part.
- For screens :
- if the checkpoint requires monitoring a precise element of the screen, a highlight is expected on this element.
- if the checkpoint requires monitoring the whole screen (e.g. "Engine gauges: Check"), the frame of the screen can be highlighted
- Highlights can be made conditional
- During evaluation of a checkpoint the camera must move to focus on the cockpit part where actions are required:
- If the checkpoint requires actions on different part of the cockpit, the camera movement should be directed to the most useful part of the cockpit for this checkpoint.
- Camera movement can be set aside for checklist pages dealing with a flight phase (e.g. Take Off, Landing, Cruise, etc). The rationale is to avoid changing the user's view, while they are in a dynamic piloting phase, and risking that they lose orientation and control. A highlight is then considered sufficient to guide them.