CREATING WASM SYSTEMS
WASM (C/C++) systems can be developed for Microsoft Flight Simulator 2024 with the Microsoft Flight Simulator Platform Toolset. System modules are important as they can be used for important tasks that do not require anything to be drawn to the screen, for example:
- computational processes that do not need to be rendered, like physics.
- centralised computation of data needed by other gauges in the same module.
These types of module have "init", "update" and "kill" callbacks, but no draw, and you can find an example aircraft showing off system modules here:
Creating A New System For Your Project
As explained in the Creating & configure WASM Project, you first need to create a MSFS 2024 WASM Module. By doing that, you will get a new project with only the module_init and module_deinit functions.
To create a new system, right click on your project in the solution explorer and add a new file. In the selection page, choose MSFS and pick System.
After selecting the MSFS WASM Module template, you will be presented with the following basic project, in which you'll be editing:
MSFS_CALLBACK bool [MODULE_NAME]_system_init(FsContext ctx, sSystemInstallData* pInstallData) {
    // This is called during initialization of the system
    // do initialization
    // ...
    // return false if there is any error
    return true;
}
The [MODULE_NAME]_system_init is the initialisation function - the first function to be called in the system cycle - that allows you to initialise everything related to the system.
- The context referencing the system is given using the
ctxparameter, and must be unique. - The
pInstallDataparameter points to asSystemInstallDatastructure. This structure is found inMSFS_SystemContext.h, and looks like this:struct sSystemInstallData { char *parameterString; // contains String Parameter given in the systems.cfg } - The
parameterStringmember of thesSystemInstallDatastruct is filled from the data given in the[WASM_SYSTEM.N]section of thesystems.cfg.
MSFS_CALLBACK bool [MODULE_NAME]_system_update(FsContext ctx, float dTime) {
    // This is called each frame
    // dTime is the time between the previous frame and this one
    // return false if there is any error
    return true;
}
The [MODULE_NAME]_system_update is the update function dedicated to this gauge. It will be called once per frame. This function must not be used for draw functions because it will be called at a moment in which the draw system in not ready.
- The context referencing the system is given using the
ctxparameter, and must be unique (this is the same as that which is used in theinitfunction). - The
dTimeparameter represents the time between the previous update and this one.
Note that the callback must return true if the initialisation hasn't encountered any errors.
MSFS_CALLBACK bool System_system_kill(FsContext ctx) {
    // This is called before the system is destroyed
    // return false if there is any error
    return true;
}
The [MODULE_NAME]_system_kill is the de-initialisation function - the last function to be called in the system cycle when the system is killed - and it allows you free associated data, and close connections (with SimConnect for example).
- The context referencing the system is given using the
ctxparameter, and must be unique (this is the same as that which is used in theinitfunction).
Editing The WASM Module Project
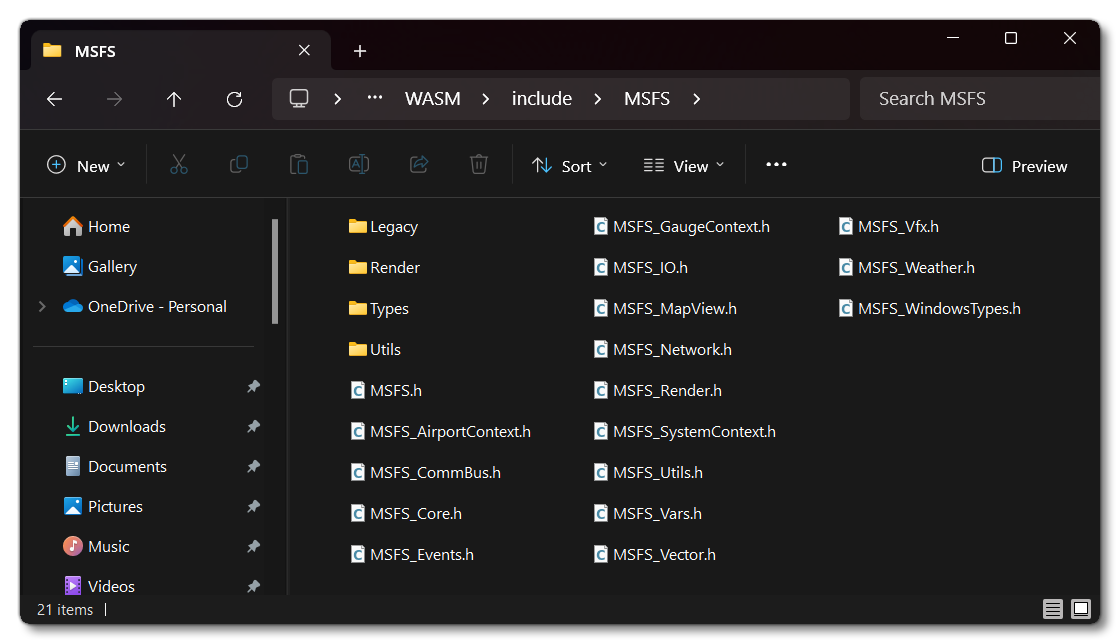
Now you've initialised the new WASM project and setup Visual Studio, you'll need to edit the source code to include the minimum header files - supplied by the SDK - to create the module. You can find all the available files that can be included from the following SDK location:
<root>\MSFS SDK\WASM\include\MSFS

These different API's are as follows:
WebAssembly System Module Constraints
When creating your WASM systems, there are a few things to be taken into consideration:
- The WASM module must be in the
wasmfolder or thepanelsfolder. - The WASM module must be in the same package as the
systems.cfg. - The WASM module must be in a SimObject or a SimAttachment.
- Module path length is 511 char at max.
- System name length is 63 char at max.
- String parameter length is 1023 char at max.
Adding The System To Your Aircraft
Once you have created the gauge, you need to be able to add it to your aircraft and to test it. This means that you should already have created an aircraft package (as explained here: Creating The Project), and after building the WASM module from Visual Studio, you will want to save in the wasm file in the PackageSources directory.
Once you have built the module and saved it to the appropriate location, you need to tell the aircraft to reference it. This is done in the systems.cfg, under the [WASM_SYSTEM.N] header, something like this:
[WASM_SYSTEM.0]
ModulePath=<VFS_PATH_WASM_FOLDER>/<MODULENAME>
SystemName=<SYSTEMNAME>
ParameterString="blah"
A more complete example would look like this:
[WASM_SYSTEM.0]
ModulePath=SimObjects/Airplane/MyCompanyWasm_Aircraft/common/wasm/myModule.wasm
SystemName=mySystem
ParameterString=AircraftVariationName, 1
[WASM_SYSTEM.1]
ModulePath=SimObjects/Airplane/MyCompanyWasm_Aircraft/common/wasm/myModule.wasm
SystemName=mySecondSystem
[WASM_SYSTEM.2]
ModulePath=SimObjects/Airplane/MyCompanyWasm_Aircraft/presets/mycompany/presetName/wasm/myModuleInPreset.wasm
SystemName=presetSystem
The important thing to note here is that a system.cfg file can only reference a WASM module that is in the same package. If a WASM system is meant to be shared between multiple packages, then it should be configured as a Sim Attachment. It should also be noted that the WASM file - located in WASM folder - can also contain WASM Gauges, if required.
When you have the saved the file in the correct location, you can go ahead and build the package (as explained here: Building A Package). Once built, you will need to restart the flight to see the module in the simulation. Note that this is the case for every edition you make to the WASM code - afterwards it will need to be re-exported, built, and the flight restarted.