
Reverse Polish Notation
The Microsoft Flight Simulator 2024 SDK has full support for the PostFix notation also known as Reverse Polish Notation (RPN). This is used in various places, such as Gauges and Model Behaviors.
In Reverse Polish Notation, the operators follow their operands - for instance, to add 3 and 4, one would write:
3 4 +rather than:
3 + 4If there are multiple operations, operators are given immediately after their second operands, so the conventional expression:
3 - 4 + 5would be written like this in reverse Polish notation:
3 4 - 5 +Essentially this means that 4 is first subtracted from 3, then 5 is added to it. An advantage of reverse Polish notation is that it removes the need for the parentheses () that are required by InFix notation (InFix notation is simply the name given to conventional notation for expressions such as these). Using the example above it could possibly have the following two interpretations:
3 - (4 * 5)
(3 - 4) * 5
Both those expressions will give quite different results, yet use the same values and operands. In Reverse Polish Notation this ambiguity is removed. The former example 3 - (4 * 5) of could be written:
3 4 5 * -which unambiguously means 3 (4 5 *) - which in turn reduces to 3 20 - , which finally gives -17. On the other hand the second “version” could be written
3 4 - 5 *which unambiguously means (3 4 -) 5 * which gives -5. This can be thought of as a series of stack operations, ie:
- When the RPN script parser comes across a value, it pushes it onto the top of the stack.
- When the script parser comes across an operator, it pops from the stack the number of operands that the operator works on (usually one or two values).
- Whatever value is left on top of the stack at the end of the execution is the result of the calculated expression.
RPN In Microsoft Flight Simulator 2024
Reverse Polish Notation is not a programming language, it is simply a compiler-friendly way of creating complex logical expressions. However, it is used along with some built-in sim functions and variables to create short scripts that are then used to do different things within the sim. Typically these a scripts will use one or more expressions to define what a gauge or model does, and - in their simplest form - the expressions are the names of simulation parameters along with the units in which the element should be expressed - both enclosed in parentheses - followed by operands.
In the following example the expression returns the value of the NAV1 OBS parameter:
(A:NAV1 OBS, degrees)The A before the colon indicates that this parameter is an Aircraft parameter. NAV1 OBS is a simulation variable (see the Simulation Variable document for a full list of variables) and degrees are the units of measure in which the aircraft parameter will display. Let’s look at how this would be used along with Reverse Polish Notation to write a small script:
(A:NAV1 OBS, degrees) d (A:PARTIAL PANEL HEADING, bool) (A:PARTIAL PANEL ELECTRICAL, bool) or 0 == if{ (A:PLANE HEADING DEGREES GYRO, degrees) 90 - - } dgrdThis would translate as:
“If the PARTIAL PANEL HEADING is false and the PARTIAL PANEL ELECTRICAL is false, then this expression returns the NAV1 OBS reading minus the ( PLANE HEADING DEGREES GYRO reading minus 90), converted to radians.”
Here is a full example of how Reverse Polish Notation is used along with the available parameters and operands within the XML for model behaviors:
<UseTemplate Name="Push_Button_With_Indicator_Template">
<ANIM_NAME>MID_Push_Isolate_Copilot#SUFFIX_ID#</ANIM_NAME>
<NODE_ID>MID_Push_Isolate_Copilot#SUFFIX_ID#</NODE_ID>
<INDICATOR_NODE_ID>MID_Push_Isolate_Copilot_Active#SUFFIX_ID#</INDICATOR_NODE_ID>
<SIMVAR_TO_WATCH_0>INTERCOM MODE</SIMVAR_TO_WATCH_0>
<SIMVAR_TO_WATCH_1>INTERCOM SYSTEM ACTIVE</SIMVAR_TO_WATCH_1>
<GET_STATE_EXTERNAL>(A:INTERCOM MODE, Enum) 0 > (A:INTERCOM SYSTEM ACTIVE, Bool) and sp0</GET_STATE_EXTERNAL>
<SIM_STATE_IS_ON_EXTERNAL>l0</SIM_STATE_IS_ON_EXTERNAL>
<CHECK_STATE_HAS_CHANGED>True</CHECK_STATE_HAS_CHANGED>
<SET_STATE_EXTERNAL>
(>H:#KEY_PREFIX#_Isolate_Copilot_Push)
(A:INTERCOM MODE, Enum) 2 == (A:INTERCOM SYSTEM ACTIVE, Bool) and if{ (>K:TOGGLE_ICS) } els{
(A:INTERCOM SYSTEM ACTIVE, Bool) ! if{
(>K:TOGGLE_ICS)
2 (>K:INTERCOM_MODE_SET)
} els{
2 0 1 3 (A:INTERCOM MODE, Enum) case (>K:INTERCOM_MODE_SET)
}
}
</SET_STATE_EXTERNAL>
<COND_INDICATOR_ACTIVE>(B:AS1000_MID_Isolate_Copilot, Bool)</COND_INDICATOR_ACTIVE>
<TT_DESCRIPTION_ID>@TT_Package.AS1000_MID_PUSH_ISOLATECO_ACTION</TT_DESCRIPTION_ID>
<TOOLTIP_TITLE>@TT_Package.AS1000_MID_PUSH_ISOLATECO_TITLE</TOOLTIP_TITLE>
<BTN_ID>MID_Isolate_Copilot</BTN_ID>
</UseTemplate>When writing expressions in an XML file you need to use the markup > and < for the symbols > and <, otherwise you’ll get an XML parsing error.
Variable Types
When using RPN to create expressions, you can use different variables, and these will require a prefix so the simulation can correctly identify their type and where they come from. The table below shows the different variable prefixes available to you.
| Variable Prefix | System Name | Description | Units |
|---|---|---|---|
| A | Simulation Variable | Gets a specified SimVar from a simulation object. | Yes |
| B | Input Events | Gets the value of the specified input event (see Input Event Definitions for more information). | No |
| C | Callback Variables | This variable prefix is only used when dealing with GPS Variables. | Yes |
| E | Environment Variable | This is an environment variable. See the section on Environment Variables. | Yes |
| F | Function Library | This denotes a built in function from the function library. See the Function Library section below for more details. | No |
| G | Gauge Variables | Gets a variable that can be used to transfer unitless data between gauges. | No |
| H | HTML Event | An HTML event sent to JavaScript. These are defined in cockpit panel Model Behaviors, and only go in one direction: from the panel to the JavaScript / HTML code. H: events are not required to be defined ahead of time (similar to L: vars) and can be named with any contiguous string of alphanumeric characters. Each cockpit panel in Microsoft Flight Simulator 2024 sends a number of cockpit specific H: events that have no analogous key event, such as pressing individual buttons on an FMS computer. These individual panel specific events can be received by JavaScript instruments. | No |
| I | Instrument Variable | Used for instrument variables, where the variable scope is the instrument itself, meaning it will be available to all components in the instrument hierarchy. For example, consider the following instrument schematic: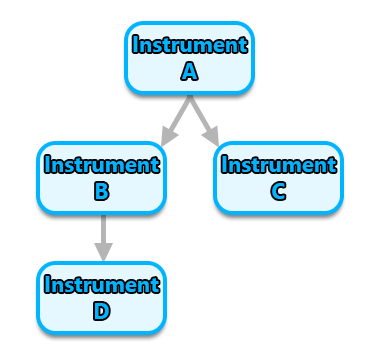 An IVar created in the An IVar created in the A:B component (or first referenced in RPN in the A:B) will be accessible in A:B, A:B:C, and also in A and A:D. The value of this IVar will be the same at all time in all components, since the variable is registered in A (the root component of the instrument). | No |
| K | Key Event ID | This is a specific variable for a key Event ID for user input.(>K:TOGGLE_ICS) | No |
| L | Local Variable | Retrieves and/or creates a user defined local variable. If the local variable has not been defined in any of the associated files then it will be created and set to 0 the very first time it is referenced (and will not persist between runs). You can, however, define a default value for local variables using the following files:- using the [LocalVars.N] section of the FLT file you can define a non-persistent local variable- using the [LocalVars] section of the Systems Config file you can create a persistent local variableThis variable can be read and set within the scope of the user aircraft, and can be read by AI Aircraft. This variable is shared between aircraft if multiple instances of the aircraft are spawned using the variable. In general this is not what you want and you should use the scoped L:1 variable type instead.IMPORTANT! L: vars can only hold numeric data and nothing else, eg: no strings, no binary values, no structs, etc… | No |
| L:1 | Local Variable (Scoped) | Retrieves and/or creates a user defined local variable. If the local variable has not been defined in any of the associated files then it will be created and set to 0 the very first time it is referenced (and will not persist between runs). You can, however, define a default value for local variables using the following files:- using the [LocalVars_EX1.N] section of the FLT file you can define a non-persistent local variable- using the [LocalVars_EX1] section of the Systems Config file you can create a persistent local variableThis variable can be read and set within the scope of the user aircraft, and can be read by AI Aircraft. This variable is scoped to each instance of the aircraft that uses it, so each instance will have a unique version of the local variable (unlike the un-scoped L var type).IMPORTANT! L:1 vars can only hold numeric data and nothing else, eg: no strings, no binary values, no structs, etc… | |
| M | Mouse Variable | Gets the state of the mouse for use in mouse click handlers. Please see the Mouse Variables section below.NOTE: This identifier cannot be used when working with Input Events. | No |
| O | Component Variable | Used for variables within components, where the variable scope is the component itself. | No |
| P | Program Variable | Same as the Environment Variable E: | Yes |
| R | Resource Variable | This is used to retrieve a value from an external resource, which can either be a legacy Help ID or Tooltip ID, or something from a custom localization file. See Resource Variables for more details. | |
| X | Calculator Variable | This variable is used exclusively when creating Mission Definitions and is for referencing parameters created in the <CalculatorParameterList> element within an RPN calculation (inside a <CalculatorFormula>. | No |
| W | Wwise Event | This is a Wwise Event ID and allows you to trigger a Wwise event based on logic driven by the XML. This makes it more flexible than the sounds defined in sound.cfg and the AnimSoundEvents, although more complex to use. | No |
| Z | Custom SimVar | These are user-defined variables which are stored in an object’s sim. The variable name is not one that has been predefined in the Microsoft Flight Simulator 2024 engine code, so anyone can create one with the name they want, as long as it doesn’t conflict with an existing SimVar. | No |
Data Types
The current version of RPN that is used by Microsoft Flight Simulator 2024 can work with the following data types:
Double- A double is a floating point data type used to hold decimal values.Int- An integer is a “whole number” data type for values with with no decimal points.String- A string is a special data type that is meant to hold characters.Vec3X- A vec is a data type comprised of 3 independent floating point values, with no specific utility.PBH- Similar to a vec, this data type holds 3 independent floating point values that specifically represent the values of pitch, bank, and heading.ProxyOffset-
Function Library
The RPN variable prefix F: can be used to access specific RPN functions. To give a very simple example of how to use these F: functions, let’s start by first creating an O: var, defined as:
(O:MyValue)Now, to alter this value using the F: functions you would use the following to set the variable:
#A_VALUE# MyValue (>F:VarO)And to get the variable:
MyValue (F:VarO)
The table below shows the full range of functions currently available:
| Function | Description |
|---|---|
VarO | Get or set a component variable with the top stack string as the identifier. |
VarI | Get or set an instrument variable with the top stack string as the identifier. |
VarL | Get or set a local variable with the top stack string as the identifier. |
VarA | Get or set a SimVar variable with the top stack string as the identifier. |
KeyEvent | Call a key Event ID with the top stack string as the identifier and the rest of the stack as the parameters. |
InputEvent | Call an InputEvent Preset with the top stack string as the identifier and the rest of the stack as the parameters. |
InputAction | Retrieve the property of the currently operative input action. The function expects an input event name and a property name:- 'input_name' 'property'_n (F:InputAction)For example:- 'ENGINE_THROTTLE_DEC' 'value'_n (F:InputAction)- 'ENGINE_THROTTLE_DEC' 'pressed_or_down_time'_n (F:InputAction)The property name you use can be any one from the following list:- value: the value carried by the input action (same value as p0 for Input events).- pressed: true if the input action was pressed this frame.- pressed_time: time the key has been pressed.- released: true if the input action was released this frame.- released_time: time the key has been released.- down: true if the input action is considered down.- down_time: time the key has been down.- pressed_or_down: combination of pressed and down conditions (either).- pressed_or_down_time: time the key has been pressed or down. |
Format | Format the top + 1 value using the described top stack format rules. |
MapRange | Map value from a range to an other range (clamping the value if needed). This function requires multiple arguments to be used:- value x1 x2 y1 y2 (F:MapRange)Where x1/x2 are the min/max values of the first range, y1/y2 are the min/max values of the second range, and the value is a number within the first range to be mapped to the second, for example:- 12550 100 25000 0 1 (F:MapRange)The output from the above example would be 0.5. A more practical example would be something like this:- (A:AMBIENT LIGHT SENSOR, Number) 0 4000 0 1 (F:MapRange)Here we are simply remaping the return value from a SimVar from one range to another. |
Lerp | Lerp (use linear interpolation) on a value. This function requires multiple arguments to be used:- value x1 x2 (F:Lerp)Where x1 is the lower bounds of the lerp, x2 is the upper bounds of the lerp, and value is the value to interpolate. For example:- 0.5 0 100 (F:Lerp)The output from the above example would be 50. |
Clamp | Clamp a value between a minimum and a maximum. This function requires multiple arguments to be used:- value x1 x2 (F:Clamp)Where x1 is the minimum value, x2 is the maximum value, and value is the value to clamp. For example:- 110 0 100 (F:Clamp)The output from the above example would be 100. |
Ratio | Return the ratio of the value over a range . This function requires multiple arguments to be used:- value x1 x2 (F:Ratio)Where x1 is the lower bounds of the range, x2 is the upper bounds of the range, and value is the value use for the ratio calculation. For example:- 125 50 150 (F:Ratio)The output from the above example would be 0.75. |
AnimPos | This is used to get the value of the position driving an animation.💡︎ |
EmissivePos | This is used to get the value of the position driving an emissive element.💡︎ |
VisibilityPos | This is used to get the value of the position driving the visibility of an element.💡︎ |
To use F:Format to create dynamic runtime variables you would flag the value(s) to substitute using % (along with a stack operator, s in the following example):
'replacement' '1st' 'My %s string with a %s' (F:Format)which would give:
"My 1st string with a replacement" (F:Format)Note On AnimPos, EmissivePos, And VisibilityPos
The functions AnimPos, EmissivePos, And VisibilityPos all work in the exact same way and are used to get the value of the position driving an animation, an emissive element, or a visibility element. These functions use the following format:
'name(@target)' (F:AnimPos\|EmissivePos\|VisibilityPos(, unit)For example:
'my_animation' (F:AnimPos)This returns the position of the animation called 'my_animation', which - if the animation was 3/4 completed, for example - would be 75, since the default return value when no unit is supplied is a percentage. However, the value can be requested in a different unit, and the automatic conversion will be based on the value over the value range in Percent Over 100 converted to the requested unit. For example:
'my_node' (F:EmissivePos, percent)In this example, if the emissive value is a value of 0.5 and falls within the range of 0-1, then the returned value will be 0.5 / 1 (in Percent Over 100) converted to percent which is 50.
For the AnimPos an animation name must be provided, and for the EmissivePos and VisibilityPos a node name is expected. If the component is not part of the same behavior (in another Sim-Sttachment, for example) a target must be added. This target correspond to the alias given to the Sim-Attachment, for example:
'ANNUNCIATORS_LOWFUEL@Annunciators_Panel' (F:EmissivePos, position 16k)
Mouse Variables
When using the M: identifier, you can check for any one of the following variables:
This identifier cannot be used when working with Input Events.
| Variable | Description |
|---|---|
X | This will return the X position of the mouse in two different ways depending on the InputType value:0 - X will be an absolute position in the screen coordinates.1 - X will represent the value of 2 axis so their values will be normalized between -1 to 1, and 0 will be the point at which the button was held down. |
Y | This will return the Y position of the mouse in two different ways depending on the InputType value:0 - Y will be an absolute position in the screen coordinates.1 - Y will represent the value of 2 axis so their values will be normalized between -1 to 1, and 0 will be the point at which the button was held down. |
RelativeX | This will return the relative X position of the mouse in two different ways depending on the InputType value:0 - the normalized X position of the mouse relative to the anchor point (where it started the interaction when holding a button down).1 - the relative X will represent the value of 2 axis, where the 0 value is the point being clicked, and the distance from that point on each axis is calculated using the <DragScalar> value. |
RelativeY | This will return the relative Y position of the mouse in two different ways depending on the InputType value:0 - the normalized Y position of the mouse relative to the anchor point (where it started the interaction when holding a button down).1 - the relative Y will represent the value of 2 axis, where the 0 value is the point being clicked, and the distance from that point on each axis is calculated using the <DragScalar> value. |
Event | This variable represents one of the following mouse events:- RightSingle- MiddleSingle- LeftSingle- RightDouble- MiddleDouble- LeftDouble- RightDrag- MiddleDrag- LeftDrag- Move- RightRelease- MiddleRelease- LeftRelease- WheelUp- WheelDown- Leave- Lock- Unlock- Enter- Exit |
DragPercent | This will be a value between 0 and 1 and is used for drag interactions when using the <DragMode>Trajectory</DragMode> setting in the mouse rect. This would be used to correspond to a position in time along an animation based on the cursor position, and works for most animation paths, curves, and lines but not for loops. It is ideal to use when working with levers, for example. |
InputType | This is the input type for the interaction and can be either 0 or 1, where 0 would generally be considered the mouse and 1 would be considered the gamepad. It will affect the X/Y and RelativeX/RelativeY values. |
Resource Variables
The resource variable R: can be used to retrieve a value from a resource file, and has two separate “modes”:
R:0- This is to be used with localization IDs to extract a simple localized string from a file. It also supports legacy projects and systems that use the ToolTip ID(opens in a new tab) (or Help ID)(opens in a new tab) variables that don’t require any dynamic elements, although these should not be used in new projects. For example:(R:0:HELPID_EXTR_LOW_VOLT)
R:1- This is the way that all new projects should use theR:variable and is designed to permit you to extract a localized ID from a file, and can also create a dynamic tooltip based on an RPN stack expression. For example:1 (R:1:@TT_Package.AUDIOPANEL_KNOB_COM_VOLUME_ACTION) (F:Format)In this example the
<Macro>@TT_Packagewould be the path to the localization file, whileAUDIOPANEL_KNOB_COM_VOLUME_ACTIONis the value in the file to retrieve, which in this case would be the string"Adjust COM %d volume". The expression then uses theF:variable to perform a substitution which will finally output the string “Adjust COM 1 volume”.
Expression Operators
There is a long list of operators that can be used within RPN stacks, all of which are given in the tables below.
General Operators
| Operator | Description | Args | Example | Result |
|---|---|---|---|---|
+ | Addition | 2 | 7 2 + | 9 |
- | Subtraction. For example, if the stack contains A B -, then the calculation is A - B. | 2 | (L:Val) 125 - | The local value Val minus 125. |
/ | Division. For example, if the stack contains A B /, then the calculation is A / B. | 2 | 16 4 / | 4 |
* | Multiplication. | 2 | 10 2 * | 20 |
% | Taking modulo. Returns the signed remainder of a dividend (argument 1) and a divisor (argument 2). NOTE: The divisor (argument 2) will always be considered as positive, regardless of the actual sign. | 2 | 7.2 2 %7.2 -2 %-7.2 2 %-7.2 -2 % | 1.21.2-1.2-1.2 |
pmod | Absolute modulo. Returns the absolute remainder (i.e. positive) of a dividend (argument 1) and a divisor (argument 2). NOTE: The divisor (argument 2) will always be considered as positive, regardless of the actual sign. | 2 | 7.2 2 pmod7.2 -2 pmod-7.2 2 pmod-7.2 -2 pmod | 1.21.20.80.8 |
++ | Increment by 1. | 1 | 158 ++ | 159 |
-- | Decrement by 1. | 1 | 1005 -- | 1004 |
/-/neg | Negates a number (essentially multiplying the value by -1). | 1 | 11 /-/ | -11 |
Comparison Operators
| Operator | Description | Args | Example | Result |
|---|---|---|---|---|
== | Will be TRUE if values are equal, or FALSE otherwise. | 2 | (L:Value) 0 == if{ A } | If the L value is 0, then operation A will be performed. |
!= | Will be TRUE if values are not equal, or FALSE otherwise. | 2 | (L:Value) 0 != if{ A } | If the L value is not 0, then operation A will be performed. |
> | Will be TRUE if one value is greater than another, or FALSE otherwise. NOTE: When using RPN in XML files, this must be written as > otherwise the XML will not parse correctly. | 2 | (L:Val1) (L:Val2) > if{ A } els{ B } | If Val1 is greater than Val2, operation A is performed, otherwise operation B is performed. |
< | Will be TRUE if one value is less than another, or FALSE otherwise. NOTE: When using RPN in XML files, this should be written as <. It may not be strictly necessary, but it is good practice. | 2 | (L:Val1) (L:Val2) < if{ A } els{ B } | If Val1 is less than Val2, operation A is performed, otherwise operation B is performed. |
>= | Will be TRUE if one value is greater than or equal to another, or FALSE otherwise. | 2 | (L:Val1) (L:Val2) >= if{ A } els{ B } | If Val1 is greater than or equal to Val2, operation A is performed, otherwise operation B is performed. |
<= | Will be TRUE if one value is less than or equal to another, or FALSE otherwise. | 2 | (L:Val1) (L:Val2) <= if{ A } els{ B } | If Val1 is less than or equal to Val2, operation A is performed, otherwise operation B is performed. |
? | Ternary operator. The third operand determines whether the first value (TRUE) or second value (FALSE) is selected. | 3 | X Y A:INTERCOM SYSTEM ACTIVE ? | If the SimVar INTERCOM SYSTEM ACTIVE evaluates as TRUE then X is selected, otherwise Y is selected. |
Bit Operators
| Operator | Description | Args | Example | Result |
|---|---|---|---|---|
& | Bitwise AND. | 2 | 3 2 & | 2 |
| | Bitwise OR. | 2 | 8 5 | | 13 |
^ | Bitwise XOR. | 2 | 17 4 ^ | 21 |
~ | Bitwise NOT. | 1 | 8 ~ | -9 |
>> | Shift the right operand N number of bits. NOTE: When using RPN in XML files, this must be written as >> otherwise the XML will not parse correctly. | 2 | 40 1 >> | 20 |
<< | Shift the left operand N number of bits. NOTE: When using RPN in XML files, this should be written as <<. It may not be strictly necessary, but it is good practice. | 2 | 5 3 << | 40 |
Logical Operators
| Operator | Description | Args | Example | Result |
|---|---|---|---|---|
!, not | Logical NOT. | 1 | (L:Val) ! (>L:Val) | Toggles the variable Val. |
&&, and | Logical AND. | 2 | (L:Val) 0xFF00 && (>L:Val) | The variable Val is ANDed with the hexadecimal value 0xFF00. |
||, or | Logical OR. | 2 | (L:Val) 135046 OR (>L:Val) | The variable Val is ORed with 135046. |
Numerical Operators
| Operator | Description | Args | Example | Result |
|---|---|---|---|---|
abs | Absolute value (essentially just forces any value to be positive). | 1 | -15 abs | 15 |
int | Truncates the value to the nearest integer. | 1 | 88.69 int-1.5 int | 88-1 |
flr | Rounds the value down to the nearest integer value which is less than the source value. | 1 | 1.5 flr-1.5 flr | 1-2 |
ceil | Rounds the value up to the nearest integer (always larger than — or equal to — the source value). | 1 | 11.4 ceil | 12 |
near | Rounds the value to the nearest integer, where a value of 0.5 or greater is rounded up, and all other values are rounded down. | 1 | 8.4 near | 8 |
rng | Returns TRUE if the third operand lies between the range created by the first and second values. | 3 | 1 10 3 rng | True |
cos | Cosine. NOTE: input is in radians. | 1 | pi cos | -1 |
lg | Logarithm to base 10. | 1 | 20 lg | 1.30102999566 |
min | Returns the minimum of two values. | 2 | 11 3 min | 3 |
sin | Sine. NOTE: input is in radians. | 1 | pi sin | 0 |
acos | Arc cosine. NOTE: return value is in radians. | 1 | 0 acos | 1.570796 |
ctg | Cotangent. NOTE: input is in radians. | 1 | 1 ctg | 0.642093 |
ln | Natural logarithm. | 1 | 10 ln | 2.302585 |
sqr | Square. | 1 | 4 sqr | 16 |
asin | Arc sine. | 1 | -1 asin | -1.570796 |
eps | Floating-point relative accuracy. | 1 | 1 eps | 2^(-52) |
log | Logarithm of the first operand, to the base of the second operand. | 2 | 16 2 log | 4 |
pi | Pi — puts π on the stack. | 0 | pi | 3.14159 |
sqrt | Square root. | 1 | 16 sqrt | 4 |
atg2 | Arc tangent with two inputs. NOTE: input is in radians. | 2 | 1 2 atg2 | 0.463647 |
exp | Exponent: e to the power of the operand. | 1 | 1 exp | 2.718282 |
max | Returns the maximum of two values. | 2 | 127 256 max | 256 |
pow | Power of: the first value to the power of the second. | 2 | 3 8 pow | 6561 |
tg | Tangent. NOTE: input is in radians. | 1 | pi tg | 0 |
atg | Arc tangent with one input. | 1 | 1 atg | 0.785398 |
sign | Returns the sign of the top number on the stack (-1 or 1; note that 0 is considered positive). | 1 | -9 sign0 sign or 160 sign | -11 |
dec | Returns the decimal part of a floating point number. | 1 | 3.14 dec | 0.14 |
Special Operators
| Operator | Description | Args | Example | Result |
|---|---|---|---|---|
div | Integer Division. The result of this operator is always an integer. | 2 | 9 4 div | 2 |
dnor | Normalizes an angle expressed in degrees, such that the result is always between 0 and 360. | 1 | -45 dnor | 315 |
d360 | Normalizes an angle expressed in degrees, such that the result is always an integer between 1 and 360, where 0 will always be interpreted as 360. | 1 | 0 d360 | 360 |
rddg | Converts radians to degrees. | 1 | pi rddg | 180 |
dgrd | Converts degrees to radians. | 1 | 180 dgrd | pi |
rnor | Normalizes an angle expressed in radians, such that the result is always between 0 and 2 pi. | 1 | -2.18166 rnor | 4.10152 |
if{ .... } | If statement. Note there is no space between the if and the opening {. | 1 | (L:Val) 0 == if{ A } | Operation A is carried out if Val is 0. |
els{ .... } | Else statement. Note there is no space between the els and the opening {. Also note that you cannot have an els without a previous if. | 1 | (L:Val1) (L:Val2) <= if{ A } els{ B } | If Val1 is less than or equal to Val2, operation A is carried out, otherwise operation B is carried out. |
quit | The quit statement allows expression evaluation to stop completely. Can be used — for example — to avoid the use of nested if{ statements. | 0 | pi quit (L:Val1) (L:Val2) <= if{ A } els{ B } | pi. The rest of the script is ignored. |
g0...gn | Goto. Execution will jump to the specified label, which was set using a colon followed by the label number. | 0 | g2 | Execution jumps to :2. |
case | Case statement. | 50 40 30 20 10 5 (L:value) case | The 5 indicates there are five case values, selected depending on the evaluation of (L:value). If the evaluation is ≥ 0 and < 1, the result is 10; if ≥ 1 and < 2, the result is 20; and so on. | |
seed | Sets the seed for the random function. | 1 | 23488 seed | N/A |
rand | Retrieves a random number between 0 and 1. | 0 | rand rand rand | 0.9875510.0587770.478326 |
xyz | Create a Vec3X from 3 values. Values must be doubles or ints. | 3 | a b c xyz | Converts the values a, b and c into a Vec3X. |
pbh | Create a pitch, bank, heading Vec3X from 3 values. Values must be doubles or ints. | 3 | a b c pbh | Converts the values a, b and c into a PBH. |
agl | Converts up to 3 inputs into a combined “ProxyOffset” vector (components: Vec3 xyz, Vec3 pbh, Float). If either Vec3 component is not supplied, a NULL component is substituted. | ≤ 3 | 100 agl | {VEC3X_NULL, PBH_NULL, 100} |
& | For vectors/ProxyOffsets made using xyz, pbh, or agl, retrieves individual components using the & accessor, e.g. &x, &y, &z, &p, &b, &h. | 1 | a &z | The value of the z component of the a{xyz} vector. |
String Operators
| Operator | Description | Args | Example | Result |
|---|---|---|---|---|
lc | Converts a string to lowercase. | 1 | 'AbCd20' lc | 'abcd20' |
uccap | Converts a string to uppercase. | 1 | 'abCD50' uc | 'ABCD50' |
chr | Converts an integer to an ASCII symbol. | 1 | 88 chr | 'X' |
ord | Converts an ASCII symbol to an integer. | 1 | 'B' ord | 66 |
scat | Concatenates two input strings. | 2 | 'abc' 'xyz' scat | 'abcxyz' |
schr | Finds the position of a specific symbol in a string. Positions start at 0. | 2 | 'abcd' 'd' schr | 3 |
scmp | Compares two strings. NOTE: This operation is case sensitive. | 2 | (M:Event) 'LeftSingle' scmp 0 == if{ A }els{ B } | Performs A if the left mouse button has been pressed, otherwise performs B. |
scmi | Compares two strings. NOTE: This operation is not case sensitive. | 2 | 'left' 'Left' scmi 0 == if{ 'yes' } | 'yes' |
slen | Returns the length of the given string. | 1 | 'abcd' slen | 4 |
sstr | Finds the position of substring B in string A. Returns -1 if the substring cannot be found. Positions start at 0. NOTE: This operation is case sensitive. | 2 | 'abcxyz' 'cx' sstr | 2 |
ssub | Extracts a substring from string A based on the (integer) “from” (B) and “to” (C) positions, inclusive. Positions start at 0. A negative value starts N characters from the end of the string. | 3 | 'abcxyz' 1 2 ssub'abcxyz' -3 2 ssub | 'bc''xy' |
symb | Extracts a single character from the string at the given (integer) position. Positions start at 0. | 2 | 'abc' 1 symb | 'b' |
Stack Operators
| Operator | Description | Args | Example | Result |
|---|---|---|---|---|
b | Backup the stack. Retrieves a value from before performing an operation. When an operation takes multiple parameters it only saves the first value in the backup (e.g. 1 2 + b would contain 2 and 1 would be lost). | 0 | (L:MyValue) neg sp0 b sp1 | sp0 contains -(L:MyValue) and sp1 contains (L:MyValue), since b is the value saved before the neg operation. |
c | Clears the stack. | 0 | stack: 1 2 3 c | stack: |
d | Duplicates the value that is on the top of the stack. | 1 | stack: 5 d | stack: 5 5 |
p | Pops and discards the top value on the stack. | 1 | stack: 1 2 3 p | stack: 1 2 |
r | Reverses the top and second values on the stack. | 2 | stack: 1 2 3 r | stack: 1 3 2 |
s0, s1, … s49 | Stores the top value in an internal register, but does not pop it from the stack. | 1 | stack: 1 2 3 s0 | stack: 1 2 3s0: 3 |
l0, l1, … l49 | Loads a value from a register to the top of the stack. | 1 | stack: 1 2 3 s0 l0 | stack: 1 2 3 3 |
sp0, sp1, … sp49 | Stores the top value and pops it from the stack. | 1 | stack: 1 2 3 sp0 | stack: 1 2sp0: 3 |
Operator Notes:
Formatted strings use a similar but slightly different syntax.
All strings should be written using single quotes, for example: ‘abcxyz’.
Hexadecimal numbers can be entered using the
0xconvention (the hex value can use upper or lower case, for example:0xffor0xFF00AA00)Octal numbers can be entered by using a leading zero. For example,
022is octal 18. This means you must be careful not to have leading zeros on decimal numbers.Scientific notation can be used to represent values, for example:
5E2represents5 x (10 to the power of 2)and5E-2represents5 x (10 to the power of -2), giving 500 and 0.005 respectively.For vectors made using the
xyz,pbh, oragl, you can retrieve the individual components using the “&” accessor, eg:&x,&y,&z,&p,&b,&h.
Strings
The following sections contain information specific to the output of strings and how the RPN should be formatted for this.
Formatting Numbers
If you wish any numbers to be formatted in a specific way then you need to use the exclamation mark symbol along with a designated letter, eg: !x!. This letter must be lowercase, and can only be one of the following:
s: the number should be formatted as a string.d: the number should be formatted as an integer. Note that if the number is not already an integer, it will be rounded (not truncated) to the nearest integer.f: the number should be formatted as a float.
When setting up number formatting in this way, you can (optionally) choose to preceed the formatting letter by a number. This number specifies the minimum number of digits to display.
When working with decimal numbers, the following rules will be applied:
- If
dis preceded by the digit “0”, then leading zeros are added if necessary. - If
dis preceded by “-”, text is left-aligned. - If
dis preceded by “+, a “+” symbol is indicated in front of the number when the number is greater than 0 (a “-” is always used to indicate numbers less than 0). - If
dis preceded by "” (space), leading spaces are added if necessary.
For floating point numbers, the following rule applies:
- If a decimal point is used in the formatting number, the digit after the decimal point specifies the number of digits to display after the decimal point.
Below you can find some examples of number formatting using various letters and values:
| Example | Result | Description |
|---|---|---|
%( 12.34 )%!4.3f! | 12.340 | The 4 in 4.3 is ignored. |
%( 12.34 )%!04.3f! | 12.340 | Leading “0"s are not added to floating point numbers. |
%( 12345.6789 )%!4.3f! | 12345.679 | The number before decimal point does not limit the number of digits displayed before decimal point. |
%( 34.56 )%!+d! | +35 | Rounding, not truncation, has occurred. |
%( 234 )%!5d! | 234 | Two leading spaces have been prefixed to the number. |
%( "foo" )%!5s! | foo | Two leading spaces have been prefixed to the string |
%( 234 )%!3s! | 234 | The number is output as a string, with a minimum of three digits. |
Conditional Gauge Strings
The format of conditions (if, then, else, and case statements) in gauge strings is different from that in other scripts. In gauge strings use the %{if}, %{else}, and %{end} constructs to choose which text to display. Note that these keywords are case-sensitive and must be typed in lowercase. Also, there must not be a space between the “%” and the “{”. An if statement can be used without a corresponding else, in which case nothing is displayed if the result of the condition is false. The syntax for usage is one of the following:
%(CONDITIONAL)%{if}TEXT TO DISPLAY IF TRUE%{else}TEXT TO DISPLAY IF FALSE%{end}
%(CONDITIONAL)%{if}TEXT TO DISPLAY IF TRUE%{end}
For example:
%( 1 )%{if}ON%{else}OFF%{end}would give the output ON, whereas:
%( 0 )%{if}The value is true%{else}The value is false%{end}would give the output: The value is false.
Escape Codes
It is also possible to insert escape code sequences into gauge strings.
| Escape Code Example | Description |
|---|---|
\{tabs=50R,60C, 244L} | Set 3 tab stops; the first is right-aligned, the second is centered, and last is left-aligned. |
\{fnt1} | Switch to the first alternate font specified as a child of the gauge text element |
\{fnt} | Return to the default font |
\{up} | Superscript |
\{dn} | Subscript |
\{md} | Normal (neither superscript nor subscript) |
\{bo} | Bold |
\{ul} | Underline |
\{itl} | Italic |
\{strk} | Strikeout |
\{blnk} | Blink |
\{rev} | Reverse background/foreground color for text |
\{nr} | Normal – clear all properties previously set. |
\{lcl} | Line color |
\{blc} | Background line color |
\{clr} | Color |
\{bck} | Background color |
\{dplo=X} | Put a degrees symbol above the next character after the ?=? |
\{dpl=XY} | Make X superscript and Y subscript |
\{lsp=23} | Set line spacing to 23 |
\{lsp} | Set line spacing to default |
\{ladj=L} | Set horizontal text alignment to left. (use ?C? for center or ?R? for right) |
\{line=240} | Draw a horizontal line with width 240 |
\{lmrg=20} | Set the left margin to 20 |
\{rmrg=30} | Set the right margin to 30 |
\{img1} | Insert image #1 (a text element can have image children) |
Examples
| String Example | Description |
|---|---|
Fuel Pressure | The text will appear exactly as entered: Fuel Pressure |
Fuel Capacity: %(A:FUEL TOTAL CAPACITY)%!1.2f! | The fuel capacity of the aircraft will be given as a floating point number accurate to two decimal places, following the initial string, such as: Fuel Capacity: 80.55 |
%(A:ENG ON FIRE:1 A:ENG ON FIRE:2 ! if{ 'Warning: Engine Fire' } ) | The text string Warning: Engine Fire will appear if either or both of the engines are on fire. |
%( 1 )%{if}ON%{else}OFF%{end} | The text ON would be rendered. If there is no {else} statement, then no text will be displayed if the condition evaluates to false. |
%( 3 )%{case}%{ :0 }AIRPORT%{ :1 }INTERSECTION%{ :2 }NDB%{ :3 }VOR%{ :4 }MARKER%{end} | A case statement can be used to select a text string from a group of strings. The case numbers do not have to be sequential. The example would produce the result: VOR |
%((C:Mission:OnScreenTimerValue) 60 / 60 / flr )%!02d!:%((C:Mission:OnScreenTimerValue) 60 / flr 60 %)%!02d!:%((C:Mission:OnScreenTimerValue) flr 60 %)%!02d!.%((C:Mission:OnScreenTimerValue) 10 * flr 10 % )%!01d! | Takes the custom on-screen timer value and displays the time in hours, minutes, seconds, and tenths of a second. The !02d! indicates that the text output should be displayed with two digits (for example, 06). The % signs inside the string refer to the modulus operator, and the colons and period between the statements will appear on the screen as text, for example: 01:14:08.2 |
85 %% | To output the percent character, use two percent signs in the script: 85 % |
%(10 s2 1 s1)%{loop}%( l1 )%!s! %( l1 ++ s1 l2 <)%{next} | This statement sets up two registers s1 and s2, with the numbers 1 and 10, then loops to print out: 1 2 3 4 5 6 7 8 9. Whatever value is on top of the stack when the %{next} statement is reached is evaluated as a boolean to determine if execution of the loop should continue. |
Converting InFix To PostFix
Unfortunately there is no easy way to automatically convert InFix expressions into RPN (PostFix) expressions, especially with the use of SimVars and things specific to the Microsoft Flight Simulator 2024 SDK. However, there are third-party tools that may be of some use to you and that can work quite well, although they are not perfect. One in particular may be worth looking at which you can find from the link below: