RECORDING AUDIO
There are multiple ways to record aircraft sounds to be used in your own add-on packages. Here we will detail just some techniques and give advice based on our own experience recording the audio for the aircraft in Microsoft Flight Simulator 2024. The advice given here is by no means the only way to do things, however it's the way we ourselves work and generally ensures good results when the sound is implemented in the simulation.
Recording Session Recommendations
Before and during the recordings, here are the important elements that need to be respected to get a successful result :
- Avoid as many sound reflections as you can when recording. It is better to record the aircraft on grass if you can, far from any hangars and structures. Grass is also convenient to fix cables and microphones on ground thanks to pegs.
- Capture at least 9/10 different RPMs from the lower to the higher, that cover progressively all the RPM range. The example for engine sounds (here: Engine Audio Setup) uses 9 different samples.
- The steady RPMs have to be stable as much as possible to correctly loop, without any irregularity or RPM variations.
NOTE: It is really important to have a decent minimum number of steady RPMs as you want to avoid using too much pitch between each RPM. Keep in mind that exceeding 300 pitch cents in Wwise will make the engine sound unnatural. - The recordings of each RPM should last at least 30 seconds. This is a minimum length that we feel comfortable working with, allowing to have enough material to make loops.
- Do not forget to record the engine startup and shutdown.
- If recording an aircraft with a propeller, record the same tracks as you would for the engine, but focused on the propeller itself (internal, external, start, stop). See the DA62 audio setup for a good reference of what samples you should be making.
- It is preferable to capture the cockpit and outside audio at the same time in order to save time and have a coherence between the different points of view.
- Recording engine sounds inside the cockpit is not mandatory as you could use outside recordings to simulate the cockpit audio, but it is highly recommended to capture the sound of the cockpit as well for better accuracy.
- Record only one engine at a time if possible.
- Avoid any parasite sounds (seat squeaks, voices, etc.) during the cockpit takes, in order to maximize the length of the usable loops.
- Avoid broadband noise that often come in front of the plane. For propeller microphones, do not hesitate to position one of those on the sides of the propeller in order to attenuate disturbances.
- Avoid as much as possible the different airflows that come from exhaust and propeller. Positioning angles and the fuselage itself can be used to protect microphones from wind and turbulence.
- A nice thing to do at the beginning of a recording session is to make a ramp up and down from the lower to the higher RPM and vice-versa. It is useful for checking the preamps before steady recordings and it will also make a good reference when you will implement your engine sounds.
- It is better to record at the maximum bitrate and sampling rate possible to get a wide dynamic range and the best sampling frequency. 32bit float recorders are even better as they avoid any clipping when recording.
- Record several takes to ensure a successful result.
Following our recommendations is a good start and should give you successful audio recordings, however don't be afraid to try microphone choices and positioning other than the ones we list here, as every aircraft is different.
Finally, when making your recording plan of the aircraft, add in anything that you may think interesting or unique - for example: flight control, cockpit instruments, battery noise, doors, etc… - and not just the "signature" sounds like the engine, or stall warning, etc...
Engine Recording
When it comes to recording the engines (or any audio, for that matter), you will need appropriate microphones and recorders, and will need to have a decent understanding of acoustics as well as the way the aircraft that you want to record fucntions. To help you understand how we do it for our aircraft, here is what we would consider as the minimum required to record both interior and exterior audio samples.
NOTE: It is important to understand that in Microsoft Flight Simulator 2024, all official aircraft have implemented their engine audio using a loop system, instead of granular audio processing (for example). This is why we recommend recording steady engine RPMs and not only ramps up or down. See here for more information: Engine Audio Setup
The Cockpit
To record the interior of any kind of aircraft, ideally you want to have:
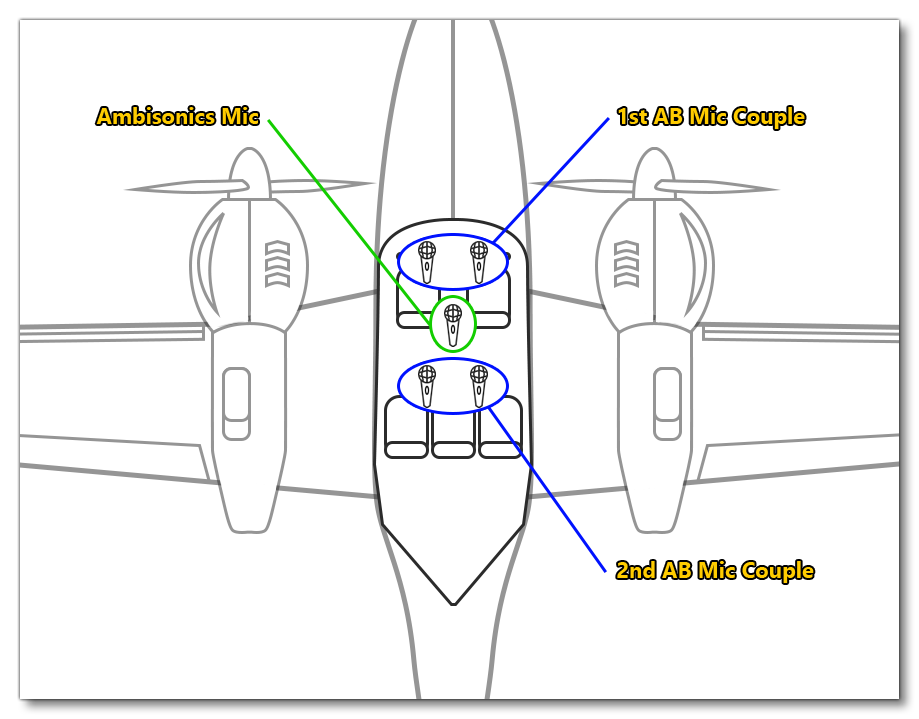
- a quad setup with 2 AB microphone stereo couples, one facing the front of the cockpit and the other facing the back of the cockpit.
- an ambisonics microphone oriented to the front of the plane to fully capture the 3D audio image of the cockpit.
Or both of the above! The image below illustrates the placement of these microphones for a small aircraft like the DA62:

External Recording
For the outside, the positioning of the microphones will depend on the type of aircraft being recorded, with the purpose being to isolate as much as possible the different audio sources (propeller, exhaust, turbine etc...). Therefor, the goal is to diversify microphone placements all around the plane, in order to feature the different sound perspectives in the simulation. You should keep in mind that an aircraft generally sounds really loud when it is pushed to the maximum RPMs so you want to have microphones that can handle high sound pressure level (SPL), especially if they are placed close to a source.
IMPORTANT! It is essential to be very careful during an aircraft recording, especially when outside. Please refer to the pilots and staff to know more about the security while being on site. It is also essential is to protect microphones and cables from the airflow and to keep them in place while running the aircraft engine. Moreover, you should use long cables to be able to stand far for the microphones while recording.
Here are some suggestions of microphones positioning:
- For a piston engine aircraft:
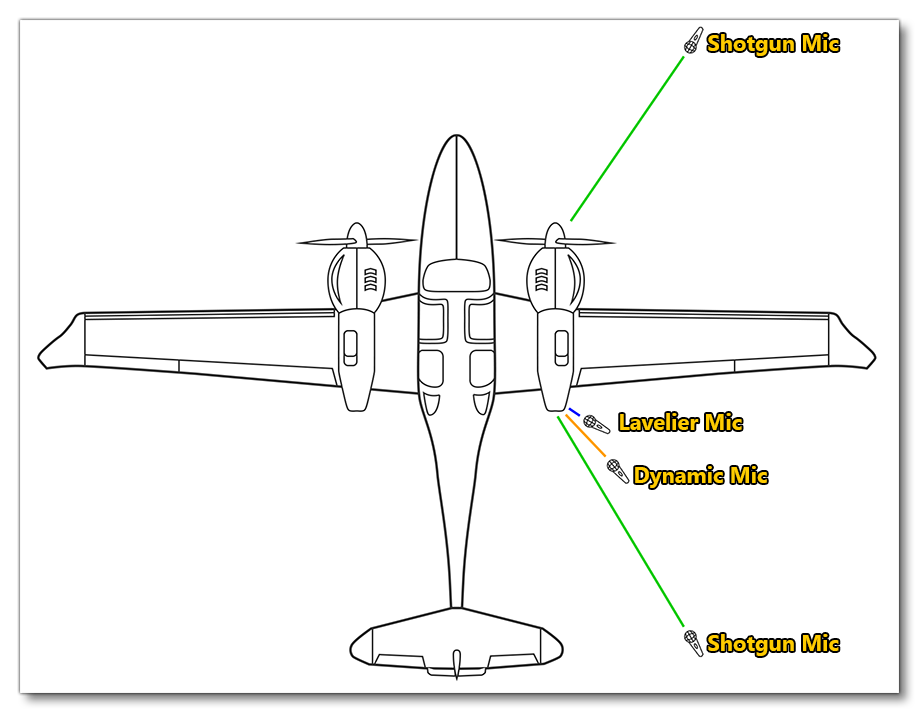
- For the propeller, we recommend that you place at least one shotgun microphone on the front of the propeller but not totally facing it. It has to be placed several meters away from the source (5/6 meters at least), preferably at the opposite side of the exhaust (if the plane only has one).
- For the exhaust, it is ideal to place a microphone that can handle very high SPL close to the exhaust pipe (between 15 and 30cm), or/and dynamic cardioid microphones at a close/medium distance (from 1 meter to the source). Please note that microphones should never be in the exhaust/propeller airflow.
- For turbine engine aircraft:
- For the turbine, we recommend that you place shotgun microphones at least 10/15 meters away from the source on the front and/or the side of the turbine.
- For the exhaust, we recommend that you place a very close microphone to the pipe, that can handle very high SPL and/or a dynamic cardioid at close/medium distance (from 5 meter to the source).
NOTE: It is great to have different microphones placed at different distances/perspectives. For example, put another shotgun pointing at the exhaust, several meters away, to give you another audio perspective.
Here is an example of an outside basic recording setup to record the right engine of a piston multi-engine aircraft:

Cockpit Acoustics
Within the cockpit, you'll notice that it has it's own acoustic quality and reverb, which is often nice to have in your recordings. Having this in the audio can be really useful later in the audio implementation process of your aircraft. For this purpose, you can make an Impulse Response of the cockpit. To do this, what we recommend that you first play a sweep audio file in the cockpit on a loudspeaker and to record that with your onboard microphones.
NOTE: During recording, the doors of the cockpit should be closed and all instruments should be turned off, to avoid any parasite audio.
In general, it is always better to record several takes to ensure the quality of the recording, ie: it has no residual noises, no people speaking, etc...). Once completed, this sweep can be deconvolved to get the Impulse Response of the cockpit. You can find a lot of documentation on internet about deconvolving and the different techniques of creating an Impulse Response file.