MSFS LOCALIZATION MANAGER

The Microsoft Flight Simulator Localization Manager is a tool supplied with the SDK that can be use to generate *.loc files so you can have localized strings within your packages. This page describes the different parts of the tool and tells you what everything does. To find out how to use this tool please see the following page:
To find out more about localization files, please see the following page:
The Localization Manager window is split into 4 main sections, each of which is outlined in the sections below.
NOTE: Any part of the Localization Manager that isn't covered on this page is currently non-functional or still a work in progress and not intended yet for use. As the application is updated, the information here will also be updated.
Menu Options
At the top of the MSFS Language Manager you have the various different menus that can be used to perform specific actions when using the tool.
File

The file menu has the following options:
- New Project From MSFS Project XML - This will open a file explorer and you can browse to the project folder that has the package(s) you want to localise. This will open the Localization Wizard where you will be asked to select the XML file for the project as well as a few other options. When finished it will create the new localization project (which will create a
.locProjfile in the same folder as the project XML). For more information see the following tutorial: Using The MSFS Localization Manager. - Open Project - Selecting this will permit you to open a
.locProjfile. This is the file that is created by the Language Manager to store the information about your project. This is normally stored in the same filder as project XML. - Save All - This option will save all changes that you may have made to any of the
*.locfiles as well as the*.locProjfile for the language project. This is the same as using the keyboard shortcutCtrl+ "S". - Recent Files - This will show a list of the localization projects that you have recently been editing, which you can then select to load.
- Exit - Exit the Language Manager.
Edit

The Edit menu has the following options:
- Undo - Undo the last action. This is the same as using the keyboard shortcut
Ctrl+ "Z". - Redo - Redo the last action that was undone. This is the same as using the keyboard shortcut
Ctrl+ "Y".
View

The View menu has the following active options (the options that aren't listed here are not currently available for use in the tool):
- Save Layout - Save the current window layout.
- Load Layout - Load a saved window layout.
- Reset Layout - Reset the window layout to the default state
Import

The Import menu has the following options:
- Import Excel File - This option will open a file explorer window where you can select an Excel file to import.
IMPORTANT! The Localization Manager requires the x64 version of Excel (ie: not 32bits) to be installed on the same machine running the tool in order for it to function properly, and all Excel files imported should be created with this version.
The Excel file should be correctly formatted, which means it should have columns for:
- Package Name - The name of the package, for example: mycompany-aircraft-simple
- Entry Name - The entry name variable, for example: AIRCRAFT.UI.DESCRIPTION
- Entry ID - A GUID for the entry
- Comments - Any comments on the translation
- Columns for each language string: en-US/English, fr-FR/French(France), es-ES/Spanish(Spain), de-DE/German, it-IT/Italian, pl-PL/Polish, pt-BR/Portuguese(Brazil), ru-RU/Russian, ja-JP/Japanese, nl-NL/Dutch, nb-NO/Norwegian, sv-SE/Swedish, fi-FI/Finnish.
 After the import you will be shown the following window:
 Here you have to tell the Language Manager which columns are which, and note that each language must be set to
 <Language> Text(as shown). When ready you click on theImportbutton to import the language strings into the project. For more information please see Importing Excel. - Import XML File - With this option you can import an XML file that contains translation data to your project. The XML file must be very carefully formatted, and you will need to have one for each language that you are translating. See the section on Translating Entries for information on formatting and see the section on Importing XML for more general importing information.
- Parse All Assets - This option can be used to have the Language Manager parse the project files (
*.cfg,*.xml,*.flt) in search of strings that have been flagged with$$:, meaning that they need to be translated. For full information, please see here: Flagging Strings - Advanced - Parse Assets Including Source Code - This option will do the same as the above option, but widen the search to include source code files within the project.
Export
 The Export menu has the following options:
NOTE: The export options will only export what is currently selected in the Language Manager. For example, if you have selected a *.loc file in the Entries Tree view then only the contents of the file will be exported, or if you have selected 3 entries in the Entries view, then only those three entries will be exported. To export everything, ensure you have selected the PROJECT in the Entries Tree view.
- Export to XML: This option can be used to generate an XML file for the project. For full details, please see here: Translating Entries.
- Export to Excel: This option can be used to generate an Excel file for the project. For full details, please see here: Translating Entries.
Settings
 None of the options here are currently for use within the Language Manager and you should not use them (they may corrupt the project or cause unforseen problems).
Help
From here you can open the About window which shows information (like the version) about the tool.
Entries Tree

The Entries Tree view is where you get an overview of the entire project that you are creating localization for. At the top level of the view you have the project, then the tree hierarchy goes: Package > *.loc File > Variable Groups > Variable Entries.
Initially you'll only have the Project and any packages associated with the project listed here and so you'll have to create the required *.loc file or files (you can have multiple localization files per package and/or project). This is done through the right mouse button menu, and the full process is explained here: Creating The *.loc File.
The right mouse button menu also has other options that will be available depending on the context of the click. In general, right-clicking on anything in the tree hierarchy will offer you the option to Expand or Collapse the part of the tree "branch" that has been clicked on. You will also be presented with the option to Export most of the tree elements, and selecting this option will export an Excel file with the contents of tree "branch" that was clicked on. The only real differences between the menus are when you right click on the package and on the *.loc file, both of which are shown below.
RMB Menu - Packages

This menu has the following additional options as well as those listed above:
- New File: Selecting this will open a window asking you to select the path to the asset group that you wish to create the *.loc file in. Once selected you will be presented with a file explorer where you can select the folder to save the file in and the name to give the file. We strongly suggest that you always use the PackageSources path, and save your files in a dedicated Localization folder within the asset group, for example:

- Parse Package Assets: This option can be used to have the Language Manager parse the package files (
*.cfg,*.xml,*.flt) in search of strings that have been flagged with$$:, meaning that they need to be translated. For full information, please see here: Flagging Strings - Export To External Package: Not currently in use and should be ignored for now.
RMB Menu - *.loc File

This menu has the following additional options as well as those listed above:
- Show In Explorer: Selecting this option will open a file explorer on the selected
*.locfile. - Resolve File: Not currently in use and should be ignored for now.
- Import / Export: Selecting this option will permit you to export an Excel file with the contents of the
*.locfile, or import data from either a JSON or an Airport file.
Entries
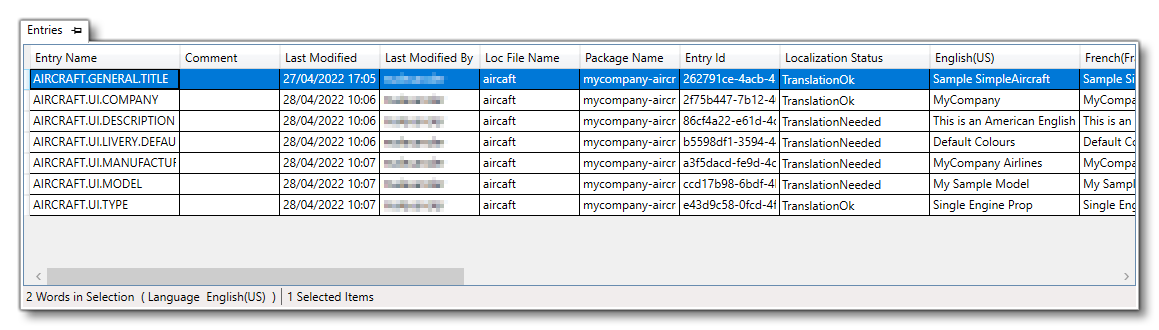
This view shows all the entries in the currently selected "branch" of the Entries Tree, and can be filtered by selecting either the Project, Package, Group, or Entry branches in the tree hierarchy.
To add a new entry into the loc file, you simply right click on the window and select the New Element option then proceed to give the required information. This process is explained in full here: The Localization Manager. Note that you can also edit existing entries by double-clicking on them, although this is limited to the following fields only:
- Entry Name
- Comment
- Localization Status
- Language Strings (English (US), French (FR), etc...)
When you use the right mouse button on any variable entry, you will be shown the following menu:

- New Element: This option will permit you to add a new entry into the list. Selecting it will open a new window where you need to select the project
*.locfile to add the netry into, and then take you back to the Netries view where you can fill in the required entry variable name. This process is explained in full here: The Localization Manager. - Duplicate: This will duplicate the entry, suffixing it with a .N value, where N is a number starting at zero. For example, duplicating the entry
AIRCRAFT.UI.TYPEwould create a new entryAIRCRAFT.UI.TYPE.0. Note that the Entry ID (GUID) will not be duplicated, but rather a new Entry ID will be generated. - Find In Tree View: This will expand the "branches" of the Entries Tree to show the location of the selected entry.
- Export To TTS: Not currently in use and should be ignored for now.
- Export To Excel: This will export the current selection as an Excel file. For full details, please see here - Translating Entries.
- Export To XML: This will export the current selection as an XML file. For full details, please see here - Translating Entries.
- Delete: This will delete the selected entries.
- Move Entries To Localization File: This will open a new window from which you can select another
*.locfile that already exists within the project. Once you have chosen the destination file the selected entries will be moved. - Duplicate Entries To Another Package: This will open a new window from which you can select another package (in the same project) and a
*.locfile from that package. Once you have chosen the destination package and file the selected entries will be moved.
Selected Entry

The Selected Entry view is where you can see the information for a single entry. The window is comprised of the following sectons:
- Entry Name: This is the entry variable string, as set when you created the entry in the Entries view. This string can be edited here by double clicking on it.
- LocFile: This is the name of the
*.locfile that the entry belongs to. This field cannot be edited. - Package: This is the name of the package that the
*.locfile belongs to. This field cannot be edited. - Last Modified: This is the date and time of the last modification that was made to the entry. This field cannot be edited.
- By: This is the name of the person that last edited the entry. This field cannot be edited.
- Speaker: Not currently in use and should be ignored for now.
- Loc Status: This is the current status for the full entry, ie: if only some of the translations are done then it would something like "TranslationNeeded", and if all the translations are done, then it would be "TranslationOk".
- Languages: This sub-window lists each of the languages that you can translate the entry to, with columns for the Language name, the actual Text, and the Localization Status per language (Voice Status can be ignored). You can edit the different Text strings by double clicking on them, and you can click on the Localization Status to select a new status message for each language in the entry.
- Tags: Not currently in use and should be ignored for now.
Filters /Audio
Not currently in use and should be ignored for now.