USING THE MSFS LOCALIZATION MANAGER
This short tutorial takes you through the steps required to use the MSFS Localization Manager to create your *.loc files to create localized text for the different display strings that are in your packages.

Before you can use this tool you should have made at least the initial project with a package and at least one asset group in The Project Editor. In general, you'll want to keep this tool open throughout the creation process of any add-ons that require localized text so you can create the localization variables at the same time as you need them for the assets being created.
Getting Started
When using the MSFS Localization Manager you'll need to first run it and open a project XML file. This is done from the File menu in the tool:

For this tutorial we'll be using the SimpleAircraft sample project as our starter project, and we'll be using the Localization Wizard which will open when you select the New Project From MSFS Project XML option from the File menu.

Clicking Next from this screen will take you to a new window where you need to browse to the package XML file for the package you want to localize.

Once selected, you will be taken to a window where you can select the languages that you will want to provide localizations for:

Here you can select one or more initial languages for localization, and at the bottom of the window you will also have to select the Sourcelanguage, which will be the language used as the source for all further localization:

Once completed, you can click on the Finish button to end the wizard and be taken back to the MSFS Localization Manager. The packages within the project will be now be shown in the Entries Tree section of the manager:

This aircraft has no localized text yet, so we'll rectify that and add some for the UI description, ATC, etc...
Creating The *.loc File
We want to create a *.loc file now for the text that will be localized, and so for that you should right-click on the package that you want to add the file to, and select New File:

This will then open a new window asking you where you want this file to be placed. It can only go in an asset group, and you will be given a selection of those in the window to choose from. In this case you want to choose the Package Sources group

After selecting the asset group to create the file in, an explorer window will open where you can further select a folder and give the file a name. It is essential that you call this folder "localization", and it will contain all the *.loc files for the package. Using a single folder like this keeps things organised and is easier to maintain long-term, and it is also required by the simulation to correctly parse all the *.loc files. So, for our example project, you need to make this folder, then save the file as "aircraft.loc", since this file will only be used to hold localized text used in the aircraft.cfg:

The new file will now be listed under the package, as shown in the image below:

Adding localized Content To Our Files
Once the file has been created you are almost ready to add in entries for each of the strings that you want to localize. As outlined here, entries are essentially "variables" that will be used in the CFG and XML files instead of the actual strings, and then the Microsoft Flight Simulator engine will parse these variables and perform a substitution for the actual text, localized in the user's language. So, we need to first create the variables that will be used.
To start with, let's open the aircraft.cfg file in your file editor of choice. You want to locate the following parameters in the [FLTSIM.2] section:
descriptionui_manufacturerui_typeui_variation
These will be shown to the user when the aircraft is selected in the hanger view before a flight, and they can all be localized. We need to edit these to tell the simulation to use the *.loc file for the text, and this is done by adding in the previously discussed variables, prefixed by TT:. The format for these variables will depend on the use that we are putting them to. However, in most cases you'll be using the following structure:
<FILE>.<USE>.<NAME>.<IDENTIFIER>
Let's see how the four parameters listed above would look following that guide:
description = "TT:AIRCRAFT.UI.DESCRIPTION"
ui_manufacturer = "TT:AIRCRAFT.UI.MANUFACTURER"
ui_type = "TT:AIRCRAFT.UI.MODEL"
ui_variation = "TT:AIRCRAFT.UI.LIVERY.DEFAULT"
It's worth noting here that we use upper case for these variables to make them easy to identify in the files, and we also only use the roman alphabet (A-Z) and numbers (0 - 9) to create the names. You'll notice that we also use full stops "." within the variable names. This permits us to have variable "classes" and "sub-classes", which will be more obvious as we add them into the Localization Manager itself.
Using the TT: prefix means that the recommended workflow is to have the Localization Manager open at the same time as you create the asset and add in each variable to the tool as you add them to the files.
You should go ahead and add these variables into the SimpleAircraft aircraft.cfg file now, and then save the file. The file should look like this:

Flagging Strings
Another method that you can use to flag strings for translation is to use the $$: suffix instead of the TT: suffix. This suffix flags a string for substitution rather than as a variable entry, which means that instead of adding the translation parameters to the localization manager as you add them to the files, you can simply go ahead and create all the files and then import all the flagged strings at the same time into the localization manager. Consider the following example from the SimpleAircraft sample project aircraft.cfg file:
title = "$$:Sample SimpleAircraft"
ui_type_role = "$$:Single Engine Prop"
ui_createdby = "$$:MyCompany"
Notice here that the string is actually written in the file rather than as a variable. This may make more sense to your workflow as it means you can simply create all the files and flag strings for localization as you go, rather than constantly switch between the Localization Manager and the files for the asset. Once you you have all the files created and you want to localize the flagged strings, you can have the Localization Manager tool parse the files. This is explained in detail in the section Parsing Flagged Strings, below.
You should take a moment and flag these strings in the SimpleAircraft aircraft.cfg file now, and then save the file. The file should look like this:

The Localization Manager
With the variables added into the CFG file we can now go ahead and add them into the MSFS Localization Manager. In the tool we have already created the aircraft.loc file (see Creating The *.loc File if you haven't yet), and adding a variable entry is simply a case of right-clicking in the Entries section and selecting New Element:

Selecting this will then open another window asking you to select the asset group and the *.loc file that you want to add the variable entry to, and then - once that has been selected - you can give the variable name. In the image below we start with the description variable:

After writing in the variable and pressing Enter to validate it, you will then be able to see the variable listed in the Entries Tree window. Take a moment to add in the other variables, and at the end your Localization Manager window should look something like this:

If you look at the Entries Tree window, you'll notice that each "part" of the variables are branched off in it's own sub-section. This makes it a lot easier to navigate and find all the related variables quickly when editing larger files. At this point you want to save the localization project (which will also save the *.loc file). This can be done using Ctrl + "S" or from the File menu.
You could then go on and create further variable entries as required for the file, and you can also add further *.loc files if required. Note that you can have a single *.loc file or multiple *.loc files, it doesn't really matter as they will all be compiled together when the package is built. What you do depends on your workflow and how you are going to go about translating everything.
Parsing Flagged Strings
As explained in the Flagging Strings section, you can flag strings in files and then parse them later to substitute them for localization variables. To be able to do this, you first have to open a project in the localization manager as explained in the Creating The *.loc File section. In this case you should already have open the SimpleAircraft sample project and have edited the aircraft.cfg file. Once you have a project open, you can then right click on package you want to parse for strings in the Entries Tree window, and select Parse Package Assets. Do this now for the SimpleAircraft project that we've been editing:

This will then open the following window, which should show the substitution strings that we flagged previously in the tutorial:

Here you click on the parsed string to localize and then do the following:
- flag the string as "valid"
- assign it a "string ID" which is the variable name that will be used for the substitution
- click on the
SetStringbutton to assign the variable to the string - click on the
Convert As New Stringto add the entry into the Language Manager and perform the substitution in the asset file
In this way, you can add all the strings to be localized across multiple files into the Language Manager, all in the same operation. For this tutorial, we'll map the flagged strings as follows:
AIRCRAFT.GENERAL.TITLE= "$$:Sample Simple AIrcraft"AIRCRAFT.UI.TYPE= "$$:Single Engine Prop"AIRCRAFT.UI.COMPANY= "$$:MyCompany"
When finished you can close the parser window and your new variables will be shown in the Language Manager:

Adding Translations
Having created the required entries for the localization, you will need to add the first of the localization languages: English. This is treated as the "default" language and it is what will be used if you don't have a localization for any entry in the users chosen language, ie: if the user has their language set to Spanish, but you don't have entries in Spanish for the text, then the text will be shown in English.
NOTE: If you have used the Parsing Flagged Strings option, then this step may not be required, as the flagged strings will already have been added as the English translation when you parsed the project files.
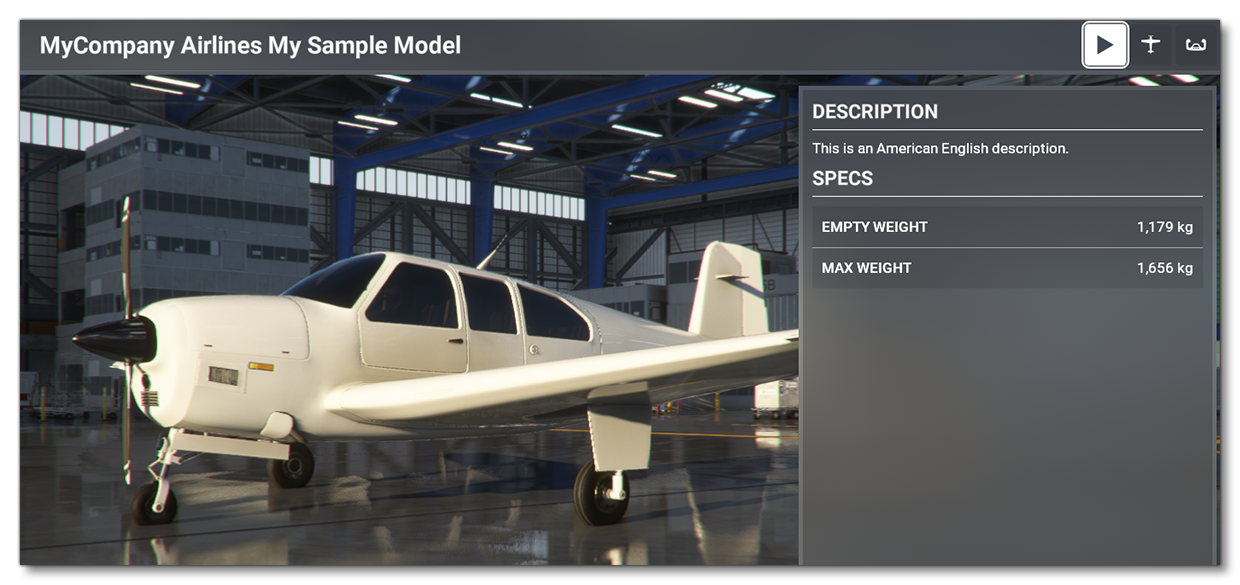
To add an initial translation you simply need to click on the entry variable, and then in the Selected Entry window, double click the Text column for English (US) and enter the text. For this example, we'll simply write something basic like "This is an American English description."

You would normally now go and fill in the English translation for all the variables you have added, then continue to add further *.loc files, variables, and English translations as you go about finishing the creation of the package. For this tutorial, you can go ahead and fill in the English content for those variables that still don't have anything (which should AIRCRAFT.UI.MANUFACTURER, AIRCRAFT.UI.MODEL, and AIRCRAFT.UI.LIVERY.DEFAULT)
Note that you can (and should) be setting the Loc Status and Localization Status. The first permits you to set the status for the variable and the second permits you to set the status for the language. So, in this example, we'd have set Loc Status to "Translation Needed" and also set each language Localization Status to "Translation Needed", except for the English (US) text, which would set to "TranslationOK". These status can be updated as you recieve/add translations for the rest of the languages that you plan to support.
Translating Entries
Generally, the majority of translation work is outsourced to specialised companies and organisations that handle these kinds of things. This means that you need to send them your English texts in some format for them to translate and send back to you. This can be done in one of the following three ways:
IMPORTANT! Ensure that you have selected the PROJECT from the Entries Tree view, as the export options will export only what is currently selected.
- ZIP the whole Microsoft Flight Simulator project along with the MSFS Language Manager tool, and have the translation company use the tool to complete the translations. This would be the preferred option, but may require that the company is happy to use third party tools and/or be familiar with Microsoft Flight Simulator and the package workflow.
- In the MSFS Language Manager, go to the Export menu and select Export to XML:
 This will create a formatted XML file that can then be sent to any company for them to use as a base for creating the translations. When exporting in this way for a third-party translation service to work with, it is expected that you get back from them individual XML files formatted in the exact same way, one for each language, EG:
- The final method is to export a spreadsheet for the translations to be added to in Excel format. Again this is done from the Export menu:
 Exporting in this way will create a correctly formatted Excel table that can then be sent to any third-party translation service, or filled in in-house, and then imported back into the Language Manager:

For the sake of this tutorial, we'll export an Excel file, so you should do that now then open the Excel file ready for editing. We want to fill in each of the columns and rows with a translation text so that we can then import this file in the next step.
Importing Translations
Once you have your translations you need to get them into the package so they will be built and used when added into the simulation. If the translation was done using the Language Manager tool, then all you'll have to do is merge in the changes to the package, however, if you you have used the XML or Excel export, you'll need to take a couple of extra steps. Note that for this tutorial we'll be using the Excel import, but we'll also explain how to import XML in case that's relevant to you in the future.
Importing XML
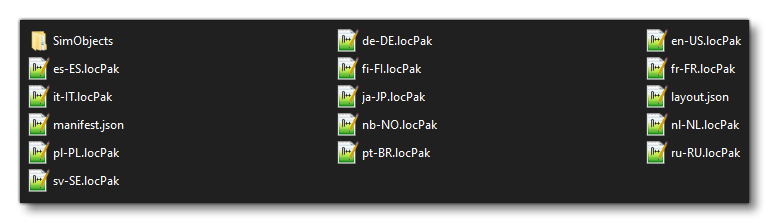
If you went with the XML file format for your translations, you should have received back up to 12 files back (13 if you include the default English file). Before these can be imported into the Language Manager, you need to first ensure that they are all in individual folders and named correctly. Each file needs to be named exactly the same as the default English file and placed in a separate folder for the language, and the folders should also be named as shown in the image below:

Note that you can have sub-folders within these folders, and you can also have more than one file if required for projects that have multiple packages. As long as the files are correctly formatted and in the correct language for the parent folder, the language manager will parse them correctly. You should also ensure that you have a separate folder for default English text file(s) that was created for sending, and that folder should be named "en-US". We need these as the Language Manager will compare what was sent with what is currently in the project and flag any discrepancies (as shown below).
Once you have your folder structure created and the files named and saved in the appropriate places within this hierarchy, you can go to the Import menu in the Language Manager and select Import XML. This will then open the XML Import window and prompt you for the location of the translated batch of files (all languages files except English). Once you give that folder, you will be prompted for the folder location of the source batch files (the default en-US folder), and then the tool will run the import. The parser will then check the source files against the current *.loc files and flag anything that is different:

You can choose to flag the translation as valid or not here for each individual conflict and then click on the Ok button to finish the import. Once finalised you will be shown a brief Report window, and when you close that you'll find all the localization strings added into the project, which you should now save.
Importing Excel
To import an Excel file with the completed translations, simply go to the Import menu and select the option Import Excel.
IMPORTANT! The Localization Manager requires the x64 version of Excel (ie: not 32bits) to be installed on the same machine running the tool in order for it to function properly, and all Excel files imported should be created with this version.This will open a file explorer window and you should browse to the location of the Excel file. When you select the file you want, you will then be shown the Import window, where the left hand column will show the different "sheets" in the Excel file - where each one would equate to a single *.loc file - and on the right you have the column formatting options for the file. In general, you only need to set the format for the language columns being imported, and these should be set to the "<language> Text" options, as shown in the image below. Go ahead and do this now for the SimpleAircraft tutorial project, importing the Excel file we made previously:
Once you have selected your column formats you can then go ahead and press Import, and after few seconds you'll get a summary of the import process:

Once you're happy that everything looks good, you can click on the Ok button. You should then save the project.
Building The Project
Once you have completed all your translations and are happy with the localization you can build the project as normal for testing in Microsoft Flight Simulator. You can find a guide on how to do that from the following link:
Your package will be built and include several *.locPak files, one for each of the translated languages. If you examine the package folder you can see these:
Each file will contain all of the localized text for the given language generated from each of the *.loc files in the package. You can then check how this text appears in the simulation and make any changes necessary to the localization project in the Language Manager before submitting it to the marketplace.