MATERIAL TOOLS
Once The 3DS Max Plugin has been installed, you will have access to the FlightSim menu and in that you will find the Material Tools.
IMPORTANT! Most of the tools in this section perform "destructive" changes that cannot be undone. Make sure to save your work and make a backup before using any of the options presented.
This option will open the Material Tools window that gives you access to some special tools that can be used to make working with the FlightSim Materials a bit easier:
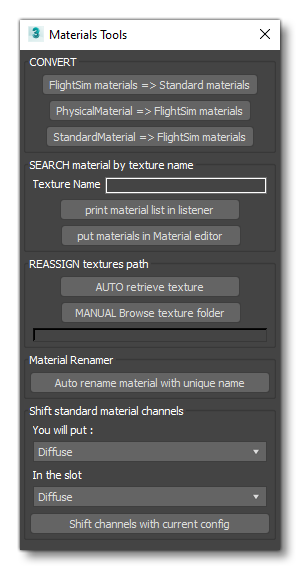
Convert
This section has three buttons that can be used to convert materials between different formats:
- FlightSim Materials > Standard Materials: Convert a FlightSim material into a standard material.
- PhysicalMaterials > FlightSim Materials: Convert a 3DS Max physical material into a FlightSim material.
- StandardMaterial > FlightSim Materials: Convert a 3DS Max standard material into a FlightSim material.
Search
From this section you can use a texture name as a search parameter to find which materials are using it. You give the name (or partial name) to check then click on one of the two buttons:
- Print material list in listener: This will open a window with a list of all the materials that contain the given texture name (or partial name).
- Put materials in Material Editor: This will automatically create a multi-material that contains all of the materials with the given texture(s) in in the selected slot of the material editor.
Reassign
This option permits you to reassign texture paths. This is generally only used when you have more than one model that have shared textures (for example dirt or ice textures may be shared between models). It has the following two buttons:
- AUTO (Retrieve Texture): When you click this button, the tool will start from the current file folder and then go up through the parent folders trying to find the texture folder. Texture paths will be overwritten if they are found in one of the parent folders, otherwise nothing will happen and you will have to use the manual option.
- MANUAL (Browse Texture Folder): This option will open a file explorer where you can browse to the texture location. After selction, texture paths will be overwritten if they are found in the chosen folder.
Material Renamer
This section has a single button - Auto Rename Material With Unique Name - that will process the materials and rename them following the format Mat_NNN where NNN is a number prefixed with zeros (if required), for example: Mat_001, Mat_045, etc...
Shift Standard Material Channels
From this section you can shift some of the texture channels for a standard material to a different channel. You select channel to shift and then the channel to shift to, before pressing the button Shift channels with current config. THe channels that can be shifted are:
- Diffuse
- Normal
- Specular Level
- Self Illumination