WASM GAUGES
WASM (C/C++) gauges can be developed for Microsoft Flight Simulator with the Microsoft Flight Simulator Platform Toolset which is installed at the same time as the SDK itself (see the Additional Tools and Web Assembly pages for more information). In this short tutorial we'll quickly take you through the main steps required to create a WASM module to be used as part of the instrumentation of an aircraft.
Creating A New Gauge For Your Project
The Microsoft Flight Simulator SDK includes a number of templates that you can - and should - use to create your WASM modules. You can get these by starting Visual Studio, selecting Create A New Project, and on the templates screen search for MSFS:
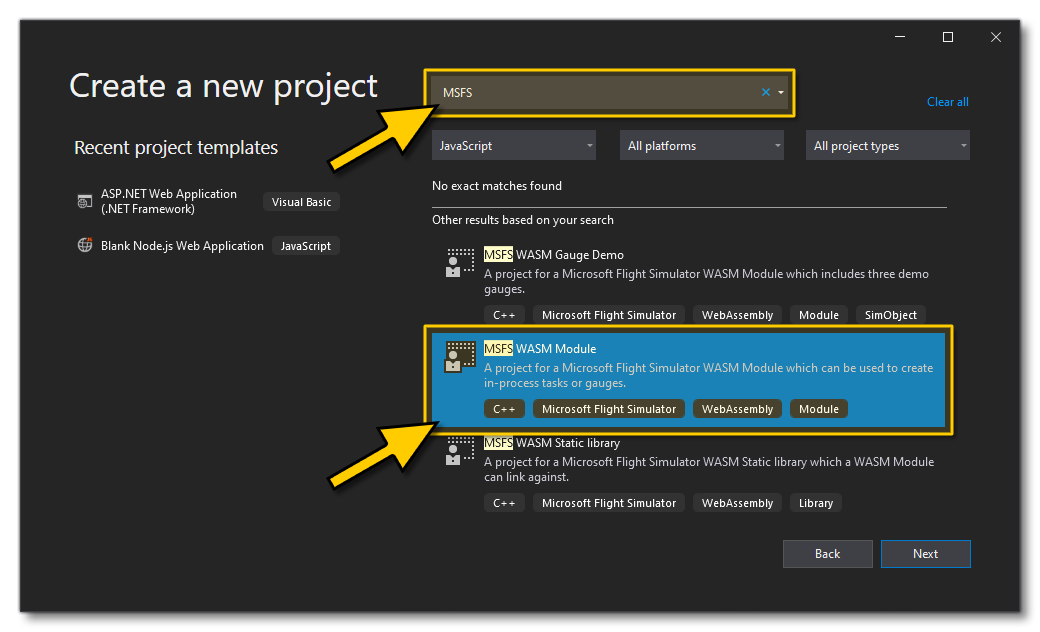
The three available templates are:
- MSFS WASM Gauge Demo: This template contains three demo gauges using a minimum of code. This is the same sample that was used for the GaugeAircraft Sample Project.
- MSFS WASM Module: This is the base template that should be used in the creation of all WASM gauges.
- MSFS WASM Static Library: This is a template that can be used to create a WASM static library for future WASM modules to link to.
After selecting the MSFS WASM Module template, you will be presented with the following basic project, which we'll be editing:
#include <stdio.h>
#include "[MODULE_NAME]_Module.h"
extern "C" MODULE_EXPORT void test(void)
{
	// TODO
}
Visual Studio Project Properties

When creating your WASM projects, most of the project settings will be the same as for a standard C++ project, however there are some things that should be set up with specific values, which we'll outline here:
- Configuration Properties: These can be left with their default values.
- C/C++: In this section you have the following properties which may need editing:
- General - Debug Information Format: This must be set as
//clang:-g. It should be set automatically, but it is worth checking. - General - Warning Level: Set this field to Level 3, and check your warning regularly, as clang will tell you if you do something wrong.
- General - Multi-processor Compilation: Use this field to speed up your compilation time.

- Optimization: When debugging you should set everything to false/disabled/no. For release, we recommend that you set Optimization at Maximum Optimization (Favor Speed) (/O2). Note that with the latest SDK update, we automatically optimize modules which have a value in Optimization field (/clang:-O3), and no optimization means it is debuggable. The others fields can also be set as you require.
- General - Debug Information Format: This must be set as
- Linker: In the Debugging section you want to set it to "Generate Debug Info (/DEBUG)" when you are testing and debugging the module, but then for release, set it to "No".
Editing The WASM Module Project
Now you've initialised the new WASM project and setup Visual Studio, you'll need to edit the source code to include the minimum header files - supplied by the SDK - to create the module. You can find all the available files that can be included from the following SDK location:
<root>\MSFS SDK\WASM\include\MSFS

These different API's are all documented here:
The following API's are the bare minimum that you will normally want to include when creating a new gauge:
#include <MSFS/MSFS.h>
#include <MSFS/MSFS_Core.h>
#include <MSFS/MSFS_Render.h>
#include <MSFS/Legacy/gauges.h>
After setting the includes, you can then create a callback for your gauge as follows:
extern "C" {
    MSFS_CALLBACK bool [MODULE_NAME]_gauge_callback(FsContext ctx, int service_id, void* pData)
    {
        switch (service_id)
        {
            // further code here ...
        }
        return false;
    }
}
Adding The Gauge To Your Aircraft
Once you have created the gauge, you need to be able to add it to your aircraft and to test it. This means that you should already have created an aircraft package (as explained here: Creating The Project), and after building the WASM module from Visual Studio, you will want to save it beside the panel.cfg file in the PackageSources directory, as shown in the following image taken from the Gauge Aircraft Sample:

Once you have built the module and saved it to the appropriate location, you need to tell the aircraft to reference it. This is done in the panel.cfg, under the [VCockpitN] header, something like this:
[VCockpit01]
size_mm=1024,768
pixel_size=1024,768
texture=TEXTURE
background_color=0,0,255
htmlgauge00=WasmInstrument/WasmInstrument.html?wasm_module=<MODULENAME>.wasm&wasm_gauge=<GAUGENAME>, 0, 0, 1024, 768, <OPTIONAL PARAMETER STRING>
The important thing to note here is that all WASM modules will need a [VCockpitN] definition, and the path (defined by the htmlgauge00 parameter) will always take the same prefixed format:
WasmInstrument/WasmInstrument.html?wasm_module=
When you have the file in the correct location, you can go ahead and build the package (as explained here). Once built, you will need to restart the flight to see the module in the simulation. Note that this is the case for every edition you make to the WASM code - afterwards it will need exported, built, and the flight restarted.
Events Received By The Gauge Callback
Once the gauge has been loaded by Microsoft Flight Simulator, the following events are sent to the callback function so they can be intercepted and acted on (if required):
PANEL_SERVICE_PRE_INSTALL: sent before the gauge is installed. ThepDataparameter points to asGaugeInstallDatastructure:- The
iSizeXmember gives the width of the gauge bitmap. - The
iSizeYmember gives the height of the gauge bitmap. - The
strParametersmember gives the optional parameter string.
- The
PANEL_SERVICE_POST_INSTALL: sent after the gauge has been installed. ThepDataparameter points to asGaugePostInstallDatastructure:- The
ctxmember is a pointer to theFsContext used by the gauge (it is the same as thectxparameter provided to the callback function).
- The
PANEL_SERVICE_PRE_INITIALIZE: sent before the gauge is initialized. ThepDataparameter is null.PANEL_SERVICE_POST_INITIALIZE: sent after the gauge has been initialized. ThepDataparameter is null.PANEL_SERVICE_PRE_UPDATE: sent before the gauge is updated. ThepDataparameter is null.PANEL_SERVICE_POST_UPDATE: sent after the gauge has been updated. ThepDataparameter is null.PANEL_SERVICE_PRE_DRAW: sent before the gauge is drawn. ThepDataparameter points to asGaugeDrawDatastructure:- The
mxmember gives the X-coordinate of the mouse in texture space. - The
mymember gives the Y-coordinate of the mouse in texture space. - The
tmember gives the absolute simulation time. - The
dtmember gives the time elapsed since last frame. - The
winWidthmember gives the width of the gauge bitmap. - The
winHeightmember gives the height of the gauge bitmap. - The
fbWidthmember gives the width of the gauge bitmap. - The
fbHeightmember gives the height of the gauge bitmap.
- The
PANEL_SERVICE_POST_DRAW: sent after the gauge has been drawn. ThepDataparameter points to asGaugeDrawDatastructure (see above).PANEL_SERVICE_PRE_KILL: sent before the gauge is deleted. ThepDataparameter is null.PANEL_SERVICE_POST_KILL: sent after the gauge has been deleted. ThepDataparameter is null.
Handling Mouse Events
It may be that you also need your gauge to deal with the input from users, and in this case you will need to add in mouse events. Mouse events are forwarded to your gauge through a mouse callback that is defined as follows:
extern "C" {
    MSFS_CALLBACK void <GAUGENAME>_mouse_callback(float fX, float fY, unsigned int iFlags)
    {
        ...
    }
}
The parameters in this callback are as follows:
- The
fXparameter gives the X-coordinate of the mouse in texture space. - The
fYparameter gives the Y-coordinate of the mouse in texture space. - The
iFlagsparameter is a combination of the variousMOUSE_*flags defined ingauges.h. Supported flags are:MOUSE_MOVE: the mouse cursor has moved.MOUSE_LEFTDRAG: left button down.MOUSE_RIGHTDRAG: right button down.MOUSE_MIDDLEDRAG: middle button down.MOUSE_LEFTRELEASE: left button up.MOUSE_RIGHTRELEASE: right button up.MOUSE_MIDDLERELEASE: middle button up.MOUSE_LEFTSINGLE: left button click (sent after a down/up sequence).MOUSE_RIGHTSINGLE: right button click (sent after a down/up sequence).MOUSE_MIDDLESINGLE: middle button click (sent after a down/up sequence).MOUSE_LEFTDOUBLE: left button click (sent after two consecutive clicks).MOUSE_MIDDLEDOUBLE: middle button click (sent after two consecutive clicks).MOUSE_WHEEL_UP: wheel moved up.MOUSE_WHEEL_DOWN: wheel moved down.
Debugging
It's inevitable that while you build and test your WASM module, you will encounter bugs that you will need to fix. The list below outlines the basic steps that you need to be able to follow to correctly debug things:
- Open your project in Visual Studio.
- Build it and copy the WebAssembly module to the panel folder of your SimObject.
- Launch Microsoft Flight Simulator.
- When the game is running, use the Debug > Attach to process command of Visual Studio.
- In the processes list, select
Microsoft Flight Simulator.exeand press the Attach button. - Once in the main menu, open your project.
- Build the package.
- Launch a flight with your SimObject.
- Once the game has loaded your SimObject, the breakpoints set in the project become active and you can step into your code.
Please also see the section on Known Issues And Limitations for further information to help with debugging.