THE PROJECT EDITOR
The project editor allows to create and edit add-on packages for Microsoft Flight Simulator 2020 which are used to add new content to the simulation. To enable the project editor, Developer Mode must be enabled in the simulation. Once enabled you can open the project editor from the Tools menu or by by creating a new project using New Project from the [DevMode] menu. Either way, the following Project Editor window will open:

This editor has the following menu items across the top:
Below the menu items you have the following buttons (these are simply shortcuts to the most common options from the Project menu):
Build All: This will build all the packages in the current project.Clean All: This will remove all packages and package information from the editor.Build & Export: This option will build all the packages in the currently open project, as if using the Build All option. It will then export the packages as a completed add-on, including any marketplace data. For more information on exporting, please see the Export Window page.
This window then permits you to set a Default Company Name and a Default Creator Name for the different add-ons that will be a part of the project. These fields cannot be left blank, and if you are an individual and not a company, you will still need to fill the company name in (you can use your own name, or some other "alias" like a forum username, for example). The Creator name can use special characters, have spaces, etc... but the Company name must be as short as possible - there is a 25 character maximum limit - and cannot contain capital letters, special characters, or spaces. Essentially only a-z and 0-9 are permitted.
The main area of the Project Editor window will be taken up with a list of packages that form a part of the current project. If you have loaded a project or have created at least one package, you will have a Filter option to show only those packages that contain a specific input keyword, or - if you prefix the filter text with "-" - you can omit items with the filter keyword from the list. You will also have Add Package and Remove Package buttons. As you would expect, these are used to add new packages to the project - which can be scenery, an airport, aircraft livery, etc... - or to remove already existing packages from the project. Adding a package to the project editor is explained in the sections below.
Creating A New Project
All add-ons in Microsoft Flight Simulator 2020 are created as projects, and within each project you can have one or more packages. A package is a self-contained add-on item, and can be an aircraft, an airport, some scenery, a mission, etc... To create each of the packages in the project you need to add asset groups which are the individual components that go together to make up the package. For example, an Airport package may have BGL, MaterialLib and ModelLib asset groups. In this section we'll walk you through the creation of all these parts - project, package and asset groups - from the beginning.
To start with you will need to create a new project which is done from the New Project option in the [DevMode] menu, or by opening the Project Editor and then selecting New Project from the Project menu. Either will open the open the "Create New Project" window:
Here you give a location where the project folder will be saved to (this folder is where all the package source files will be stored for the entire project), and the name of the project. Clicking Create New Project will create the <ProjectName>.xml file. If you have no yet defined a default creator name or company name, you may also supply these here, otherwise the fields will be pre-filled with the default names (which you can change if required). You will then be shown the following window:
 Here you want to select the Package option, as that's the most basic first step in creating add-on content for Microsoft Flight Simulator 2020. We'll not be covering the Bundles & Packs option here, but you can find more information on the following page:
We'll also cover the Import Item option further down this page.
After this you will then be shown the New Package Wizard. where you give the package details. Every project that you make for Microsoft Flight Simulator 2020 must contain at least one package, which is a collection of files that will be bundled together to create the final add-on for the simulation. For example, you could have a package that adds scenery to the world, or adds an aircraft, or changes the livery of an existing aircraft. Your project can even contain multiple individual packages that do all these things and more. So, the first thing that you are required to do when you create a new project is add an initial package.
Adding A Package
The New Package Wizard is shown when you initially create a new project and name the initial package, or it will open when you click the Add Package button from the main Project Editor window:

Each of these buttons is a wizard to help you though the asset group creation process for your package. Currently you have a choice of three main package types:
- Airport: Airport packages are discussed in more detail on the page Creating Or Replacing An Airport
- Visual Effect: Visual effect packages are discussed in detail on the page about The Visual Effects Editor
- Custom: This package type is used for anything that is not covered by the wizards listed above
Since the other wizards are covered elsewhere in the documentation, we'll be using the Custom type, so click the Custom button and note how the window will changes:
 Here you need to give the following details about the package that you are creating:
- Display Title: The title that will be displayed for the package in the content manager and on the Marketplace. A maximum of 50 characters.
- Company Name: This will contain the name of the company in relation to the package. This will be the default name supplied for the project, but can be changed on a per-package basis.
- Package Name: The name of the package. There are some strict rules on how the package should be named depending on the contents of the package, and they should all be based on the following schema:
developer - type ( - subtype ) - name-of-asset ( - variation-of-named-asset ) ( - subcontent )
NOTE: The package name has a maximum length of 128 characters. Below you can find more precise examples of how this naming convention can be applied to the main packages that will be made using the SDK (if a type of package is not mentioned here then you are free to name it as you see fit, but it's recommended to adopt the above shown formatting structure - for example a visual effects package could be named<company>-vfx-<name>):- Airports:
<company>-airport-<ICAO>-<airport_name>, for example -mcsweeneyassets-airport-ksea-seattle-tacoma - Aircraft:
<company>-aircraft-<aircraft_name>, for example -mcsweeneyassets-aircraft-dr400 - Aircraft Liveries:
<company>-aircraft-<aircraft_name>-livery-<livery_name>, for example -mcsweeneyassets-aircraft-dr400-livery-xbox-aviators - Landing Challenges:
<company>-landingchalenge-<ICAO>-<name>, for example -mcsweeneyassets-landingchallenge-eidl-donegal - Discovery Missions:
<company>-discovery-<name>, for example -mcsweeneyassets-discovery-copenhagen - Bushtrips:
<company>-bushtrip-<name>, for example -mcsweeneyassets-bushtrip-alaska - Model Libraries:
<company>-modellib-<name>, for example -mcsweeneyassets-modellib-props - SimObjects:
<company>-simobjects-<type>, for example -mcsweeneyassets-simobjects-characters - Scenery:
<company>-scenery-<name>, for example -mcsweeneyassets-scenery-cliffsofdover
- Airports:
- Content-Type: The type of package that you are making. The available content types are shown below:
 Which one of these different content types you select will depend on the package you are creating and the choice should follow these rules:
- Unknown - This package type will only be shown when none of the types listed below are selected. This type will not permit you to build a package and a content type must be set before you can (this is done from the Inspector window for the package)
- Aircraft - This package type is only for use when adding a new aircraft model to the simulator, and will require you to use The Aircraft Editor. If you select this type of content then an additional option will be shown:
- Manufacturer. This is the name of the manufacturer of the aircraft being referenced in the package.
- Instruments - This package type permits you to bundle cockpit instruments together for use in several aircraft.
- Scenery - This package type is for scenery elements made using the The Scenery Editor (and is also used for Airports, but you should use the Airport Wizard as explained here instead)
- Livery - This package type is for adding liveries to existing aircraft.
- Mission - This package type is for creating missions using the The Script Editor.
- Misc - This package type is for use for anything that doesn't fit into any of the "main" package types listed above (like Visual Effects, for example).
Once you have filled in the required data and selected the package type you would click on the Create button.
Adding An Asset Group
When you first add a package, a new window will open where you can add your first Asset Group to the package:
NOTE: All packages require at least one Asset Group, although you can add more later through the Inspector window, if required.

Here you need to give the following details:
- Asset Group Name: This is the name of the Asset Group as it will be shown in the Project Editor
- Asset Type: This is the type of asset that is being added to the package. You can finds a complete list of available assets on the Asset Types page of the documentation.
- Template: Some assets have "templates" that can be used to create a base on which to build the asset. If one or more is available they will be listed in this section and you can click on the one you want to use to select it. If you click the wrong one, or do not wish to use a template, simply click on it again to deselect it.
Once you have added the asset group, it will be shown beside the package in the Project Editor:
 From the project editor, you can then click on the listed items that compriose the project to get further information about them in the Inspector window, which can be opened from the View menu if it hasn't opened automatically.
If you click on the asset group that was just added, you will see that the relative paths within the project for the packages assets and output have already been set up for you and you can then click the Load In Editor button (if available for the asset group type) to open the asset in the relevant Dev Mode editor and start working on it.

Adding Further Asset Groups And Packages
If a package needs to have multiple asset groups - for example, a scenery package may also require ModelLibs or Materials - then this can be done by selecting the package in the Project Editor, and then clicking the Add Asset Group button at the bottom of the Inspector window:

This is also how you would add assets if you cancelled the initial package wizard when you first created the package.
You can also have multiple packages in the same project - for example, you can have an aircraft package along with a couple of livery packages. To add a new package to the project you need to click the Add Item button at the bottom of the Project Editor and select the Package option:

This will then open the Package Wizard, and you can begin the process explained at the top of this page in the Adding A Package section. The other option available from the Add Item button - Bundle / Pack - is explained here: Bundles And Packs
Building A Package
Once you have added the assets and made the editions you need, you can build the package and test it in the simulation. This can be done by clicking the Build package button at the bottom of the Inspector window for the package:
 This will build (compile) the package into a format that can be used by the simulation, and save it to the
 Packages folder within the project files. This package can then be zipped and shared with other users, who can unzip it into The Community Folder and see the package contents in their version of Microsoft Flight Simulator 2020. The Build package button will also temporarily add the package to the simulation. So, if it is - for example - an aircraft, you can test it by going to the main menu and looking for it in the available aircraft.
NOTE: The build progress can be tracked by opening the console (in the menu bar choose Debug > The Console).
If your project has multiple packages - or you want to build a package for Microsoft Marketplace - then an alternative to building them individually is to use the Build & Export option from the Project Editor Project menu. This will build all the packages within the project at the same time, adding them all to the simulation and saving them to the Packages folder. This option is explained in more detail on the page covering the Export Window.
Importing Packages
It may be that you want to consolidate multiple packages within a single project - for example, an aircraft along with it's liveries - or you may want to create a project that is to be used for creating Bundles and/or Packs. You can import packages in one of two ways:
- When Creating A New Project: When you create a new project, the New Project Wizard will give you the option to import an exisiting package from another project:

- As Part Of An Exisiting Project: When you have an exisiting project open in the Project Editor, you can click on the
Import Itembutton:

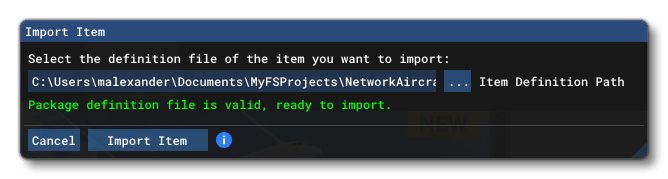
In either case, you will be presented with a new window asking you to provide the path to the package definition file (XML) for the package that is to be imported:

If you click the ... button, a file explorer window will open and you can navigate to the PackageDefinitions folder where you will find the XML file that defines the package you want to import:

Once you select the XML file to import, the Import Item window will show a message saying that the XML file chosen is correct and that you can continue to import the package:
When the package import process has finished it will be listed in the Project Editor along with any other packages that the project contains.
The Inspector
The Inspector window can be opened from the View menu of the Project Editor and is used to show additional information about the Packages and Asset Groups that are currently listed as part of the project. To change the item being inspected, simply click on it in the Project Editor Package List (note that you can expand a package to see it's contents by clicking on the little arrow on the left):

The Package Inspector
 When you select a package from the list in the Project Editor, the Inspector window will change and two tabs are available for editing.
Summary Content Manager
The Summary Content Manager tab is where you set the main meta-data for the selected package. Some of the data here is already set based on information you gave when you created both the project and the package, but it can all be edited and changes as required. The available options are:
- Version: Here you can give the version number of the package. You can input the values directly or use the
+/-buttons to increment/decrement the values.
- Company Name: The name of the company or individual that is responsible for the project. This field cannot be left blank.
- Package Name: The name of the package. There are some strict rules on how the package should be named depending on the contents of the package, which are listed in the Adding A Package section, above. If you edit this here, you will need to click on the
Update Package Nameto apply the changes.
- Manufacturer: The name of the manufacturer of the aircraft being recreated in the package (this is only required when creating an aircraft package and can be ignored for anything else).
- Title: The package Title is essentially the "display name" for the package that the end-user will see, and is also the display name for the package on the Marketplace.
- Creator: The name of the company or user(s) that has created the package.
- Content-Type: The general type of package that is being inspected. The different types available are explained in full in the section on Adding A Package.
- Content Manager Thumbnail: This is where you must add a thumbnail image that represents the package contents. You can click on the image to open a browser and select an image from a file, or - if you are creating an Aircraft package - you can browse to the hangar and select the aircraft then click the
Capture Aircraft Thumbnailbutton to generate an image form the current hangar camera. The image should be authored at 420px * 170px using theJPGformat. Note that you can setup The Aircraft Thumbnail Capture Tool to generate this image as part of a Capture Set.
NOTE: This image is obligatory, and will lead to errors when building the package if it is not supplied.
- Marketplace Data: Clicking the
Add Marketplace Databutton this will change the Inspector to the Marketplace window, where you can add information and setup the Microsoft Marketplace meta-data. Full details of this process can be found on the Marketplace Data page.
- Asset Groups: This section lists all the asset groups that have been added to the package. You can click the
Editbutton to open the asset group in the Inspector for editing, or you can click theRemovebutton to remove the asset group from the package. You can also add further asset groups to the package by clicking on the(+)Add Asset Groupbutton and then selecting the asset group type to add, which will open the Add Asset Group window as explained in the Adding An Asset Group section, above. You can then edit the group details from The Asset Group Inspector, if required. For information on the different assets that can be added, see the page on Asset Types.
Build Package: This button will build the package, compiling it and placing it in the package output folder, as well as add it - temporarily - to the simulation. Note that this will not remove any files that have previously been output by a build and will simply overwrite existing files. Use theClean Packageoption to clean the output folder first if you have issues.
Clean Package: This button will clean the package output folder, removing any previously built versions of the package and the files it contains.
Release Notes
 This tab permits you to add release notes for each version/update of the package. To start with this section will be empty, and you need to click the
 + button at the bottom to add the first (and subsequent) set of release notes to the list. Beside that button is the X button that can be used to remove any release notes from the list. Once you have added a set of release notes you can start to set the following values:
- Version: The version number that the release notes refer to.
- Date: The date on which the package is released.
- Text: The Release Notes text that explains the contents/changes/updates for the package version.
It is worth noting that the release note text can use MarkDown, so you can easily add some basic formatting to them (like bullet points, bold text, etc...).
The Asset Group Inspector
When you select an asset group from the Project Editor list, the Inspector window will change to show the following input fields:
- Name: This is the name of the Asset Group as it will be shown in the Project Editor list
- Type: This is the type of the asset, as set when it was first added to the package. This can be changed if required, although you should ensure that the sources for the asset group are adequate for the selected type. You can find information on the different asset types here: Asset Types.
- AssetDir: This is the folder where the source files for the asset group will be stored. This will be automatically created for you when you add an asset group to a package, however you can click the
...button to change the directory. - OutputDir: This is the folder where the compiled contents of the asset group will be stored. This path is relative to the
Packagesfolder, which in turn will be inside the main project folder. If you want to edit this path, you need to manually edit the contents of the field, then pressEnterto validate it. You can check the path location using the...button to open a file explorer, but this will not set the path to any folder you select.
The Bundles & Packs Inspector

When you select a pack or a bundle from the Project Editor list, the Inspector window will change to show details related to the pack or bundle. You can find information on this here: