AIRCRAFT CATEGORY PROFILES
IMPORTANT! Please note that this page is a work in progress and as such may not contain correct or final information and is provided as a reference only for those people that wish to check progress on this feature.
The purpose of general profiles and aircraft category profiles, is to create control configurations for specific devices and as such, this section is aimed more at device manufacturers rather than aircraft developers. That said, there is nothing stopping any individual from using this process to create general/aircraft category profiles for their favourite or personal controller configuration. If you wish to create an input profile for a specific aircraft please see the following page:
Package Setup
Before starting to create device profiles, we recommend that you fist create the base package which is going to be used to share the final profiles publicly. For that the first thing you need to do is run the simulation and then open The Project Editor and from the Project menu, select New Project then fill in the package details:

Once you have given the basic details for the project, clicking Create New Project will open the Publishing Item Selection window, and here you need to select Package, then click Next. You can then select the Package Type, which for the purpose of device inputs, should be Custom, and the type should be MISC (as shown in the image below).

On the final page of the package wizard, you need to give the name of the asset group which should be:
- Aircraft - if you are creating device profiles for multiple aircraft categories then this should be the name of the aircraft category you are creating, ie: "Airplane", "Helicopter", "Airship", etc...
- General - If you are creating a general profile, then simply supplying "General" should suffice.
You should also ensure that the asset type is set to Copy:

Once this has been done, the final step is to edit the AssetDir and OutputDir for the asset group in the , as the auto-generated paths will not be correct. The following paths should be used:
- For a general profile:
- Set the AssetDir to
PackageSource\InputProfiles\General\[DEVICENAME]\ - Set the OutputDir to
InputProfiles\General\
- Set the AssetDir to
- For aircraft category profiles:
- Set the AssetDir to
PackageSource\InputProfiles\Categories\[AIRCRAFT_CATEGORY]\[DEVICENAME]\ - Set the OutputDir to
InputProfiles\Categories\[AIRCRAFT_CATEGORY]\
- Set the AssetDir to

When setting this up, you may need to delete the "Copy" folder that was created originally, and we recommend that you also add a Sources folder beside the PackageSources and PackageDefinitions folders (as shown here: General Package Folder Structure). This folder will be where you will store the device project files, ie: the files used to create the device profiles that are not meant to be included in the package itself.
Input App Setup
To create a general device profile or device profiles for multiple aircraft types, it can be done in two ways, both explained in the sub-sections below. It should be noted, however, that using the InputProfilesSample file is the recommended way to create device profiles.
Before continuing, you should have the controller you wish to create a profile for already plugged into your PC. If you do not have access to the controller, you can still create a profile, but it will be much harder as you will need to add the device inputs manually and know certain details about the device (like the product ID, hardware version, input names, etc...)
Creating A New InputApp Project
When you open the Input Application it will be pre-populated with all the available Actions, and also have three device profiles pre-created for you: Keyboard, Mouse, Controller (XBox One For Windows). You should go ahead and save the project to your Sources folder before doing anything further - giving it an appropriate name, and keeping the device folder set to Default - so that your changes are stored safely.

If you have the device you want to create profiles for connected to the PC, then that should also be listed in the Device Profiles (it needs to have been plugged in before you opened the app), for example:

If it is not listed - or you do not have the device available - then you can click on the ![]() button to add a new profile, using the following rules:
button to add a new profile, using the following rules:
- If your device is Xbox compatible you should choose:
- Xbox series Stick for any device which is not an official Xbox gamepad, nor a keyboard, or a mouse.
- Xbox series Gamepad for an official XBox gamepad device.
- Keyboard for any keyboard device.
- Mouse for any mouse device.
- If your device is PC Compatible you should choose:
- Keyboard for any keyboard device.
- Mouse for any mouse device.
- XInput Gamepad for any gamepad device which is compatible with PC.
- XR Controller Left / right for VR/AR controller devices.
- Tobbi if you are using any official Tobii controller.
Once you have added the device, you can click on the ![]() button to rename it, and then click the
button to rename it, and then click the ![]() button to setup the device properties if you have the relevant details:
button to setup the device properties if you have the relevant details:

If you plan on creating seperate device profiles for each aircraft category then you would first set up the plane profile to be the "base", and then click the ![]() button to duplicate this profile, rename it for the next aircraft category you want to edit, and repeat the process of binding actions to the device in a specific way for the new aircraft category. If you are just creating a general device profile, then you would simply bind actions in this single device profile. You can find out how to bind actions to device inputs in the following section:
button to duplicate this profile, rename it for the next aircraft category you want to edit, and repeat the process of binding actions to the device in a specific way for the new aircraft category. If you are just creating a general device profile, then you would simply bind actions in this single device profile. You can find out how to bind actions to device inputs in the following section:
Using The InputProfilesSample Project
Open the Input Application and then load in the InputProfilesSample.inputdb file, which gives you a base project to work from. This base project has a number of device profiles already created and prepared for all the different aircraft categories. This means you can simply duplicate and edit one of the existing profiles and use it for your own device, getting a head-start on the device profile creation process. This is the recommended way to create device profiles.
To duplicate a profile, first select it from the drop down list of existing profiles. For this example we will duplicate the Sample_Keyboard_Airplane profile:

Once it has been selected (1) you can click on the ![]() button (2) to duplicate this profile, and then use the
button (2) to duplicate this profile, and then use the ![]() button (3) to rename it to something appropriate, eg: "Keyboard_Airplane_MyDevice" (4).
button (3) to rename it to something appropriate, eg: "Keyboard_Airplane_MyDevice" (4).

Once you have the new device profile setup, you will want to save the project. The path should be set to your Sources folder, and the devices folder should be set to default:
Now you have saved out the project, you can go ahead and start to create or modify bindings. This is explained in the section below:
Binding Actions To Device Input
Once you have set up the input device and created a profile - either as a general profile, or as a profile for an aircraft category - it should be selected so that you can start setting up the specific action/input bindings. A binding is when you assign an input (or combined inputs) from a device to a specific Input Event Action. This is done by following these general steps:
- Find the Input Event Action that you want to bind to a controller input. This is made simpler by using the Search window, which you can open from The Edit Menu.
- Once you have selected the event to bind, you can click on the Modify Binding button
 to open the Input window:

- In the Input window you can click on the magnifying glass button
 (which will turn red) and then press a button, move an axis, etc..., on the input device. This will populate the Input window with the ID of the input used. If the binding requires two or more concurrent inputs, then you should go ahead and press/move the next input(s). When finished, click the
  button again. The image below shows an example of a binding using two gamepad buttons:
 If you make a mistake, you can click on the clear inputs button
  to reset the input. If you do not have the physical device then you can still add inputs by manually typing in the input values to bind, as long as you know what they are.
- At this point you would set any modifiers as appropriate for the type of input from the device and the input action it's being bound to, for example sending a specific value, or having the input happen only when the button is released. For more information these modifiers please see here: Override Action Type
- You can then repeat this process for each of the input event actions that you wish to bind device input to. Note that if you make a mistake at any time, you can click on the clear binding button
 to remove the binding, and if you need to start again you can click on the clear all bindings button at the top of the bindings section to clear all bindings.
Following these steps you should be able to start to setup bindings for your device, either as a general set of bindings, or as specific bindings for different aircraft types. If you are creating multiple profiles so the device has inputs specific to airplanes, helicopters, gliders, etc... then just repeat the process of creating a new profile (or duplicating an existing one), then follow the steps above again for each action you want to assign to an input.
Example Bindings
To give an example of how bindings are created and then displayed in the simulation UI, we will be using a copy of the Sample_Keyboard_Airplane profile from the InputProfilesSample.inputdb sample project (see Using The InputProfilesSample Project for details). After creating the duplicate version of this profile, we will adapt it to include additional inputs.
The first thing to do is hide the actions that have no inputs assigned to them, making it easier to see what has been defined already. This is done by clicking the filter button ![]() , which will filter the list:
, which will filter the list:

After filtering you can see that we have some actions related to the airplane throttle, however the current mapping does not allow the user to control throttle controls separately. So, for this example, we want to change this to allow separate controls for throttle 1 and throttle 2. To start with, we want to remove the existing increment / decrement throttle bindings using the clear binding button ![]() :
:

We can then unfilter the action list (click the filter button ![]() again), and open the Search tool. In the tool we search for the
again), and open the Search tool. In the tool we search for the KEY_THROTTLE1_INCR action:

Once we have found the action, then we can click on the start input scan button ![]() to open the Input window, where we click on the magnifying glass button
to open the Input window, where we click on the magnifying glass button ![]() (which will turn red) and then press the "
(which will turn red) and then press the "R" key, and click Okay.

We can now repeat all the previous steps to map all the throttle 1 and 2 actions, as follows:
KEY_THROTTLE1_DECR→FKEY_THROTTLE2_INCR→TKEY_THROTTLE2_DECR→G
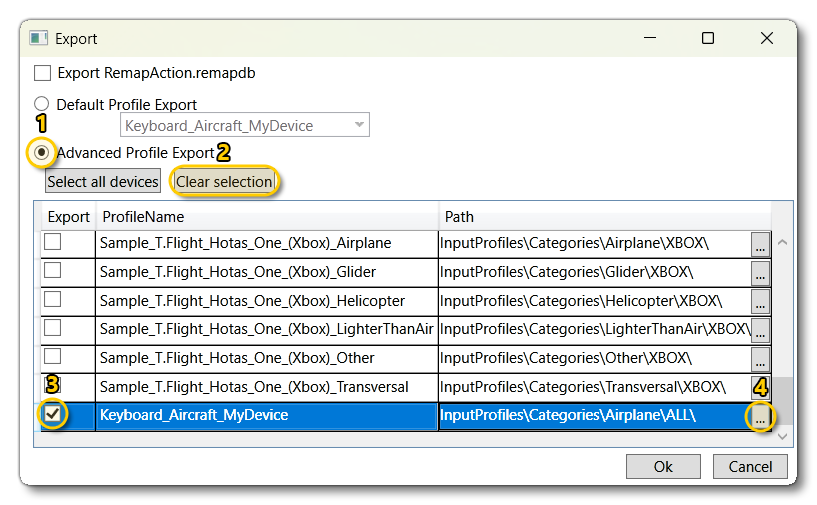
Once that has been done we can save the project to the Sources folder, and then use the Export option to output the necessary files to the PackageSources folder. In the Export window we will use the Advanced Profile Export option (1), then click on the Clear Selection button to remove all profiles from the export (2) as - for this example - we will only be exporting the profile we have just created. Then we select the profile (3) and finally set the path to the PackageSources path we want to export the profile to (4):
In this example the output path is:
[root]\PackageSource\InputProfiles\Categories\Airplane\MyDevice\