ADDING AIRCRAFT VFX
When it comes to creating a realistic aircraft add-on for Microsoft Flight Simulator 2024, a core feature that is often overlooked is the addition of visual effects (VFX). These can be used to simulate the heat shimmer from an engine, the dust thrown up when landing, the fumes from an exhaust port, etc... Making your own VFX is relatively simple, thanks to The Visual Effects Editor, and there are a number of pre-made effects included with the simulation that you can use as well. However, creating or having an effect is only the first part of using it, as you will also need to add information into the aircraft files to specify when and where the effect should be used. This is done using the Model Behaviors XML and some Templates that have been created to simplify the process.
Using An Existing VFX Template
The simplest way to add VFX to an aircraft is to use one of the VFX that have already been created for the simulation and that are available through the various Visual Effects Templates. For example, if you want to include a heat distortion effect to the engines of the aircraft, you would use the FX_Heat_Engine VFX which is referenced through the ASOBO_ET_FX_HEAT_ENGINE template.
Once you have identified the VFX that you want to add, you will need to include it in the Model Behaviors for the part of the aircraft where it will be used, within a <Component> element (and you can have multiple components to define multiple VFX). You will also need to include the relevant model behavior template in the behavior XML. For example:
<ModelBehaviors>
    <!-- INCLUDES -->
    <Include ModelBehaviorFile="ASOBO_EX1\Common\Exterior\Templates\VFX.xml"/>
    ...
    <!-- VFX COMPONENTS -->
    <Component ID="ENGINE_VFX">
        ...
    </Component>
    <!-- further components as required -->
</ModelBehaviors>
With this basic setup, you can go ahead and add in the different sub-components that will spawn the VFX. For this you will need to reference the appropriate template using the <UseTemplate> element. Note that some templates will require additional parameters to be included as elements as well. For example, the ASOBO_ET_FX_HEAT_ENGINE template also needs you to supply a VFX Helper or Contact Point to define where the effect should be placed, as well as the index of the engine that the effect will be spawned on and the diameter of the engine exhaust (these values are used to modulate the effect based on the condition of the engine). The full component will look something like this:
<Component ID="ENGINE_LEFT">
    <FX_NODE>ATTACH_FX_Heat_Engine_LEFT</FX_NODE>
    <FX_GRAPH_PARAM_0>engineDiameter, 0.46</FX_GRAPH_PARAM_0>
    <FX_GRAPH_PARAM_1>engineIndex, 1</FX_GRAPH_PARAM_1>
</Component>
Using this example, the full engine VFX component will look like this in the behavior XML file:
<ModelBehaviors>
    <Include ModelBehaviorFile="ASOBO_EX1\Common\Exterior\Templates\VFX.xml"/>
    <Component ID="ENGINE_VFX">
        <Component ID="ENGINE_LEFT">
            <FX_NODE>ATTACH_FX_Heat_Engine_LEFT</FX_NODE>
            <FX_GRAPH_PARAM_0>engineDiameter, 0.46</FX_GRAPH_PARAM_0>
            <FX_GRAPH_PARAM_1>engineIndex, 1</FX_GRAPH_PARAM_1>
        </Component>
        <Component ID="ENGINE_RIGHT">
            <FX_NODE>ATTACH_FX_Heat_Engine_RIGHT</FX_NODE>
            <FX_GRAPH_PARAM_0>engineDiameter, 0.46</FX_GRAPH_PARAM_0>
            <FX_GRAPH_PARAM_1>engineIndex, 2</FX_GRAPH_PARAM_1>
        </Component>
    </Component>
</ModelBehaviors>
It should be noted that all the included VFX templates use the same basic set of elements to modify the effect, and you can find them all listed on the following page:
You can also find instructions for using the most common VFX templates on the following page:
This is all you need to know to use the VFX that are included with the simulation, and you can go ahead and use the format outlined above to add in all the most common VFX without having to create your own or do any extra work.
VFX Helpers
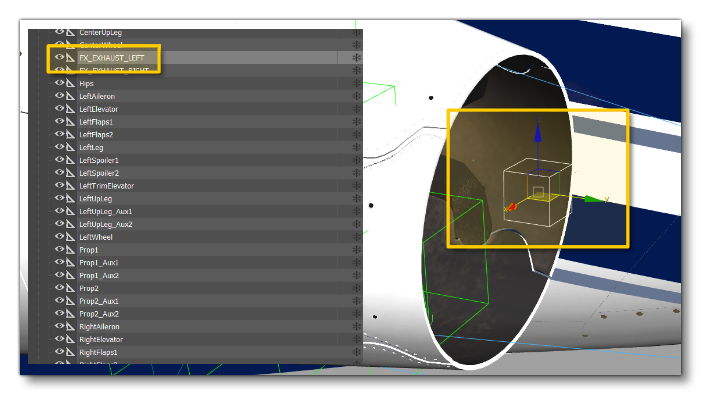
One of the ways to place a visual effect on your aircraft is to use a helper node on the model. This is useful when you need the VFX to be attached to a moving part (the helper node can be parented to an animated part, for example), or if you need to place the VFX with more precison than the <FX_Offset_X>, <FX_Offset_X>, <FX_Offset_X> XML template parameters. If you go the helper route, it is very important to note that the Y-axis must be oriented along the axis of emission for the VFX you want to use, eg:

Once you have the node on the model it can be used in the VFX component when calling the required template, for example:
<Component ID="FX_HEAT_EXHAUST">
<UseTemplate Name="ASOBO_ET_FX_HEAT_EXHAUST">
<FX_NODE>ATTACH_FX_Heat_Apu</FX_NODE>
<FX_CODE>(A:APU PCT RPM, Percent) 0 ></FX_CODE>
<FX_GRAPH_PARAM_0>exhaustDiameter, 0.26</FX_GRAPH_PARAM_0>
<FX_GRAPH_PARAM_1>aircraftType, 0</FX_GRAPH_PARAM_1>
<FX_GRAPH_PARAM_2>isAPU, 1</FX_GRAPH_PARAM_1>
</UseTemplate>
</Component>
Contact Points
Many of the available VFX require a contact point to be supplied as the point where a VFX will be spawned (for example, FX_Landing_Dust). This is done through the use of the <FX_CONTACT_POINT_ID_N> element tag when you call the appropriate template. In Microsoft Flight Simulator 2024, contact points have unique names, and these are given to the XML using the following format: 'CONTACT_POINT_NAME'_n. For example:
<Component ID="FX_LANDING_FLOATS">
    <UseTemplate Name="ASOBO_ET_FX_LANDING_CP">
        <FX_CONTACT_POINT_ID_0>'Float_BackLeft'_n</FX_CONTACT_POINT_ID_0>
        <FX_CONTACT_POINT_ID_1>'Float_BackRight'_n</FX_CONTACT_POINT_ID_1>
        <TEMPLATE_0>ASOBO_ET_FX_LANDING_WATER_FLOAT_CP</TEMPLATE_0>
    </UseTemplate>
</Component>