AIRPORT ARCHETYPE OVERRIDES
 On this page we list all the different options available to override the selected airport archetype. These options will play a part in how some areas of your airport will be rendered. In general you should only need to select one of the default Archetype options that are presented in the drop down menu at the top, and only continue on to edit the various archetype sub-sections listed under this menu option, if necessary. The default archetypes will enabled / disable certain ground details options as well as change the quantity and spacing of the enabled details based on the size of the airport.
NOTE: If you are editing a legacy airport and wish the ground features look like they did in previous versions, you should select the "Legacy Airport" option. This will enable only the Runway Tire Gum option.
Each archetype sub-section is listed below with a description of the available parameters and their effect. The options provided are designed to create the general look you want for the features, but without any guaranteed specific placing or graphic(s) being used. It should be noted that some of these effects are based on a random seed which is based on airport ICAO. This means that RNG-dependent effects will be different from one airport to another, but all users at the same airport should see the same things in the same places.
Taxiway Tire Gum

The options here are used to customise the way the tire residue decals on the airport taxiway corners looks. These decals will be applied automatically by the simulation based on the amount of curve of the taxiway and the min/max values specified. When checked, each of the following options can be edited to change the visual appearance of the taxiway tire gum:
- Override Opacity: This will change the opacity (alpha) of the decal, and should be between 0 (invisible) and 1 (fully opaque).
- Override Material: Here you can choose to override the default material with another one from The Material Editor. To apply a new material, open the Material editor, find the material to use, click on it, and drag it onto the Material Name button.
- Override Tiling: Changing the value here will change the amount that the decal material is tiled.
- Override Min Count: This value sets the minimum number of decals that can be overlaid (the actual amount will be a random number between the min and max count values).
- Override Max Count: This value sets the maximum number of decals that can be overlaid (the actual amount will be a random number between the min and max count values).
- Override Random Rotation: This value sets the variation in angle for each of the overlaid decals.
- Override Random Translation: This value sets the variation in the translation offset for each of the overlaid decals.
- Override Mean Width: This value can be used to control the mean/average width (in meters) over which the tire gum decals will be applied.
- Override Min Density: This value sits the minimum density for the tire gum decals.
- Override Max Density:This value sits the maximum density for the tire gum decals.
Runway Tire Gum

The options here are used to customise the way the tire residue decal on the runway looks. When checked, each of the following options can be edited to change the visual appearance of the runway tire gum:
- Override Opacity: This will change the opacity (alpha) of the decal, and should be between 0 (invisible) and 1 (fully opaque).
- Override Opacity Variance: This will change the amount of random variance in the decal opacity (alpha) that is applied, from 0 (no variance) to 1 (full variance).
- Override Material: Here you can choose to override the default material with another one from The Material Editor. To apply a new material, open the Material editor, find the material to use, click on it, and drag it onto the Material Name button.
- Override Width: Sets the relative width of the tire gum decal on the runway, where 1 is the un-scaled base decal width, 0.5 would be half the decal width, and 2 would double the decal width.
- Override Tiling V: Sets the horizontal tiling amount for the decal material.
- Override Aiming Point Ratio: Sets the distance ratio from the runway aiming point after which the tire gum decal should be stretched. A ratio of 1 will have the decal stretched after the aiming point the same amount as before, 0.5 will be half that distance, 2 will be double that distance.
Runway Crack

The options here are used to customise the way any cracked areas of the runway will look. When checked, each of the following options can be edited to change the visual appearance of the cracks:
- Override Opacity: This will change the opacity (alpha) of the decal, and should be between 0 (invisible) and 1 (fully opaque).
- Override Material: Here you can choose to override the default material with another one from The Material Editor. To apply a new material, open the Material editor, find the material to use, click on it, and drag it onto the Material Name button.
- Override Material Tiling: This value essentially sets the scale of the material being used. This value is almost always greater than 1, since normally you don't want to show the full cracks decal texture, but rather have the simulation only show a scaled random sample from it. The final appearance of the decal will also depend on the Mesh Tiling value.
- Override Mesh Tiling: This will affect the way that the material texture is sampled and displayed, as the simulation uses the mesh vertex count to define the "patches" within the decal to be displayed. A high density mesh (ie: lower values) will show a more "noisy" sample from the material, while a lower density mesh (ie: higher values) will show a less noisy sample. The image below uses a test material to better show what the effect this will have looks like:

- Override Width Min: This value sets the minimum width for the cracks mesh (the actual width will be a random number between the min and max values).
- Override Width Max: This value sets the maximum width for the cracks mesh (the actual width will be a random number between the min and max values).
- Override Length Min: This value sets the minimum length for the cracks mesh (the actual length will be a random number between the min and max values).
- Override Length Max: This value sets the maximum length for the cracks mesh (the actual length will be a random number between the min and max values).
- Override Density: This value sets the density of the cracks that will be added between the min/max length and width.
- Override Profile: This permits you to set a specific "damage profile" for where the cracks will be clustered. You have the following options:
- Uniform: cracks will be scattered in a uniform away anywhere on the runways and roadways that have them.
- Centered: cracks will be mainly concentrated along the center of the runways and roadways that have them.
- Edges: cracks will be mainly concentrated along the edges of the runways and roadways that have them.
- Override Markings: Checking this will permit you to choose whether to have the cracks decals drawn over or under the runway markings.
Sealed Joint

The options here are used to customise the way that decals showing sealed up cracks (joints) in the runway are displayed. When checked, each of the following options can be edited to change the visual appearance of these sealed up joints:
IMPORTANT! The sealed joints and the runway patches use the same random seed to generate their images, therefor changing the values of any of the properties here will change that random seed value, and thus affect the appearance of runway patches too.
- Override Opacity: This will change the opacity (alpha) of the decals, and should be between 0 (invisible) and 1 (fully opaque).
- Override Base Material: Here you can choose to override the underlying "base" material (which defines the cracks and joints that are then going to be sealed) with another one from The Material Editor. To apply a new material, open the Material editor, ind the material to use, click on it, and drag it onto the Material Name button.
- Override Material: Here you can choose to override the default material with another one from The Material Editor. To apply a new material, open the Material editor, ind the material to use, click on it, and drag it onto the Material Name button.
- Override Material Tiling: This value essentially sets the scale of the material being used. This value is almost always greater than 1, since normally you don't want to show the full sealed joint decal texture, but rather have the simulation only show a scaled random sample from it. The final appearance of the decal will also depend on the Mesh Tiling value.
- Override Mesh Tiling: This will affect the way that the material texture is sampled and displayed, as the simulation uses the mesh vertex count to define the "patches" within the decal to be displayed. A high density mesh (ie: lower values) will show a more "noisy" sample from the material, while a lower density mesh (ie: higher values) will show a less noisy sample. The image below uses a test material to better show what the effect this will have looks like:
- Override Width Min: This value sets the minimum width for the sealed joint mesh (the actual width will be a random number between the min and max values).
- Override Width Max: This value sets the maximum width for the sealed joint mesh (the actual width will be a random number between the min and max values).
- Override Length Min: This value sets the minimum length for the sealed joint mesh (the actual length will be a random number between the min and max values).
- Override Length Max: This value sets the maximum length for the sealed joint mesh (the actual length will be a random number between the min and max values).
- Override Density: This value sets the density of the sealed joints that will be added between the min/max length and width.
- Override Profile: This permits you to set a specific "damage profile" for where the sealed joint decals will be clustered. You have the following options:
- Uniform: sealed joints will be scattered in a uniform away anywhere on the runways and roadways that have them.
- Centered: sealed joints will be mainly concentrated along the center of the runways and roadways that have them.
- Edges: sealed joints will be mainly concentrated along the edges of the runways and roadways that have them.
- Override Over Markings: Checking this will permit you to choose whether to have the sealed joint decals drawn over or under the runway markings.
Runway Patch

The options here are used to customise the way that repair patch decals in the runway are displayed. When checked, each of the following options can be edited to change the visual appearance of these patches:
IMPORTANT! The patches and the sealed joints overlays use the same random seed to generate their images, therefor changing the values of any of the properties here will change that random seed value, and thus affect the appearance of sealed joints too.
- Override Opacity: This will change the opacity (alpha) of the decals, and should be between 0 (invisible) and 1 (fully opaque).
- Override Material: Here you can choose to override the default materials with other ones from The Material Editor, remove materials, or add more. Each material should represent a single patch decal, and the simulation will choose one of the materials randomly for each patch applied to the runway. To add a new material click the
Add Matbutton, and to remove a material, simply click theXbutton beside the material name. To apply a material, open the Material editor, find the material to use, click on it, and drag it onto the Material Name button. - Override Colour Fade: This value (between 0 and 1) sets how much of the albedo texture colour for the patch materials will be blended with the underlying runway material colour. At 0, no colour from the patch will be used, and at 1, only the patch material colour will be used.
- Override Size Min: This value sets the minimum size of the patch decal (the actual size will be a random number between the min and max values).
- Override Size Max: This value sets the maximum size of the patch decal (the actual size will be a random number between the min and max values).
- Override Density: This value sets the density of the patches that will be added between the min/max length and width.
- Override Profile: This permits you to set a specific "damage profile" for where the patch decals will be clustered. You have the following options:
- Uniform: patches will be scattered in a uniform away anywhere on the runways and roadways that have them.
- Centered: patches will be mainly concentrated along the center of the runways and roadways that have them.
- Edges: patches will be mainly concentrated along the edges of the runways and roadways that have them.
Runway Grooving

The options here can be used to modify how the runway grooving looks, and has the following options:
- Override Opacity: This will change the opacity (alpha) of the grooving, and should be between 0 (invisible) and 1 (fully opaque).
- Override Material: Here you can choose to override the default material with another one from The Material Editor. To apply a new material, open the Material editor, find the material to use, click on it, and drag it onto the Material Name button.
- Override Tiling U: Sets the horizontal tiling amount (along the width of the runway).
- Override Tiling V: Sets the horizontal tiling amount (along the length of the runway).
- Override Min Length: Sets the minimum length that the runway needs to be to have the runway groove decals applied (in meters).
Asphalt Dirt
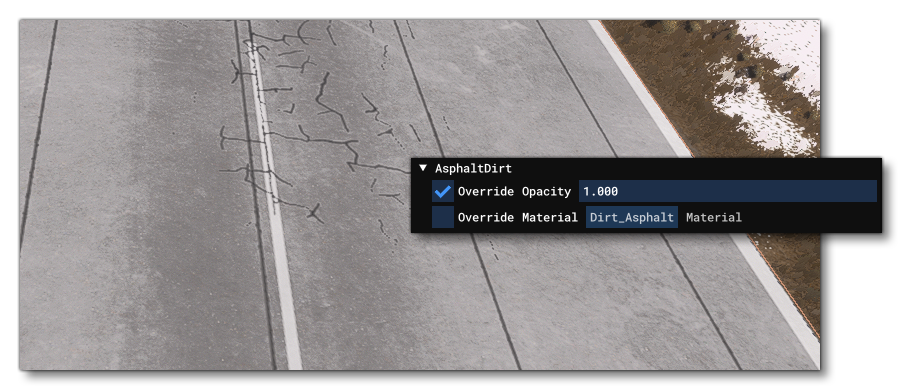

The options here can be used to modify how "dirty" the runway looks. This can be quite a subtle effect so the image above can be moused over to see the difference to a runway with and without the dirt textures applied. This section has the following options:
- Override Opacity: This will change the opacity (alpha) of the dirt material, and should be between 0 (invisible) and 1 (fully opaque).
- Override Material: Here you can choose to override the default material with another one from The Material Editor. To apply a new material, open the Material editor, find the material to use, click on it, and drag it onto the Material Name button. It should be noted that only the first texture - the albedo - is used in this override, where the RGB channels are interpreted such that:
- RGB values of 0.5 will produce no changes to the base colour.
- RGB values below 0.5 will darken the primary base colour.
- RGB values above 0.5 will lighten the primary base colour
- a value of 0.5 will produce no changes in the asphalt roughness.
- a value below 0.5 will reduce the roughness.
- a value above 0.5 will increase the roughness.
Taxiway Tire Stains
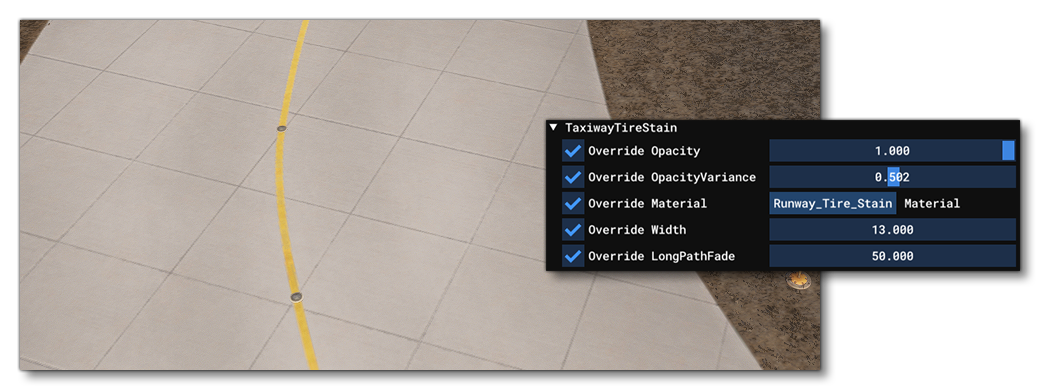

The options here can be used to modify how "stained" the taxiways look. This can be quite a subtle effect so the image above can be moused over to see the difference to a taxiway with and without the stain textures applied. This section has the following options:
- Override Opacity: This will change the opacity (alpha) of the tire stain material, and should be between 0 (invisible) and 1 (fully opaque).
- Override Opacity Variance: This will change the amount of random variance in the decal opacity (alpha) that is applied, from 0 (no variance) to 1 (full variance).
- Override Material: Here you can choose to override the default material with another one from The Material Editor. To apply a new material, open the Material editor, find the material to use, click on it, and drag it onto the Material Name button.
- Override Width: Sets the relative width of the tire gum decal on the runway, where 1 is the un-scaled base decal width, 0.5 would be half the decal width, and 2 would double the decal width.
- Override Long Path Fade: This sets the distance that the decal will be faded out over the length of the taxiway path.
Apron Patches

The options here are used to customise the way that repair patch decals on the aprons are displayed. When checked, each of the following options can be edited to change the visual appearance of these patches:
IMPORTANT! The patches and the sealed joints overlays use the same random seed to generate their images, therefor changing the values of any of the properties here will change that random seed value, and thus affect the appearance of sealed joints too.
- Override Opacity: This will change the opacity (alpha) of the asphalt patch material, and should be between 0 (invisible) and 1 (fully opaque).
- Override Material: Here you can choose to override the default materials with other ones from The Material Editor, remove materials, or add more. Each material should represent a single patch decal, and the simulation will choose one of the materials randomly for each patch applied to the apron. To add a new material click the
Add Matbutton, and to remove a material, simply click theXbutton beside the material name. To apply a material, open the Material editor, find the material to use, click on it, and drag it onto the Material Name button. - Override Size Min: This value sets the minimum size of the patch decal (the actual size will be a random number between the min and max values).
- Override Size Max: This value sets the maximum size of the patch decal (the actual size will be a random number between the min and max values).
- Override Density: This value sets the density of the patches that will be added between the min/max length and width.
Apron Stains

The options here can be used to modify the amount and type of "stains" visible on the aprons. This section has the following options:
- Override Opacity: This will change the opacity (alpha) of the apron stain material(s), and should be between 0 (invisible) and 1 (fully opaque).
- Override Material: Here you can choose to override the default materials with other ones from The Material Editor, remove materials, or add more. Each material should represent a single stain decal, and the simulation will choose one of the materials randomly for each patch applied to the apron. To add a new material click the
Add Matbutton, and to remove a material, simply click theXbutton beside the material name. To apply a material, open the Material editor, find the material to use, click on it, and drag it onto the Material Name button. - Override Size Min: This value sets the minimum size of the stain decal (the actual size will be a random number between the min and max values).
- Override Size Max: This value sets the maximum size of the stain decal (the actual size will be a random number between the min and max values).
- Override Density: This value sets the density of the stains that will be added between the min/max length and width.
Apron Car Tire Mark

The options here can be used to modify the effect of vehicles leaving tire marks on the apron over time. This section has the following options:
- Override Opacity: This will change the opacity (alpha) of the apron car tire mark material, and should be between 0 (invisible) and 1 (fully opaque).
- Override Material: Here you can choose to override the default materials with other ones from The Material Editor, remove materials, or add more. Each material should represent a single car tire mark decal, and the simulation will choose one of the materials randomly for each patch applied to the apron. To add a new material click the
Add Matbutton, and to remove a material, simply click theXbutton beside the material name. To apply a material, open the Material editor, find the material to use, click on it, and drag it onto the Material Name button. - Override Size Min: This value sets the minimum size of the car tire mark decal (the actual size will be a random number between the min and max values).
- Override Size Max: This value sets the maximum size of the car tire mark decal (the actual size will be a random number between the min and max values).
- Override Density: This value sets the density of the car tire mark that will be added between the min/max length and width.
Apron Crack

The options here are used to customise the way that any cracked areas on the apron will look. When checked, each of the following options can be edited to change the visual appearance of the cracks:
- Override Opacity: This will change the opacity (alpha) of the decal, and should be between 0 (invisible) and 1 (fully opaque).
- Override Material: Here you can choose to override the default material with another one from The Material Editor. To apply a new material, open the Material editor, find the material to use, click on it, and drag it onto the Material Name button.
- Override Material Tiling: This value essentially sets the scale of the material being used. This value is almost always greater than 1, since normally you don't want to show the full cracks decal texture, but rather have the simulation only show a scaled random sample from it. The final appearance of the decal will also depend on the Mesh Tiling value.
- Override Mesh Tiling: This will affect the way that the material texture is sampled and displayed, as the simulation uses the mesh vertex count to define the "patches" within the decal to be displayed. A high density mesh (ie: lower values) will show a more "noisy" sample from the material, while a lower density mesh (ie: higher values) will show a less noisy sample. The image below uses a test material to better show what the effect this will have looks like:
- Override Width Min: This value sets the minimum width for the cracks mesh (the actual width will be a random number between the min and max values).
- Override Width Max: This value sets the maximum width for the cracks mesh (the actual width will be a random number between the min and max values).
- Override Length Min: This value sets the minimum length for the cracks mesh (the actual length will be a random number between the min and max values).
- Override Length Max: This value sets the maximum length for the cracks mesh (the actual length will be a random number between the min and max values).
- Override Density: This value sets the density of the cracks that will be added between the min/max length and width.
Traffic

The options here can be used to modify the general traffic that may be present on the aprons. This section has the following options:
- Override Density: This will change the density of airport traffic around, where 0 is no traffic and 1 is the maximum amount permitted for the airport category.
- Override Variety Airport Category: This sets the category of traffic to override, where each value corresponds to an existing airport archetype:
- 0: Extra Small Airport
- 1: Small Airport
- 2: Medium Airport
- 3: Large Airport
- 4: Extra Large Airport
- 5: Extra Extra Large Airport
TaxiwaySign

The option can be used to modify the global look of any taxiway signs that have been placed around the airport:
- Override Emissive Intensity: Enabling this option will override the emissive intensity for all taxiway signs using the value given (in candela).