THE SYSTEMS TAB
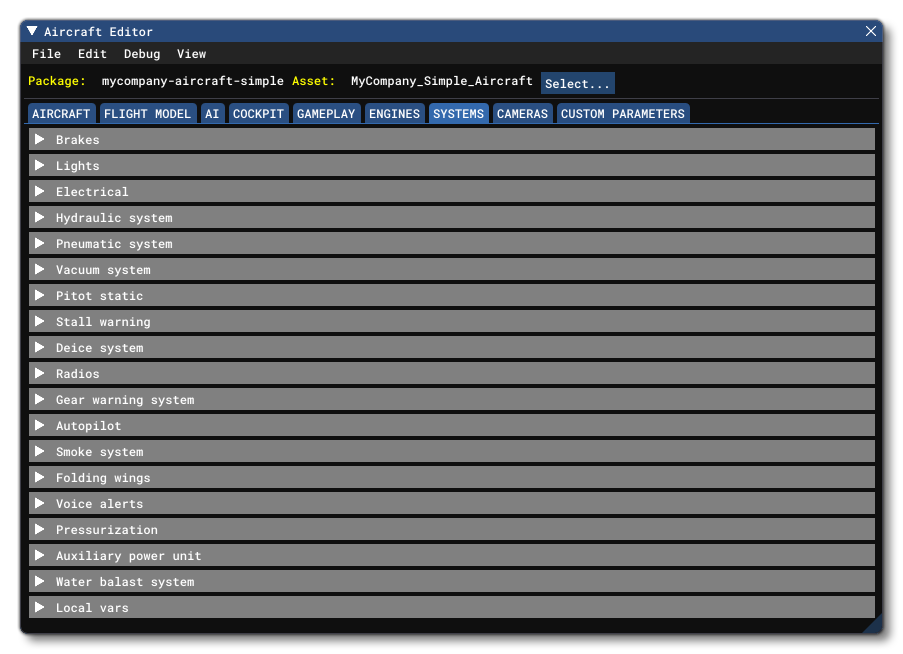
This tab covers most of the aircraft systems that are not directly related to the engines or the flight model. It is split into multiple sections which are all explained below.
Brakes
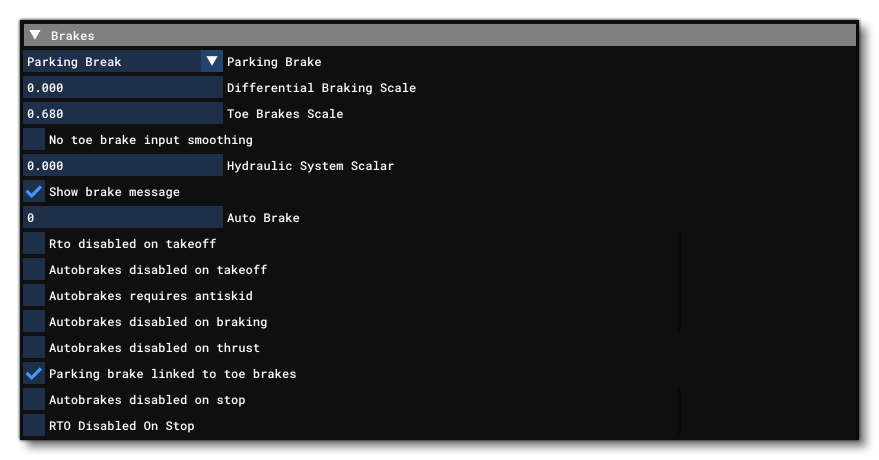
This section controls the aircraft's brake systems. Available parameters are:
- Parking Brake: The type of parking brake available. Can be one of the following:
- None
- Parking brake
- Ground restraint brake
- Differential Braking Scale: Differential braking is a function of using both brakes and the rudder pedal input. The amount of difference between the left and right brake is scaled by this value. Setting this to 0.0 means no differential braking is desired, while a setting of 1.0 is the normal setting for when differential braking is desired - which is particularly useful for tailwheel airplanes.
- Toe Brakes Scale: Sets the scaling of the toe braking effectiveness. Note that a setting of 0.0 scales the brakes to no effectiveness.
- Hydraulic System Scalar: On brakes dependent on the hydraulic system, this is the ratio of hydraulic system to maximum brake hydraulic pressure.
- Auto Brakes: The number of autobrakes available (0 means no autobrakes).
- RTO Disabled On Takeoff: Sets whether the autobrake is disabled (checked) or not (unchecked) for an RTO.
- Autobrakes Disabled On Takeoff: Sets whether the autobrake is disabled (checked) or not (unchecked) for takeoff.
- Autobrakes Requires Antiskid: Sets Whether the autobrake systems require anti-skid (checked) or not (unchecked).
- Autobrakes Disabled On Braking: Sets whether the autobrake is disabled (checked) or not (unchecked) when manually braking.
- Autobrakes Disabled On Thrust: Sets whether the autobrake is disabled (checked) or not (unchecked) on reverse thrust.
- No Toe Brake Input Smoothing: Sets whether to disable (checked) or not (unchecked) input soothing for toe brakes.
-
Show Brake Message: Sets whether to show the braking message (checked) or not (unchecked) in the UI.
-
Parking Brake Linked To Toe Brakes: This parameter governs whether the parking brake will release upon application of the toe brakes.
- Autobrakes Disabled On Stop: Sets whether the autobrake is disabled (checked) or not (unchecked) when the plane stops after a landing.
- RTO Disabled On Stop: Sets whether the autobrake is automatically disabled (checked) or not (unchecked) when the aircraft stops after an RTO.
Lights
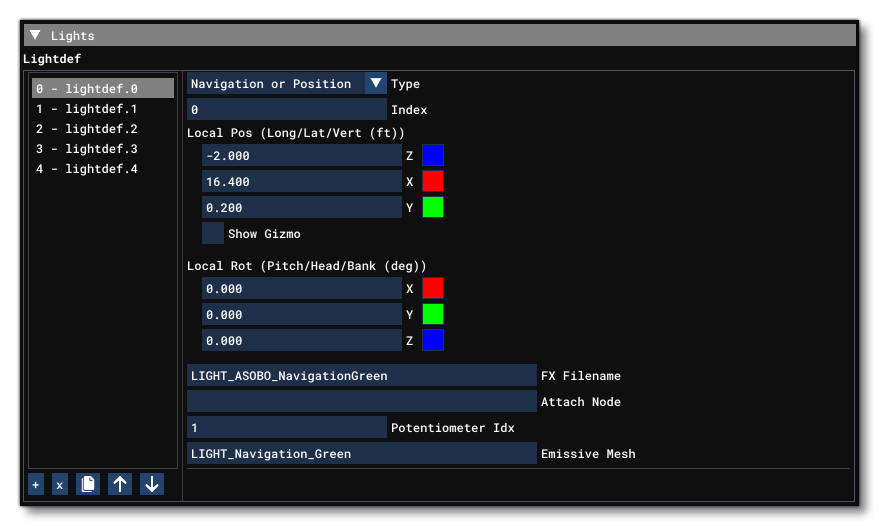
This section controls the lights on the aircraft. The given index value can then be passed to the corresponding light SimVar to apply a different behavior to different lights. Each light is added by clicking on the + button, after which you can set the parameters listed below to define them. You may also remove lights by clicking the x button.
NOTE: This is the default way to define lights, but if you have checked the Use Legacy checkbox then you should be using the legacy lights, explained further down on this page.
- Type: Tells the sim what type of light is being defined for the aircraft. Note that if the light type is "None" then the light is not connected to any circuit type, and you have to write to their
LIGHT_POTENTIOMETERSimVar to control them. Also note that the "Ambient" light type is only for use in the cockpit. Available light types are:- None
- Beacon
- Strobe
- Navigation or Position
- Panel
- Landing
- Taxi
- Recognition
- Wing
- Logo
- Cabin
- Pedestal
- Glareshield
- Ambient
- Index: This is the index of the electrical circuit that controls the light. Note that the value is the type index for the circuit, not the circuit index itself. Also note that if you set an index of 0 then the light will be part of the "general" circuit, meaning that a change to any light circuit will affect all lights with index 0.
- Local Position (X, Y, Z): The local position offset relative to the Datum Reference Point. Values are in ft. Note that you can also position the light visually by checking the Show Gizmo option.
- Local Rotation (X, Y, Z): The local angle of rotation for the light. Values are in degrees from -360° to 360°.
- FX Filename: The FX file that describes the light. These files have
*.fxextensions and should be placed in the root effects folder.
- Attach Node: The aircraft node to which you want to attach the light.
- Potentiometer Index: The potentiometer index for the light, which will drive the intensity of the light when using the SimVar
LIGHT_POTENTIOMETER.
- Emissive Mesh: The name of the emissive mesh to use. Note that the material used for the mesh must be named
LIGHTSand use the Standard material type.
The following parameters are for defining lights when the Use Legacy checkbox has been checked:
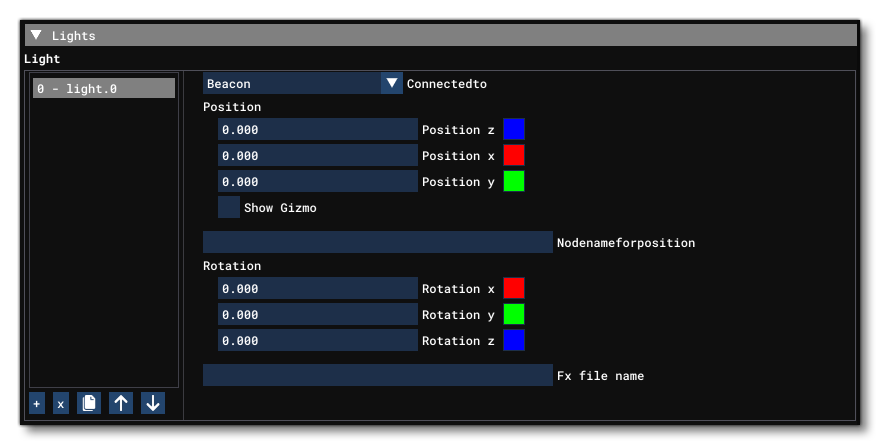
- Connected To: This defines which circuit, or switch, the light is connected to. Multiple lights may be connected to a single switch. Possible circuits are:
-
Beacon
-
Strobe
-
Navigation or Position
-
Panel
-
Landing
-
Taxi
-
Recognition
-
Wing
-
Logo
-
Cabin
-
Pedestal
-
Glareshield
-
Ambient
-
- Position Z: The z position relative to the Datum Reference Point, in ft. Note that you can also position the light visually by checking the Show Gizmo option. This option will be ignored if you supply a node to the Node Name For Position parameter.
- Position X: The x position relative to the Datum Reference Point, in ft. Note that you can also position the light visually by checking the Show Gizmo option. This option will be ignored if you supply a node to the Node Name For Position parameter.
- Position Y: The y position relative to the Datum Reference Point, in ft. Note that you can also position the light visually by checking the Show Gizmo option. This option will be ignored if you supply a node to the Node Name For Position parameter.
- Node Name For Position: This is the name of a node on the model that will be used to position the light. If supplied, this will override the Position X/Y/Z parameters.
- Rotation X: The X axis rotation, in degrees.
- Rotation Y: The Y axis rotation, in degrees.
- Rotation Z: The Z axis rotation, in degrees.
- FX File Name: The FX file name that is used by this light (for example,
fx_navred). These files have*.fxextensions and should be placed in the root effects folder.
Electrical

This section controls everything related to the aircraft electrical systems. An electrical system is defined by certain "base" parameters, and its components, of which there are 5 types:
- circuits: A circuit consumes power, requiring current to function (see Circuits for governing SimVars).
- batteries: A battery is a power source with a set capacity in ampere hours (see Batteries for governing SimVars).
- alternators: The alternator is a power source dependent on an engine/APU's RPM (see Alternators for governing SimVars).
- external power: This is an external power source which delivers power as long as it is available (see External Power for governing SimVars).
- buses: a bus is what creates connections between systems and sub-systems (see General / Buses for governing SimVars).
IMPORTANT! A system only exists if at least one bus is defined.
Each of these components can be defined multiple times as parameters within the [ELECTRICAL] configuration header. For how to access the information that these parameters add to an aircraft, please see the section on SimVars And Keys.
Apart from these components you also have the following parameters:
- Max Battery Voltage: The maximum battery voltage.
- Generator Alternator Voltage: The generator alternator voltage.
- Max Generator Alternator Amps: The maximum alternator amperage.
- Alternators: When checked, this indicates that alternators are available.
- Num Batteries: The number of batteries available.
- Electric Always Available: When checked, it will ensure that electrical equipment is always available.
The following parameters will also be visible if the Use Legacy checkbox has been checked:
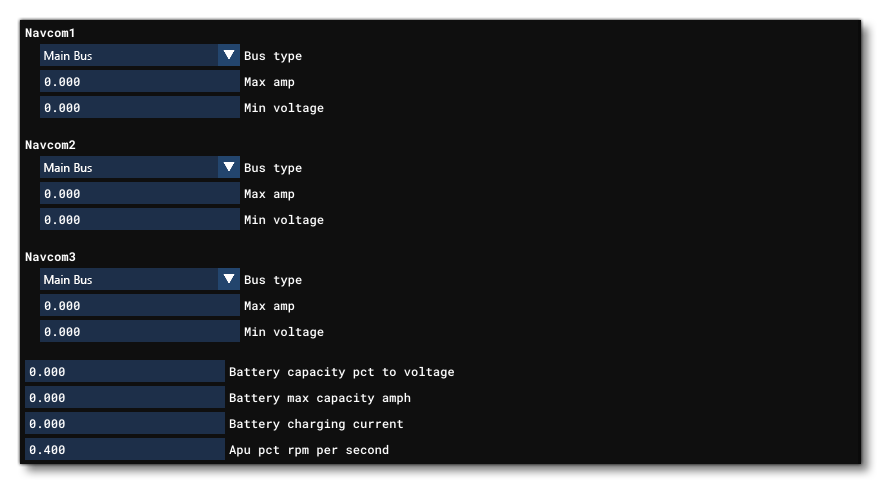
- Navcom1: Can be used to override default settings for the NAVCOM1 electrical circuit. Here you set the bus type, max amp, and min voltage. The bus can be one of the following:
- Main Bus
- Avionics Bus
- Battery Bus
- Hot Battery Bus
- GenAlt Bus 1
- GenAlt Bus 2
- GenAlt Bus 3
- GenAlt Bus 4
- Navcom2: Can be used to override default settings for the NAVCOM2 electrical circuit. Here you set the bus type, max amp, and min voltage. The bus options are the same as for Navcom1.
- Navcom3: Can be used to override default settings for the NAVCOM3 electrical circuit. Here you set the bus type, max amp, and min voltage. The bus options are the same as for Navcom1.
- Battery Capacity Pct To Voltage: Can be used to override default settings for correspondence between percentage Max Battery Capacity and voltage.
- Battery Max Capacity Amph: Can be used to override the default Battery Capacity (in AH).
- Battery Charging Current: Controls the battery's charging current (In Amps).
- APU Pct RPM Per Second: Controls the speed at which the APU's RPM increases.
If you are using the legacy FSX electrical system then you should be using the following parameters:
- Max Battery Voltage: The maximum battery voltage.
- Generator Alternator Voltage: The generator alternator voltage.
- Max Generator Alternator Amps: The maximum alternator amperage.
- Alternators: Set to TRUE (1) to indicate that alternators are available, or FALSE (0) otherwise.
- Num Batteries: The number of batteries available.
- Electric Always Available: Check to always enable electrical equipment, or uncheck if this is not the case.
- Battery Capacity % To Voltage: Can be used to override default settings for correspondence between % Max Battery Capacity and voltage.
- battery max capacity amph: Can be used to override the default Battery Capacity (in AH). Default is 24 or 42 depending on Battery Voltage.
- Battery Charging Current: Controls the battery's charging current (In Amps). Default is 10% of the capacity.
- APU % RPM Per Second: Controls the speed at which the APU's RPM increases. Default is 0.4.
- Navcom 1: Can be used to override default settings for the NAVCOM1 electrical circuit.
- Navcom 2: Can be used to override default settings for the NAVCOM2 electrical circuit.
- Navcom 3: Can be used to override default settings for the NAVCOM3 electrical circuit.
- Flap Motor: Can be used to override default settings for the flaps motor circuit.
- Gear Motor: Can be used to override default settings for the landing gear motor circuit.
- Autopilot: Can be used to override default settings for the autopilot circuit.
- Avionics Bus: Can be used to override default settings for the avionics bus circuit.
- Avionics: Can be used to override default settings for the avionics circuit.
- Pitot Heat: Can be used to override default settings for the pitot heat circuit.
- Additional System: Can be used to override default settings for the additional systems circuit.
- Marker Beacon: Can be used to override default settings for the marker beacon circuit.
- Gear Warning: Can be used to override default settings for the gear warning circuit.
- Fuel Pump: Can be used to override default settings for the fuel circuit.
- Starter 1: Can be used to override default settings for the engine 1 starter circuit.
- Starter 2: Can be used to override default settings for the engine 2 starter circuit.
- Starter 3: Can be used to override default settings for the engine 3 starter circuit.
- Starter 4: Can be used to override default settings for the engine 4 starter circuit.
- Navigation Light: Can be used to override default settings for the navigation light circuit.
- Beacon Light: Can be used to override default settings for the beacon light circuit.
- Landing Light: Can be used to override default settings for the landing light circuit.
- Taxi Light: Can be used to override default settings for the taxi light circuit.
- Strobe Light: Can be used to override default settings for the strobe light circuit.
- Panel Light: Can be used to override default settings for the panel light circuit.
- Cabin Light: Can be used to override default settings for the cabin light circuit.
- Recognition Light: Can be used to override default settings for the recognition ligth circuit.
- Wing Light: Can be used to override default settings for the wing light circuit.
- Logo Light: Can be used to override default settings for the logo light circuit.
- prop sync: Can be used to override default settings for the prop-sync circuit.
- Auto Feather: Can be used to override default settings for the auto-feather circuit.
- Auto Brakes: Can be used to override default settings for the auto-brake circuit.
- Standby Vacuum: Can be used to override default settings for the standby vacuum circuit.
- Hydraulic Pump: Can be used to override default settings for the hydraulic pump circuit.
- Fuel Transfer Pump: Can be used to override default settings for the fuel transfer pump circuit.
- Propeller Deice: Can be used to override default settings for the propellor de-ice circuit.
- Directional Gyro: Can be used to override default settings for the directional gyro circuit.
- Directional Gyro Slaving: Can be used to override default settings for the directional gyro slaving circuit.
Circuit
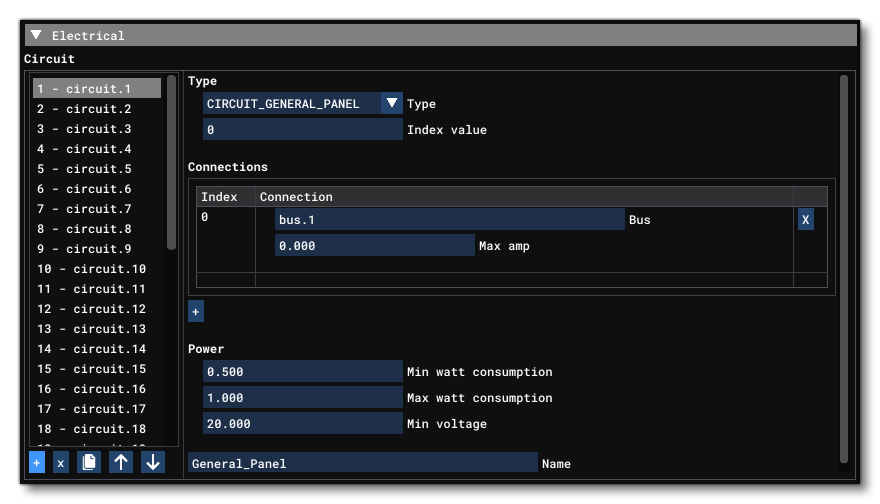
Circuits are the most used electrical components, and a circuit is comprised of multiple parameters that define how it works. Circuits are indexed from 1 and you can add them using the + button at the bottom of the table, and you can remove a circuit by clicking on the x button. The circuit parameters available are:
- Type: This sets the type of circuit being created, which can be one of those listed in the table below:
CIRCUIT_INVALIDInvalid circuit which has no direct impact on sim state
CIRCUIT_XMLGeneric circuit which has no direct impact on sim state
CIRCUIT_GENERAL_PANELCircuit checked for general power availability
CIRCUIT_FLAP_MOTORCircuit turned on when flaps are moving (if electrical)
CIRCUIT_GEAR_MOTORCircuit turned on when landing gears are moving (if electrical)
CIRCUIT_AUTOPILOTCircuit checked for autopilot availability
CIRCUIT_AVIONICSCircuit checked for avionics availability
CIRCUIT_PITOT_HEATCircuit controlling pitot heat state
CIRCUIT_PROP_SYNCCircuit controlling prop sync
CIRCUIT_AUTO_FEATHERCircuit controlling auto feathering
CIRCUIT_AUTO_BRAKESCircuit controlling auto brakes
CIRCUIT_STANDBY_VACUUMCircuit controlling standby vacuum
CIRCUIT_MARKER_BEACONCircuit checked for beacon marker system availability
CIRCUIT_GEAR_WARNINGCircuit checked for gear warning system availability
CIRCUIT_HYDRAULIC_PUMPCircuit controlling electric hydraulic pumps
CIRCUIT_FUEL_PUMPCircuit controlling electrical fuel pumps. See the section on Pump.N for more information.
CIRCUIT_FUEL_TRANSFER_PUMPCircuit controlling electrical fuel transfer pumps
CIRCUIT_PROP_DEICECircuit controlling prop deicing
CIRCUIT_STARTERCircuit controlling electrical starter state
CIRCUIT_LIGHT_NAVCircuit controlling navigation light state
CIRCUIT_LIGHT_BEACONCircuit controlling beacon light state
CIRCUIT_LIGHT_LANDINGCircuit controlling landing light state
CIRCUIT_LIGHT_TAXICircuit controlling taxi light state
CIRCUIT_LIGHT_STROBECircuit controlling strobe light state
CIRCUIT_LIGHT_PANELCircuit controlling panel light state
CIRCUIT_LIGHT_RECOGNITIONCircuit controlling recognition light state
CIRCUIT_LIGHT_WINGCircuit controlling wing light state
CIRCUIT_LIGHT_LOGOCircuit controlling logo light state
CIRCUIT_LIGHT_CABINCircuit controlling cabin light state
CIRCUIT_LIGHT_PEDESTALCircuit controlling pedestal light state
CIRCUIT_LIGHT_GLARESHIELDCircuit controlling glareshield light state
CIRCUIT_DIRECTIONAL_GYROCircuit checked for directional gyro system availability
CIRCUIT_DIRECTIONAL_GYRO_SLAVINGCircuit checked for directional gyro slaving system availability
CIRCUIT_NAVCircuit checked for NAV system availability
CIRCUIT_COMCircuit checked for COM system availability
CIRCUIT_PFDCircuit checked for PFD system availability, no effect on sim
CIRCUIT_MFDCircuit checked for MFD system availability, no effect on sim
CIRCUIT_ADC_AHRSCircuit checked for ADC and AHRS system availability, no effect on sim
CIRCUIT_FISCircuit checked for FIS system availability, no effect on sim
CIRCUIT_ADF_DMECircuit checked for ADF and DME system availability, no effect on sim
CIRCUIT_XPNDRCircuit checked for transponder system availability
CIRCUIT_TURN_COORDINATORCircuit checked for turn coordinator system availability
CIRCUIT_AUDIOCircuit checked for audio system availability
CIRCUIT_AVNFANCircuit checked for avionics fan system availability, no effect on sim
CIRCUIT_GPSCircuit checked for avionics GPS system availability
CIRCUIT_ATTITUDE_INDICATORCircuit checked for attitude indicator availability (if electrical) CIRCUIT_STALL_WARNINGCircuit checked for stall warning availability (if electrical)
CIRCUIT_APU_STARTERCircuit controlling APU starter state
CIRCUIT_FUEL_VALVECircuit controlling a [FUEL_SYSTEM]valve. See the section onValve.Nfor more information.
- Index Value: This is a value that is used to tell the difference between multiple circuits of the same type. For example, if you have two Fuel Pump circuits, you would give them indices 1 and 2 to ensure they can be differentiated.
- Connections: This is a table of the different buses that this circuit is connected to. You can add more connections using the
+button (and remove them using thexbutton), and each connection goes to a Bus, which also requires an index number to identify it. You can also specify the maximum amps for each of the bus connections here, however if you set a value of -1, then the connection will sustain an "infinite" current.
- Power - Min watt Consumption: The minimum consumption - in watts - for the circuit.
- Power - Max watt Consumption: A maximum/ideal Watt consumption.
- Power - Min Voltage: A minimum voltage.
NOTE: For more information on the power calculations behind a circuit, please see the following section: circuit.N - Power
- Name: The name of the circuit. This is an identifier name and is only added for debugging purposes. Cannot contain special characters or spaces.
Battery
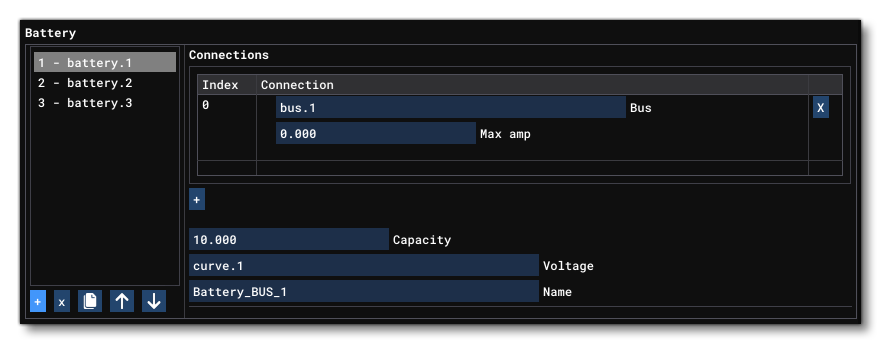
A battery is a power supplier with a set capacity that decreases over time depending on the load it must sustain. Batteries are indexed from 1 and you can add them using the + button at the bottom of the table, and you can remove them by clicking on the x button. The battery parameters available are:
- Connections: This is a table of the different buses that this battery is connected to. You can add more connections using the
+button (and remove them using thexbutton), and each connection goes to a Bus, which also requires an index number to identify it. You can also specify the maximum amps for each of the bus connections here, however if you set a value of -1, then the connection will sustain an "infinite" current.
- Capacity: The battery capacity, in ampere hours.
- Voltage: A curve of values that sets the the voltage for capacity percentage (explained in the Curve section).
- Name: The name of the battery. This is an identifier name and is only added for debugging purposes. Cannot contain special characters or spaces.
Alternator
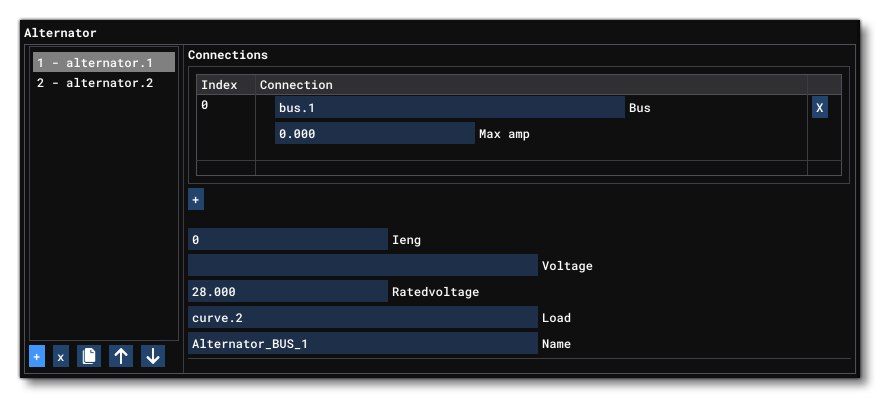
This defines an alternator power source dependent on an engine/APU's RPM. Alternators are indexed from 1 and you can add them using the + button at the bottom of the table, and you can remove them by clicking on the x button. The alternator parameters available are:
- Connections: This is a table of the different buses that this alternator is connected to. You can add more connections using the
+button (and remove them using thexbutton), and each connection goes to a Bus, which also requires an index number to identify it. You can also specify the maximum amps for each of the bus connections here, however if you set a value of -1, then the connection will sustain an "infinite" current.
- iEng: An engine index to get it's power from (starting at 0).
- Voltage: here you give a Curve that defines the voltage for the given RPM or percentage RPM.
NOTE: This should only be supplied if the RatedVoltage parameter is not used.
- RatedVoltage: The voltage that the alternator is rated for.
NOTE: This should only be supplied if the Voltage parameter is not used.
- Name: The name of the alternator. This is an identifier name and is only added for debugging purposes. Cannot contain special characters or spaces.
External Power
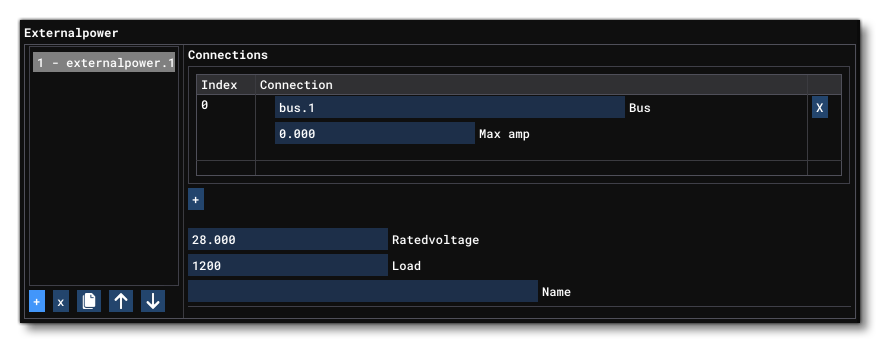
An external power source is a power supplier with a constant and infinite power output. External power sources are indexed from 1 and you can add them using the + button at the bottom of the table, and you can remove them by clicking on the x button. The external power parameters available are:
- Connections: This is a table of the different buses that this external power source is connected to. You can add more connections using the
+button (and remove them using thexbutton), and each connection goes to a Bus, which also requires an index number to identify it. You can also specify the maximum amps for each of the bus connections here, however if you set a value of -1, then the connection will sustain an "infinite" current.
- Rated Voltage: The voltage that the external power source is rated for.
- Load: The load output, which is constant.
- Name: The name of the external power source. This is an identifier name and is only added for debugging purposes. Cannot contain special characters or spaces.
Bus

A bus is a hub for connecting different components (and other buses) to each other. Buses are indexed from 1 and you can add them using the + button at the bottom of the table, and you can remove them by clicking on the x button. The bus parameters available are:
- Connections: This is a table of the different buses that this bus is connected to. You can add more connections using the
+button (and remove them using thexbutton). You can also specify the maximum amps for each of the bus connections here, however if you set a value of -1, then the connection will sustain an "infinite" current.
- Name: The name of the bus. This is an identifier name and is only added for debugging purposes. Cannot contain special characters or spaces.
Curve

The curve parameter is defined as a 1D table of paired values. The exact number of paired values that are in the curve will depend on the use the curve is going to get, since curves are used by other parameters to store information. Curves are indexed from 1 and you can add them using the + button at the bottom of the table, and you can remove them by clicking on the x button. Curves have no unique parameters, and instead you add in paired values to a table using the + and x buttons within the table for each curve index.
Hydraulic System
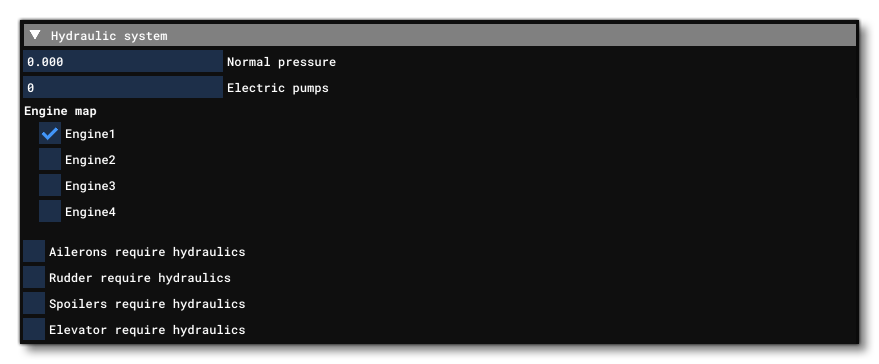
This section controls the hydraulic pressure systems. Available parameters are:
- Normal Pressure: The normal hydraulic pressure, in psi.
- Electric Pumps: The number of electric pumps for the hydraulics.
- Engine Map: This is a map of each engine and you can check the engines that have a hydraulic system associated with it.
- Ailerons Require Hydraulics: Sets whether the ailerons require hydraulics (Checked) or not (Unchecked).
- Rudder Require Hydraulics: Sets whether the rudder requires hydraulics (Checked) or not (Unchecked).
- Spoilers Require Hydraulics: Sets whether the spoilers require hydraulics (Checked) or not (Unchecked).
- Elevator Require Hydraulics: Sets whether the elevator requires hydraulics (Checked) or not (Unchecked).
Pneumatic System

This section controls the pneumatic system of the aircraft. Available parameters are:
- Max Pressure: The maximum permitted pressure for the pneumatic system, in psi.
- APU Max Pressure: The maximum pressure from the bleed permitted for the APU, in psi.
- Bleed Air Scalar: Pneumatic pressure is a function of bleed air from the turbine engine. This scalar is used to multiply this bleed air pressure.
Vacuum System
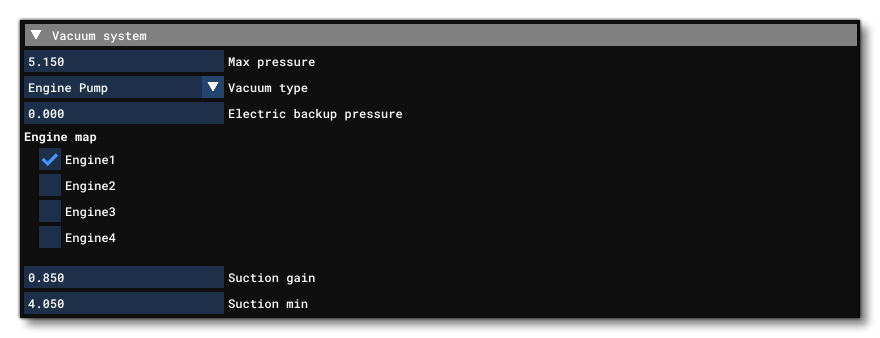
This section controls the aircraft vacuum system. Available parameters are:
- Max Pressure: The maximum suction pressure, in inHg.
- Vacuum Type: The type of vacuum system installed on the aircraft. Can be one of the following:
- Engine pump
- Pneumatic
- Venturi
- Electric Backup Pressure: The electrical backup pressure value, in inHg.
- Engine Map: This is a map of each engine and you can check the engines that have a vacuum pump associated with it.
- Suction Gain: The gain speed at which suction grows.
- Suction Min: The minimum suction value possible when the system is operating.
Pitot Static

A pitot-static system is a system of pressure-sensitive instruments that is most often used in aviation to determine an aircraft's airspeed, Mach number, altitude, and altitude trend. This section permits you to set certain attributes for using this system. Available parameters are:
- Vertical Speed Time Constant: This is a speed-time constant, used for the vertical speed generation in gauges. Values in 1/seconds. Increasing will cause a more instantaneous reaction in the visual speed indicator
- Pitot Heat: Pitot heat scalar value used to weight temperature increase for the pitot system.
Stall Warning

This section controls the stall warning system. Available parameters are:
- Type: The warning system type. Can be any one of the following options:
- Normal
- Electric
- Stick Shaker: Whether force feedback stick shaking is enabled (checked) or not (unchecked).
Deice System

This section controls the de-ice system. Available parameter is:
- Structural Deice Type: The deice type on the aircraft. Can be any one of the following:
- None
- Bleed air heated leading edge
- Bleed air boots
- Engine vacuum pump boots
- Windshield Deice Rate: Sets the rate at which the windshield will get deiced when the deice system is enabled. Value is in percent/second.
- Structural Deice Rate: Sets the rate at which the a¡rcraft structure will get deiced when the deice system is enabled. Value is in percent/second.
Radios
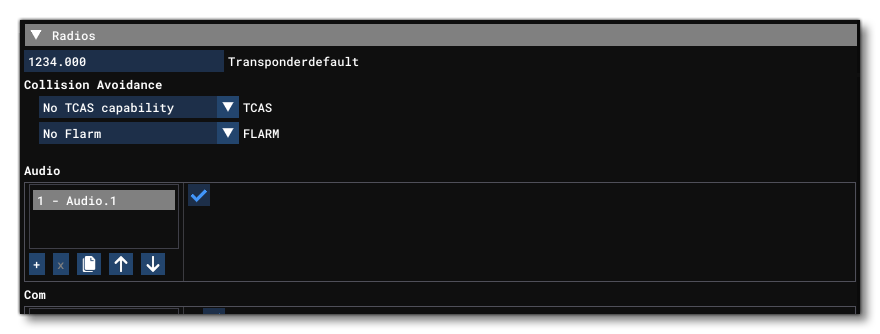
This section controls the aircraft radios. It has the following parameters:
- Collision Avoidance - TCAS: This parameter can be used to indicate the presence of a TCAS systems. You can give one of the following options:
- No TCAS capability (no transponder)
- Only transponder responses
- Standard TCAS
- External TCAS
- Collision Avoidance - FLARM: This parameter can be used to indicate the presence a FLARM systems. You can give one of the following options:
- No Flarm
- Flarm installed
- Transponder Default: The default Frequency of the aircraft (will be overridden by FLT and ATC values).
- Audio: Set the audio systems available. At least one audio system needs to be included, and when you add one (using the
+button) you can flag it as available (checked) or not (unchecked). You can use thexbutton to remove any selected audio system.
- Com: Set the COM receivers available. At least 1 COM receiver needs to be defined, and you can have a maximum of 2. You can add a COM system using the
+button and remove one using thexbutton. Each COM system can be flagged as available (checked) or not (unchecked) and whether it has a standby mode (checked) or not (unchecked).
- Nav: Set the Nav receivers available. At least 1 Nav receiver needs to be defined, and you can have a maximum of 4. You can add a Nav system using the
+button and remove one using thexbutton. Each Nav system can be flagged as available (checked) or not (unchecked), as having a standby mode (checked) or not (unchecked), and whether it has glide-slope (checked) or not (unchecked).
- Adf: Set the ADF system available. At least 1 ADF system needs to be defined, and you can have a maximum of 2. You can add an ADF system using the
+button and remove one using thexbutton. Each ADF system can be flagged as available (checked) or not (unchecked), and as having a standby mode (checked) or not (unchecked).
- Transponder: Set the transponders available. At least 1 transponder needs to be defined, and you can add a transponder using the
+button and remove one using thexbutton. Each transponder can be enabled (checked) or disabled (unchecked).
- Marker: Set the marker systems available. At least 1 marker system needs to be defined, and you can add a marker using the
+button and remove one using thexbutton. Each marker can be enabled (checked) or disabled (unchecked).
- Tacan: Set the Tacan systems available, up to a maximum of 2. You can add an Tacan system using the
+button and remove one using thexbutton. When you add a Tacan it requires two values where the first sets whether the active frequency is available (checked) or not (unchecked) and the second sets whether the standby frequency is available (checked) or not (unchecked).
Gear Warning System

This section defines the functionality of the gear warning system for the aircraft. This is generally related to the throttle lever position and the flap deflection. Available parameters are:
- Gear Warning Available: Sets the type of gear warning system available on the aircraft, with the following options available:
- None
- Normal
- Amphibian
- Flap Limit Power: The flap limit above which the warning will activate (regardless of throttle position).
- Flap Limit Idle: This limit is the flap deflection above which the warning will activate if the gear is not down and locked while the throttle is below the limit specified by Pct. Throttle Limit. Setting this limit to a value greater than 0, the pilot can reduce the throttle to idle without activating the warning (this is often utilized in jets to decelerate/descend the aircraft).
- Pct. Throttle Limit: The throttle limit, below which the gear warning will activate if the gear is not down and locked while the flaps are deflected to at least the setting for Flap Limit Idle below. This flap limit can be 0 so that the warning effectively is a function of the throttle.
Autopilot

This section controls the aircraft autopilot systems. Available parameters are:
- Autopilot Available: When checked this makes the autopilot system available to the aircraft, otherwise leave it unchecked to disable the autopilot.
- Flight Director Available: When checked this makes the flight director available to the aircraft, otherwise leaving it unchecked will disable the flight director.
- Min Feet For AP: Sets the height (in ft) below which the autopilot is automatically disabled. A value of -1000 can be used to completly disable this feature.
- Min Flight Time For AP: Sets the time (in seconds) after takeoff until the autopilot can be enabled. A value of 0 disables this feature.
- Default Vertical Speed: The default vertical speed, in ft per second, that the autopilot will command when selecting a large altitude change.
- Autothrottle Available: When this is checked it makes available an autothrottle system on the aircraft.
- Autothrottle Arming Required: When this is checked the autothrottle is required to be armed prior to it being engaged. leaving it unchecked allows the autothrottle to be engaged directly.
- Autothrottle Does Not Move Lever: When this is checked the autothrottle will not move the throttle lever. Uncheck it if this is not the behavior you require.
- Autothrottle Managed By Plane: When this is checked the autothrottle will be managed automatically by the aircraft. Leave it unchecked if this is not the behavior you require.
- Altimeter Indicator: Indicates the index of the altimeter indicator system on the aircraft which is being referenced by the autopilot.
- Attitude Indicator: Indicates the index of the attitude indicator system on the aircraft which is being referenced by the autopilot
- Direction Indicator: Indicates the index of the direction indicator system on the aircraft which is being referenced by the autopilot, where 0 is the first.
- Autothrottle Takeoff GA: If this is checked then takeoff / go-around operations with the autothrottle will be enabled.
- Autothrottle Max RPM: This sets the highest engine speed that the autothrottle will attempt to maintain as a percentage of the maximum engine speed.
- Pitch Takeoff GA: The default pitch that the takeoff / go-around mode references, in degrees.
- Use No Default Pitch: When checked this tells the autopilot not to use the default pitch option.
- Default Pitch Mode: This determines the default pitch mode when the autopilot is enabled. The options are:
- None
- Pitch
- Altitude
- Vertical Speed
- Pitch Use Trim: When set to 1 (TRUE) the autopilot will use the trim to hold pitch, and when set to 0 (FALSE) it will use the elevator directly.
- Max Pitch: The maximum pitch angle, in degrees, that the autopilot will command either up or down.
- Max Pitch Acceleration: The maximum angular pitch acceleration, in degrees per second squared, that the autopilot will command up or down.
- Max Pitch Velocity Lo Alt: The maximum angular pitch velocity, in degrees per second, which the autopilot will command when at an altitude below that specified by the parameter Max Pitch Velocity Lo Alt Breakpoint.
- Max Pitch Velocity Hi Alt: The maximum angular pitch velocity, in degrees per second, which the autopilot will command when at an altitude above the altitude specified by the parameter Max Pitch Velocity Hi Alt Breakpoint. The maximum velocity is interpolated between the hi and lo altitude velocities when between the hi and lo altitude breakpoints.
- Max Pitch Velocity Lo Alt Breakpoint: The altitude below which the autopilot maximum pitch velocity is limited by the parameter Max Pitch Velocity Lo Alt.
- Max Pitch Velocity Hi Alt Breakpoint: The altitude above which the autopilot maximum pitch velocity is limited by the parameter Max Pitch Velocity Hi Alt. The maximum velocity is interpolated between the hi and lo altitude velocities when between the hi and lo altitude breakpoints.
- Max Pitch Velocity Lo Ang: This defines the fly-by-wire load factor hold system's max pitch velocity at low angle differences. This parameter - along with Max Pitch Velocity Hi Ang - gives more control over the fly-by-wire pitch rate and therefore the maximum load factor achievable by the aircraft. Default value is 1.
- Max Pitch Velocity Hi Ang: This defines the fly-by-wire load factor hold system's max pitch velocity at high angle differences. This parameter - along with Max Pitch Velocity Lo Ang - gives more control over the fly-by-wire pitch rate and therefore the maximum load factor achievable by the aircraft. Default value is 5.
- Use No Default Bank: Checking this tells the autopilot not to use the default bank option.
- Default Bank Mode: This determines the default bank mode when the autopilot is enabled. Will be one of the following:
- None
- Wing level
- Heading
- Roll Hold
- Max Bank Acceleration: The maximum angular bank acceleration, in degrees per second squared, that the autopilot will command left or right.
- Max Bank Velocity: The maximum angular bank velocity, in degrees per second, which the autopilot will command left or right. This parameter takes a series of values - added using the
+button, removed using thexbutton - where each value corresponds to a specific bank switch position (seeAP_MAX_BANK_SET), up to a maximum of 6 values. Note that the number of entries given for this parameter should correspond with the number of values given for Max Bank.
- Max Bank: The maximum bank angle, in degrees, that the autopilot will command either left or right. This parameter takes a series of values - added using the
+button, removed using thexbutton - where each value corresponds to a specific bank switch position (seeAP_MAX_BANK_SET), up to a maximum of 6 values. Note that the number of entries given for this parameter should correspond with the number of values given for Max Bank Velocity.
- Auto Max Bank: If checked, this adds an extra max bank selection for the autopilot that automatically changes depending on the airspeed. For more information, please see
AP_MAX_BANK_SET.
- Auto Max Bank Table: This parameter has a table of values that sets the correspondence between an airspeed (in Knots) and a max bank value (in degrees), when Auto Max Bank is checked.
- Auto Max Bank Velocity Table: This parameter has a table of values that sets the correspondence between an angular bank velocity (in Knots) and a max bank value (in degrees / second).
- Auto Max Bank Min Alt: Sets the altitude (in ft) above ground level below which the max bank angle is limited (see Auto Max Bank Min Alt Angle) in feet.
- Auto Max Bank Min Alt Angle: Sets the max bank angle (in degrees) when the plane is in auto max bank angle mode below the minimum altitude set by Auto Max Bank Min Alt.
- Max Throttle Rate: This value sets the maximum rate at which the autothrottle will move the throttle position.
- Pitch Proportional / Integrator / Derivative: The three parameters used for the pitch PID controller constant.
- Pitch Integrator Boundary: The boundary, or maximum signal error, in degrees in which the pitch integrator function is active.
- Pitch Derivative Boundary: The boundary, or maximum signal error, in degrees in which the pitch derivative function is active.
- Roll Proportional / Integrator / Derivative: The three parameters used for the roll PID controller constant.
- Roll Integrator Boundary: The boundary, or maximum signal error, in degrees in which the roll integrator function is active.
- Roll Derivative Boundary: The boundary, or maximum signal error, in degrees in which the roll derivative function is active.
- HDG Proportional / Integrator / Derivative: The three parameters used for the heading PID controller constant.
- HDG Integrator Boundary: The boundary, or maximum signal error, in degrees in which the heading integrator function is active.
- HDG Derivative Boundary: The boundary, or maximum signal error, in degrees in which the heading derivative function is active.
- Vertical Speed Proportional / Integrator / Derivative: The three parameters used for the vertical speed PID controller constant.
- VS Integrator Boundary: The boundary, or maximum signal error, in degrees in which the vertical speed integrator function is active.
- VS Derivative Boundary: The boundary, or maximum signal error, in degrees in which the vertical speed derivative function is active.
- Nav Proportional / Integrator / Derivative EX1: The three parameters used for the navigation PID controller constant.
- Nav Integrator Boundary EX1: The boundary, or maximum signal error, in degrees in which the integrator navigation function is active.
- Nav Derivative Boundary EX1: The boundary, or maximum signal error, in degrees in which the derivative navigation function is active.
- Nav Yaw Proportional / Integrator / Derivative: The three parameters used for the yaw navigation PID controller constant.
- Nav Yaw Integrator Boundary: The boundary, or maximum signal error, in degrees in which the yaw navigation integrator function is active.
- Nav Yaw Derivative Boundary: The boundary, or maximum signal error, in degrees in which the yaw navigation derivative function is active.
- GS Proportional / Integrator / Derivative: The three parameters used for the glideslope mode PID controller constant.
- GS Integrator Boundary: The boundary, or maximum signal error, in degrees in which the glideslope integrator function is active.
- GS Derivative Boundary: The boundary, or maximum signal error, in degrees in which the derivative function is active.
- Yaw Damper Gain: The proportional gain on the yaw dampers yaw rate error.
- Head Hold PID: The full heading hold PID definition for the propeller, given as the Proportional, First Integrator, Second Integrator, Derivative, First Integrator Boundary, Second Integrator Boundary, and the Derivative Boundary.
- Airspeed Hold PID: The full airspeed hold PID definition for the propeller, given as the Proportional, First Integrator, Second Integrator, Derivative, First Integrator Boundary, Second Integrator Boundary, and the Derivative Boundary.
- Min Altitude Ref: Sets the minimum altitude (in ft) that can be set in the Autopilot.
- Max Altitude Ref: Sets the maximum altitude (in ft) that can be set in the Autopilot.
- Min Vertical Speed Ref: Sets the minimum vertical speed (in ft per minute) that can be set in the Autopilot.
- Max Vertical Speed Ref: Sets the maximum vertical speed (in ft per minute) that can be set in the Autopilot.
- Min Mach Ref: Sets the minimum Mach that can be set in the Autopilot.
- Max Mach Ref: Sets the maximum Mach that can be set in the Autopilot.
- Alt Mode Slot Index: Set the default alt mode slot index (from 0 to 3). This is the index for the SimVar
AUTOPILOT ALTITUDE LOCK VARwhich the altitude hold mode will track when captured. You can change this using theALTITUDE_SLOT_INDEX_SETevent ID or retrieve it using theAUTOPILOT ALTITUDE SLOT INDEXSimVar. When this parameter is set to 1, 2 or 3, the altitude capture will watch the altitude set at that index, unless overridden by changing the currently observed slot using the key eventALTITUDE_SLOT_INDEX_SET. If the currently observed slot has been changed when altitude is captured, the set altitude in the currently observed slot will be copied to the Alt Mode Slot Index slot and the currently observed slot will also be changed to that slot. When this config parameter is set to 0, the altitude capture will always use whatever the currently observed slot is set to and will not change slots or write to any slots on capture.
- FLC Proportional / Integrator / Derivative: The three parameters used for the FLC PID controller constant.
- FLC Integrator Boundary: The FLC integrator control boundary.
- FLC Derivative Boundary: The FLC derivative control boundary.
- FLC Min Pitch Low Alt: Sets the minimum AP pitch (in degrees) when the plane is in FLC mode and below FLC Min Low Alt Limit.
- FLC Min Low Alt Limit: Sets the maximum height (in ft) below which the pitch in FLC mode is limited.
- Min Feet For Athr: Set the height (in ft) below which the auto-throttle is automatically disabled.
- Altitude English Slow Increment: Sets the slow increments (in ft) of the autopilot's altitude when in english units.
- Altitude English Fast Increment: Sets the fast increments (in ft) of the autopilot's altitude when in english units.
- Altitude English Fastest Increment: Sets the fastest increments (in ft) of the autopilot's altitude when in english units.
- Altitude Metric Slow Increment: Sets the slow increments (in meters) of the autopilot's altitude when in metric units.
- Altitude Metric Fast Increment: Sets the fast increments (in meters) of the autopilot's altitude when in metric units.
- Altitude Metric Fastest Increment: Sets the fastest increments (in meters) of the autopilot's altitude when in metric units.
- Metric VS Increment: Sets the increments of the autopilot's vertical speed when in metric units (meters per minute).
- English VS Increment: Sets the increments of the autopilot's vertical speed when in english units (ft per minute).
- IAS Slow Increment: Sets the slow increments of the autopilot's target speed (in Knots).
- IAS Fast Increment: Sets the fast increments of the autopilot's target speed (in Knots).
- IAS Fastest Increment: Sets the fastest increments of the autopilot's target speed (in Knots).
- Mach Increment: Sets the increments of the autopilot's target speed (in Mach).
- HDG Ref Var: Set the compass variable to be used as the source of heading reference. Can be one of the following options:
- Magnetic
- Gyro
- Auto Throttle Hold VS: If unchecked, the auto throttle will not attempt to hold the vertical speed when attempting to hold an airspeed and if checked then it will.
- Auto Rudder Use Pedals: If unchecked, the autorudder will not move the cockpit pedals, and when checked then it will.
- Auto Disengage With Pilot Input: When this is checked then the autopilot will be disengaged when any pilot action on inputs is greater than 50% of the axis for more than 1 second.
- Basic Modes Disengage With FBW: If checked and the fly-by-wire is set to "ON" and the auto-pilot is on, then the Pitch, Bank and Yaw dampening modes are disengaged.
- No Alt Capture In VS Mode: When checked, this will disable the altitude capture by autopilot when the VS mode is engaged.
- Pitch Use Elevator Only: If checked, the autopilot/fly-by-wire will not use trim for pitch inputs. When unchecked, the autopilot/fly-by-wire uses trimming for pitch inputs.
- FBW Pitch Trim Speed Scalar: This value can be used to scale the speed at which pitch trim is applied using a fly-by-wire system.
- FBW High Speed Roll Speed Scalar: This value can be used to scale the speed at which roll is applied using a fly-by-wire system.
Smoke System

This section controls the aircraft smoke system. You can use this section to define multiple smoke points, adding each one using the + button. You can also remove smoke points using the x button. Each smoke point has the following parameters:
- Position Z / X / Y: The local position offset relative to the Datum Reference Point (in ft). You may position this visually within the simulation by checking the Show Gizmo checkbox.
- FX Name: This is the name of an FX file that should be used for the smoke effect at the given point.
Folding Wings

This section is for defining the parameters required by an aircraft that has folding wings. Available parameters are:
- Wing Fold System Type: The type of system used to fold the wings, which can be one of the following:
- None
- Hydraulic
- Electrical
- Pneumatic
- Manual
- Left Wing Rate: The folding rate for the left wing, expressed as 1 / seconds. Note this parameter will not be visible if the Type is set to None.
- Right Wing Rate: The folding rate for the right wing, expressed as 1 / seconds. Note this parameter will not be visible if the Type is set to None.
Voice Alerts
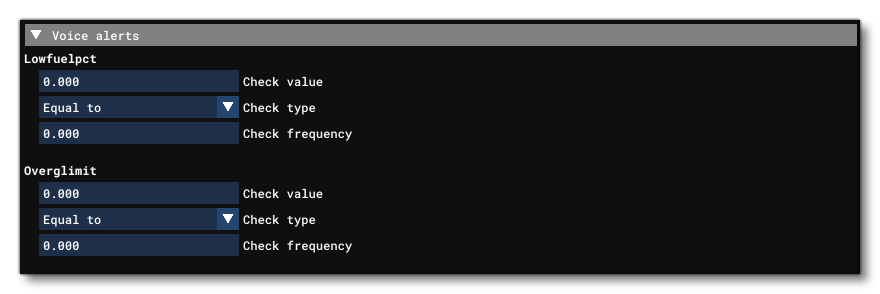
This section controls any voice alerts for the aircraft. Available parameters are:
- Low Fuel Pct.: Sets the low fuel warning voice alert using three inputs:
- Check value: The amount of fuel that will trigger the voice alert.
- Check type: The type of check to perform, which can be greater than, less than or equal to.
- Check frequency: How often (per second) that the check should be performed.
- Over G Limit: Sets the over G warning voice alert using three inputs:
- Check value: The G value that will trigger the voice alert.
- Check type: The type of check to perform, which can be greater than, less than or equal to.
- Check frequency: How often (per second) that the check should be performed.
Pressurization

This section controls the cabin pressurization systems. Available parameters are:
- Design Cabin Pressure: The cabin pressure, as designed, in psi. This value is used to set the
PRESSURIZATION_CABIN_ALTITUDE_GOALSimVar.
- Max Pressure Differential: The maximum pressure deferential permitted, in psi.
Auxiliary Power Unit

This section controls APU systems. Available parameter is:
- Available: When checked, this indicates that there is an APU system available.
Water Ballast System

This section controls the water balance system. Available parameters are:
- Version: The version of the water ballast system being used. This will impact how the Tank parameter is defined, where 1 will be the legacy definition and 2+ will be the modern definition.
- Number Of Release Valves: The number of ballast release valves available.
- Dump Rate: The dump rate for the ballast, in Gallons per second.
- Tank: Here you can define the tanks used for balance using the
+button to add a tank and thexbutton to remove one. The actual parameters that are shown here will depend on the Version being used, as explained below. In general you should always be on version 2 or above, and version 1 should be reserved only for legacy aircraft:- Version 1 Parameters:NOTE: When defining tanks you can have up to 6 of them, and they are indexed as follows:
0 = Front Fuselage
1 = Rear Fuselage
2 = Left Outboard
3 = Left Inboard
4 = Right Inboard
5 = Right Outboard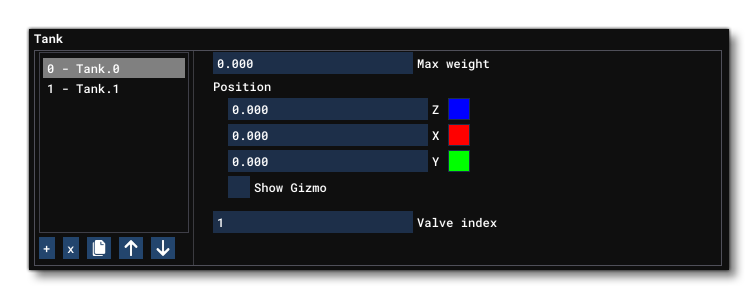
- Max Weight: the maximum weight of the tank, in Gallons.
- Z / X / Y: The local position offset relative to the Datum Reference Point (in ft). You may position this visually within the simulation by checking the Show Gizmo checkbox.
- Valve Index: The valve index (between 1 and the number of release valves defined).
- Version 2+ Parameters:
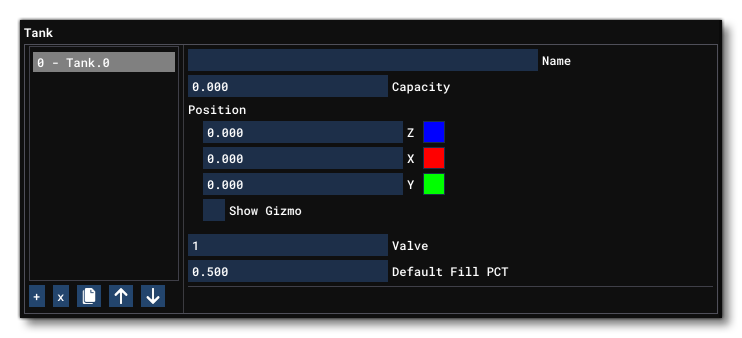
- Name: The name of the tank.
- Capacity: The tank capacity, in Gallons.
- Position: The local position offset relative to the Datum Reference Point (in ft). You may position this visually within the simulation by checking the Show Gizmo checkbox.
- Valve: The valve index, from 1 to Number Of Release Valves.
- Default Fill Pct: The default percentage of the tank that should be filled.
- Version 1 Parameters:NOTE: When defining tanks you can have up to 6 of them, and they are indexed as follows:
Local Vars
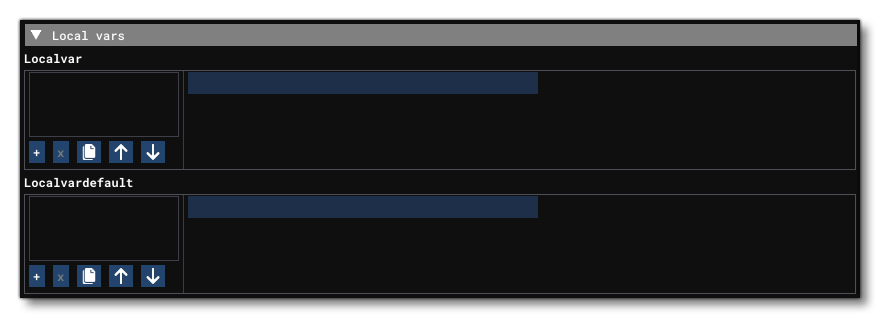
This section can be used to set the initial value of persistent local variables to be used in the XML Model Behaviours templates and gauges. These local vars are accessed using the "L:" var identifier in Reverse Polish Notation. When an aircraft is selected by a user and the flight is first started, these "L:" vars are defined using the LocalVar.N parameter and then initialised using a default value (done using the LocalVarDefault.N parameter). Any changes to these variables that have been made will then be saved to a file (state.cfg) when the flight is exited. This file will be saved to a local location on the users computer using the following path schema:
STEAM: C:\Users\<USERNAME>\AppData\Roaming\Microsoft Flight Simulator\SimObjects\<AIRCRAFT_NAME>\state.cfg
MS STORE: C:\Users\<USERNAME>\AppData\Local\Packages\Microsoft.FlightSimulator_8wekyb3d8bbwe\LocalCache\SimObjects\<AIRCRAFT_NAME>\state.cfg
The next time the aircraft is used, the local variables will be initialised as before, only now they will be set to the values stored in the state.cfg.
IMPORTANT! The variables defined here take precedence over those stored in the FLT file, and will overwrite any with the same name that are saved to that file when an aircraft is loaded.
Note that if you define a variable here but don't initialise it using a LocalVarDefault value, then the first time it is used it will be considered as having a value of 0.
- LocalVar: This section defines the name of one or more local variables that will have their value saved. Each variable should be defined as a string, and is indexed from 1.
- LocalVarDefault: This defines a local variable default value. Each variable defined using the parameter should have a corresponding default value and index, with the indexing starting at 1.