SIMPROPCONTAINER OBJECTS
A SimPropContainer object is an object element that is a container for multiple Scenery objects or SimObj objects. Within the main scenery editor, these objects will be treated as a single SimPropContainer object, meaning that when you select it and then use the Gizmo to transform or move it, every object within the container will be moved and transformed as a group, as if they were all a single object. You can find more information on how to create objects to be used in a SimPropContainer from the following page:
When you select this object type you will be presented with a list of different SimPropContainer elements listed in the Objects window:
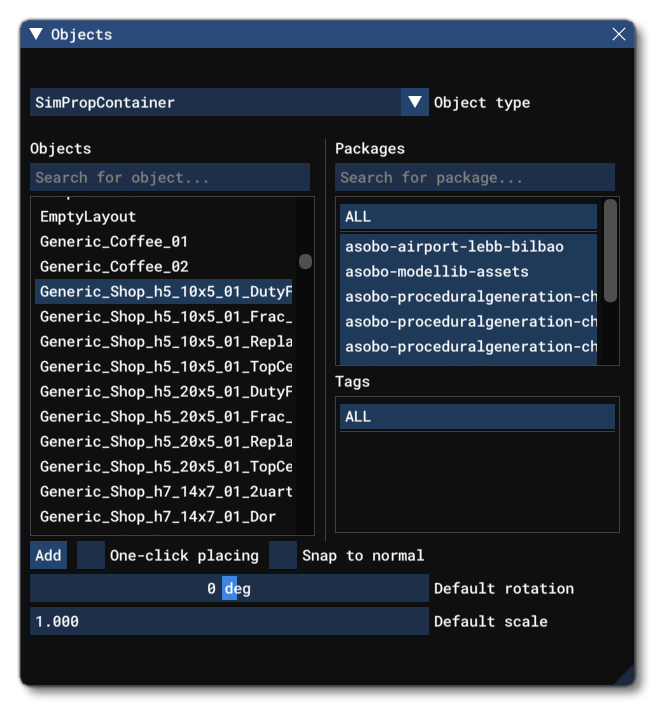
The exact number and kind of elements listed will depend on the version of Microsoft Flight Simulator 2024 that you are running as well as what packages you have installed and whether you have added any custom packages.
To place a SimPropContainer element in the scene you can click the Add button, and then use the Translate Gizmo to position the object where you want, or you can enable One-Click Placing and simply click in the world to place it. You may also use the Rotation Gizmo to change the angle the element is shown at, as well as the Scale Gizmo to change its size. Note that all Gizmo controls will act on the SimPropContainer as if it was a single object, even though it is comprised of multiple individual scenery Objects or SimObj objects.
Properties
SimPropContainer objects have the following Properties which can be edited:

-
Name
This is the name of the element as defined from its file.
-
Display Name
This is the name of the element as it will be displayed in the The Scenery Contents List. This can be edited and is helpful for identifying elements when you have a lot of items in the content list, all from the same base resource.
-
Instance ID
Here you can find the unique GUID-formatted Instance ID for the instance of the object element placed within the simulation. This can be useful for many things like when creating mission scripts (for example), and can be easily copied for use elsewhere using the
Copy...button.
-
GUID
This shows the unique GUID for the SimPropContainer element. This ID value is for the base SimPropContainer itself, and will be shared with all instances of the element that are placed in the world. Use the Instance ID if you require a unique GUID for a specific instance of the SimPropContainer element. You can press the
Copybutton to copy the GUID to the clipboard if required.
-
Snap To Ground
This option is enabled by default, and will "snap" the SimPropContainer element to the ground so that - regardless of the terrain height - the element will always be at ground level, even when moving it. Enabling this means that the altitude Gizmo does nothing, while disabling this will permit you to change the altitude. When this is disabled, you will have a new option present in the Properties window:
-
Offset To Ground
This value is the altitude from the ground for the object, and editing it will raise or lower the element (and changing the altitude using the Translate Gizmo will also change this value automatically.
-
-
Snap To Normal
When enabled, the SimPropContainer element will change orientation based on the terrain surface normal underneath the center-point of the element. When disabled, it will maintain the default orientation regardless of the terrain underneath (or the orientation which is set using the Rotation Gizmo, and note that when enabled the Rotation Gizmo will only affect the horizontal axis around the center of the element). This option is disabled by default.
-
Snap To Building
When enabled, the scenery object element will snap to the height of any procedural building that is at the position where it has been placed. This option is disabled by default.
-
Use Low Resolution Altitude
This option, when checked, will force the simulation to use a lower resolution altitude calculation when calculating the placement of the SimPropContainer in relation to the camera. In general this option only needs to be checked when the object is placed on a slope and you can see it "bounce" up or down in altitude as the camera gets closer/farther from it. Enabling this option should stop this changing visual altitude.
-
Ground As Reference
When this is enabled, the object altitude will be based on AGL, meaning that the object will always follow the height of the terrain and adapt to any changes that have been made by other scenery.
-
Hide on TIN
When checked, this option will hide the object element unless the TIN data is unavailable, for example when the user is offline, at which point it will be visible. The option is disabled by default.
-
Replace With
The
Replace with...button permits you to select a different Scenery object / SimObject / SimPropContainer for the tower object element:
 Depending on what you select from the window these options open, the properties for the object may change.
-
Edit SimPropContainer
The
Edit SimObjectContainerbutton is used to open the SimPropContainer object in the Scenery Editor so that it can be edited.
SimProp Container Only Properties

If the SimProp Container is being added to another SimProp Container, the properties will show the following additional 3 options:
-
Only In Edition
When this is checked, the simprop container will only be visible when the the simprop is being edited, but not when placed in the simulation.
-
Optimizable
Checking this option means that the object can be "optimized", ie: the simulation will modify the spawn probability based on the user graphics settings.
-
Override AO Strength
When checked, this option will show a slider that permits you to override the automatic ambient occlusion settings. This can let you better match the lighting on the object with the rest of the scene.
Creating A SimPropContainer Object
SimPropContainers are objects that are used in scenery and stored within the unique SimPropContainer library Asset Type. This asset library is listed individually within a package in the project editor, and can contain multiple SimPropContainer objects:

The simplest - and recommended - way to make a SimPropContainer object is to use the Scenery Editor. You should create or open a scenery project, and then in the Scenery Editor go to the Create Empty SimPropContainer option in the Edit menu. This option will then open a sub-window prompting you to give a name for the container, and select the package that you wish to add it to (the current package, by default):

After you click Create, you will then be able to edit the SimPropContainer in the Scenery Editor.
NOTE: If there is no SimPropContainer Library already in the project, then one will be added, and the SimPropContainer will be added to it. Further containers will be added to the same library.
The editor itself will have changed to show only the contents of the SimPropContainer in The Scenery Contents List, since you are no longer editing the scene but the contents of the container object. To go back to editing the full scene and save the SimPropContainer, you can click the Go Back To Main Scene Button.

Alternative Creation Methods
There are two other ways that a SimPropContainer library (and SimPropContainers) can be created in a package. These are explained below. Note that these are provided as an additional production route for those that require it, however using the Scenery Editor is the recommended way to create a SimPropContainer.
The Project Editor
The first alternative for creating a SimPropContainer is to create it using the Project Editor. For this you would simply open - or create - a project, and then click the Add Asset Group:

This will bring up the Asset Creation Wizard, where you should select the SimPropContainer asset group:

You will be asked to give the container a name, and also select the "empty" template for the SimPropContainer, and then you can click on the create button to add the new asset group to the project. At this point the Scenery Editor will change to the Sim Prop Container, and you can edit the contents.
Using An Object
It is possible to create a SimPropContainer object within the Scenery Editor using either a Scenery Object or a SimObj Object. For this, you need to add the required object to a scene within the Scenery Editor, and then open the Properties window for the object. In the properties window there will be a button marked Convert To SimPropContainer:

Selecting this option will open a sub menu where you can name the SimPropContainer and select the package it should belong to:
You can then go ahead and edit the contents of the SimPropContainer as you would with any other creation method. However, it should be noted that the object that was used to create the SimPropContainer becomes the pivot for the container, and so cannot be moved within the container object. This also means that if you edit the object model at any time in the future, you cannot change the root/pivot otherwise you will have issues after importing the changed model to the simulation.
Editing The SimPropContainer Library Contents
Once you have created a SimPropContainer object, you will want to add further parts to it to create the final model to be used within your scenes. To edit a SimPropContainer, simply select the SimPropContainerLib asset group from the list in the Project Editor, then in the Inspector window, click the Load In Editor button (if it's not already open for editing after being created):

If the SimPropContainer Library has multiple SimPropContainers within it, then you will be shown the following window:

From this window you can select the container that you wish to edit, which will automatically open it in the Scenery Editor.
Within this container you can then add the following objects to make the final SimProp:
- Decal Objects
- Light Objects
- ProceduralInstance Objects
- Scenery Objects
- SimObj Objects
- SimPropContainer Objects
- Tree Objects
These objects can be added to the SimPropContainer just as you would add any other object to scenery, however - once the SimPropContainer is complete - when it is added into the scene all these objects will behave as if they were a single unique object. It is worth noting that to aid with the process of creating your SimPropContainers, you can use the Snap To Mesh option from The Edition Gizmo tool. This permits you to align objects perfectly for things like walls, windows, structures, etc...
It is worth noting that you can create a SimPropContainer and then use it within another SimPropContainer. For example, when building an airport it may have multiple concourses that all have the same design. In this case you may wish to split a single concourse into multiple segments where each segment can be made of multiple parts. So, you would create a SimPropContainer for a single segment, then create another container where you would place multiple segments to create the concourse. This concourse SimPropContainer can then placed multiple times in the world.
Once you have completed the SimPropContainer, you can then use the Save Scenery button in the Scenery Editor to save the contents of the container ready for use in a scene. You should then build the package and the new SimPropContainer will be visible in the scenery editor for placing in the scene.
Duplicating And Deleting A SimPropContainer
There may be times where you wish to either duplicate or delete a SimPropContainer from with the SimPropContainerLib, you can do this from the Asset Path Selection window:
This window is opened when you select the Library in the Project Editor and then click Load In Editor. It can also be opened from the Scenery Editor by clicking the containers Select button, then selecting the SimPropContainerLib that you want to edit:


From here you can use the Delete and Duplicate buttons to edit the contents of the Library.
Related Topics