AIRCRAFT LOADS
All aircraft, regardless of the task they are designed to perform, can have loads assigned to them, either as part of the aircraft Attachments or the aircraft variation Presets. A "load" in this context is simply something that adds mass to the aircraft - something other than the passengers or pilot/crew - at one or more specific points. For example, the suitcases in the hold compartment when in free flight with passengers, or the cargo being transported as part of a cargo career mission. On this page you can find instructions on how to set up your aircraft to spawn loads, as well as how to create them.
Reference Points
Loads are positioned relative to a reference point that has been assigned to the aircraft. So, the first thing you will need to do is load the aircraft you wish to add a load to into The SimObject Editor, and then browse to the reference_points.cfg tab. On this tab you should add a reference point and position it approximately where you want the loads to spawn:

IMPORTANT! Once the reference point has been placed and the loads have been defined, the reference point cannot be moved without "breaking" the load position. The reference point is also used by all SimProp Containers so each load will be placed relative to it's position (this is why the reference point in the image above is in the center between the two cargo areas).
The only other thing that the reference point(s) need, other than a position, is a name. The name should be unique and appropriate to the position/use of the point, as it will be used in the loads.lbl file you'll be creating later, as well as in the SimProp Containers that you will create.
Once you have the reference point(s) defined for the aircraft, you should be in freeflight and then Pause the Simulation before continuing onto the next step.
SimProp Container Loads
The loads themselves are created using SimProp Containers, since these permit you to create a container object with multiple sub-objects, and so adapt the load to fit the space available in the aircraft. For that you will need to add a new package to the project so you can add the necessary containers. You can do this using the Project Editor wizard, which should be setup something like this:
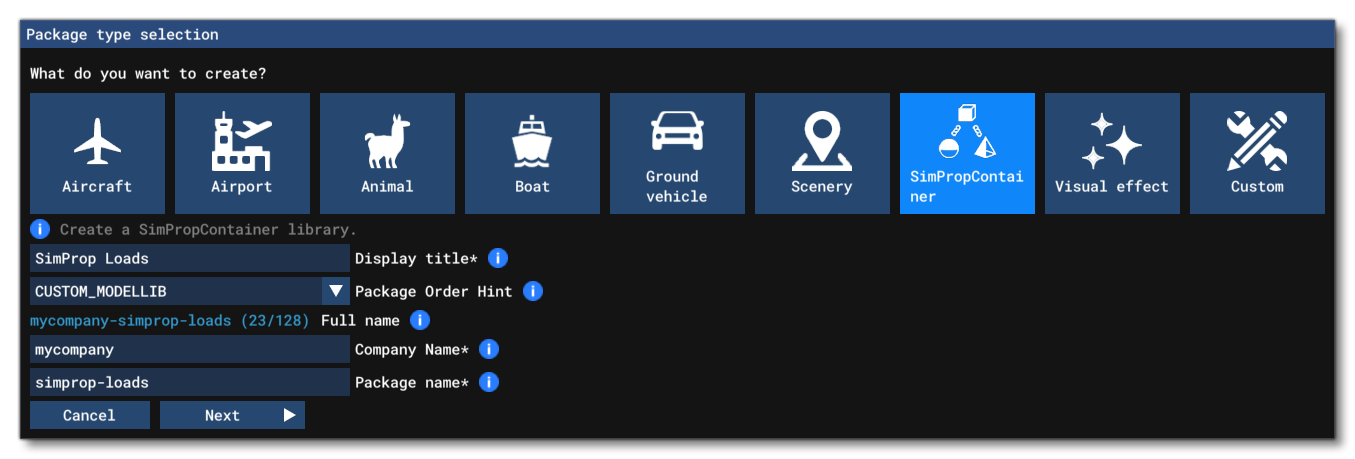
When you click the Next button, you will then be asked to give an asset group and the name of the first SimProp Container that will be added to it. Keep in mind that you'll need at least three containers for "light", "medium", and "heavy" loads, but you can make more if required - as in this example where there are "left" and "right" versions of each load as well as the different sizes. The image below shows the creation the "heavy" and "left" SimProp Container (the one that will be used when the left-hand aircraft hold is "full"):
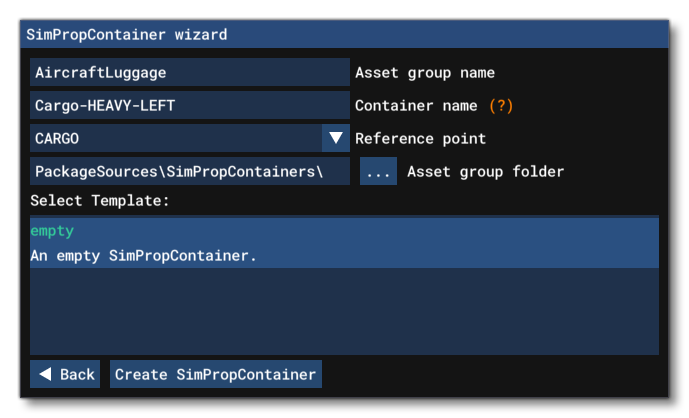
In this window you can give the relevant information for the SimProp Container asset group and the first SimProp Container object that will be added. Don't forget to set the Reference Point option to the one you created previously.
Future SimProp Containers
This page only describes the setup for a single SimProp Container object, however after you have the first created, you will need to create more. The process for them is the exact same as that listed here with a single difference: further SimProp Containers will need to be created in The Scenery Editor. This is done as follows:
- In the Project Editor right-click on the SimProp Container Lib asset group you created previously and select Load In Editor.
- The Scenery Editor will now open with the SimProp Container library and the current SimProp Container objects listed in the contents:
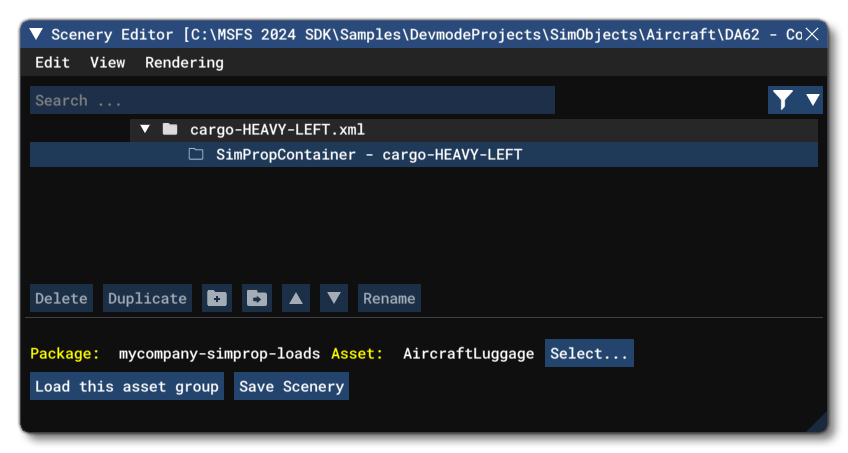
- From The Edit Menu, select Create Empty SimProp Container.
- In the window that opens, ensure you have selected the correct package, library and reference point, and give the new SimProp Container object a name, as shown in the image below:
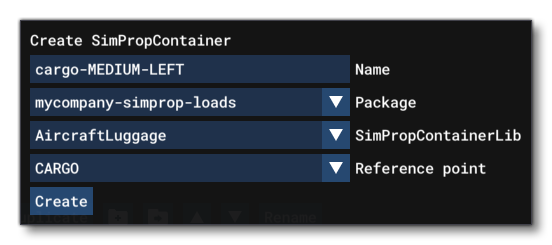
- After clicking the
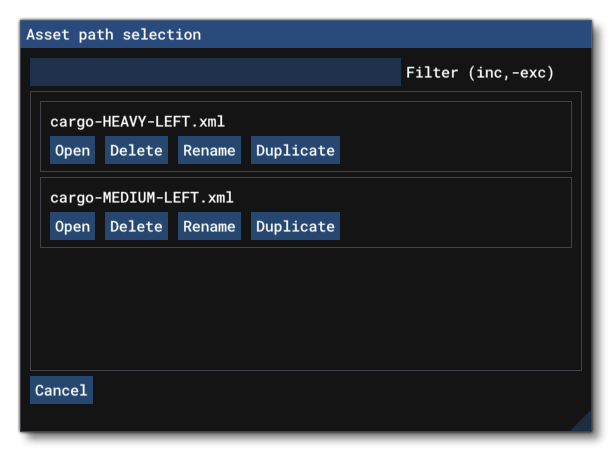
Createbutton, you should save the project and then continue to edit the SimProp Container as required. - The next time you use the Load In Editor for the SimProp Container asset group, you will be able to choose which one you want to edit:
Placing Load Objects
With the SimProp Container open in the Scenery Editor you can start to place the objects that will comprise the load into the scene. For this you should ensure that the simulation is paused to prevent any unwanted collisions moving the aircraft or the objects. We'll be using objects that are included for this purpose as part of the core simulation files, but you can use your own custom objects as well (these will need to have been created in a separate ModelLib in the project):
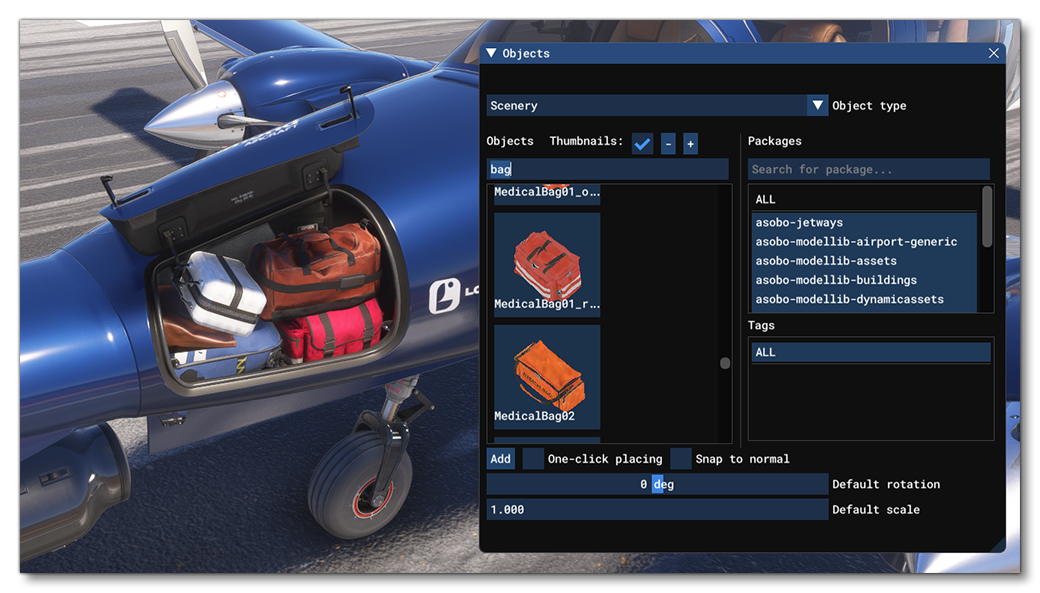
Once finished, you should click the Save Scenery button in the Scenery Editor, and you can then continue to make the other loads (based on the different weights and positions of the loads the aircraft can carry). The image below shows all the files that have been created for the DA62 aircraft, which is what was used to create this example:

Note that you can also create additional loads to cover specific preset variations, such as cameras and equipment for a Scientific Research mission, palettes and boxes for a Cargo Transport mission, etc... These would go in the Presets folder rather than in a more generic Attachments folder for the aircraft body.
Navigation Graph Nodes
The next part of load creation is to set up the navigation_graph.cfg. This file is used to tell the simulation where exactly to position the loads, as well as whether to spawn them or not, and what kind of maximum mass should be expected. For all this to work the file must be named as follows:
navigation_graph_cargo.cfg
This file will be placed either in the Presets folder or the Attachments folder, depending on the setup of the aircraft (it can even go in the Common folder, if all aircraft variations spawn loads at the same positions with the same base properties).
This file requires nodes for each of the positions where cargo can be spawned, and each of these nodes should have the following parameters:
name- This is the name of the node, and it will be used in the associated loads.lbl file to filter the SimProp Containers that can be spawned on the node.tag- This is the node tag, which should be "CARGO".pos- This is where you set the position of the node.
NOTE: This is not the position where the load SimProp Container will spawn, it is simply the position of the node, but it should still be placed approximately at the position of the load, as it is may be used by other related systems.modelNode- This is the name of the reference point previously created for the SimProp Containers.node_occlusion_factor- This value can be used to multiply the ambient occlusion of the SimProp Container objects so that they look correct based on the lighting of the area where they are being spawned.spawnLoad- This should be set to 1 (True) otherwise the visuals for the load will not be shown.massSection- if it is directly related to the mass sections listed for the aircraft, specific to load in this situation
The modelNode, name and the load settings in the EFB, will determine which SimProp Container is spawned based on the labels in the LBL file (as explained in the Loads.lbl Setup section, below).
Station Loads
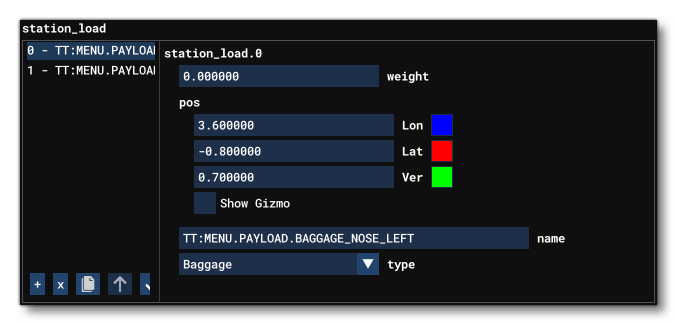
The nodes that you add will not be used for the weight distribution of the loads within the aircraft, only for spawning the visual SimProp Container assets. For weight distribution, you will need to assign one or more station_load.N sections (found in the flight_model.cfg), ensuring that each station load has a name, as this will be used to assign a mass section it in the navigation graph file. The number and placement of the stations should reflect the approximate distribution of how the loads could be placed within the aircraft. For example, a small aircraft may only have 2 stations, left and right, while a large aircraft could could have many more (front, front left, left, back left, etc...). It is worth noting that the weight input for the station load should be set to 0, as it will be modified by the different flight activities to reflect the actual weight being distributed at the point, and the type should always be set to baggage.
Mass Sections
Having added the various stations, the next thing to do is go back to the navigation graph and create Mass Sections for each of the stations that you added previously. Each of these mass sections should have a name that represents the station it is assigned to, it should have a fill proportion of 1, and it's maximum mass should be a percentage of the total maximum mass permitted (proportional to the total number of mass sections). So, for example, if you have 4 mass sections and the aircraft is to be used for medium cargo, each mass section would have a maximum weight of 793kg.
NOTE: The total maximum weight for the mass sections should equal the maximum permitted weight for the aircraft cargo, but it does not have to be split equally between the mass sections. Distribution can be setup to add more weight to specific sections if that is realistic for the aircraft, as long as the total combined weight of each section is not more than the maximum permitted weight.
The image below shows an example of the mass section setup:

Once the mass sections have been set up, they will need to be added into the Main Graph section of the navigation graph, and they will also need to be listed in the Mass Section parameter for the node that was created previously.
Navigation_graph_cargo.cfg Example
The following shows an example of how an aircraft like the DA62 would be setup in the navigation_graph_cargo.cfg file, where there are two cargo/load compartments, with their accompanying nodes and mass sections:
[VERSION]
major = 1
minor = 0

[Node.0]
name = cargo_nose_left
tag = CARGO
node_occlusion_factor = 1.5
pos = 3.600000, -0.800000, 0.700000
modelNode = CARGO
spawnLoad = 1
massSection = CARGO_LEFT

[Node.1]
name = cargo_nose_right
tag = CARGO
node_occlusion_factor = 1.5
pos = 3.600000, 0.800000, 0.700000
modelNode = CARGO
spawnLoad = 1
massSection = CARGO_RIGHT

[MassSection.0]
name = front_cargo_left
stationLoadName = TT:MENU.PAYLOAD.BAGGAGE_NOSE_LEFT
maxMass = 300
fillProportion = 1

[MassSection.1]
name = front_cargo_right
stationLoadName = TT:MENU.PAYLOAD.BAGGAGE_NOSE_RIGHT
maxMass = 300
fillProportion = 1

[MainGraph.0]
nodes = cargo_nose_left,cargo_nose_right
massSections = CARGO_LEFT,CARGO_RIGHT
Loads Project Folder
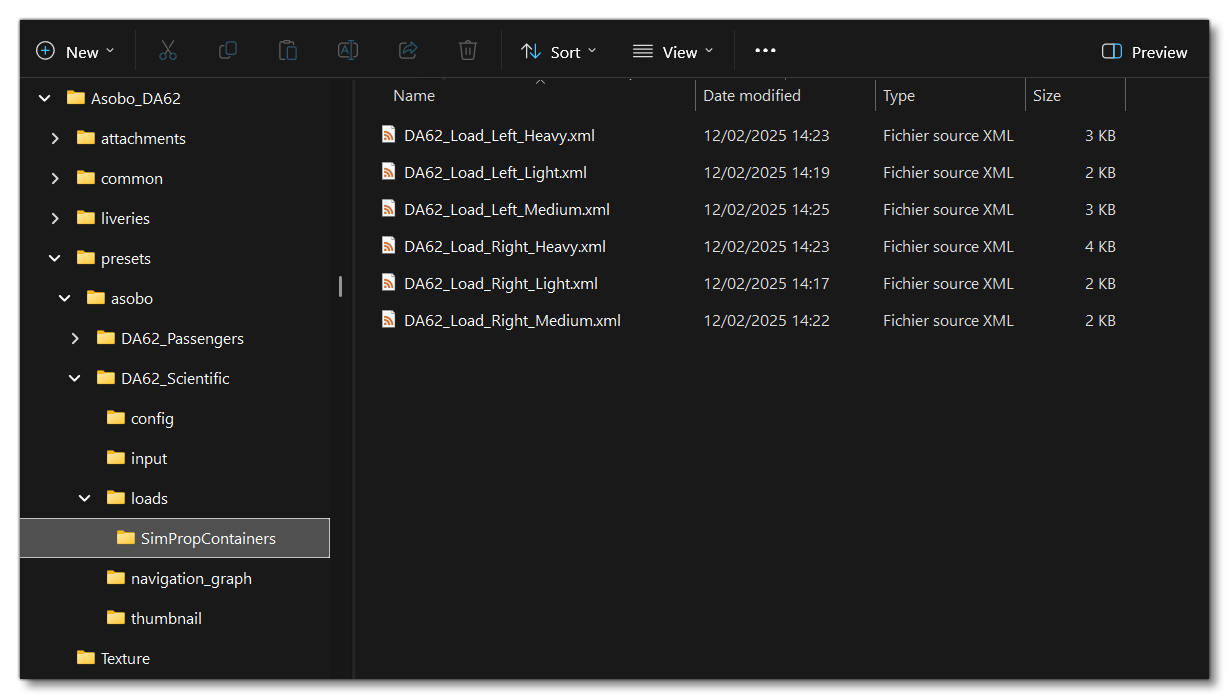
Having set up the CFG files and created all the required SimProp Containers, you need to create a new folder called "Loads" in the aircraft package. This folder will either be added to the Presets folder or the Attachments folder, depending on whether you are creating loads for a specific aircraft variation preset, or just a generic load in an attachment (for example, the airframe body). Once you have created the Loads folder, you will then need to create a sub-folder called "SimPropContainers". In this sub-folder you need to copy the previously created SimProp Container XML files for the package:
At this point you could remove the SimProp Container package from the project, as it plays no active part from now in on the creation of the loads in the simulation. However, if you need to edit the containers at any time, then this is not recomended.
Loads.lbl Setup
The final file to create is the loads.lbl. This is a Dynamic Library file that is used by the simulation to decide which SimProp Container to spawn based on the labels used in the file, and the state of the simulation. The concept is simple: when a load needs to be spawned, this file is parsed, and the load that has labels which are appropriate for the occasion is spawned. If multiple loads in the LBL file are found to be appropriate, one will be picked at random.
When creating the LBL file, you will need to give the GUID of the SimProp Containers, which can be found in the SimProp Container XML itself:

You will need to create at least one LBL file entry for each of the SimProp Containers that you have created for the aircraft, and the file itself has the following required format (although you can add further labels if needed):
{
  "LabeledSimPropContainers": [
        {
            "Name": "Load_Name_01",
            "SimPropContainerGUID":"{the_GUID_of_the_load_01}",
            "Labels": [
            {
                "Key": "Aircraft",
                "Values":["Aircraft_Variation_01","Aircraft_Variation_02"]
            },
            {
                "Key": "Weight",
                "Values":["Weight_Variation_01"]
            },
            {
                "Key": "LoadType",
                "Values":["Boxes"]
            },
            {
                "Key": "NodeName",
                "Values":["node1"]
            }
            ]
        },
        {
            "Name": "Load_Name_02",
            "SimPropContainerGUID":"{the_GUID_of_the_load_02}",
            "Labels": [
            {
                "Key": "Aircraft",
                "Values":["Aircraft_Variation_01","Aircraft_Variation_02"]
            },
            {
                "Key": "Weight",
                "Values":["Weight_Variation_02"]
            },
            {
                "Key": "LoadType",
                "Values":["Boxes"]
            },
            {
                "Key": "NodeName",
                "Values":["node2"]
            }
            ]
        }
    // ETC....
    ]
}
In the example we've been using of a small aircraft like the DA62 with a left and right luggage compartment, you would have six entries in this file, ie: light, medium, and heavy definitions for each of the two compartments. Clicking the link below will expand the full example of the DA62 so you can see a completed version of this file.
Once this file is complete, it should be saved in the Loads folder.
Testing Loads/Cargo
Coming Soon!
Related Topics