SCENERY XML AND MODEL CFG
When it comes to creating scenery, you will need to have at least one model.xml file included with the exported model files, and - in the case of a SimObject - model.cfg file. On this page we'll go through the basics of how to make these files.
Scenery Static Objects
A static scenery object is one that has no animations or interactions within the simulation (other than collisions), and so you do not need a model.cfg file, and only one XML file per model. This XML file doesn't need to be created and added to the files manually either, as it can be created using the 3DS Max Multi-Exporter or the Blender Exporter. The file itself simply contains the information that the simulation needs to generate the correct LODs based on the size on screen of the model, something like the following:
<?xml version="1.0" encoding="utf-8"?>
<ModelInfo guid="{e6381078-bc26-4d2d-aa3a-ca8801677e2a}" version="1.1">
   <LODS>
      <LOD minSize="220.0"/>
      <LOD minSize="80.0"/>
      <LOD minSize="35.0"/>
      <LOD minSize="10.0"/>
      <LOD minSize="1.0"/>
   </LODS>
</ModelInfo>
You'll notice that there is no file path given for each of the LODs. This is because the XML file should be named the same as each of the model files (minus the LOD suffix), and the simulation will look for those files. For example:

Once you have all the necessary model files, you can add the object to the Scenery Editor, as explained here:
Scenery SimObj Objects
If you are making SimObj objects for use as scenery, then you will need the following:
- the
*.glTF,*.bin,*.xmland*.cfgfiles which should be placed in the model folder. - the different textures which should be placed in the texture folder.
- the different animation files (
*.bin) which should be placed in the animations folder. - the
sim.cfgfile which goes beside the other folders.
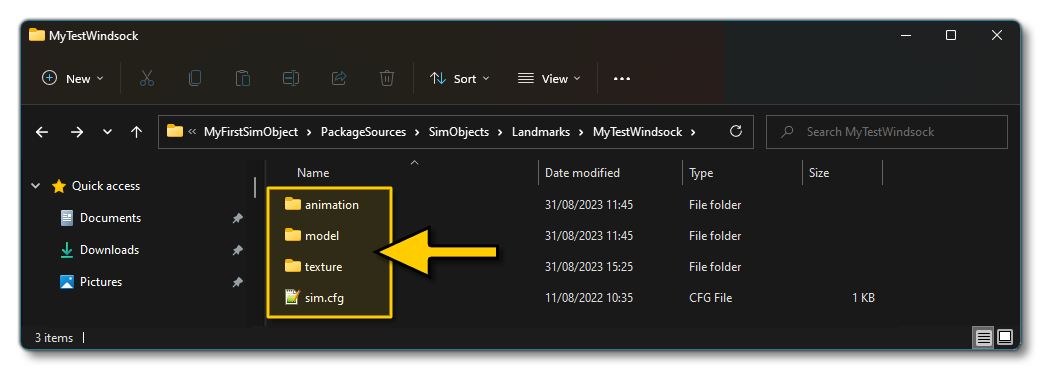
When you first created the SimObject project, only the main folders will have been created, so you will need to manually add the sub-folders and files listed above. The AssetDir structure should be like this:

model.cfg
This file is very simple to setup and tells the simulation what XML files will be used to define the different models used for the different LODs, as well as to define their animations and behaviors. The file should be placed in the models folder and The first thing you need to do here is setup the [models] section to point to the file which will define the SimObj model behaviors. This file doesn't exist yet - you'll create it later - but you can still give the name here:
[models]
normal=SimObjNameHere.xml
model=[ModelPath]
texture=[TexturePath]
Note that the model and texture parameters can be left blank if you are using the model and texture folders beside the CFG file.
The next thing you would need to add to this file is the [General] section. This section has some parameters that are used to tell the simulation what kind of SimObj object it is and at what distance the animations can be ignored (since they will not be visible, or too small to be worth the processing power):
[General]
category=StaticObject
DistanceToNotAnimate=2000
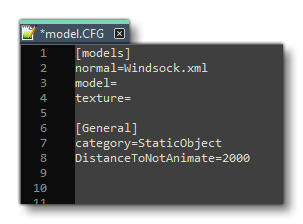
After this, the whole file should look something like this:

At this point you want to save the file to the "models" folder for the scenery, which should have a path similar to the following:
ROOT\<PackageName>\PackageSources\SimObjects\Landmarks\<SceneryName>\model\model.cfg
Model XML
Having created the CFG file and referenced the XML file, the next logical step is to create the XML file. This file will be similar to that for a static object with no animation, as all you need them to do is tell the simulation which glTF file to use for each specific LOD.
IMPORTANT! Unlike for static objects, you cannot use the multi-exporter (3DS Max or Blender) to generate your XML and you have to create this file manually and fill it in manually.
This file should be created in the in the same location as the model.cfg file - and it should be named after the name of your scenery (eg: Windsock.xml). Ensure that this is the same filename that you gave for the normal parameter in the CFG file.
NOTE: If you'd like more information on the different XML elements used in these files, please see the following page: Model XML Properties.
With the file for the scenery SimObj object created, you should open it and add in the following:
<?xml version="1.0" encoding="utf-8" ?>
<ModelInfo version="1.0" guid="">
    <LODS>
        <LOD MinSize="10" ModelFile="Windsock_LOD00.gltf"/>
        <LOD MinSize="5" ModelFile="Windsock_LOD01.gltf"/>
        <LOD MinSize="1" ModelFile="Windsock_LOD02.gltf"/>
        <LOD MinSize="0.1" ModelFile="Windsock_LOD03.gltf"/>
    </LODS>
</ModelInfo>
Once you have that, you can save the file to the same location as the model.cfg. Note that the values given don't need to be edited straight away and you can copy those shown above as placeholders until you can test the scenery in the simulation and adjust them as required. If your scenery has more or less than the five LODs shown in the example code, then simply adapt the values shown as required.
That should be enough information for you to actually get the scenery package loaded into the simulation and see how it looks when placed in the world. However, the XML will also contain more information related to the animations that the scenery uses and how interactions with the world should be performed. In the following complete example, for a windsock, there is some XML to setup the animations and also some XML to get the current wind direction:
<?xml version="1.0" encoding="utf-8" ?>
<ModelInfo version="1.1" guid="{ebb99e88-a7b4-43da-b2d0-1d2c7dcc23f2}">
    <LODS>
        <LOD MinSize="10" ModelFile="Windsock_LOD00.gltf"/>
        <LOD MinSize="5" ModelFile="Windsock_LOD01.gltf"/>
        <LOD MinSize="1" ModelFile="Windsock_LOD02.gltf"/>
        <LOD MinSize="0.1" ModelFile="Windsock_LOD03.gltf"/>
    </LODS>
    <Animation name="Knots_00" guid="0096FD0E-EE60-45AF-968E-6F450DAEF1D0" type="Standard"/>
    <Animation name="Knots_05" guid="62E315C3-B373-4042-A4C8-BFB80A556DB7" type="Standard"/>
    <Animation name="Knots_10" guid="92D6EDCE-7F4B-4AB3-9F9B-91CC7EB462FA" type="Standard"/>
    <Animation name="Knots_15" guid="09E22898-E9EF-4A82-9A61-FF88EA595BB7" type="Standard"/>
    <Animation name="Knots_20" guid="FF244E92-4407-479F-8C3C-FB09254D87CB" type="Standard"/>
    <Animation name="Knots_25" guid="EE3688CA-1F3B-4E6F-AF97-A8E38F0F2905" type="Standard"/>
    <AnimGraph>
        <DefaultState name="Anim"/>
        <BlendTreeState name="Anim">
          <Animations>
            <Animation guid="0096FD0E-EE60-45AF-968E-6F450DAEF1D0" loop ="True" speed="1" threshold="0"/>
            <Animation guid="62E315C3-B373-4042-A4C8-BFB80A556DB7" loop ="True" speed="1" threshold="5"/>
            <Animation guid="92D6EDCE-7F4B-4AB3-9F9B-91CC7EB462FA" loop ="True" speed="1" threshold="10"/>
            <Animation guid="09E22898-E9EF-4A82-9A61-FF88EA595BB7" loop ="True" speed="1" threshold="15"/>
            <Animation guid="FF244E92-4407-479F-8C3C-FB09254D87CB" loop ="True" speed="1" threshold="20"/>
            <Animation guid="EE3688CA-1F3B-4E6F-AF97-A8E38F0F2905" loop ="True" speed="1" threshold="25"/>
          </Animations>
          <Value>(A:AMBIENT WIND VELOCITY, KNOTS)</Value>
        </BlendTreeState>
     </AnimGraph>
    <Behaviors>
        <Include ModelBehaviorFile="Asobo\Misc\SimObjects.xml"/>
        <Component ID="WindSock">
            <UseTemplate Name="ASOBO_WindDirection_Template">
            </UseTemplate>
        </Component>
    </Behaviors>
</ModelInfo>
The animations and interactions with the simulation are all dealt with using the Model Behavior system, which is explained in detail in the following section: