USING WWISE
This page outlines how to use Wwise along with the Sample Project supplied with the Microsoft Flight Simulator SDK. This sample project can be found from the following folder:
<SDK ROOT>\MSFS SDK\Samples\WwiseSampleProject\
It is important to note that you can't create a Wwise Project from scratch and use it to generate audio content for Microsoft Flight Simulator. Even if you create the same buses in the Master-mixer Bus hierarchy, they won't be recognized by the game. To create new content, use only the shared WwiseSampleProject as your base.
IMPORTANT! The WwiseSampleProject is regularly updated and so you always should ensure that you are using the latest version supplied with the current SDK.
If you are unfamiliar with Wwise then we recommend that you go through the tutorial supplied by AudioKinetic, available from the following link, before going any further:
It is also strongly recommended that you review the following page to get full details on licencing Wwise before continuing:
Finally, while this page gives an overview of how to create your sound effects packages and how to integrate them with your aircraft package, it is not a comprehensive step-by-step guide on using Wwise and the sound.xml/soundai.xml files. However we have created a full tutorial that covers the entire process of creating both simple and complex sound effects as part of the Aircraft Tutorial, which you can find here:
Before Getting Started
Before you start doing anything, it's important to know what you can and cannot do with the supplied Wwise project, so we've compiled the following list to help you:
- You can create your own Soundbanks and Packages,
- You can edit the Actor-Mixer Hierarchy and the Event Hierarchy, in order to create and integrate your own audio content
- You can create your own SimVar Game Parameters if the ones that are shared do not include the ones you need
- You can create your own Attenuation Shareset
- You can create your own Effects Shareset and use it in your Actor-Mixer Hierarchy (please keep in mind that moderate use of these effects is recommended, as they may have a significant impact on game performance)
However:
- You can't make any edits to the Master-Mixer Hierarchy (creating new output buses or auxiliary buses, adding some effects, etc...), but you can use it to route your sounds. Please visit the Master Mixer Hierarchy page in order to find out how to route your sounds.
- You can't edit or create new States and Switches, but you can use all the shared States and Switches game syncs. Please visit the Shared states and switches page in order to find out how to use the shared
game_sync.
Note that the base structure of the project is included in the initialisation soundbank of Microsoft Flight Simulator. This structure will be maintained over time and it won't be subject to any changes.
Finally, here are a couple of very common mistakes that people can make and that should be avoided:
- Mixing too low or too high: Microsoft Flight Simulator is mixed in compliance with the ITU-R BS 1770-3 recommendations. Every audio content provider should follow these guidelines, so that together we ensure a consistent mix of all community audio content. Please visit the Audio Mixing Standards page in order to find out how to deal with your aircraft loudness mix in Microsoft Flight Simulator.
- Incorrect routing: please make sure to send your sounds to the right bus, so that the in-game mixer will apply to your aircraft. The Master Mixer Hierarchy page will help you find out how to route your sounds.
- Do not exceed the clip distance in your attenuation shareset:
- Aircraft player: clipping distance is set up to 10,000 meters,
- AI Aircraft: clipping distance is set up to 5,000 meters.
We invite you to explore the WwiseSampleProject and the aircraft samples so you can have an overview and a better understanding of the implementation process.
Workflow
Now you have an idea of some of the do's and don'ts when using the Wwise Sample Project, let's go ahead and create the required SimObject workflow and packages. We'll start by creating our SimObject work units:
IMPORTANT! Because the Microsoft Flight Simulator SDK is constantly being updated, you will need to build your work space by creating several WorkUnits in the WwiseSampleProject in order to avoid your work being overwritten by future SDK updates.
- Start by creating your Actor-Mixer workunit, by going to the "Audio" tab in the Project explorer window. Name it with your company name, followed by your aircraft name. For an AI aircraft, just add an "_AI" suffix:
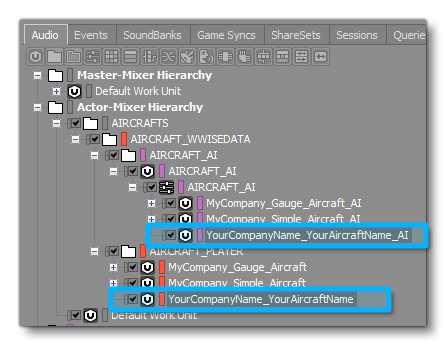
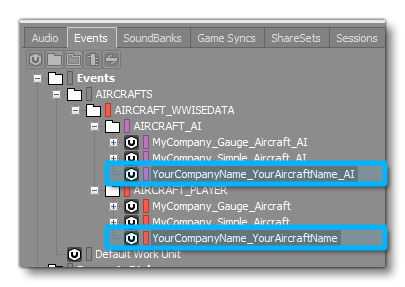
- Create your Event workunit by going to the "Event" tab, and also name it like your previous actor-mixer workunit. Do the same for AI aircraft, just add "_AI" suffix:
- You'll then need to create your own workunit for all the content you'll create:
- ShareSets
- Game Parameters
- Sessions
- Queries
Create Player And AI Soundbanks
In the Wwise Project Explorer window go to the Soundbanks tab, and create your workunit and your own aircraft soundbank. The name of the soundbank must be the one described in the sound.xml in the Wwisepackage element. For more information about the WwisePackage element, please see the sound.xml page. We recommend that you also name it just like you Actor-Mixer & Event workunit, eg:
: YourCompanyName_YourAircraftName.
And the same for an AI aircraft, just add "_AI" suffix to your AI soundbank:

Once the creation is completed, simply drag and then drop your freshly created event *.wwu onto your soundbank from the Wwise Soundbank layout:
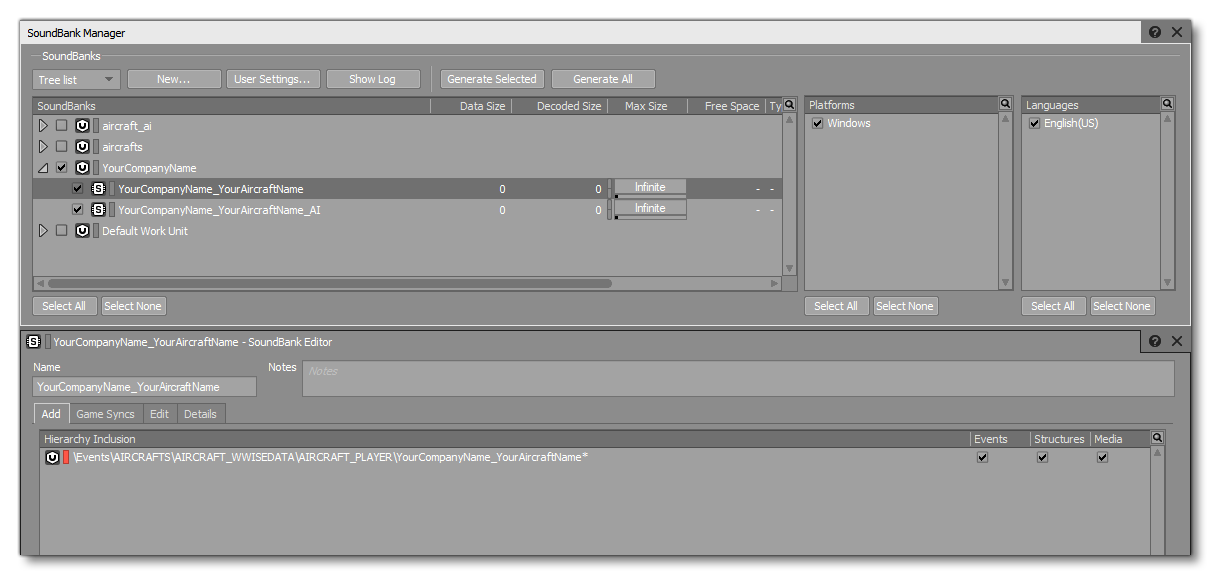 You now need to generate the Wwise Soundbanks using the with the "Generate" button in Wwise.
Create your Simobject package (PC.PCK)
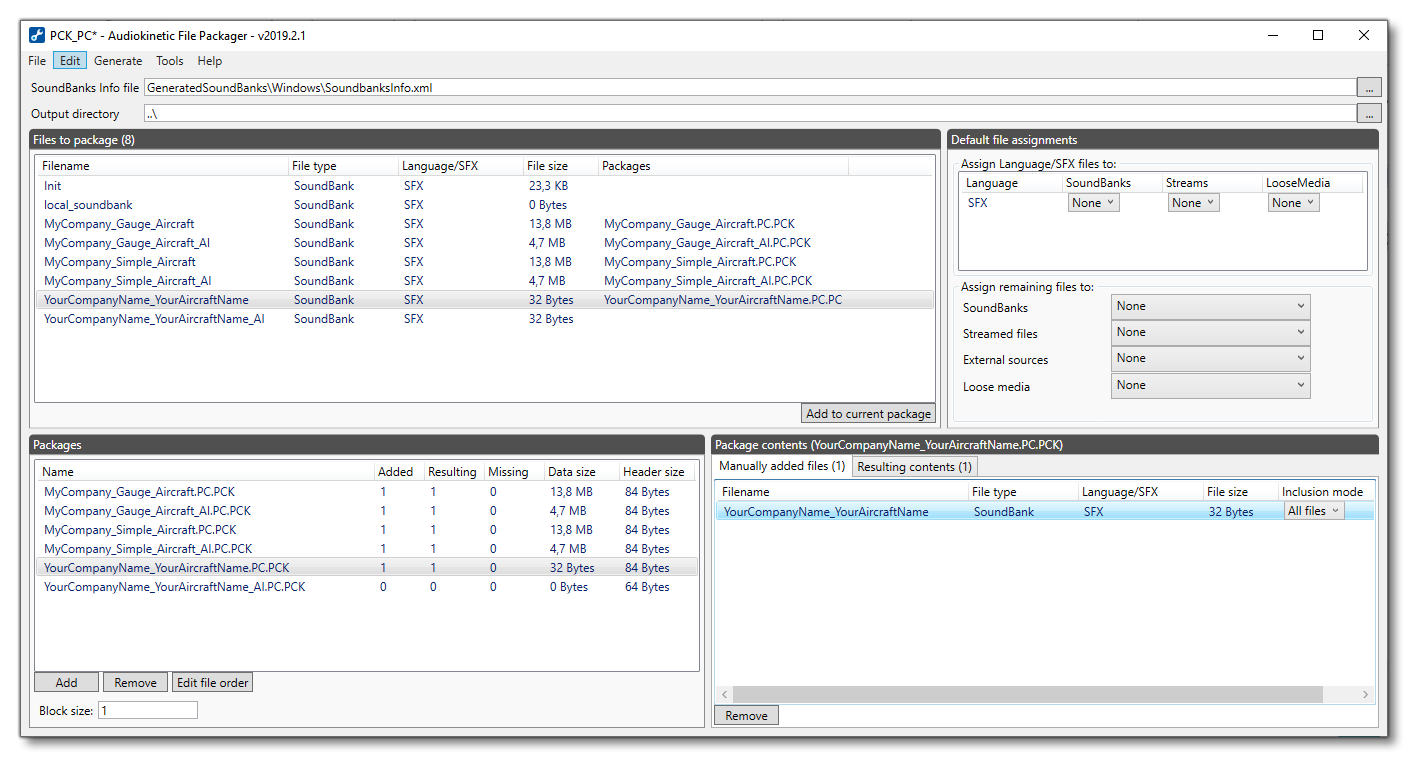
You now have everything required to create your SimObject.PC.PCK file. To do so:
- Launch the
FilePackager.App.exefrom your Wwise installation path. - Open the
PCK_PC.wfpprojlocated in the Wwise Project directory. - Create you own package, naming it as your Soundbank and adding the "
PC.PCK" extension: Your AI packages also require the "_AI" suffix. - Simply drag and drop your Soundbank into your packages.
- Generate
- Copy and paste the Package from the GeneratedSoundbanks folder in the WwiseSampleProject into the
sound(orsoundai) folder of your SimObject.
NOTE: A version of Microsoft Flight Simulator higher than 1.3 is required to load the soundbank.
Your PC.PCK file must now be referenced in your sound.xml to be loaded in Microsoft Flight Simulator:
<WwisePackages>
    <MainPackage Name="YourCompanyName_YourAircraftName"/>
</WwisePackages>
Your soundai.xml must also reference its package :
<WwisePackages>
    <MainPackage Name="YourCompanyName_YourAircraftName_AI"/>
</WwisePackages>
For more information about the WwisePackage XML element, please see the sound.xml page.
Your soundbank and audio package are now ready to be loaded in Microsoft Flight Simulator. Keep in mind that you will need to generate your soundbanks and packages using the "Generate" button in Wwise, each time you modify or create new content in Wwise.
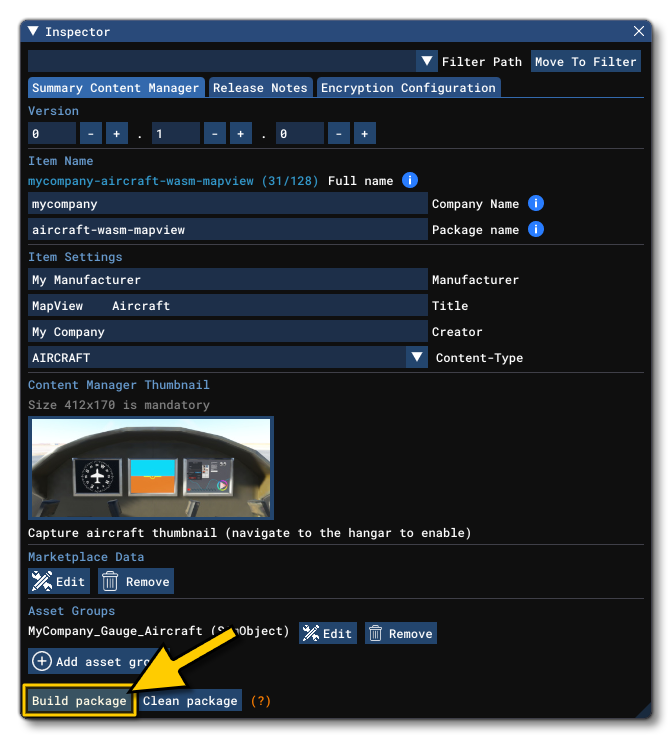
The last step, to listen and test your audio content in the game, is to load your package at runtime using the build button in the Microsoft Flight Simulator Project Editor. For that you need to enable developer mode (see here if you aren't sure how to do that), then open your project from the File menu. Select your aircraft, and click on the Build Package button:
Event Naming Convention
The Wwise event naming convention is simple, but must be respected otherwise the sounds will not play properly. Every Wwise event using the wwisedata=true attribute must be named following this convention:
Play_[SoundbankName]_[WwiseEvent]Where:
[SoundbankName]: the name of your Soundbank or yourPC.PCKfile.[WwiseEvent]: the name value that is set up in thesound.xmlfor your audio event in theWwiseEventattribute (if you haven't already done so, go and seesound.xmlintroduction page)
For instance, with a Soundbank and PC.PCK file called "MyAircraft" you would first set up the XML like so:
<WindSounds>
    <Sound WwiseEvent="wind_sound" WwiseData="true" />
</WindSounds>
The resulting event name in Wwise for "wind_sound" would be: "Play_MyAircraft_wind_sound".
AI aircraft events must be named by adding the "_ai_" suffix between SoundbankName name and the WwiseEvent. The resulting event name for that AI sound in Wwise would be like this: "Play_MyAircraft_ai_wind_sound" .
IMPORTANT! The naming rules described above apply to all sounds except EngineSoundPresets which have their own specificity, allowing us to ensure backward compatibility with legacy systems. This convention is described in detail below.
Naming convention for EngineSoundPresets
Below is the naming convention for EngineSoundPresets:
| Sound.xml WwiseEvent | Event Name in Wwise [SBName] = SoundBankName [Index] = EngineIndex |
Example |
|---|---|---|
| JetWhine | Play_[SBName]_eng[Index]_jet_whine |
Play_MyAircraft_eng1_jet_whine |
| NonCombustion | Play_[SBName]_eng[Index]_non_combustion |
Play_MyAircraft_eng1_non_combustion |
| Starter | Play_[SBName]_eng[Index]_starter |
Play_MyAircraft_eng1_starter |
| CombustionStart | Play_[SBName]_eng[Index]_combustion_start |
Play_MyAircraft_eng1_combustion_start |
| Combustion | Play_[SBName]_eng[Index]_combustion |
Play_MyAircraft_eng1_combustion |
| Propeller | Play_[SBName]_eng[Index]_prop |
Play_MyAircraft_eng1_prop |
| Rotor | Play_[SBName]_rotor[Index]_rotor |
Play_MyAircraft_rotor1_rotor |
| Shutdown | Play_[SBName]_eng[Index]_shutdown |
Play_MyAircraft_eng1_shutdown |
And for AI aircraft:
| Sound.xml WwiseEvent | Event Name in Wwise [SBName] = SoundBankName [Index] = EngineIndex |
Example |
|---|---|---|
| JetWhine | Play_[SBName]_ai_eng[Index]_jet_whine |
Play_MyAircraft_ai_eng1_jet_whine |
| NonCombustion | Play_[SBName]_ai_eng[Index]_non_combustion |
Play_MyAircraft_ai_eng1_non_combustion |
| Starter | Play_[SBName]_ai_eng[Index]_starter |
Play_MyAircraft_ai_eng1_starter |
| CombustionStart | Play_[SBName]_ai_eng[Index]_combustion_start |
Play_MyAircraft_eng1_combustion_start |
| Combustion | Play_[SBName]_ai_eng[Index]_combustion |
Play_MyAircraft_ai_eng1_combustion |
| Propeller | Play_[SBName]_ai_eng[Index]_prop |
Play_MyAircraft_eng1_prop |
| Rotor | Play_[SBName]_ai_rotor[Index]_rotor |
Play_MyAircraft_ai_rotor1_rotor |
| Shutdown | PPlay_[SBName]_ai_eng[Index]_shutdown |
Play_MyAircraft_ai_eng1_shutdown |
Final Notes
To end this introduction on using Wwise to generate sounds for your add-ons, we'd like to give you some tips on positioning your sounds in 3D space:
- The
EngineIndexthat you set up in thesound.xmlpositions the engine sound to the coordinates of the corresponding engine(defined in theengines.cfgfile). There is thus no need to set up aNodeNameon engine sounds. -
The
RotorIndexattribute for EngineSounds works like theEngineIndexwhich allows you to position the audio emitter on the corresponding Engine. For exemple:RotorIndex = 1is the Main Rotor,RotorIndex = 2is the Secondary Rotor (note that the limit is 2). - For
AnimationSounds, the sound automatically plays on the animation node, so there is no need for aNodeNameto be set up either. - For other sounds, if no
NodeNameis set up throughsound.xml, the sound will play at the center of the plane. But it's always better to set up aNodeNameso your sounds will play in the right place. See the sound.xml page for more information about the sound attributes insound.xml. - Pay attention to the
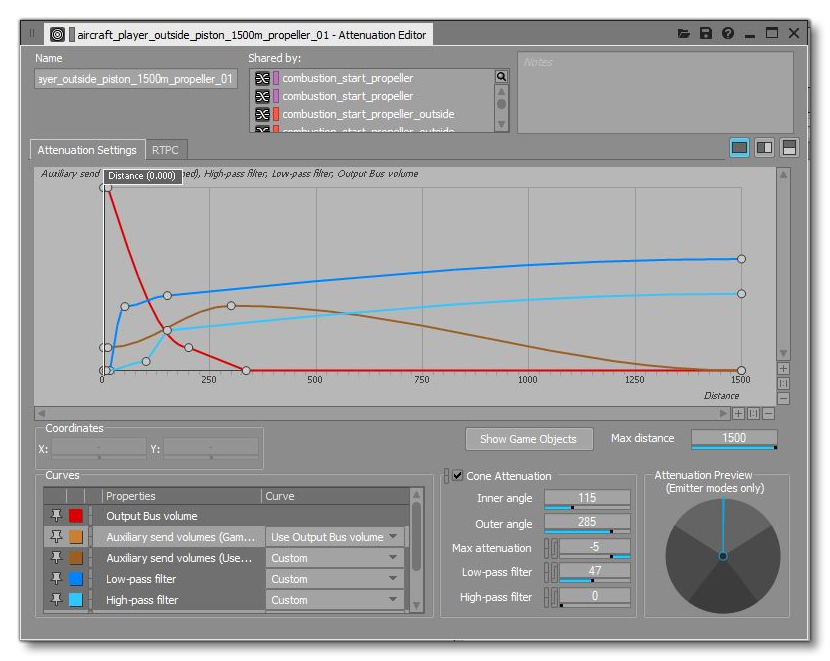
ConeHeadingattribute insound.xmlespecially for engine sound if you want to emphasize its perspective. By default, the engine node is facing forward. So if you want the exhaust sounds to be facing backwards, you'll need to set up the cone heading usingConeHeading=180 and attenuate the outer angle in Wwise:
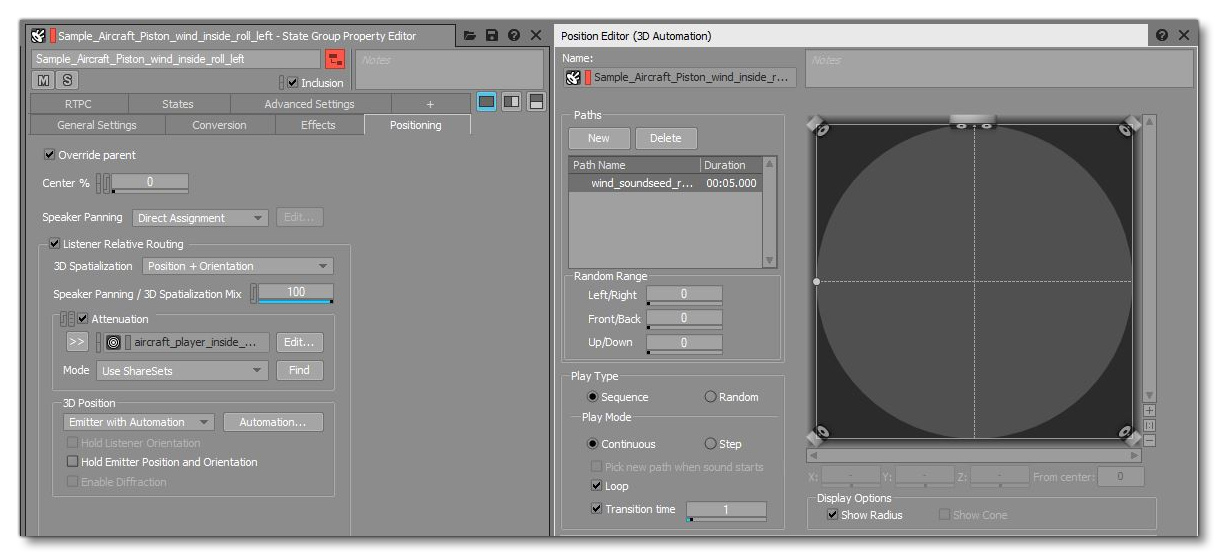
- You can also set up a position for your sounds using the Wwise Emitter with Automation feature. It can be really useful for cockpit loops, like buzz, fans, etc...:
Finally, some tips on handling SimVars:
- The SimVar Watcher is a very useful tool, and can be found in the SDK tool kit:
<SDK ROOT>\Samples\SimvarWatcher\
As the name suggests, it allows to watch simvar values in real-time so it's easier to setup your game parameter and your RTPC. - The Wwise Profiler can be a great ally to track errors and mistakes in the implementation process.