INPUT EVENT DEFINITIONS
The <InputEvent> element is designed to act as an interface between what the user inputs and the simulation, permitting you to react and inhibit any Event IDs and generate custom behavior instead of sending the event to the sim. This means that you can redefine how a key works and prevent it from altering something in an uncontrolled or unwanted way. The element also acts as a link between the simulation and the user interface, permitting the creation of custom tooltips for control inputs.
NOTE: We recommend that you create a separate "inputs.xml" file for Input Events. This would have the different <InputEvent> elements within the main <ModelBehaviors> element.
The goal when creating an Input Event is to shift the code complexity outside of the <MouseRect> - which defines what to do based on the user interaction with a knob or button, etc... - and into the input event <Preset>. This greatly simplifies interactions as you only have to define some aliases to do the job most of the time, and it also simplifies animations since you can simply retrieve the input event value and base your animation on that instead of looking for the SimVar state which can get quite complicated quite rapidly. The added bonus is that input events are only executed when they are needed, so it's far cheaper to get an animation value using the cached value inside the input event rather than recalculating it every frame in the animation code.
We recommend that you take some time to look over the different input templates which can be found in the following locations:
<PACKAGES ROOT>\Official\OneStore\fs-base-aircraft-common\ModelBehaviorDefs\Asobo\Inputs\
<PACKAGES ROOT>\Official\OneStore\fs-base-aircraft-common\ModelBehaviorDefs\Asobo\Common\Inputs\
Pay particular attention to the "Templates.xml" which simplifies interaction templates and is designed as a base to be copied into your own aircraft and then modified to suit your needs. Also be sure to have a look at the different XML files stored in the various "Inputs" sub folders elsewhere in the main "Asobo" directory. It is worth noting that you can also create your own Input Event and template files - you can find a primer on how to create these files from the following page:
Below is a schematic for how a basic <InputEvent> should be structured, and you can find an example of a complete event from the following section:
<InputEvent ID="ASOBO_GIE_Base">
    <Presets>
        <Preset ID="#INPUT_EVENT_ID_SOURCE#_#IE_NAME#">
            <Tooltip>
                <Icon>#TT_ICON#</Icon>
                <Interaction>#TT_INTERACTION#</Interaction>
                <InteractionLockable>#TT_INTERACTION_LOCKABLE#</InteractionLockable>
                <TTDescription RPN="#TT_DESCRIPTION_IS_DYNAMIC#">#TT_DESCRIPTION#</TTDescription>
                <TTValue RPN="#TT_VALUE_IS_DYNAMIC#">#TT_VALUE#</TTValue>
            </Tooltip>
            <Value>
                <Units>#VALUE_UNITS#</Units>
                <Code>#VALUE_CODE#</Code>
                <Init>#INIT_CODE#</Init>
                <WatchVars>
                    <LocalVar ID="#LOCAL_VAR_TO_WATCH#"/>
                    <Simvar ID="#SIMVAR_TO_WATCH#"/>
                </WatchVars>
            </Value>
            <Inc>
                <Code>#INC_CODE#</Code>
                <Parameters>
                    <Param Type="#PARAM_TYPE#" RPN="#PARAM_IS_DYNAMIC#">#PARAM_VALUE#</Param>
                </Parameters>
                <Bindings>
                    <Binding Alias="#ALIAS_ID#" EventID="#EVENT_ID#">
                        <Param RPN="#IS_RPN#">#VALUE#</Param>
                    </Binding>
                </Bindings>
            </Inc>
            <Dec>...</Dec>
            <Set>...</Set>
        </Preset>
    </Presets>
</InputEvent>
The principle behind the InputEvent system is the creation of one or more <Preset> elements, where each element has a unique ID with which it can then be referenced elsewhere in the model behavior. If you want to define an InputEvent preset the principle elements that you'll be required to create will be:
<Inc>,<Dec>,<Set>: These elements are what govern the logic of what the InputEvent preset does as well as its bindings. These are obligatory elements as without them the preset won't register the user input correctly.<Value>: If defined, this element will associate a value to the InputEvent preset which can be used to keep a state in memory (either a number or a string).<Tooltip>: If defined, this element will associate data that can be used to display some information about the event.
It is also worth noting that you have the B: variable for use in these elements to modify the value of an input event using Reverse Polish Notation. When using B: you would supply the <Preset> ID with the operation you wish to perform appended onto it. For example, to increment the preset "Sound_COM1_Volume" you would have some RPN like this:
(>B:Sound_COM1_Volume_Inc)
<Presets>
This element is a container element for the different <Preset> and <Extend> elements that are going to be used for input. It has no attributes.
<Extend>
This element is designed to permit you to make the most of the pre-defined "generic" input event templates. These generic templates setup a great number of things for so you don't have to recreate the same input events time and time again. You can find these generic input events in the following file:
<PACKAGES ROOT>\Official\OneStore\fs-base-aircraft-common\ModelBehaviorDefs\Asobo\Inputs\Generic.xml
This is similar to the idea of the model behavior component Templates, only for input events.
The element should be within a <Presets> container element, can contain one or more <Parameters> element, and it has the following attribute:
| Attribute | Description | Type | Required |
|---|---|---|---|
Target |
The target <InputEvent> ID to use as the extension |
String | Yes |
When extending the parameters of the target input event, you can choose to set the "Default" parameters as well as "Override" any of the existing parameters. Note that most of the generic extensions have an element <INPUT_EVENT_ID_SOURCE> which should be used to supply the ID of the input event that is using the extension. Below you can see a cut-down example taken from the Generic.xml:
<InputEvent ID="ASOBO_GIE_Anim_Handling">
<Presets>
<Preset ID="#INPUT_EVENT_ID_SOURCE#_#IE_NAME#">
<Extend Target="ASOBO_GIE">
<Parameters Type="Override">
<INPUT_EVENT_TYPE>FLOAT</INPUT_EVENT_TYPE>
<IE_NAME>#LEVER_ID#</IE_NAME>
<INTERACTION_TYPE>Lever</INTERACTION_TYPE>
</Parameters>
<Parameters Type="Default">
<ON_STATE_CHANGED_EXTERNAL_CODE/>
<ROTATION_SPEED>10</ROTATION_SPEED>
<ANIM_VAR>_LeverAnimVar</ANIM_VAR>
<ANIM_VAR_TYPE>O</ANIM_VAR_TYPE>
</Parameters>
<Parameters Type="Override">
<Condition Valid="NO_ANIM_VAR_UPDATE">
<False>
<ON_STATE_CHANGED_EXTERNAL_CODE>#ON_STATE_CHANGED_EXTERNAL_CODE# (O:#INPUT_EVENT_ID_SOURCE#_#IE_NAME#_Position) (>#ANIM_VAR_TYPE#:#ANIM_VAR#)</ON_STATE_CHANGED_EXTERNAL_CODE>
</False>
</Condition>
</Parameters>
</Extend>
</Preset>
</Presets>
</InputEvent>
<Preset>
This element is used to define a single preset within an input event, and can use any of the Program Template Definitions, as well as some of the General Template Definitions, and the <Extend>, <Tooltip>, <Value>, <Inc>, <Dec>,and <Set> elements. It is a sub-element of <Presets> and has the following attributes:
| Attribute | Description | Type | Required |
|---|---|---|---|
ID |
This is the preset ID (name) and is what will be used elsewhere to reference the input. | String | Yes |
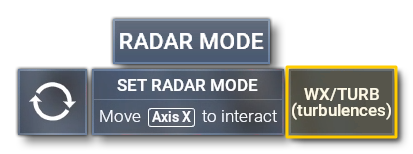
<Tooltip>
This container element is used to define the tooltip overlay that will accompany the input <Preset>. The image below shows an example of this tooltip and the main elements that should be defined for it to function correctly:
 There should only be one tooltip element per-preset, and it can contain the
 <Icon>, <IconLockable>, <TTDescription>, <TTValue>, <Interaction>, <TTInteraction>, <InteractionLockable>, and <TTInteractionLockable> elements. It has no attributes.
<Icon>
This defines the icon graphic that should be used for the <Preset> when the input is the mouse. The element is a sub-element of <Tooltip>, has no attributes, and will use one of the following strings:
| String | Icon |
|---|---|
MOVE_X |
|
MOVE_Y |
|
MOVE_AXIS |
|
MOVE_AXIS_X |
|
MOVE_AXIS_Y |
|
ROTATE |
|
PUSH |
|
PULL |
<IconLockable>
This defines the icon graphic that should be used for the <Preset> when the input is the gamepad. The element is a sub-element of <Tooltip>, has no attributes, and will use the same icon strings as the <Icon> element.
<TTDescription>
This element is for generating the <Tooltip> description within a single <Preset>. It has the following optional attribute:
| Attribute | Description | Type | Required |
|---|---|---|---|
RPN |
Sets whether the string should be constructed using RPN or not. | Boolean | No |
When the RPN attribute is "False" (or omitted) then the element can only contain a tooltip ID (This is a legacy feature and should not be used - it is only listed for supporting FSX projects).
When the RPN attribute is "True", then you can use RPN to access and generate the description string. This requires the use of an RPN stack which can use the R: variable and a localization ID or a string. For example:
<TTDescription RPN="True">1 (R:1:@TT_PATH.AUDIOPANEL_KNOB_COM_VOLUME_ACTION) (F:Format)</TTDescription>In this example the <Macro> @TT_PATH would be the path to the localization file, while AUDIOPANEL_KNOB_COM_VOLUME_ACTION is the value in the file to retrieve the localized ID from - in this case the ID would point to the (localized) string "Adjust COM %d volume". The expression then uses the F: variable to perform a substitution which will finally output the string "Adjust COM 1 volume". You may also use a non-localized string when RPN is "True":
<TTDescription RPN="True">'Adjust the panel light brightness'</TTDescription>or with an RPN expression:
<TTDescription RPN="True">1 'Adjust COM %d volume' (F:Format)</TTDescription>
<TTValue>
This element is for showing a value associated with the item that is displaying the tooltip. This value does not have to be numeric in nature, as long as it's a formatted string then it will be used, for example:
As with the <TTDescription> element, this has the following optional attribute:
| Attribute | Description | Type | Required |
|---|---|---|---|
RPN |
Sets whether the string should be constructed using RPN or not. | Boolean | No |
When the RPN attribute is "False" (or omitted) then the element can only contain a localization ID for a simple (non-dynamic) value string, for example "N/A".
When the RPN attribute is "True", then you can use RPN to access and generate the description string. This requires the use of an RPN stack which can use the R: variable and a localization ID or a string. For example:
<TTDescription RPN="True">1 (R:1:@TT_PATH.AUDIOPANEL_KNOB_COM_VOLUME_ACTION) (F:Format)</TTDescription>In this example the <Macro> @TT_PATH would be the path to the localization file, while AUDIOPANEL_KNOB_COM_VOLUME_ACTION is the value in the file to retrieve the localized ID from - in this case the ID would point to the (localized) string "Adjust COM %d volume". The expression then uses the F: variable to perform a substitution which will finally output the string "Adjust COM 1 volume". You may also use a non-localized string when RPN is "True":
<TTDescription RPN="True">'Adjust the panel light brightness'</TTDescription>or with an RPN expression:
<TTDescription RPN="True">1 'Adjust COM %d volume' (F:Format)</TTDescription>
<Interaction>
This is used to define the interaction <Tooltip> text within the <Preset> when using a mouse. This element has no attributes and can be one or more of the following pre-created options (if you want to generate custom interaction text, you should instead use <TTInteraction>):
NOTE: These can be combined in pairs if required, for example: SECONDARY_DOWN+UNLOCK
X_AXISX_AXIS_LEFTX_AXIS_RIGHTY_AXISY_AXIS_DOWNY_AXIS_UPPRIMARY_UPPRIMARY_DOWNSECONDARY_UPSECONDARY_DOWNTERTIARY_UPTERTIARY_DOWNLOCKUNLOCKINCREASEDECREASE
<TTInteraction>
This is used to define a localized string for the interaction <Tooltip> text within the <Preset> when using a mouse. This element has the following attribute:
| Attribute | Description | Type | Required |
|---|---|---|---|
RPN |
Sets whether the string should be constructed using RPN or not. | Boolean | No |
Please see the <TTDescription> element description for details of how to format the input when the RPN attribute is set to "True" or "False". Note that you may use the <Interaction> element instead of this one if you want to use any of the built-in interaction strings.
<InteractionLockable>
This is used to define the interaction <Tooltip> text within the <Preset> when using a gamepad. This element has no attributes and will accept the same strings as <Interaction>.
<TTInteractionLockable>
This is used to define a localized string for the interaction <Tooltip> text within the <Preset> when using a gamepad. This element has the following attribute:
| Attribute | Description | Type | Required |
|---|---|---|---|
RPN |
Sets whether the string should be constructed using RPN or not. | Boolean | No |
Please see the <TTDescription> element description for details of how to format the input when the RPN attribute is set to "True" or "False". Note that you may use the <InteractionLockable> element instead of this one if you want to use any of the built-in interaction strings.
<Value>
This element is for retrieving the value that the input event is affecting. It is contained within the <Preset> element, has no attributes, and contains the elements <Units>, <Code>, <Init>, and <WatchVars>.
<Units>
This sub-element of <Value> defines the units used by the value being retrieved. It can be any one of the unit strings listed here: Simulation Variable Units
<Code>
This sub-element of <Value> defines the code that should be executed to generate the value. Code is written using Reverse Polish Notation.
<Init>
This sub-element of <Value> defines the code to be executed to regenerate the value when starting a flight or when a watched variable is updated. Code is written using Reverse Polish Notation.
<WatchVars>
This sub-element of <Value> defines one or more watch variables, which are the variables that will be watched for change when the input event is triggered. When an watched variable has it's value changed, the <Init> code will be triggered. This element has no attributes and is a container for <LocalVar /> and <SimVar />.
<LocalVar />
This self-closing element sets a local variable as the watch variable for the input event. You may have multiple of these elements within a <WatchVars> container, and it has the following attribute:
| Attribute | Description | Type | Required |
|---|---|---|---|
ID |
The Id of the local variable to add to the variable watch list. | Boolean | No |
<SimVar />
This self-closing element sets a simulation variable as the watch variable for the input event. You may have multiple of these elements within a <WatchVars> container, and it has the following attribute:
| Attribute | Description | Type | Required |
|---|---|---|---|
ID |
The Id of the SimVar to add to the variable watch list. | Boolean | No |
<Inc>
This element is used in a <Preset> to increment the value associated with the input. This is an essential element within a preset and requires a <Code> and at least one <Param>. To use this event you would call the preset name then append the string "_Inc" to the end, for example incrementing a value inside the input event <Preset> "Sound_COM1_Volume":
<Inc>
<Code>(B:SOUND_COM_1_Volume) p0 + (>B:SOUND_COM_1_Volume_Set)</Code>
<Parameters>
<Param Type="Float" RPN="True">p0 5 *</Param>
</Parameters>
</Inc>You would then have your <MouseRect> with the following code to use it:
1 (>B:Sound_COM1_Volume_Inc)
<Dec>
This element is used in a <Preset> to decrement the value associated with the input. This is an essential element within a preset and requires a <Code> and at least one <Param>. To use this event you would call the preset name then append the string "_Dec" to the end, for example decrementing a value inside the input event <Preset> "Sound_COM1_Volume":
<Dec>
<Code>(B:SOUND_COM_1_Volume) p0 - (>B:SOUND_COM_1_Volume_Set)</Code>
<Parameters>
<Param Type="Float" RPN="True">p0 5 *</Param>
</Parameters>
</Dec>You would then have your <MouseRect> with the following code to use it:
1 (>B:Sound_COM1_Volume_Dec)
<Set>
This element is used in a <Preset> to set the input variable to a value that has been modified. This is an essential element within a preset and requires a <Code> and at least one <Param>. To use this event you would call the preset name then append the string "_Set" to the end, for example setting a value inside the input event <Preset> "Sound_COM1_Volume":
<Set>
<Code>p0 0 max 100 min (>O:MyValue)</Code>
<Parameters>
<Param Type="Float" RPN="True">p0</Param>
</Parameters>
</Set>You would then have your <MouseRect> with the following code to use it:
50 (>B:Sound_COM1_Volume_Set)
<Param>
This is a sub element within the <Parameters> element or the <Binding> element, and is used to create - or modify - a parameter value. This element can be used in multiple places, for example: <Inc>, <Dec>, <Set>. The element can have either of the following attributes:
| Attribute | Description | Type | Required |
|---|---|---|---|
Type |
The type of parameter that is being modified. This is a required attribute. |
String: "Int" |
No |
RPN |
Sets whether the parameter should be constructed using RPN or not. | Boolean | No |
The attribute types listed above will do the following:
- Int: Compute the contents of the element using RPN, with an integer result.
- Float: Compute the contents of the element using RPN, with an float result.
- Param: Get the content of a parameter by name when it is not possible to use
#PARAM_NAME#.
Here are some examples of use:
<Param Type="Param">#TYPE##ID#_SIMVAR_INDEX</Param>
<Param Type="Float" RPN="True">p0 5 *</Param>
<Param Type="Int" RPN="True">(L:Toggle_Value) !</Param>
<Bindings>
This is a container element for one or more <Binding> elements for the preset. These can be used to override a default key event behavior using your own code, or you they create aliases for different presets within your own behaviors. This element has no attributes.
<Binding>
This is a sub element of the <Bindings> container and is used to create a single binding within a preset. This element should contain at least one <Param> and has the following attributes, of which only one should be used:
| Attribute | Description | Type | Required |
|---|---|---|---|
EventID |
The Event ID to override with the binding. |
String |
No |
Alias |
The name of the binding alias for the preset. | String | No |
For more information on how this element should be used, please see the following section: