CREATING INTERACTIONS USING INPUTEVENTS
In this tutorial we'll be showing you various different generic interactions using the <InputEvent> element from (Model Behaviors) that can be created for use in your own aircraft. Throughout the sections on this page we'll be referring to "TEST_INSTRUMENT" and - if using the examples shown here - you would simply swap this out for the name of your own instrument file.
In general, for any given aircraft, you will have the following files and folders within a "Templates" folder in the same location as the other aircraft files:
- a file called
TEST_INSTRUMENT.xml - a folder called "
Input" - a file in the "
Input" folder calledTEST_INSTRUMENT_Inputs.xml - a folder "
SubTemplates" - a file in the "
SubTemplates" folder calledTEST_INSTRUMENT_SubTemplates.xml
NOTE: Sub-templates can be created in the same file as the base templates but for clarity you generally want to have a separate file to keep things more organised and clear.
The final structure schematic for the package source would look something like this:
|---+ [Root Aircraft Folder]
    |---+ Templates
    |   |---+ Inputs
    |   |   |---- TEST_INSTRUMENT_Inputs.xml
    |   |---+ SubTemplates
    |   |   |---- TEST_INSTRUMENT_SubTemplates.xml
    |   |---- TEST_INSTRUMENT.xml
    |   |---- [further instrument XML files]
    |---- [Other Aircraft Files and Folders]
Input XML Declaration
To be able to create generic Input Events you will need an <InputEvent> declaration, as part of a <ModelBehaviors> element. The most common - and simplest - method when creating your own inputs in to extend from ASOBO_GIE_Anim_Handling. When extending from this base you need to include the Helpers.xml file (which is part of the base code) and also provide an INPUT_EVENT_ID_SOURCE. This will let the base know what prefix the Input Events you create will use. For a generic Input Event we use the same name as the Input Event itself (in this case TEST_INSTRUMENT). Put all this together and the TEST_INSTRUMENT_Inputs.xml file will look like this:
<?xml version="1.0" encoding="utf-8"?>
<ModelBehaviors>
    <Include ModelBehaviorFile="ASOBO\Inputs\Helpers.xml" />
    <InputEvent ID="TEST_INSTRUMENT">
        <Presets>
            <Extend Target="ASOBO_GIE_Anim_Handling">
                <Parameters Type="Default">
                    <INPUT_EVENT_ID_SOURCE>TEST_INSTRUMENT</INPUT_EVENT_ID_SOURCE>
                </Parameters>
            </Extend>
        </Presets>
    </InputEvent>
</ModelBehaviors>
Template XML Declaration
Above we've shown how you can create the basic input events in their own file, so the next thing to do would be to set up the template file to make use of it with one or more templates. This is done with the following in the TEST_INSTRUMENT.xml file:
<?xml version="1.0" encoding="utf-8"?>
<ModelBehaviors>
    <Template Name="ASOBO_TEST_INSTRUMENT_Base_Template">
        <Parameters Type="Default">
            <INPUT_EVENT_ID_SOURCE>TEST_INSTRUMENT</INPUT_EVENT_ID_SOURCE>
        </Parameters>
        <UseTemplate Name="ASOBO_Interaction_Base_Template">
            <USE_INPUT_EVENT_ID>TEST_INSTRUMENT</USE_INPUT_EVENT_ID>
        </UseTemplate>
    </Template>
    <Template Name="ASOBO_TEST_INSTRUMENT_Push_Event_Base_Template">
        <UseTemplate Name="ASOBO_Interaction_Push_Event_Base_Template">
            <USE_INPUT_EVENT_ID>TEST_INSTRUMENT</USE_INPUT_EVENT_ID>
        </UseTemplate>
    </Template>
    <Template Name="ASOBO_TEST_INSTRUMENT_Pull_Event_Base_Template">
        <UseTemplate Name="ASOBO_Interaction_Pull_Event_Base_Template">
            <USE_INPUT_EVENT_ID>TEST_INSTRUMENT</USE_INPUT_EVENT_ID>
        </UseTemplate>
    </Template>
</ModelBehaviors>
Each template has it's own intended use and you'll mainly use ASOBO_TEST_INSTRUMENT_Base_Template, then - in some more specific cases - the other ones. Note that ASOBO_Interaction_Base_Template is a huge template that does all the heavy work for you, and whenever you want to create an interaction and/or animation, you'll probably be using this base template. Depending on what parameters you give it the template, it will create interactions, Input Event <Presets>, animations, and sound events.
The other two templates mentioned in the code above - ASOBO_Interaction_Push_Event_Base_Template and ASOBO_Interaction_Pull_Event_Base_Template - will mainly be used for knobs and secondary interactions as a compliment to ASOBO_Interaction_Base_Template. They take the same parameters as the ASOBO_Interaction_Base_Template for creating an Input Event <Preset>.
Parameters
Before going on to look at some examples, we should take a moment to look at some of the most important parameters within a template file, and explain briefly what each of them does.
Tooltips
The 2 most important parameters when editing tooltips are:
TT_DESCRIPTION_ID- this is the ID of the localized string to use. It describes what the Interaction does, for example:COCKPIT.TOOLTIPSV2.ADF_KNOB_RECEIVERVOLUME_ACTION
Which translates as "Adjust ADF receiver volume". In the XML it would be written as:<TT_DESCRIPTION_ID>COCKPIT.TOOLTIPSV2.ADF_KNOB_RECEIVERVOLUME_ACTION</TT_DESCRIPTION_ID>
TOOLTIP_TITLE_ID- this is the ID of the localized string to use. It's used to give a short description of what we're interacting with, for example:COCKPIT.TOOLTIPSV2.ADF_KNOB_RECEIVERVOLUME_TITLE
which translates as "ADF receiver volume". In the XML it would be written as:<TOOLTIP_TITLE_ID>COCKPIT.TOOLTIPSV2.ADF_KNOB_RECEIVERVOLUME_TITLE</TOOLTIP_TITLE_ID>
If these localized strings are setup with string replacement in mind, you can format it using an additional parameter:
TT_DESCRIPTION_INDEX/TOOLTIP_TITLE_INDEX- this represents one (or more) pieces of data to be used for formatting the string, where the last value is read back first, for example:
2 is read first then 1. A more complete example would be like this:<TT_DESCRIPTION_INDEX>1 2</TT_DESCRIPTION_INDEX>
which translates as "Toggle %s aux pump" and in the XML it would look like this:<TT_DESCRIPTION_ID>COCKPIT.TOOLTIPSV2.FUEL_SWITCH_AUXPUMP_ACTION_SET</TT_DESCRIPTION_ID>
and this would output the formatted string "Toggle left aux pump".<TT_DESCRIPTION_INDEX>COCKPIT.TOOLTIPSV2.GT_STATE_LEFT</TT_DESCRIPTION_INDEX>
To have total control over the output you can use tell the template that you want to use RPN instead of using the arguments shown above, using the following elements:
TT_DESCRIPTION_IS_DYNAMICTOOLTIP_TITLE_IS_DYNAMIC
TT_DESCRIPTION and TOOLTIP_TITLE will then be interpreted as Reverse Polish Notation and the resulting string will be the what gets displayed. For this to work correctly TT_DESCRIPTION_IS_DYNAMIC and TOOLTIP_TITLE_IS_DYNAMIC have to be "true" for the other parameters to be interpreted as RPN, for example:
<TT_DESCRIPTION_IS_DYNAMIC>True</TT_DESCRIPTION_IS_DYNAMIC>
Here are some examples of typical cases when you would want to enable the use of RPN:
- A literal string:
which would would display the string "Hello, world!".<TT_DESCRIPTION>'Hello, world!'</TT_DESCRIPTION>
- A formatted number:
which would display the string "1500 RPM" (1500 is illustrative here, it would be whatever the SimVar contains at any given time).<TT_DESCRIPTION>'(A:GENERAL ENG RPM:1, rpm) '%d RPM' (F:Format)</TT_DESCRIPTION>
- A localized string:
which would display "Left battery" in en-US.<TT_DESCRIPTION>(R:1:COCKPIT.TOOLTIPSV2.GT_STATE_BATTERY) (R:1:COCKPIT.TOOLTIPSV2.GT_STATE_LEFT) '%s %s' (F:Format)</TT_DESCRIPTION>
NOTE: Whenever you want to format a value you'll have to use (F:Format) which takes the previous string and formats it using the previous stack values. This is explained in detail here: Function Library
For Icons and Interactions, you'll find that these are already setup by the ASOBO_Interaction_Base_Template. However You can override interactions by providing TT_INTERACTION and a TT_INTERACTION_LOCKABLE elements, and you can override the icon with TT_ICON (see the sections on <Interaction> and <Icon> for more information).
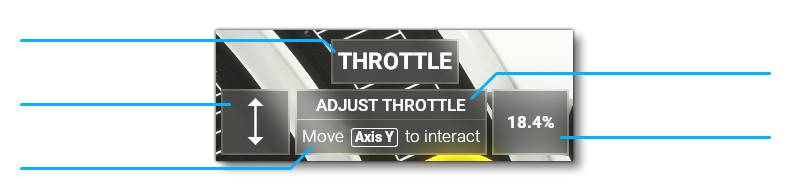
Finally we have the value parameter, TT_VALUE. This is discussed in more detail in the following sections on this page, but if you want to override it anywhere you can use TT_VALUE and TT_VALUE_IS_DYNAMIC - just the same as for the description and title - and you can use some RPN to display the state of your Input Event preset.
Input Event Preset Required Parameters
The following parameters are required by the templates:
USE_INPUT_EVENT_ID- sets the ID of your Input Event. Setting up custom templates for usingASOBO_Interaction_Base_Templatelets you setup some parameters so you don't have to provide them every time.USE_INPUT_EVENT_IDis setup in such a way that it is impossible to override by mistake, and it defines the name of the InputEvent to use, ie: the name your InputEvent in theInputs.xmlfile.
INPUT_EVENT_ID_SOURCE- Default name of your Input Event presets. Lets say you setup an Input Event for a radio... if you have several instances of your radio you'll want to have different IDs for your Input Event presets so they don't interfere with each other. For example, if the Input Event is calledMY_RADIO, and you want to make sure that various events in a template are unique to that, you can use:
This is what will be used to generate the unique Input Event preset name. Note that instead of<INPUT_EVENT_ID_SOURCE>MY_RADIO_#ID#</INPUT_EVENT_ID_SOURCE>_#ID#you can also useASOBO_GT_Helper_Suffix_ID_Appenderwhich will fill theSUFFIX_IDdepending on the ID and some other parameters.
IE_PRESET_ID- The Input Event preset name, which is created as follows:
where<IE_PRESET_ID>#INPUT_EVENT_ID_SOURCE#_#IE_NAME#</IE_PRESET_ID>IE_NAMEis the name of the element you're creating. For example, for a button "SWAP" it would be
So with<IE_NAME >Swap</IE_NAME ><ID>1</ID>the Input Event preset being created would beMY_RADIO_1_Swap.
INTERACTION_TYPE- This can be one of Push, Switch, Knob, or Lever, and will make use of the correct templates, sound events names, animation and tooltip icons and interactions, all automatically, eg:<INTERACTION_TYPE>Switch</INTERACTION_TYPE>
Input Event Preset Common Parameters
The following list of parameters are the ones that we would consider the most commonly required when creating input for an aircraft:
WWISE_PREFIX- prefix given to all Available WwiseEvents, the suffix will depend on the interaction type and template used
NODE_ID- Name of the node to attach the<MouseRect>to (the interaction collider)
ANIM_NAME- Name of the animation to play. Depending on the interaction type the template called might be more or less complex and multiple animations may be required.
COMP_UPDATE_CODE- Update code created inside the same component as the<MouseRect>and animation (you can specify aFREQUENCYto override the default of 1 update per second if required).
COMP_INIT_CODE- Update code created inside the same component as the<MouseRect>and animation. This is only run once.
CREATE_COMPONENT- Iftrue(the default value) then a component will be created to contain the interaction, Input Event, updates, and animation. TheNODE_IDis used to fill the node attribute.
SIMVAR_TO_WATCH_#- a Simvar to track the value of (see<WatchVars>for more info). Here the#should be changed to a number starting at 0 to permit you to have multipleSIMVAR_TO_WATCH. For example:<SIMVAR_TO_WATCH_0>LIGHT PANEL:2</SIMVAR_TO_WATCH_0>
LOCAL_VAR_TO_WATCH_#- Local var to track the value of (see<WatchVars>for more info). Here the#should be changed to a number starting at 0 to permit you to have multipleLOCAL_VAR_TO_WATCH. For example:<LOCAL_VAR_TO_WATCH_0>XMLVAR_MyLocalVar</LOCAL_VAR_TO_WATCH_0>
SET_STATE_EXTERNAL- In this parameter you give an RPN code snippet implementing the behavior of your interaction (what happens when you push a button, toggle a switch, etc...).
GET_STATE_EXTERNAL- For events with an integer state, store relevant SimVar or variable related to the state in stack variables. For events with a float state, simply return the relevant SimVar or variable directly. Note, any Input Event defining this parameter will have an O:Var holding the value with the following format:(O:#INPUT_EVENT_ID_SOURCE#_#IE_NAME#_Position)
ENUM_VAL_TO_POS_EXTERNAL- For events with an integer state, transform the enum value (that you stored inGET_STATE_EXTERNAL) into a physical value. Used for a switch position or for a button, for example whether the underlying state is ON or OFF for an autopilot mode. By default simply containsL:0(referring to the first stack variable).
VALUE_UNITS- Units the value should be interpreted as. If used this essentially allows for unit conversion when reading an Input Event Preset value. Nite that this is only for Input Event Presets with a state of type float.
GET_TT_VALUE_STATE- If theGET_STATE_EXTERNALparameter doesn't return the correct value then this lets you specify another one as a replacement (this can happen when, for example, the value is not in the correct unit).
FORMAT_VALUE- Permits you to specify how the value should be formatted into a string. The default formatting is:<FORMAT_VALUE>'%.1f%%' (F:Format) </FORMAT_VALUE>
MIN_VALUE- 0 by default, prevent the value from going under this limit
MAX_VALUE- 100 by default, prevent the value from going over this limit
Creating Interactions Using Generic InputEvents
In this section we'll give an in depth explanation on how to make use of the generic Input Event setup in the section above. Note that when going through the examples in subsequent sections, we'll intentionally leave out the tooltips parameters as those can be quite verbose, but they are still explained below and you will need to use them. The same thing will be true about INTERACTION_TYPE, ANIM_NAME, and NODE_ID these will all be replaced by <!-- [other parameters] --> in the examples.
Simple Event Example
In this example we have a button sending an HTML event called TEST_INSTRUMENT_button_swap_html_event when pushed. Here, <INTERACTION_TYPE>Push</INTERACTION_TYPE> is expected:
<UseTemplate Name="ASOBO_TEST_INSTRUMENT_Base_Template">
<IE_NAME>Swap</IE_NAME>
<SET_STATE_EXTERNAL>if{ (>H:MY_RADIO_button_swap_html_event) }</SET_STATE_EXTERNAL>
<!-- (other parameters) -->
</UseTemplate>
Another example is a knob sending HTML events when rotated left or right. Note that <IS_INFINITE>True</IS_INFINITE> is used for knobs that can rotate indefinitely. If there are no values tied to a knob but only events, then that's what you'll be using. In SET_STATE_EXTERNAL p0 will equal 1 when rotating right and -1 when rotating left (see Input Parameters for more information on p0/p1/etc...). From this we can then simply call the <Inc> event when p0 is greater than 0 and <Dec> when it is lower than 0. Here, <INTERACTION_TYPE>Knob</INTERACTION_TYPE> is expected:
<UseTemplate Name="ASOBO_TEST_INSTRUMENT_Base_Template">
<IE_NAME>Knob</IE_NAME>
<IS_INFINITE>True</IS_INFINITE>
<SET_STATE_EXTERNAL>p0 0 > if{ (>H:TEST_INSTRUMENT_Knob_Inc_html_event) } els{ (>H:TEST_INSTRUMENT_Knob_Dec_html_event) }</SET_STATE_EXTERNAL>
<!-- (other parameters) -->
</UseTemplate>
Timed Interactions
Timed interactions are events triggered after a given time when holding a button down. For these interactions the timer before the long event is triggered can be configured by overriding LONG_CLICK_TIME (which is set to 1 second by default).
To use this kind of interaction you need to add the following to the template:
<EXTRA_OPTION>_Timed</EXTRA_OPTION>
<USE_INPUT_EVENT_TEMPLATE>Push</USE_INPUT_EVENT_TEMPLATE>
This lets you use ON_PUSH_EVENT and ON_PUSH_EVENT_LONG. The first event - ON_PUSH_EVENT - is sent at the release of the button. Then, if LONG_CLICK_TIME has elapsed, the next event - ON_PUSH_EVENT_LONG - is triggered and the button is automatically released:
<UseTemplate Name="ASOBO_TEST_INSTRUMENT_Base_Template">
<IE_NAME>Timed_Button</IE_NAME>
<EXTRA_OPTION>_Timed</EXTRA_OPTION>
<USE_INPUT_EVENT_TEMPLATE>Push</USE_INPUT_EVENT_TEMPLATE>
<ON_PUSH_EVENT>(>H:MY_RADIO_Push)</ON_PUSH_EVENT>
<ON_PUSH_EVENT_LONG>(>H:MY_RADIO_Push_Long)</ON_PUSH_EVENT_LONG>
<!-- ... (other parameters) -->
</UseTemplate>
Simple Event With A Matching State Example
In this example we're syncing the value of a local var to the state of a switch (the same thing could be made with a SimVar):
<UseTemplate Name="ASOBO_MyInputEvent_Base_Template">
<IE_NAME>2States</IE_NAME>
<SET_STATE_EXTERNAL>p0 (>L:XMLVAR_MyVar)</SET_STATE_EXTERNAL>
<GET_STATE_EXTERNAL>(L:XMLVAR_MyVar) sp0</GET_STATE_EXTERNAL>
<LOCAL_VAR_TO_WATCH_0>XMLVAR_MyVar</LOCAL_VAR_TO_WATCH_0>
<!-- ... (other parameters) -->
</UseTemplate>If this was to be used with an INTERACTION_TYPE other than Push or Switch you would have to specify some additional parameters:
- Lever:
<LEVER_TYPE>2_STATES</LEVER_TYPE> - Knob:
<KNOB_TYPE>X_STATES</KNOB_TYPE> and <NUM_STATES>2</NUM_STATES>
For these events with 2 possible states there are also the following additional parameters:
TT_VALUE_ON/TT_VALUE_OFF- sets the string displayed when the switch is in the ON or OFF state. by default it looks like this:
If the input is coming from a lever, rather than a push or a switch, then you would use something like this instead:<TT_VALUE_ON>(R:1:COCKPIT.TOOLTIPSV2.GT_STATE_ON)</TT_VALUE_ON> <TT_VALUE_OFF>(R:1:COCKPIT.TOOLTIPSV2.GT_STATE_OFF)<TT_VALUE_OFF><TT_VALUE_ON>(R:1:COCKPIT.TOOLTIPSV2.GT_STATE_DOWN)</TT_VALUE_ON> <TT_VALUE_OFF>(R:1:COCKPIT.TOOLTIPSV2.GT_STATE_UP)<TT_VALUE_OFF>
STR_STATE_ON/STR_STATE_OFF- This is the string given to the different Input Bindings. By default the strings would be simply "On" and "Off" for a push or a switch, and "Down" and "Up" for a lever.
SET_STATE_ON/SET_STATE_OFF- These can be used as a replacement forSET_STATE_EXTERNALto set the state as either on or off with seprate events.
Held Interactions
Held interactions are events triggered on Press and Release of a button. To use this kind of interaction you need to add <EXTRA_OPTION>_Held</EXTRA_OPTION>, for example:
<Component ID="TEST_INSTRUMENT_Timed_Button" Node="TheNodeID">
<Parameters Type="Override">
<EXTRA_OPTION>_Held</EXTRA_OPTION>
<INTERACTION_TYPE>Push</INTERACTION_TYPE>
<CREATE_COMPONENT>False</CREATE_COMPONENT>
<IE_NAME>Held_Button</IE_NAME>
<!-- (other parameters) -->
</Parameters>
<UseTemplate Name="ASOBO_GT_Anim_Code">
<ANIM_CODE>(B:TEST_INSTRUMENT_#IE_NAME#, Bool) 100 *</ANIM_CODE>
</UseTemplate>
<UseTemplate Name="ASOBO_TEST_INSTRUMENT_Base_Template">
<SET_STATE_EXTERNAL>(>L:XMLVAR_Button_Down)</SET_STATE_EXTERNAL>
<VALUE_CODE>(L:XMLVAR_Button_Down)</VALUE_CODE>
<LOCAL_VAR_TO_WATCH_0>XMLVAR_Button_Down</LOCAL_VAR_TO_WATCH_0>
</UseTemplate>
</Component>NOTE: This template will be improved in the future to be made less verbose as currently you still need to provide the animation and a component for it.
Event With Integer Multi-State
In this example we have a switch/knob with several positions, to be used with other INTERACTION_TYPE Knob, eg: <KNOB_TYPE>X_STATES</KNOB_TYPE>. Note that the following parameter is required and should always be defined:
NUM_STATES- This sets the number of states the switch/knob has.
For these events with X possible states there are some additional parameters (note that # represents a numbered value starting at 0):
TT_VALUE_#- This is for a string to be displayed when the switch is in the position number#. By default it's expecting a localized string ID, for example:<TT_VALUE_0>COCKPIT.TOOLTIPSV2.GT_STATE_MAIN</TT_VALUE_0>
STR_STATE_#- This is string given to the Input Bindings for the position number#.
SET_STATE_#- This is a replacement of SET_STATE_EXTERNAL and is used to set the state when the switch is in the position#.
If using the Switch INTERACTION_TYPE you can also define a SWITCH_DIRECTION - either 'Horizontal' or 'Vertical', and the positions 0, 1, 2, etc... go from left to right when horizontal and top to bottom when vertical. It is also worth noting that an important parameter for this type of event is ENUM_VAL_TO_POS_EXTERNAL. This is using stored variables (in GET_STATE_EXTERNAL) to check the simulation state and give a physical position as an output.
NOTE: If you're making a template to be used in several aircraft, we advise using default template parameters for the different position indices making the whole thing easily reusable.
Below you can see an example of this kind of interaction:
<Parameters Type="Default">
<POS_BAT_1>0</POS_BAT_1>
<POS_OFF>1</POS_OFF>
<POS_BAT_2>2</POS_BAT_2>
</Parameters>
<Parameters Type="Override">
<NUM_STATES>3</NUM_STATES>
<SET_BAT_1>(A:ELECTRICAL MASTER BATTERY:1, Bool) != if{ 1 (>K:TOGGLE_MASTER_BATTERY) }</SET_BAT_1>
<SET_BAT_2>(A:ELECTRICAL MASTER BATTERY:2, Bool) != if{ 2 (>K:TOGGLE_MASTER_BATTERY) }</SET_BAT_2>
</Parameters>
<Parameters Type="Override">
<SET_STATE_#POS_BAT_1#>1 #SET_BAT_1# 0 #SET_BAT_2#</SET_STATE_#POS_BAT_1#>
<SET_STATE_#POS_OFF#>0 #SET_BAT_1# 0 #SET_BAT_2#</SET_STATE_#POS_OFF#>
<SET_STATE_#POS_BAT_2#>0 #SET_BAT_1# 1 #SET_BAT_2#</SET_STATE_#POS_BAT_2#>
<STR_STATE_#POS_BAT_1#>Main</STR_STATE_#POS_BAT_1#>
<STR_STATE_#POS_OFF#>Off</STR_STATE_#POS_OFF#>
<STR_STATE_#POS_BAT_2#>Emergency</STR_STATE_#POS_BAT_2#>
<GET_STATE_EXTERNAL>(A:ELECTRICAL MASTER BATTERY:1, Bool) sp0 (A:ELECTRICAL MASTER BATTERY:2, Bool) sp1</GET_STATE_EXTERNAL>
<ENUM_VAL_TO_POS_EXTERNAL>
l0 l1 ! and if{ #POS_BAT_1# sp2 g1 } (* BAT 1 is ON and BAT 2 is OFF *)
l0 ! l1 and if{ #POS_BAT_2# sp2 g1 } (* BAT 1 is OFF and BAT 2 is ON *)
l0 ! l1 ! and if{ #POS_OFF# sp2 g1 } (* BAT 1 is OFF and BAT 2 is OFF *)
(* If you end up here then all test failed therefore you're in a undesired state, you need to fix it *)
1 #SET_BAT_1# 0 #SET_BAT_2#
:1 l2
</ENUM_VAL_TO_POS_EXTERNAL>
<SIMVAR_TO_WATCH_0>ELECTRICAL MASTER BATTERY:1</SIMVAR_TO_WATCH_0>
<SIMVAR_TO_WATCH_1>ELECTRICAL MASTER BATTERY:2</SIMVAR_TO_WATCH_1>
</Parameters>
<UseTemplate Name="ASOBO_TEST_INSTRUMENT_Base_Template">
<IE_NAME>Battery</IE_NAME>
<!-- ... (other parameters) -->
</UseTemplate>In the example above there is a potential "impossible" state with the 2 batteries ON at the same time. In the XML you can see that we have recognised this possibility and fixed it (see the comments within the <ENUM_VAL_TO_POS_EXTERNAL> block), and we remind you to be vigilant for such potential problems when creating your own files and to ensure that they all contain fixes to avoid such an "impossible" situation.
Event With Float Multi-State
In the following example we have a template adjusting the cowl flaps:
NOTE: The compatible INTERACTION_TYPEs here would be the Knob and Lever types.
<UseTemplate Name="ASOBO_TEST_INSTRUMENT_Base_Template">
<SIMVAR_TO_WATCH_0>RECIP ENG COWL FLAP POSITION:#ID#</SIMVAR_TO_WATCH_0>
<SET_STATE_EXTERNAL>(>K:COWLFLAP#ID#_SET)</SET_STATE_EXTERNAL>
<GET_STATE_EXTERNAL>(A:RECIP ENG COWL FLAP POSITION:#ID#, position 16k)</GET_STATE_EXTERNAL>
<GET_TT_VALUE_STATE>(A:RECIP ENG COWL FLAP POSITION:#ID#, percent)</GET_TT_VALUE_STATE>
<INC_PARAM_0>p0 @16k 10 / *</INC_PARAM_0>
<INC_PARAM_0_IS_DYNAMIC>True</INC_PARAM_0_IS_DYNAMIC>
<DEC_PARAM_0>p0 @16k 10 / *</DEC_PARAM_0>
<DEC_PARAM_0_IS_DYNAMIC>True</DEC_PARAM_0_IS_DYNAMIC>
<SET_PARAM_0>p0 @16k *</SET_PARAM_0>
<SET_PARAM_0_IS_DYNAMIC>True</SET_PARAM_0_IS_DYNAMIC>
<INC_CODE_ADJUST_VALUE>@16k /</INC_CODE_ADJUST_VALUE>
<DEC_CODE_ADJUST_VALUE>@16k /</DEC_CODE_ADJUST_VALUE>
<MIN_VALUE>0</MIN_VALUE>
<MAX_VALUE>@16k</MAX_VALUE>
<VALUE_UNITS>position 16k</VALUE_UNITS>
<!-- ... (other parameters) -->
</UseTemplate>Here we want to modify a value that is in the position 16k type, so we've set up the Input Event in a way such that one increment will move the value 1/10th of the full range - using INC_PARAM_0 and DEC_PARAM_0. By default the increment is p0 for both <Inc> and <Dec>.
NOTE: A knob will be using the <Inc> and <Dec> events while a Lever will use all native events - <Inc>, <Dec> and <Set>.SET_PARAM_0 is set this way so that for a value of 0 you get 0 and for a value of 1 you get 16k. It is done this way so we can directly input (M:DragPercent) in the template, which is a value from 0 to 1. You can also override DRAG_VALUE_TO_EVENT_SET to make this conversion in the mouserect and not in the Input Event itself.
Finally, here is another example, this time of a very common template - a potentiometer. As you can see, this is much simpler:
<UseTemplate Name="ASOBO_TEST_INSTRUMENT_Base_Template">
<SET_STATE_EXTERNAL>#POTENTIOMETER# (>K:2:LIGHT_POTENTIOMETER_SET)</SET_STATE_EXTERNAL>
<GET_STATE_EXTERNAL>(A:LIGHT POTENTIOMETER:#POTENTIOMETER#, percent)</GET_STATE_EXTERNAL>
<SIMVAR_TO_WATCH_0>LIGHT POTENTIOMETER:#POTENTIOMETER#</SIMVAR_TO_WATCH_0>
<!-- ... (other parameters) -->
</UseTemplate>
Additional Events
In this last section we will go over "nested" Input Event presets. Nested event presets are commonly used for knobs, where you'll often have an Input Event for controlling the knob rotation, but you'll also want to accept pushing this knob to trigger an additional event. The problem with setting this up is that you cannot declare 2 mouserects on the same node so the same mouserect will have to handle both Input Event presets.
To deal with the issue described above, there are different types of additional events specifically for knobs:
- Push - Add a
IE_ID_EXTERNAL_0corresponding to theIE_NAMEof the event to call. - Pull - Same as Push, but with the added parameter
<IS_PULL>True</IS_PULL>. - PushPull - Add an
IE_ID_EXTERNAL_0and anIE_ID_EXTERNAL_1each corresponding respectively to the Push and PullIE_NAME. - Push_Timed - Same as Push but with the added parameter
<IS_TIMED>True</IS_TIMED>. - Switch - Same as Push with the added parameter
<TEMPLATE_VARIANT>Switch</TEMPLATE_VARIANT>.
Push
First we create the Input Event preset that will be referenced by the knob for the push action using ASOBO_TEST_INSTRUMENT_Push_Event_Base_Template, and then we create the knob itself with the rotation Input Event preset. When creating the knob we reference "Knob_Button", which is the IE_NAME of the push event:
<Component ID="TEST_INSTRUMENT_Knob" Node="TheNodeID">
<UseTemplate Name="ASOBO_TEST_INSTRUMENT_Push_Event_Base_Template">
<IE_NAME>Knob_Button</IE_NAME>
<ON_PUSH_EVENT>(>H:TEST_INSTRUMENT_Knob_Push)</ON_PUSH_EVENT>
<!-- (other parameters) -->
</UseTemplate>
<UseTemplate Name="ASOBO_TEST_INSTRUMENT_Base_Template">
<IE_NAME>Knob</IE_NAME>
<IE_ID_EXTERNAL_0>Knob_Button</IE_ID_EXTERNAL_0>
<IS_INFINITE>True</IS_INFINITE>
<SET_STATE_EXTERNAL>p0 0 > if{ (>H:TEST_INSTRUMENT_Knob_Inc) } els{ (>H:TEST_INSTRUMENT_Knob_Dec) }</SET_STATE_EXTERNAL>
<CREATE_COMPONENT>False</CREATE_COMPONENT>
<!-- (other parameters) -->
</UseTemplate>
</Component>
Pull
First we create the Input Event preset that will be referenced by the knob for the pull action using ASOBO_TEST_INSTRUMENT_Pull_Event_Base_Template, and then we create the knob itself with the rotation Input Event preset. When creating the knob we reference "Knob_Button", which is the IE_NAME of the pull event. We also use IS_PULL so the knob will animate the pull interaction correctly:
<Component ID="TEST_INSTRUMENT_Knob" Node="TheNodeID">
<UseTemplate Name="ASOBO_TEST_INSTRUMENT_Pull_Event_Base_Template">
<IE_NAME>Knob_Button</IE_NAME>
<ON_PULL_EVENT>(>H:TEST_INSTRUMENT_Knob_Pull)</ON_PULL_EVENT>
<!-- (other parameters) -->
</UseTemplate>
<UseTemplate Name="ASOBO_TEST_INSTRUMENT_Base_Template">
<IE_NAME>Knob</IE_NAME>
<IE_ID_EXTERNAL_0>Knob_Button</IE_ID_EXTERNAL_0>
<IS_INFINITE>True</IS_INFINITE>
<IS_PULL>True</IS_PULL>
<SET_STATE_EXTERNAL>p0 0 > if{ (>H:TEST_INSTRUMENT_Knob_Inc) } els{ (>H:TEST_INSTRUMENT_Knob_Dec) }</SET_STATE_EXTERNAL>
<CREATE_COMPONENT>False</CREATE_COMPONENT>
<!-- (other parameters) -->
</UseTemplate>
</Component>
PushPull
First we create the Input Event preset that will be referenced by the knob for the push action using ASOBO_TEST_INSTRUMENT_Push_Event_Base_Template and the pull event with ASOBO_TEST_INSTRUMENT_Pull_Event_Base_Template. We then create the knob itself with the rotation Input Event preset. When creating the knob we reference "Primary_Action" and "Secondary_Action" using the IE_NAMEs of the push and pull events:
<Component ID="TEST_INSTRUMENT_Knob" Node="TheNodeID">
<UseTemplate Name="ASOBO_TEST_INSTRUMENT_Push_Event_Base_Template">
<IE_NAME>Primary_Action</IE_NAME>
<ON_PUSH_EVENT>(>H:TEST_INSTRUMENT_Knob_Push)</ON_PUSH_EVENT>
<!-- (other parameters) -->
</UseTemplate>
<UseTemplate Name="ASOBO_TEST_INSTRUMENT_Pull_Event_Base_Template">
<IE_NAME>Secondary_Action</IE_NAME>
<ON_PULL_EVENT>(>H:TEST_INSTRUMENT_Knob_Pull)</ON_PULL_EVENT>
<!-- (other parameters) -->
</UseTemplate>
<UseTemplate Name="ASOBO_TEST_INSTRUMENT_Base_Template">
<IE_NAME>Knob</IE_NAME>
<IE_ID_EXTERNAL_0>Primary_Action</IE_ID_EXTERNAL_0>
<IE_ID_EXTERNAL_1>Secondary_Action</IE_ID_EXTERNAL_1>
<IS_INFINITE>True</IS_INFINITE>
<SET_STATE_EXTERNAL>p0 0 > if{ (>H:TEST_INSTRUMENT_Knob_Inc) } els{ (>H:TEST_INSTRUMENT_Knob_Dec) }</SET_STATE_EXTERNAL>
<CREATE_COMPONENT>False</CREATE_COMPONENT>
<!-- (other parameters) -->
</UseTemplate>
</Component>NOTE: This will likely be improved later on so we can use a single event for both push and pull.
Push_Timed
First we create the Input Event preset that will be referenced by the knob for the push action using ASOBO_TEST_INSTRUMENT_Push_Event_Base_Template, and then we create the knob itself with the rotation Input Event preset. When creating the knob we reference "Knob_Button" as the IE_NAME of the push event and we use IS_TIMED so the knob will animate the push interaction correctly:
<Component ID="TEST_INSTRUMENT_Knob" Node="TheNodeID">
<UseTemplate Name="ASOBO_TEST_INSTRUMENT_Push_Event_Base_Template">
<IE_NAME>Knob_Button</IE_NAME>
<IS_TIMED>True</IS_TIMED>
<ON_PUSH_EVENT>(>H:TEST_INSTRUMENT_Knob_Push)</ON_PUSH_EVENT>
<ON_PUSH_EVENT_LONG>(>H:TEST_INSTRUMENT_Knob_Long_Push)</ON_PUSH_EVENT_LONG>
<!-- (other parameters) -->
</UseTemplate>
<UseTemplate Name="ASOBO_TEST_INSTRUMENT_Base_Template">
<IE_NAME>Knob</IE_NAME>
<IE_ID_EXTERNAL_0>Knob_Button</IE_ID_EXTERNAL_0>
<IS_TIMED>True</IS_TIMED>
<IS_INFINITE>True</IS_INFINITE>
<SET_STATE_EXTERNAL>p0 0 > if{ (>H:TEST_INSTRUMENT_Knob_Inc) } els{ (>H:TEST_INSTRUMENT_Knob_Dec) }</SET_STATE_EXTERNAL>
<CREATE_COMPONENT>False</CREATE_COMPONENT>
<!-- (other parameters) -->
</UseTemplate>
</Component>
Switch
First we create the Input Event preset that will be referenced by the knob for the push action using ASOBO_TEST_INSTRUMENT_Push_Event_Base_Template, then we create the knob itself with the rotation Input Event preset. When creating the knob we reference "Knob_Button" as the IE_NAME of the push event, and we use IS_TIMED so the knob will animate the push interaction correctly.:
<Component ID="TEST_INSTRUMENT_Knob" Node="TheNodeID">
<UseTemplate Name="ASOBO_MyInputEvent_Base_Template">
<IE_NAME>Knob_Button</IE_NAME>
<SET_STATE_EXTERNAL>p0 (>L:XMLVAR_MyVar)</SET_STATE_EXTERNAL>
<GET_STATE_EXTERNAL>(L:XMLVAR_MyVar) sp0</GET_STATE_EXTERNAL>
<LOCAL_VAR_TO_WATCH_0>XMLVAR_MyVar</LOCAL_VAR_TO_WATCH_0>
<!-- (other parameters) -->
</UseTemplate>
<UseTemplate Name="ASOBO_TEST_INSTRUMENT_Base_Template">
<IE_NAME>Knob</IE_NAME>
<IE_ID_EXTERNAL_0>Knob_Button</IE_ID_EXTERNAL_0>
<IS_TIMED>True</IS_TIMED>
<IS_INFINITE>False</IS_INFINITE><!-- doesn't work with infinite -->
<SET_STATE_EXTERNAL>100 / (>L:XMLVAR_My_Knob)</SET_STATE_EXTERNAL>
<GET_STATE_EXTERNAL>(L:XMLVAR_My_Knob) 100 *</GET_STATE_EXTERNAL>
<LOCAL_VAR_TO_WATCH_0>XMLVAR_My_Knob</LOCAL_VAR_TO_WATCH_0>
<USE_SIMVAR_FOR_BUTTON_ANIM>False</USE_SIMVAR_FOR_BUTTON_ANIM>
<USE_SIMVAR_FOR_KNOB_ANIM>False</USE_SIMVAR_FOR_KNOB_ANIM>
<ANIM_CODE_SWITCH>(B:TEST_INSTRUMENT_Knob_Button, Bool) 100 *</ANIM_CODE_SWITCH>
<KNOB_ANIM_CODE>(B:TEST_INSTRUMENT_Knob, Percent)</KNOB_ANIM_CODE>
<CREATE_COMPONENT>False</CREATE_COMPONENT>
<TEMPLATE_VARIANT>Switch</TEMPLATE_VARIANT>
<!-- (other parameters) -->
</UseTemplate>
</Component>NOTE: This will likely be improved later on.
Making A Copilot Checklist
Rather than going through the struggle of guessing what event you should use to have the copilot autocomplete a checklist action, or struggle to get the same conditions in your switch mouse-rect as in your checklist, you can now simply use Input Events.
For example, say you have an Input Event preset called TEST_INSTRUMENT_Battery_1 , which expects a boolean true/false value. To check if the battery switch is ON you can do the following check using RPN:
(B:TEST_INSTRUMENT_Battery_1, Bool)If you need to have the copilot make the switch turn on when the checklist autocompletes, you can make use of Input Bindings with RPN to make it happen:
(>B:TEST_INSTRUMENT_Battery_1_On)The base templates available as part of the SDK are designed in a way to always create a selection of bindings for you to use externally. For example, in the case of a switch with two states, you'll always have one binding for each position and one additional binding to toggle the state.
Debugging
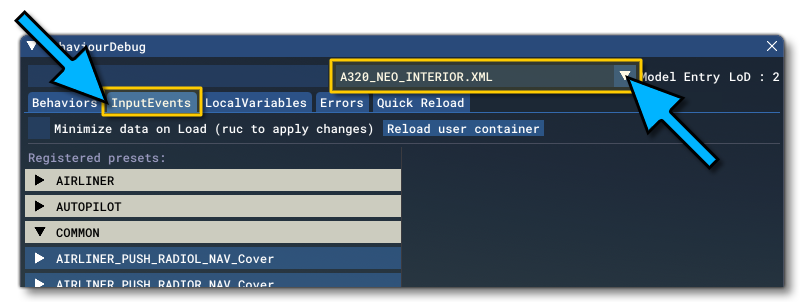
With Input Events setup you will find them all listed in the debug view of Behaviors (found from the Behaviors Debug window in DevMode). With the correct XML selected (the interior.xml of your aircraft) go in the InputEvents tab to find this list:
For each Input Event preset you create there will be at the very least 3 events: Inc, Dec, and Set (in yellow), and each prefixed by your input name. Depending on the interaction there may also be some bindings (in purple) and some watched variables (in green):
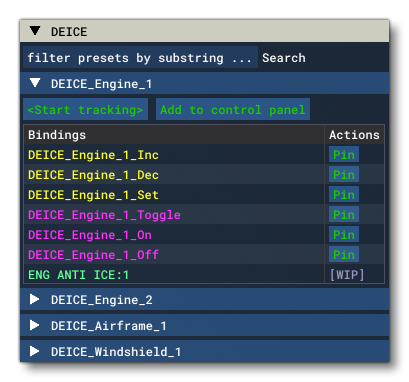
Note that you can also Pin any of these events, which will add them to the Pinned Events window and permit you to test it as if you were clicking on the switch itself using the Execute button:

Each Input Event preset can be tracked too. This is the equivalent of the SimVar watcher but for Input Events, and it will display in a table your InputEvent with some data (Value, TTValue and Units):
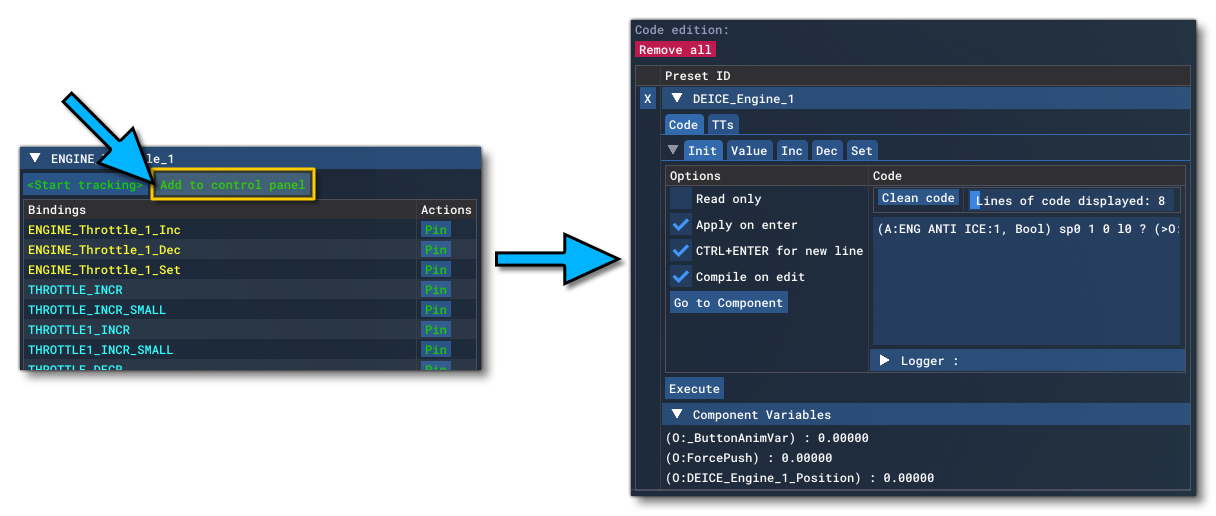
![]() Finally, you can edit the you code live by using the button
Finally, you can edit the you code live by using the button Add to control panel. Doing so will let you access almost any data you may be interested in debugging and iterating over in a live environment:
Example Files
To compliment this tutorial and to show more complete examples of how the Input Event system works, you can find a ZIP file from the link given below that contains two interior.xml files:
- With Base Templates: Example file that takes advantage of the base template hierarchy to create a smaller file and reduce the amount of work required to set things up.
- Without Base Templates: Example file that doesn't use base templates, generating a larger file that is slightly more complex, but giving a better understanding of how the component and input system works at a low level.
You can get both these example files from the following ZIP: