CONTROLTOWER OBJECTS
A ControlTower object is an object element used to add an ATC tower to an airport. When you select this object type you will be presented with a list of different scenery object elements listed in the Objects window:
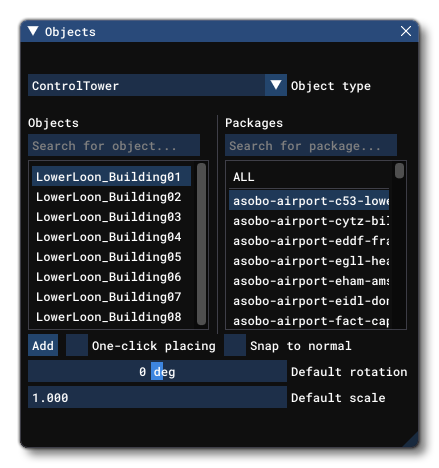 Since towers are considered scenery objects all scenery objects will be shown in the list, but you can use the filter at the top of the Objects window to narrow down the search to the objects that you want. Once you have found the tower that you want to add to the airport, click the
 Add button, and then use the Translate Gizmo to position the tower where you want, or you can enable One-Click Placing and simply click in the world to place it. You may also use the Rotation Gizmo to change the angle the element is shown at, as well as the Scale Gizmo to change its size.

IMPORTANT! Tower objects require one or more Airport Objects to be present in the scene, and must be added to an airport group in The Scenery Editor. If no airport is present then they cannot be used. Also note that if they are placed too far away (ie: outside the airport Object Test Radius) then they will not be rendered.
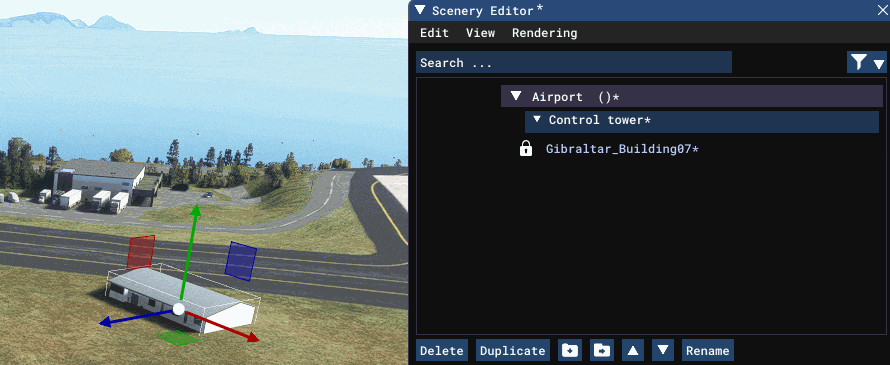
Once you place a ControlTower in an airport, the Scenery Editor will show a ControlTower group with a single child that is the tower that was just placed. Both the group and the Tower object have properties that can be set, explained below.
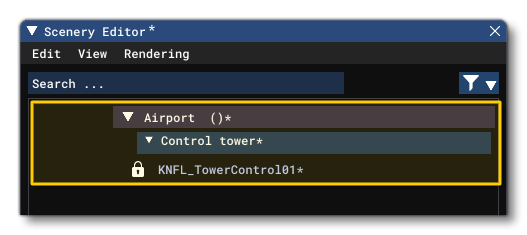
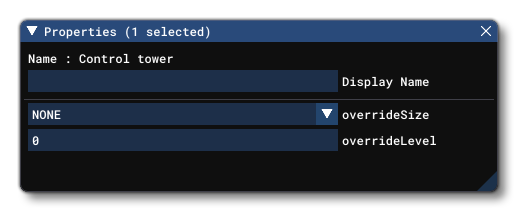
ControlTower (Group) Properties
ControlTower groups have the following Properties which can be edited:
-
Name
This is the name of the object group.
-
Display Name
This is the name of the element group as it will be displayed in the The Scenery Contents List. This can be edited and is helpful for identifying elements when you have a lot of items in the content list.
-
Override Size
The size of the tower object will be based on the mesh the object uses, but will be modified based on the size of the airport that it belongs to. Using this option you can override this and change the size to something other than the default.
-
Override Level
The height of the tower object will be based on the mesh the object uses, but will be modified based on the size of the airport that it belongs to. Using this option you can override this and change the height to something other than the default.
Tower Object Properties (Not available for World Hub Airports)
Tower objects have the following Properties which can be edited:
-
Name
This is the name of the tower object element as defined from its file.
-
Display Name
This is the name of the tower as it will be displayed in the The Scenery Contents List. This can be edited and is helpful for identifying elements when you have a lot of items in the content list.
-
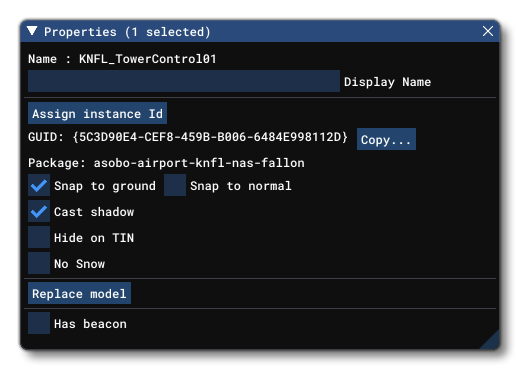
Assign Instance ID
Clicking this button will create a GUID-formatted Instance ID unique to the instance of the tower placed within the simulation. This is distinct to the GUID value (explained below), as the GUID will be shared by all elements of the same object, while the instance ID will be unique to each instance of that object. This can be useful for many things like when creating mission scripts (for example).
-
GUID
This shows the unique GUID for the tower object element. This ID value is for the base object element itself, and will be shared with all instances of the element that are placed in the world. Use the
Assign Instance IDbutton if you require a unique GUID for a specific instance of the object element.
-
Package
This shows the name of the package that the currently selected tower object comes from.
-
Snap To Ground
This option is enabled by default, and will "snap" the tower to the ground so that - regardless of the terrain height - the element will always be at ground level, even when moving it. Enabling this means that the altitude Gizmo does nothing, while disabling this will permit you to change the altitude. When this is disabled, you will have a new option present in the Properties window:
-
Offset To Ground
This value is the altitude from the ground for the object, and editing it will raise or lower the element (and changing the altitude using the Translate Gizmo will also change this value automatically).
-
-
Snap To Normal
When enabled, the tower object element will change orientation based on the terrain surface normal underneath the center-point of the tower. When disabled, it will maintain the default orientation regardless of the terrain underneath (or the orientation which is set using the Rotation Gizmo and note that when enabled the Rotation Gizmo will only affect the horizontal axis around the center of the element). This option is disabled by default.
-
Cast Shadow
This option will enable or disable the ability for the tower model to cast a shadow on the terrain. This option is enabled by default.
-
Hide on TIN
When checked, this option will hide the tower object element unless the TIN data is unavailable, for example when the user is offline, at which point it will be visible. The option is disabled by default.
-
No Snow
This option will enable or disable snow on the tower, where appropriate. This option is disabled by default.
-
Replace Model
The
Replace Modelbutton permits you to select a different Scenery model for the tower object element. This will not change any of the properties that have been set for the tower and simply change the visual model used to represent it.
-
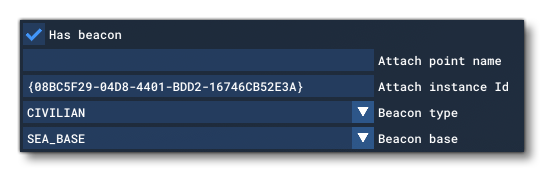
Has Beacon
Selecting this option will permit you to attach a beacon to the object element.
NOTE: This option is designed for object elements that have a custom model/mesh assigned to them, as you need to supply the name of an attach point which is a node on the model.When enabled you will be presented with the following extra options:
-
Attach Point Name: The name of the attach point node on the model.
-
Attach Instance ID: This is a unique GUID which can be used to identify the beacon.
-
Beacon Type: The type of beacon to be added, either CIVILIAN, MILITARY or CANADIAN.
-
Beacon Base: The type of base to give the beacon, either SEABASE, AIRPORT or HELIPORT.
-
Procedural ControlTowers
When you create the ControlTower group, you need to pick an object from the Objects list and that will be added to the scene as the Control Tower. However, it may be that you don't have an appropriate object, or that you don't want to model one yourself and create a new object just for this airport. In these cases, you can delete the object from the scenery editor ControlTower group and just leave the group. When you do that, the ControlTower group will tell the simulation to generate a "generic" control tower model procedurally, for example: