THE SCENERY EDITOR
The Scenery Editor is where you can edit all the various aspects of the Microsoft Flight Simulator 2020 physical world, from landscapes, to POIs, to airports, and more. This section of the SDK documentation outlines the different parts of the scenery editor, and also explains how each of them can be used to create and edit great add-ons for the simulation.
NOTE: In general, the Scenery Editor will only ever be used in the simulation, so you should not attempt to open or use this editor on any of the main menu screens. Instead, you should start a flight and only open the editor when you are in the sim.While this page provides an overview of the Scenery Editor sections, but you can find more detailed information about how to use the editor from the following page:
The most important part of using the scenery editor is the placing of objects within the scene, and there are many different types of objects available, each with their own properties and settings. You can find in-depth explanations of all these objects from the following page:
Overview
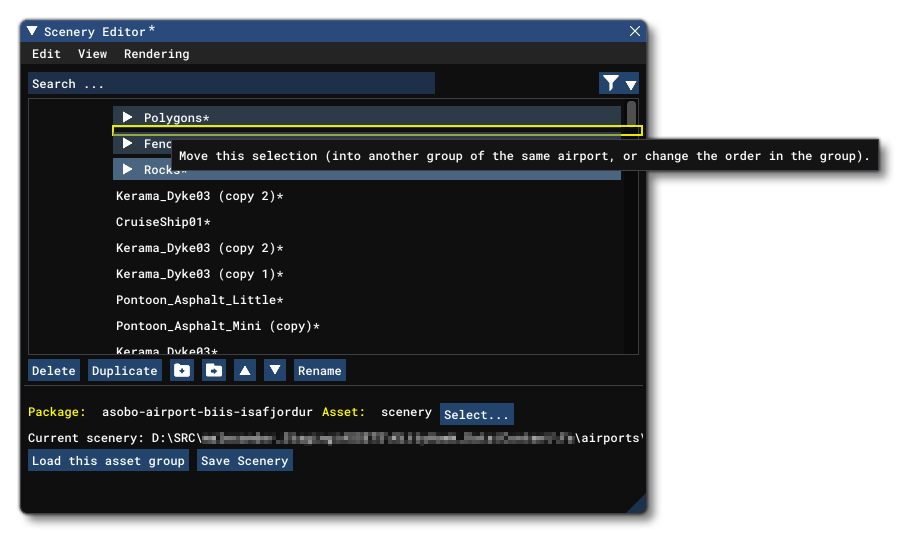
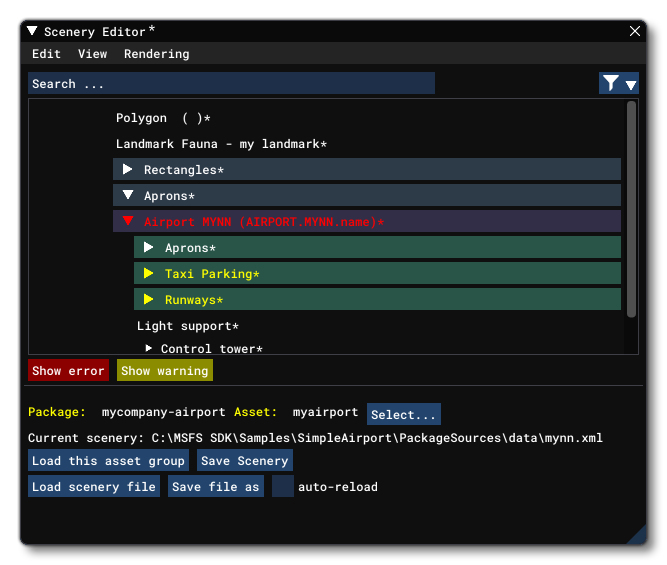
The Scenery Editor can be opened directly from the Tools menu, or - and this is the more common method for opening it - it'll be opened from Project Editor when you create or edit a package (as explained below). The editor itself looks like this:
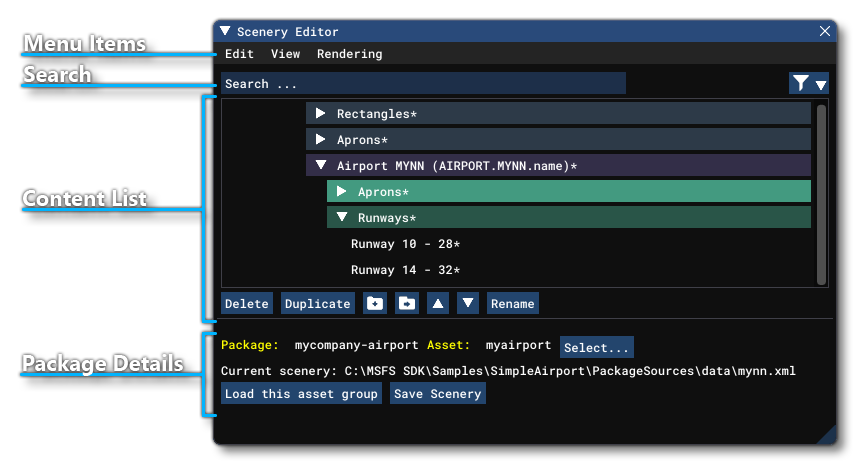
- Menu Items: This part of the edit gives you access to the different editor menus, which are explained on the following pages.
- Search: This input field can be used to filter the Content List based on the input term, or - if you prefix the filter text with "
-" - you can omit items with the input keyword from the list. Finally, you have the additional Filter options button which will open the following window:
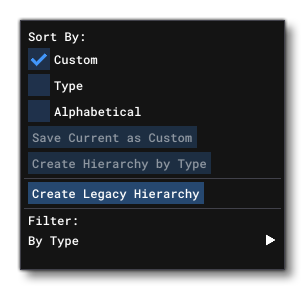 Here you can choose the "Sort By" option, which permits you to choose one of the following three options:
- Custom - Elements are not sorted automatically, but will be stored in the order that you put them in. You can change the order of the different elements using the
▲and▼buttons under the Content List section. - Type - Elements will be sorted by type, so "like" elements will be grouped together. This option can be saved as a custom option so you can reorder individual elements after sorting by clicking the
Save Current As Custombutton. You can also use theCreate Hierarchybutton to create a "type hierarchy" for one or more airports within the same package. This will delete all current airport groups then create individual groups for each element type present in the airport(s). Note that this cannot be undone!
 Note that you have one other button that can be used to create a custom hierarchy:
 Create Legacy Hierarchy. This will go through the entire list of scenery objects and restructure the groups such that there is only one group for each object type at the top level of the hierarchy. This option is provided as a convenience for those people that are used to (or prefer) the old way the Scenery Editor grouping system worked. As with theCreate Hierarchybutton, this cannot be undone. - Alphabetical - Elements will be sorted by name in alphabetical order from A - Z. This option can be saved as a custom option by clicking the
Save Current As Custombutton so you can reorder individual elements after sorting.
Note that these sorting orders only apply to airports. Finally, you can use the Filter: By Type option at the bottom of the pop-up to view only those objects of a specific type or types.
- Custom - Elements are not sorted automatically, but will be stored in the order that you put them in. You can change the order of the different elements using the
- Content List: This section lists all the different object elements and groups within the package. The section on The Scenery Contents List, below, has more information.
- Package Details: Here you can see details about the current package and asset being edited edited. Since a single package can contain multiple assets, you can change the one being edited from here by clicking on the
Select...button, and you can load a different asset group using theLoad This Asset Groupbutton. Finally you can save the current progress for the asset using theSave Scenerybutton.
The Scenery Contents List
As you go about adding elements to your scene, the Scenery Editor content list will slowly fill up as it lists each of the object elements and their type:
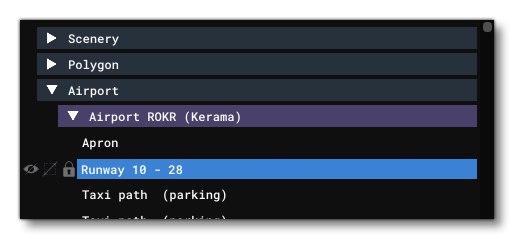
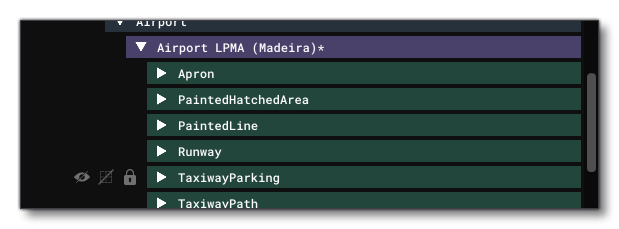
By default, each object type will have it's own "container" and within that the different elements for that type. For example, the SimObject type could have animals, aircraft, windsocks, etc... as elements within it, depending on the Container Title that you set. You can expand each object type by clicking the arrow icon beside the type name, then select an element from within by clicking on it again. You can also go to the element by double-clicking it, which will move the developer camera to focus on the element. Once an element is selected, you can then right-click anywhere in the editor to open up a menu of options for that element. At it's most basic this menu looks like this:
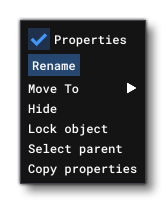
- Properties: If unchecked, this will open the object element Properties window (explained in more detail on the page about Objects).
Rename: This button will bring up a dialog that permits you to rename the element.NOTE: This will not change the actual names of the items, but only their display names as shown in the list.
Ungroup Items: This option will only be available when you have right-clicked on a group. Selecting this option will remove all elements from the group and place them at the same level in the hierarchy within the Content List. For more information about groups see the Scenery Groups section, below.
- Move To: This can be used to move the selected elements(s) to the top or the bottom of the current group.
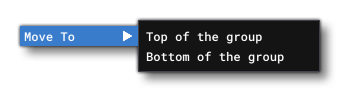 Note that if the selected element(s) is outside of any groups, then it will be moved to the top/bottom of the content list itself.
- Hide: This will hide the element in the simulation, making it invisible and also locking it from editing. This is the same as using the "hide" button in the Content List (explained below).
- Lock Object: This locks the element gizmo for translation/rotation/scale, but still permits other properties for the element to be edited.
- Select Parent: This option will select the group folder for the element(s) within the hierarchy. Note that this option will only be present for those objects that are within a group (including groups within groups).
- Copy Properties: This option will copy the selected element properties to the clipboard. If there are properties copied like this, then the menu will also show a Paste Properties option. This can be used to copy the property details between elements of the same type. For more information on the properties of each object element, please see here.
Beside each object type and element in the content list there are three "buttons". The first ![]() is for hiding the element (or elements if clicked on an object type or group) from view in the simulation. The second
is for hiding the element (or elements if clicked on an object type or group) from view in the simulation. The second ![]() is for hiding the edition tool overlay for the selected object in the simulation (note that this will also temporarily lock the object so it can't be edited). Finally, the third
is for hiding the edition tool overlay for the selected object in the simulation (note that this will also temporarily lock the object so it can't be edited). Finally, the third ![]() is for locking an element (or elements), meaning they will still be visible within the simulation, but you will be unable to edit them in any way. Note that hiding an element will also lock it from editing.
is for locking an element (or elements), meaning they will still be visible within the simulation, but you will be unable to edit them in any way. Note that hiding an element will also lock it from editing.
To select an element, simply click on it using the left mouse button, or you can also use Ctrl + Click to select multiple individual elements, or click an element thenShiftShift + Click to select consecutive elements in this list. Many element options can be used on multiple elements at once, like grouping, or hiding, etc...
At the bottom of the content list you also have a number of buttons that can be used to perform actions on one or more selected elements in the list:

The buttons relating to scenery groups (see below for more details) may be greyed out depending on the currently selected element, but the ones that are always available are:
Delete: Clicking this will deleted the currently selected element(s), including groups.Duplicate: Clicking this will duplicate the currently selected element(s), including groups.Rename: Clicking this will rename the currently selected element(s), including groups. Note that if this is used on multiple elements, then each element will be given the same name, but also have an identifying number appended to it in brackets.
Note that the Scenery Editor Content List will also highlight any errors and warnings that should be resolved before creating your scenery package. See here for more information:
Scenery Groups
The Scenery Editor content list permits you to create and edit groups, so that you can move and place assets within them and so keep your scene hierarchy organised to suit your own workflow.
To create a group you simply press the Create A New Group button ![]() . This will add a group to the contents list which you can then rename from the Right Mouse Button menu or by selecting it and then editing the name in the . Created groups can be nested - so you can place a group within a group within a group, and so on.
. This will add a group to the contents list which you can then rename from the Right Mouse Button menu or by selecting it and then editing the name in the . Created groups can be nested - so you can place a group within a group within a group, and so on.
Elements and groups, once created in the contents list, can be easily moved up or down in the list, either by selecting them and then using the move up button ![]() or the move down button
or the move down button ![]() , or by clicking and dragging them up or down.
, or by clicking and dragging them up or down.
 You can use this system for multiple selected elements and/or groups too (selected using
 Ctrl + Click and/or Shift + Click), although you cannot move groups or elements from an airport group out of the airport group, nor can you move elements from outside of an airport group into an airport group. Note that If you have a selection of multiple elements, then click one, this will de-select all the other elements. Therefore you must use the Alt key when moving, for example:
- Use
Ctrl+ Click to select three different elements. - Hold down
Alt. - Click on one element and drag it to the new position.
- All elements will be moved along with the one you clicked.
Please note the following caveats when creating or moving groups:
- When you add an airport, it will automatically be assigned it's own group.
- Airport groups can be moved and placed within other groups, except within another Airport group.
- Objects add to the scene that are specifically for airports - for example Runways, Jetways, TaxiwayParking - cannot be moved outside the airport group they were created in, but can be placed in groups created within an airport group.
- Objects added to the scene that are not specifically for airports - for example Polygons, Rectangles, LandmarkLocation - cannot be moved into an airport group, or into a group within an airport group.
Finally you have the Move Selection To Another Group button ![]() . Selecting this will open the following window (the contents of the window will change depending on the groups in the group list and whether the selected elemets/groups are airport specific or not):
. Selecting this will open the following window (the contents of the window will change depending on the groups in the group list and whether the selected elemets/groups are airport specific or not):
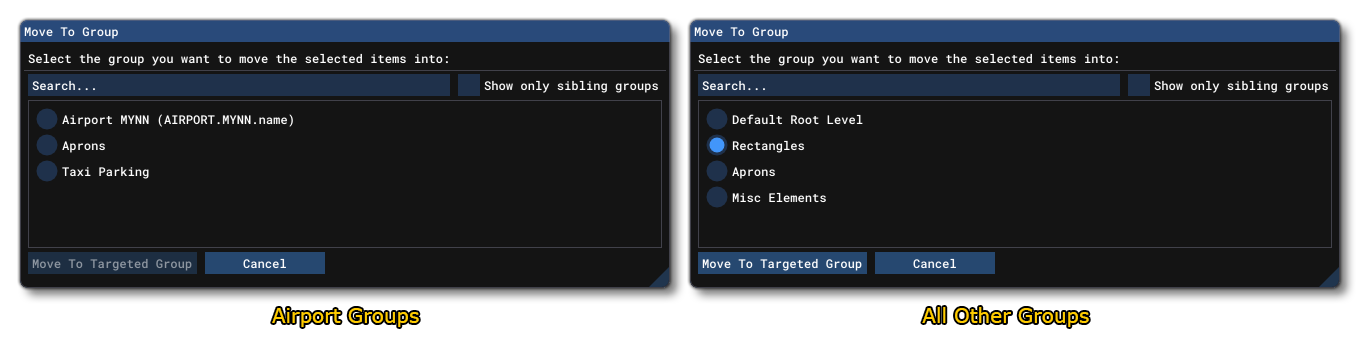 For airports (and groups within airports), you can only move to other groups within the airport itself, or move to the top level airport group. For all other elements, you can move to any other group, except airport groups. When you have multiple groups, you can use the Search option at the top of the window, and you can also filter the groups to show only siblings (and parents) of the selected element(s) by checking the Show Only Sibling Groups option.
Warnings And Errors
The Scenery Editor will do it's best to show any issues that you may have with the objects that have been placed in the current scene being edited:
Warnings will be highlighted in yellow and errors will be highlighted in red, and there will also be buttons shown at the base of the Content List. Clicking either the Show error or Show warning button will take you to the first object element that is causing the problem. If there is more than one object generating an issue then subsequent clicks of the buttons will cycle through them. Note that a warning does not mean that the scene cannot be built as a package, but an error does. So, before trying to build any packages all errors must be fixed.
World Hub Mode
The Scenery Editor is - by default - a fully featured and powerful tool that can be used to create scenery features and airport packages. However when used to edit World Hub projects, it will instead be limited and work as a "lightweight" editor, where some features will be limited. This has been done to ensure consistency within the simulation between airports that have been made by many different people, and it prevents any issues that may arise because of package dependencies etc...
World Hub Mode will be activated automatically for the Scenery Editor when you load a World Hub BGL file, and will be shown by the fact you have an extra ZipProject button and some text showing the version of the editor being used:

World Hub Objects
When using World Hub mode you will be limited to the following objects only (and some of their options may also be limited compared to the normal Scenery Editor - these changes will be flagged on the appropriate object page):
- Airport Objects
- Apron Objects
- CarParking Objects
- ControlTower Objects
- Helipad Objects
- LightRow Objects
- LightSupport Objects
- PaintedHatchedArea Objects
- PaintedLine Objects
- Polygon Objects
- Runway Objects
- TaxiwayParking Objects
- TaxiwayPath Objects
- TaxiwayPoint Objects
- Taxiway Sign Objects
- Windsock Objects
For more information on the World Hub and a full tutorial for creating and uploading an airport, please see here: