THE VIEW MENU
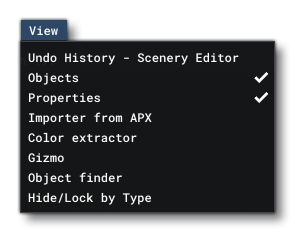 This menu is where you can open the different Scenery Editor views (windows). Each item in the menu is explained below.
-
Undo History
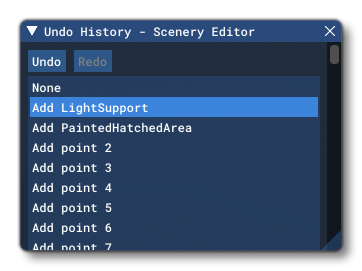
The Scenery Editor supports undo/redo functionality which can be accessed through this window, or alternatively using the keyboard shortcuts
Ctrl+ "Z" for undo, andCtrl+ "Y" for redo. From this window, however, you can select any item from the list and "reset" the editor to that state without having to go through each of the steps before or after. If you want to step through the state list, you can use the aforementioned shortcuts, or use theUndoandRedobuttons at the top.
-
Objects
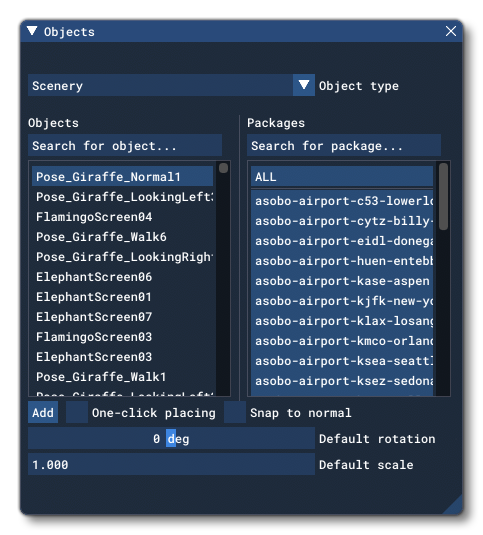
The Objects window is where you can browse, select and add the different "objects" that are available to use in The Scenery Editor.
NOTE: When we talk about "objects" we are referring to anything that can be used a scenery editor element, and this includes non-physical things like polygons, exclusion rectangles and waypoints.
At the top of the window you have a drop-down menu where you can select the Object Type that you want to add. There are a lot of different types, and each one is explained in full from the Objects page.
Once you've selected the type, on the left of the window you may be presented with a list of Objects within that type that can be placed in the scene (not all types have objects to choose from though). The right of the window will show all the Packages that the have objects of the selected type. You can use the Search For Object input field to add filters to use for the list of objects, and you can use the Search For Package input field to add filters to the list of packages. Note that you (if available) you can select the All option from the package list to show the appropriate object from all installed packages. Note that for both search filters, the filter keyword can be used to show only those elements that contain the word, or exclude elements that contain the keyword. Exclusion is achieved by prefixing the keyword with "-", for example "-runway" would exclude elements with the word "runway" in their name.
To add the object to the scene, you would select the object you want from the left hand list (if available, as some objects - like polygons - don't have anything to choose) then click the
Addbutton which will place the object instance in the scene at the center point where the camera is positioned. If you have enabled the option One-click Placing, then simply clicking in the scene will directly place the object element at the mouse position. You also have a Snap To Normal option that - when enabled - will snap placed elements to the terrain surface normal.Finally, you can edit the default rotation and scale for the elements as they are added. Changing these settings will influence how all subsequent object elements will look when added to the scene.
-
Properties
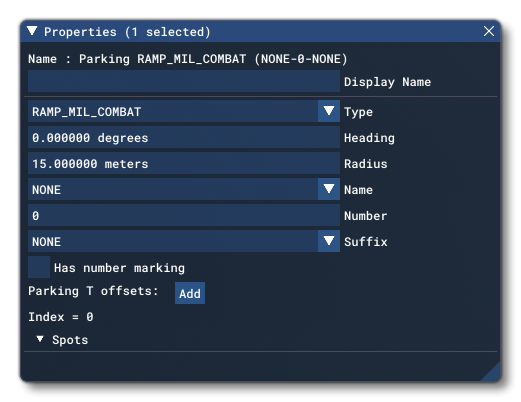
This window shows any element specific properties for the currently selected object element. The actual contents of this window will change depending on the selected Object Type, and are listed along with the type information on the Objects page.
-
Importer From APX
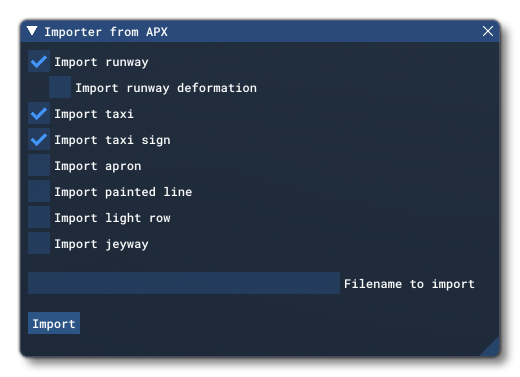 This window permits you to import some of the elements from one airport into the current one being edited. Before you can use this window, you must have created an airport object element in the scene (see Airport Objects for more information). The available options in this window are:
- Import Runway: When checked the runways from the given file will be imported to the airport.
- Import Taxi: When checked the taxiways from the given file will be imported to the airport.
- Import Taxi Sign: When checked the taxiway signs from the given file will be imported to the airport.
- Import Apron: When checked the aprons from the given file will be imported to the airport.
- Import Painted Lines: When checked the painted lines from the given file will be imported to the airport.
- Import Light Row: When checked the light rows from the given file will be imported to the airport.
- Import Jetway: When checked the jetways from the given file will be imported to the airport.
After making your selections, you then add the path to the file you want to import the object elements from to the Filename To Import field. When finished click the
Importbutton to import the elements.
-
Color Extractor
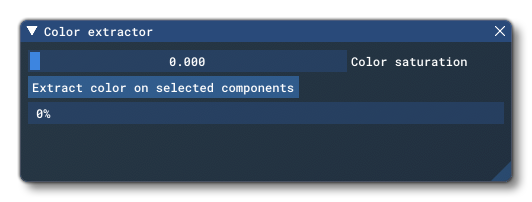 The purpose of this window is to permit you to retrieve the ground color and apply it to aprons, taxiway paths, and runways. This tool can be used in two different ways:
-
Select an object (or objects) in the scene that you want to apply it to then click the
Extract Colour On Selected Componentsbutton -
Select the Airport group in The Scenery Contents List then in this window click the
Extract Whole Airports Colourbutton.
After a few seconds, the simulation will reload and the colors will have been applied to the selected object(s), or to all applicable objects within the airport. The actual colour that is applied will be an average of the sum of the colours that are detected underneath the applicable objects - this is calculated by sampling the colour of each ground pixel found under the object(s) and then getting the average over all pixels.
IMPORTANT! This tool is currently under development and may not work correctly 100% of the time, and it may also cause stability issues with Microsoft Flight Simulator 2020. As such, use at your own risk.
-
-
Gizmo
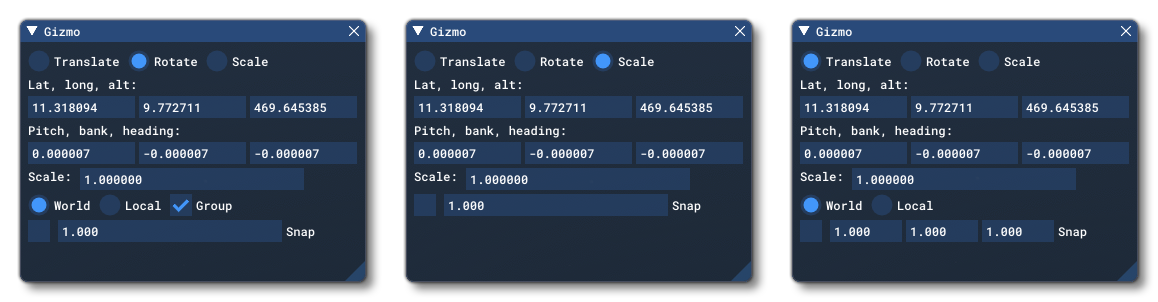
The Gizmo window permits you to change the properties of the translate/rotate/scale gizmos using the following input fields and buttons:
- Translate/Rotate/Scale: Select which kind of gizmo you want to use to apply changes to the object element.
- Lat/Long/Alt: Set the position using latitude, longitude and/or altitude for the object element. These values will automatically change when manipulating the gizmo handles on the element(s) in the simulation, but you can also input values here manually. Note that the altitude value may not be editable if the Snap To Ground option is checked in the element Properties.
- Pitch/Bank/Heading: These are used to set the rotation of the object element along the X/Y/Z axis. These values will automatically change when manipulating the gizmo handles on the element(s) in the simulation, but you can also input values here manually.
- Scale: Set the size scale as a multiplier. For example, a value of 0.5 is half the base size, while a value of 2 would be double the size.
- World/Local: Selecting this will change the Gizmo UI to be based on the world location/angle or on the local location/angle.
- Group: This option is only available to the Rotate Gizmo and changes how grouped elements will be rotated. If this is checked, then 2 or more elements being rotated together will rotate around the common axis of the gizmo (the center-point between all elements), while un-checking this will cause all elements to rotate around their own center-points.
- Snap: This option permits you to enable/disable value snapping, as well as set the snap amount. For example, when scaling, if you enable this option and set the value to 2, then the gizmo handles will only permit you to increment or decrement the object element in steps of 2.
As mentioned in the list above, each of the gizmos has different "handles" so you can adjust the placement/rotation/scale in the actual simulation:
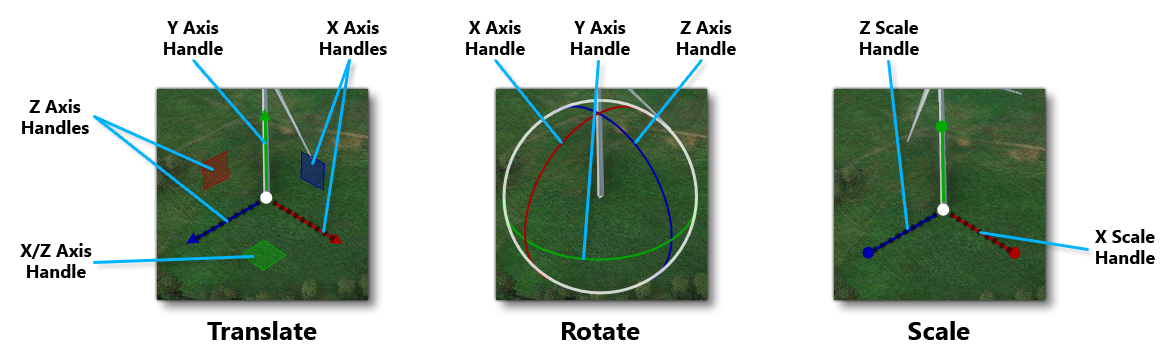
To use the different handles, simply click and hold the left mouse button on them and then drag. If you have selected multiple object elements, then the gizmo will be placed in the approximate center of all of them and manipulating the gizmo with the mouse will move/rotate/scale all the selected elements together as one.
Finally, the following shortcuts are available when using the Gizmo:-
When using the Translate gizmo, holding down
Ctrl+Shiftthen clicking and dragging the gizmo will duplicate the currently selected object(s). -
If you position the mouse over the center point of the Gizmo and click the middle mouse button, you can swap between the different Gizmo types (translate, rotate, scale).
-
If you hold down the
Shiftkey while using any of the Gizmo controls the controls will react with more precision.
-
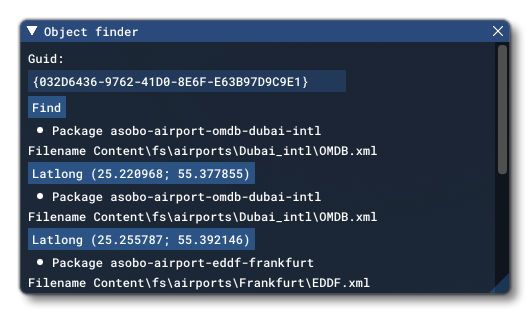
Object Finder
 This window can be used to check the GUID of an object element and see if all the references to it in the packages that make up the project. You supply the GUID to check (with no {}, eg: CA557D51-3E1B-4A35-B1D2-F01E90FB32A2), and then click the
 Findbutton. Depending on the size of the project and the number of packages it contains, this can take several seconds to complete.Once the search has been completed, a list of all the packages that reference the given GUID will be shown, and each one will be accompanied by a
LatLongbutton which you can click to be taken to the location of the object element in question.
-
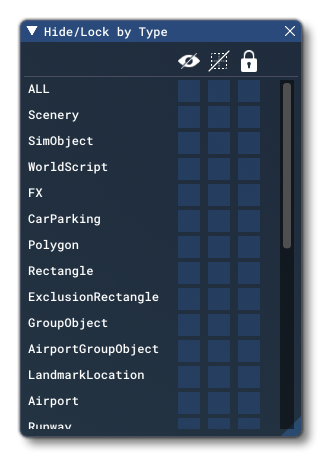
Hide/Lock By Type
 This window controls how the information in the The Scenery Contents List is displayed. To start with, along the very top of the window, you have the "block check" options which are a series of options that can be applied to entire "blocks" of items. Below that you have a table where you can toggle on or off the following options for one or more specific groups of scenery objects:
 Hide: Hide all of the selected object type(s) in the simulation.
 Hide Edition Markers: Hide the edition tool overlay for the selected object(s) in the simulation (this will also temporarily lock the object so it can't be edited).
 Lock: Lock the selected object(s) so they cannot be edited in any way.