Update
 The Update block will update particle attributes every frame that the particle is "alive". This block must be a child of an Init block, and you can only have one Update block per emitter. Note that any attributes set here will override those that are set in the Init block. Once an Init block has been linked to the Update Block, the Referenced From section of the Inspector will show a button:
 ParticleUpdate. Clicking this will pan the Node Graph to the Init block that is the parent of the Update block.
When you add an Update block item to the VFX Node Graph, the Inspector window will change to show a list of child attributes that can be added to the block:
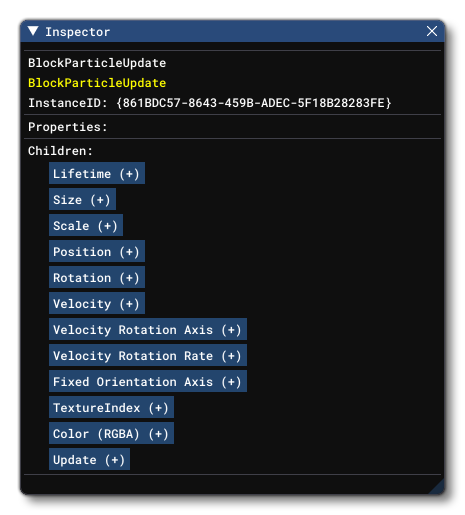 The following buttons exist (for information on how to dynamically edit these values, please see the Block Inputs section, below):
-
Clicking this button will add the particle Lifetime property to the block, which defines the lifetime - how long a particle will exist in the system - of a particle in the effect (in seconds).Lifetime
-
Clicking this button will add the particle Size property to the block, which defines the size (radius) of a particle each frame of the effect for the particle lifetime (in meters).Size
-
Clicking this button will add the particle Scale property to the block, which will add three parameters to the block, permiting you to scale the particle along the X, Y and/or Z axis. Scale values will be applied to the ParticleSize.Scale
-
Clicking this button will add the particle Position property to the block, which defines the position of the particle each frame of the effect for the particle lifetime relative to the emitter (in meters).Position
-
Clicking this button will add the particle Rotation property to the block, which defines the orientation of the particle each frame of the effect for the particle lifetime (in meters).Rotation
-
Clicking this button will add the particle Velocity property to the block, which defines the velocity of the particle each frame of the effect for the particle lifetime (in meters per second).Velocity
-
Clicking this button permits you to add an input (or set values) for the rotation axis of the particle as a vector. This vector represents the particle axis in the coordinate space of the effect, which will be world or local depending on the EmmitInLocalSpace parameter on the Emitter block.Velocity Rotation Axis
-
With this button you can add the option to set the velocity rotation rate of the particle (in degrees per second).Velocity Rotation Rate
-
Fixed Rotation AxisThis button adds the possibility to set the fixed rotation axis for particles. It is only used when the Output is set to emit quads and the Quad Orientation Type parameter is set to FixedAxis. This axis is defined in the coordinate space of the emitter, and the emitted quad will be oriented so that it is perpendicular to this axis. The default value for the
Fixed Rotation Axisis (0, 1, 0). This default value only makes sense in local space mode, where it points up and fixes the quads horizontally relative to the emitter. In world space mode, you should provide an axis using nodes that are aware of the coordinate space context and can provide useful directions (ie: LocalDirection, GroundDirection, GravityVector).
-
Clicking this button will add the particle TextureIndex property to the block, which will update the index of the sprite from the material texture atlas. This parameter requires that the Output block uses the Atlas UVMode and has a material with sprites for the texture, otherwise it will be ignored. Any value you input here will be rounded to the nearest integer, and it will also be "wrapped" to maintain the value within the bounds of 0 and the (max index number) - 1. For example, if the texture atlas has 8 sprite images and the value used here is 11, the sprite shown will be index 3.Texture Index
-
Clicking this button will add the particle Color property to the block, which defines the color and alpha of the particle each frame of the effect for the particle lifetime.Color (RGBA)
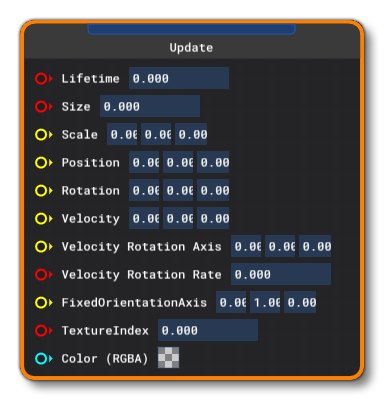
After clicking any of these buttons, the block will show the given attribute and permit it to be edited, either within the block itself or within the Inspector window (click the button again to change the inspector to the attribute properties). You can remove an attribute from the block at any time by clicking the X button beside it.
The Update block also has a further button, ParticleOutput(+). Clicking this will permit the emitter to accept an Output block as a child. Note that an Update block can only have one Output block attached to it. Once you have linked an Output block with the Update block, the button will change and there will be an additional X button. This can be used to break the link with the Output block (but this does not remove the Output block, only the link).
Block Inputs
 The Update block permits various inputs from Nodes to set the following values:
- Lifetime: This input can be a single scalar value and will be used to set the lifetime (in seconds) for the particle. The input value must be positive.
- Size: This input can be a single scalar value and will be used to set the size (in meters) for the particle.
- Scale: This input requires a 3 value vector to define the scale of the particle relative to the size. The values in the vector are X/Y/Z components for the size along each of the axis.
- Position: This input requires a 3 value vector to define the position of the particle relative to the emitter. The values in the vector are X/Y/Z components for the position in meters.
- Rotation: This input requires a 3 value vector to define the rotation of the particle relative to the emitter. The values in the vector are the X/Y/Z axis components for the rotation in degrees.
- Velocity: This input requires a 3 value vector to define the velocity of the particle relative to the emitter. The values in the vector are the X/Y/Z axis components for the velocity vector in degrees.
- Velocity Rotation Axis: This input requires a 3 value vector to define the the rotation axis for particles. The values in the vector are the X/Y/Z axis components for the rotation axis in degrees.
- Velocity Rotation Rate: This input can be a single scalar value and will be used to set the rotation rate of the particle in degrees per second.
- Fixed Orientation Axis: This input requires a 3 value vector to define the fixed orientation of the particle. The values in the vector are the X/Y/Z axis components for the rotation in degrees.
- TextureIndex: This input requires a single scalar value which will be used to extract a single "sprite" from the texture atlas of the material being used. Any input will be rounded to the nearest integer value, and the input will also be "wrapped" so that any value that is over the number of sprites in the atlas will be modulo'd to maintain it within the bounds of 0 and (max index number) - 1. For example, an 8 image texture atlas with an input of 11 would show the sprite index of 3 on the texture atlas. Note that for straight animation you can use the AtlasPlayer node as the input.
- Colour: This input requires a 4 value vector to define the color and alpha of the particle. The vector values should be ordered as RGBA, and should be between the values of 0 and 1. You can click the color swatch on the node to open the Colour Picker and edit the color directly if required.