THE PROJECT INSPECTOR
The Inspector window can be opened from the View menu of the Project Editor and is used to show additional information about the Packages and Asset Groups that are currently listed as part of the project. To change the item being inspected, simply click on it in the Project Editor Package List (note that you can expand a package to see it's contents by clicking on the little arrow on the left).

The contents of the Project Inspector will change depending on the item being inspected. The image below shows the most common view, which is that for a package:

When inspecting a package, the Project Inspector window will show two tabs for editing, the details of which are explained in the sections below.
Summary Content Manager

The Summary Content Manager tab is where you set the main meta-data for the selected package. Some of the data here is already set based on information you gave when you created both the project and the package, but it can all be edited and changes as required. The available options are:
-
Version
Here you can give the version number of the package. You can input the values directly or use the+/-buttons to increment/decrement the values.
-
Item Name
This is a non-editable field that shows the full name for the package in the Project Editor This is what is used for all file paths, and is generated as follows:<company_name> - <package_name>, for example:mycompany-mynewairport
-
Company Name
The name of the company or individual that is responsible for the project. This field cannot be left blank, and will be in lower case, and cannot contain spaces, nor special characters (ie: A-Z and numbers only).
-
Package Name
The name of the package. There are some strict rules on how the package should be named depending on the contents of the package, which are listed in the Package Name section of the Project Editor documentation.
-
Manufacturer
The name of the manufacturer of the aircraft being recreated in the package (this is only required when creating an aircraft package and can be ignored for anything else).
-
Title
The package Title is essentially the "display name" for the package that the end-user will see, and is also the display name for the package on the Marketplace. Note that you can only have a title with a maximum of 50 characters (including spaces).
-
Creator
The name of the company or user(s) that has created the package. It is strongly recommended that you use the same creator name for all packages you produce, as it helps with showing all of them together when displaying items on the Marketplace. Note that you can only have a creator name with a maximum of 28 characters (including spaces).
-
Content-Type
The general type of package that is being inspected. The different types available are explained in full in the section on Content-Type on the Project Editor page.
-
Dependencies
This is where you can add any dependencies for the package. A dependecy is another package that needs to be mounted in the VFS along with the package being defined, for the package being defined to work correctly. For example, it could be you are using one or more materials from an existing package in your own aircraft, so the package with the materials you are using needs to be declared here (even if the package is one of the "default" packages that comes with the simulation). To add a package, you must click theAdd Dependecybutton, and then select a package from the list of those currently mounted in the VFS:
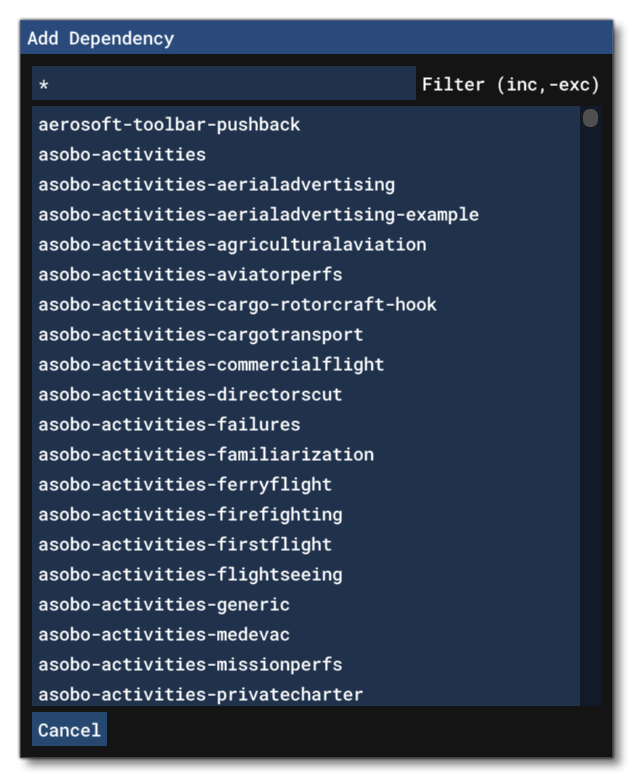
You can repeat this process for as many dependencies as required for your own package to function. Failing to list any package dependencies here could mean that your aircraft will fail the validation and injestion process for the Microsoft Marketplace (see the Export Window page for more information).
-
Content Manager Thumbnail
This is where you must add a thumbnail image that represents the package contents. You can click on the image to open a browser and select an image from a file, or - if you are creating an Aircraft package - you can start a free-flight and select the aircraft then click theCapture Aircraft Thumbnailbutton to generate an image from the world. The image should be authored at 320px * 240px using theJPGformat. Note that you can setup The Aircraft Thumbnail Capture Tool to generate this image as part of a Capture Set.
NOTE: This image is obligatory, and will lead to errors when building the package if it is not supplied.
-
Package Order Hint
This section is used to help categorise the package in such a way that the package will be placed in the correct place in the load order for the VFS, helping prevent conflicts with other packages as they are loaded. The hints will be shown in two groups, with the inferred "recommended" hints in the top section, and then the full list in the bottom section. that are available are as follows (note that most of these are assigned automatically when you create the package using the Package Wizard, however for Custom package types you will need to set this here manually, and for other package types you can change it here if required, although that's not recommended):
Hint Description Bespoke airport patch Overrides changes from a 'Bespoke airport' package. Custom airport Contains airport data for an existing generic airport or a completely new one. Custom airport life Contains custom airport services or navigation services. Custom airport patch Overrides airport data from a 'Custom airport' package. Custom instrument Contains custom cockpit instruments (altimeters, radios, flight computers, etc). Custom instrument patch Overrides custom cockpit instruments from a 'Custom instrument' package. Custom local scenery Contains custom sceneries in a specific region (ex: adding all castles of France). Custom material library Contains custom materials. Custom material library patch Overrides custom materials from a 'Custom material library' package. Custom model library Contains custom models. Custom model library patch Overrides custom models from a 'Custom model library' package. Custom navigation data Replaces all navigation data by custom ones. Custom navigation data patch Overrides custom navigation data from a 'Custom navigation data' package. Custom point of interest Contains custom point of interest. Custom point of interest patch Overrides custom point of interest from a 'Custom point of interest' package. Custom scenery patch Overrides custom sceneries from a 'Custom world scenery' or 'Custom local scenery' package. Custom sim attachment library Contains custom sim attachments for modular sim objects. Custom sim attachment library patch Overrides custom sim attachments from a 'Custom sim attachment library' package. Custom sim object Contains custom interactive objects in the simulation (aircraft, characters, animals, etc). Custom sim object patch Overrides custom sim objects from a 'Custom sim object' package. Custom SPC library Contains custom sim prop containers. Custom SPC library patch Overrides custom sim prop containers from a 'Custom SPC library' package. Custom texture library Contains custom textures. Custom texture library patch Overrides custom textures from a 'Custom texture library' package. Custom vfx Contains custom visual effects (weather effects, explosions, water splashes, etc) or other graphical enhancements. Custom world scenery Contains custom sceneries around the world (ex: adding all electric pylons of the earth). Device Contains one or more input device definitions. Generic airport patch Overrides generic airports from a 'Generic airport' package. Input Contains one or more device input profiles (transversal, global, or individual). Instrument patch Overrides generic instruments from an 'Instrument' package. Material library patch Overrides generic materials from a 'Material library' package. Model library patch Overrides generic models from a 'Model library' package. Navigation data patch Overrides generic navigation data from a 'Navigation data' package. Panel patch Overrides cockpit elements from a 'Panel' package. Point of interest patch Overrides generic point of interest from a 'Point of interest' package. Scenery patch Overrides generic sceneries from a 'Scenery' package. Sim attachment library patch Overrides generic sim attachments from a 'Sim attachment library' package. Sim object patch Overrides generic sim objects from a 'Sim object' package. SPC library patch Overrides generic sim prop containers from an 'SPC library' package. Texture library patch Overrides generic textures from a 'Texture library' package. UI patch Overrides user interface elements from an 'UI' package.
-
Asset Groups
This section lists all the asset groups that have been added to the package. You can click theEditbutton to open the asset group in the Inspector for editing, or you can click theRemovebutton to remove the asset group from the package. You can also add further asset groups to the package by clicking on the(+)Add Asset Groupbutton and then selecting the asset group type to add, which will open the Add Asset Group window as explained in the Adding An Asset Group section, above. You can then edit the group details from , if required. For information on the different assets that can be added, see the page on Asset Types.
-
Build Package
This button will build the package, compiling it and placing it in the package output folder, as well as add it - temporarily - to the simulation. Note that this will not remove any files that have previously been output by a build and will simply overwrite existing files. Use theClean Packageoption to clean the output folder first if you have issues.
-
Clean Package
This button will clean the package output folder, removing any previously built versions of the package and the files it contains.
Release Notes
 This tab permits you to add release notes for each version/update of the package. To start with this section will be empty, and you need to click the
 + button at the bottom to add the first (and subsequent) set of release notes to the list. Beside that button is the X button that can be used to remove any release notes from the list. Once you have added a set of release notes you can start to set the following values:
- Version: The version number that the release notes refer to.
- Date: The date on which the package is released.
- Text: The Release Notes text that explains the contents/changes/updates for the package version.
It is worth noting that the release note text can use MarkDown, so you can easily add some basic formatting to them (like bullet points, bold text, etc...).
Globally Overriden Base Sim Files

This tab is used if your package wishes to override any of the global base files that are protected from overwrite by default. Currently this means the files in the following folders:
html_uiModelBehaviorDefs
However, we recognise that some add-ons have a good reason to modify files in these folders, and so we have provided this tab as a way to still override any of these files. Essentially this tab is to ensure that - if you are overriding any files in these folders - your are aware of the consequences and prevent any add-on mistakenly overriding them.
To use this tab, simply give the relative path within the VFS to the file you want to edit in the Filepath field, then click the + button to add it to the list. If you need to get the path itself, then simply enable the VFS Projector and browse to the file you want to override in the file system, then copy the path and paste it into the Inspector omitting the part that includes the up to the VFSProjection folder. For example, this path:
C:\Users\USERNAME\Documents\My Games\Microsoft Flight Simulator 2024\VFSProjection\html_ui\js\avionics.js
Would become the following for the Globally Overriden Base Sim Files tab:
\html_ui\js\avionics.js
When using this system, any file concerned by the explicit override mecanism has a different way to resolve the file when accessed via the VFS:
- If a package contains the file but does not list the file in the global override tab, then the file will not override the base file.
- If one package contains the file and has a corresponding entry, it takes priority over any package which does not contain the entry.
- If two packages override the same file via this system, regular package priority takes over.
The Asset Group Inspector

When you select an asset group from the Project Editor list, the Inspector window will change to show the following input fields:
- Name: This is the name of the Asset Group as it will be shown in the Project Editor list
- Type: This is the type of the asset, as set when it was first added to the package. This can be changed if required, although you should ensure that the sources for the asset group are adequate for the selected type. You can find information on the different asset types here: Asset Types.
- AssetDir: This is the folder where the source files for the asset group will be stored. This will be automatically created for you when you add an asset group to a package, however you can click the
...button to change the directory. - OutputDir: This is the folder where the compiled contents of the asset group will be stored. This path is relative to the
Packagesfolder, which in turn will be inside the main project folder. If you want to edit this path, you need to manually edit the contents of the field, then pressEnterto validate it. You can check the path location using the...button to open a file explorer, but this will not set the path to any folder you select.
The Selected Packages Inspector

In the Project Editor you can select multiple packages by using Ctrl + click. When you have multiple packages selected the inspector will show the selected packages along with their current status, and also give you the following buttons:
-
Build And Mount Selected Packages
Clicking this button will build all the selected packages and then mount them in the VFS.
-
Clean Selected Packages
Clicking this button will remove the selected packages and package information from the editor.
-
Build And Export Selected Packages
Clicking this button will build all the selected packages. It will then export the packages as completed add-ons, including any marketplace data. For more information on exporting, please see the Export Window page.