THE AIRCRAFT CAPTURE TOOL

This tool is designed to make it as easy as possible to create a comprehensive set of screenshots and thumbnails that can be used for promotional purposes and as part of the meta-data after uploading to the Microsoft Flight Simulator 2024 Marketplace.
When you first open this tool, you will be transported to an "empty" space which is the scene used to generate the thumbnails and aircraft images. If this does not happen, then you should click on the Teleport To Scene button. You will then need to use the Spawn Window to select the aircraft variation that you wish to capture and click on the Spawn Object button to spawn it into the scene, ready to be captured.
The Capture Process
The general flow for creating the required images for your aircraft is as follows:
- Select the Aircraft Capture Tool from the Tools menu, which will open the tool itself plus the Spawn Window. This will also change the world to a "blank" environment, better suited to generating a homogeneous suite of captures.
- From the Spawn Window, you will want to select the aircraft (or aircraft variation or livery) to capture, then click on the
Spawn Objectbutton, followed by theTeleport To Scenebutton. This should spawn the aircraft and center the camera on it (the aircraft may occupy too much or or two little of the screen at this point, but that will be dealt with in later steps).
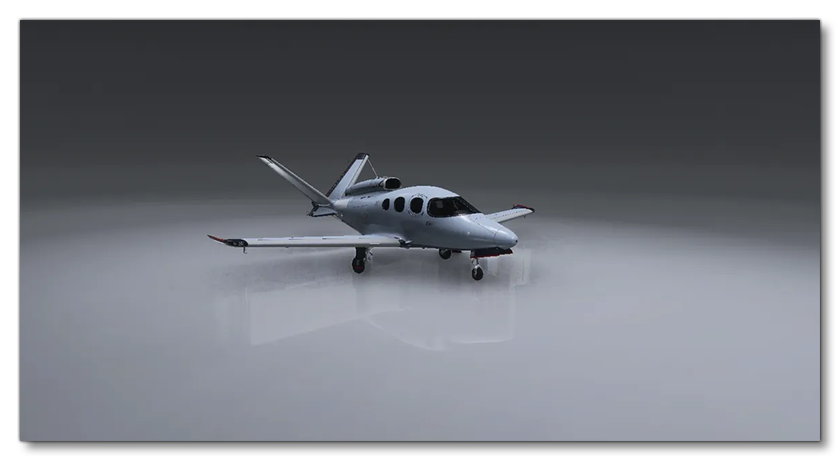
- The next step would be to go to the Add Preset button at the bottom of the Capture Tool window, and select one (or all) of the presets listed. These will give you the essential screenshots and thumbnails required for both the marketplace and for the package.
- Each preset will be added as a Group in the capture tool, and inside each group you will have a list of shots. A shot is simply a unique camera setup that will be used to generate a screenshot, and - depending on the preset used - you will have a number of these defined.
- You should go through each shot and click the Active checkbox. When a shot is active the view will switch to the camera that has been setup and you should ensure that this is correct for your aircraft. If it's not then you can use the mouse or the gamepad to re-position the camera or zoom in/out until it's correct. In most cases, you can simply select the Camera option "Optimise", and have the camera view and FOV be automatically optimised.
- Having revised all the shots in each capture group, you can then click the Capture button. You will be prompted to give a save location for the screenshots - if you have given a SubFolder for each group, then the groups will be saved to the named sub-folder at the selected location - then the simulation will generate all the images for you. Note that this may take some time and the screen will flash and change while the capture is in progress. The resulting screenshots will be saved in the specified location.
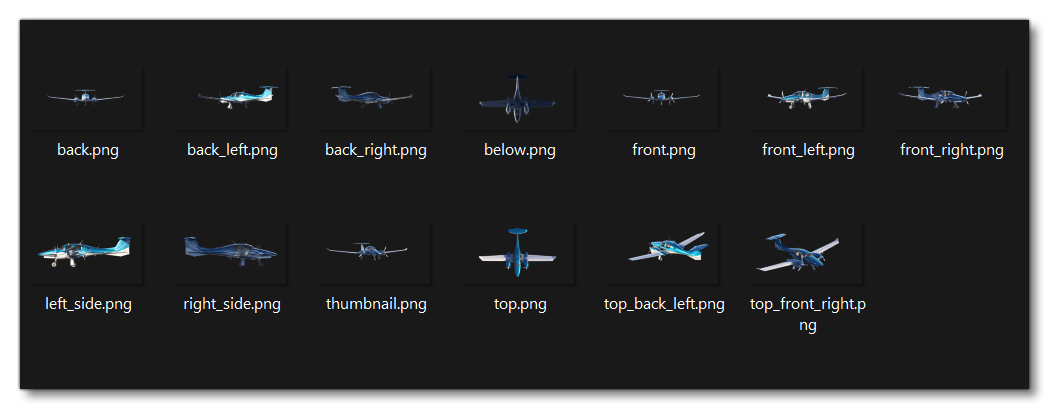
Once you have the thumbnails, they can be added into the appropriate folder in the SimObject package. The folder where they are placed must always be named thumbnail, and you can have one of these folders in each of your common, preset, attachments, and liveries folders, since you may require different thumbnails for all these different parts of the modular aircraft (see here for more information: Modular SimObject Project Structure).
Thumbnail Presets
The aircraft capture tool can be used to create the Thumbnail Images required by the simulation UI when displaying information about the aircraft. You can set these up manually using this tool, but we also provide a preset file which can be loaded into the capture tool and includes predefined shots for the thumbnail.png, thumbnail_button.png, and thumbnail_side.png:
To use this preset, simply open the capture tool and then click on the Load Custom Set button. This will open the file explorer and should browse to the file linked above. On load the capture tool will be setup to capture the thumbnails requires for all modular aircraft.
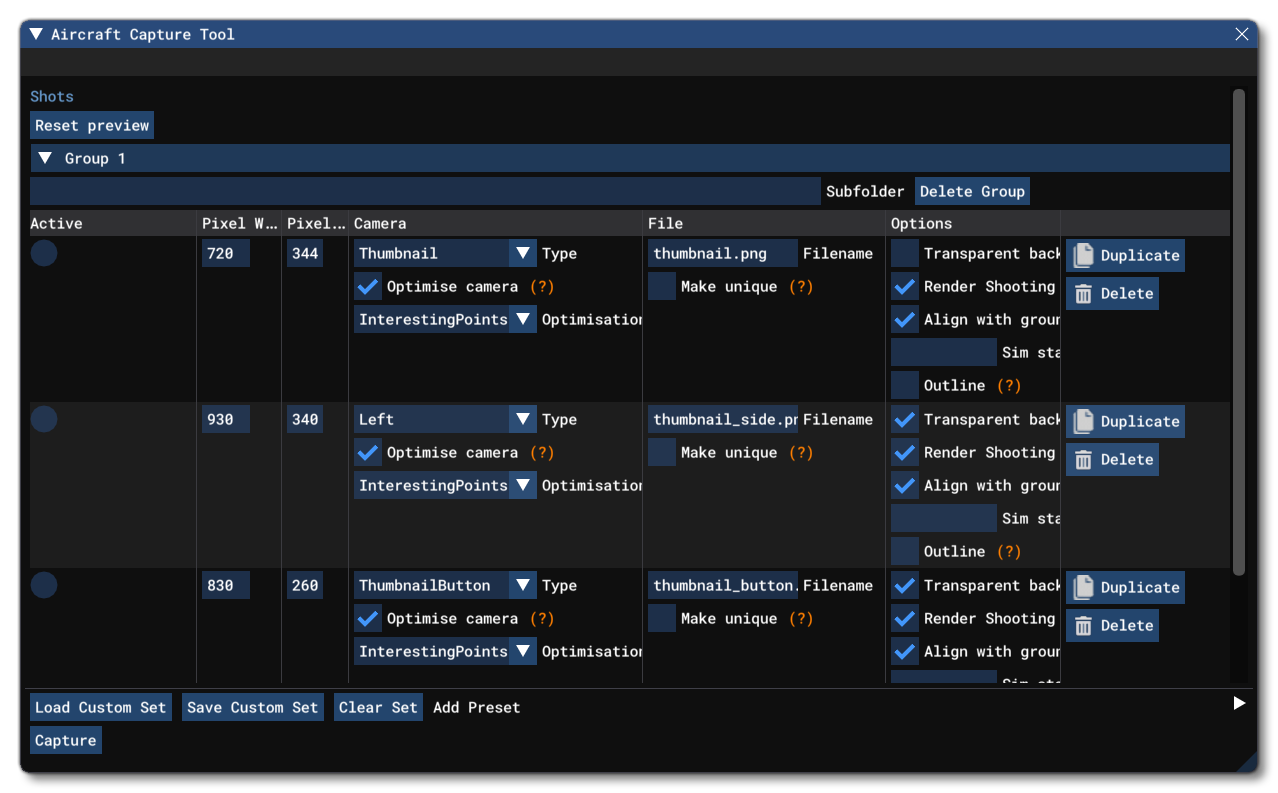
You can now simply click on the Capture button to run the preset, which should work for all aircraft types. Note that the preset does not include a shot for the thumbnail_variation.png thumbnail image, as this is very much aircraft dependent.
EFB Silhouette Thumbnail
As well as the main thumbnails that are created using the preset linked above, we recommend that you add in a silhouette thumbnail to be used in the EFB. This is will be used in various places, for example when viewing the seat positions in the Mass And Balance page:
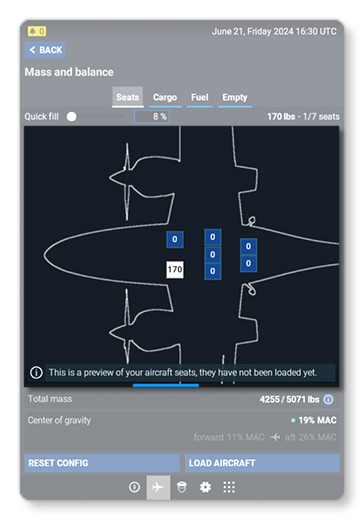
To generate this image, simply create a new shot and then set up the following options exactly as listed below:
Pixel Width: 1920
Pixel Height: 1080
Type: TopLeft
Optimise Camera: Checked
Optimisation: Aircraft Nodes
Filename: thumbnail_shape
Align With Ground: Checked
Outline: Checked

Additionally, the Outline Width can be changed if required, as sometimes larger aircraft may require a slightly thicker line. Once set up, you can click on the Capture button to create the silhouette, which will be a transparent image called thumbnail_shape.png. This should be added into the common thumbnail folder of the aircraft for the EFB to pick it up, although if your aircraft shape changes based on attachments and presets, you can use the thumbnail folder in each preset instead (every preset will require a shape image in this case).
Note that the thumbnail_shape.png file created this way will contain meta-data defining certain aircraft attributes which are required by the EFB to be able to position the image correctly:

This means that if you modify the image file in a different art program, this meta-data may be removed which will cause the EFB to fail to display certain elements correctly (like seats). Therefor we strongly recommend that you do not edit this file after creation. It is worth noting that you can modify how this image is presented in a basic way using the <MassAndBalance> section of the Panel XML file.
The Aircraft Capture Tool Window
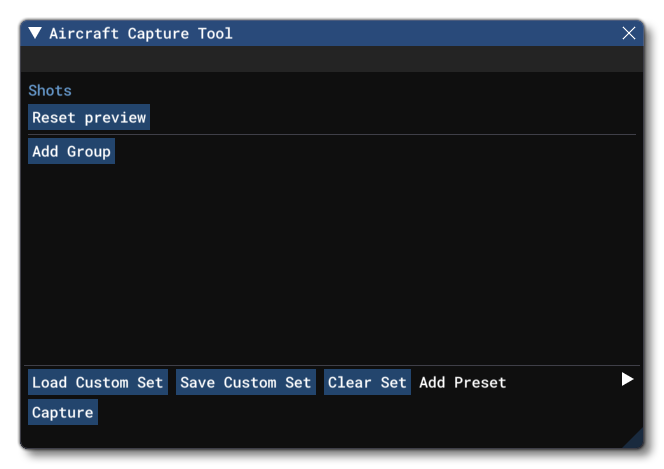
The aircraft capture tool window is where you can set up one or more shots to be taken as part of the capture of the aircraft. Initially the window will be empty and has the following options:
-
Reset Preview
This will reset the position and angle of the preview camera within the scene.
-
Add Group
This adds a new capture group to the tool. Capture groups are used to group individual shots into specific folders when they are created and saved.
-
Load Custom Set
This button will open a file explorer where you can load in a previously saved capture group.
-
Save Custom Set
This button will open a file explorer and prompt you to give a name to the capture group being saved out.
-
Clear Set
With this button you can clear all the information in the currently loaded (or created) set. This will delete all the defined Capture Groups and their contents, but will not delete any screenshots/thumbnails that have been created using them.
-
Add Preset
Clicking this will open a sub-window with a few preset capture groups that can be used to quickly set up the essential images and basic shots required for package thumbnails and marketplace screenshots. Available options are:- General: The general capture set creates a number of high-resolution screenshots of the aircraft, taken from multiple angles and positions. These can then form the basis for the marketplace specification screenshots.
- UI: The UI capture set creates a number of required thumbnail files which can then be added into the aircraft package.
-
Capture
This button will generate all the images that you have predefined in the different Capture Groups. Note that the screen may flash and change during this process, and after the initial captures are taken, there will be some post-processing done in the background. This means that there will be some time between pressing the capture button and the capture actually finishing, as the tool needs to do some work to process the files and then save them. During this time, you will see a progress bar and the "Capture" button will be disabled:

Once you have added a group and a shot - or loaded a custom set - the window will change to show the different options for each group:

-
SubFolder
This field lets you supply the name of a subfolder for the group output to be saved to. Leaving it empty will result in the images being generated directly in the root of the user-selected directory (as chosen when you click theCapturebutton).
-
Delete Group
Clicking this button will delete the group, removing it and all the defined shots it contains from the UI.
-
Add Shot
Clicking this will add a new shot definition to the capture group, ready to be set up and edited as required.
Within each group you have your shots and these have the following properties:
-
Active
When this is selected, it sets the shot as the "Active" shot, moving the camera into the position where the shot was set up to be taken.
-
Pixel Width / Pixel Height
Sets the width and height (in pixels) of the image being defined in the shot. This is particularly useful when creating images to be used on the Marketplace.
-
Camera
From here you can select from a number of default camera positions (set the shot being defined to active to preview what each of the different cameras will look like):
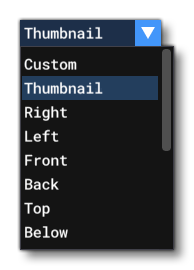 If you wish to set your own camera positions then you should use the Custom option, which is explained in more detail in the Editing Cameras section, below. The list of default camera positions will also include those that have been set in the
 cameras.cfgfile for the aircraft, which you can use to get shots of the interior or from different angles. Within the camera section you also have the following additional options:- Optimise Camera: Checking this option will change the way the camera is defined automatically, attempting to frame the aircraft as close as possible to the camera, adjusting the FOV when necessary. The final result will depend on the Optimisation Type.
- Optimisation Type: This sets the type of optimisation process to use when the Optimise Camera option is checked. The choice is between Aircraft Nodes or Interesting Points.
-
File
This section has an input field where you can give the setting a file name. By default all shots will be saved as*.pngfiles, however if you append an extension onto the filename (for example:my_image.jpg) then the image will be saved in that format. Note that currently only*.png,*.jpgand*.jpegare supported. If you check the Make Unique box, then a randomly generated number will be appended onto the given filename. By default, when this option is unchecked, each capture done with this setting will overwrite any previously saved captures. However by checking this box, each time the capture tool is used the images will be saved with a unique number appended to them so you will have multiple "versions" of the image.
-
Options
Here you are presented with a number of options that will affect how the final thumbnail/screenshot is rendered. These options are:- Transparent Background: The image will be rendered on a transparent background. Note that for this option the file should be
*.png, and using any other file type will give unexpected and/or incorrect results. - Render Shooting Scene: This will include the "empty" scene in the shots, so that the aircraft will render with shadows on the "ground" and ambient light reflections.
- Align With Ground: This option, when checked, will ensure that the camera is always aligned with the ground. This option is checked by default, and un-checking it will mean that the camera can be rotated to any angle relative to the ground.
- SimState: Here you can choose a
*.fltfile to load, and the simulation will use the flight characteristics from that to setup the simulation to take the screenshots. When supplying the file, you give the name only without the .flt extension. Note that when you supply a file here, the tool will wait 4 additional seconds between capturing screenshots to ensure the aircraft has time to stabilize. Leave this blank to use the default hangar view. - Outline: This can be used to render an image that is only an outline of the aircraft silhouette. When this is checked, the Transparent Background and Render Shooting Scene will be disabled, and an additional option will be available that permits you to define the thickness of the outline.

- Transparent Background: The image will be rendered on a transparent background. Note that for this option the file should be
-
Duplicate
Clicking this will duplicate the shot.
-
Delete
Clicking this will delete the shot. Note that this cannot be undone.
Editing Cameras
When a shot has the Active flag checked, and the Camera is set to custom you will be shown a number of additional options related to the current camera:
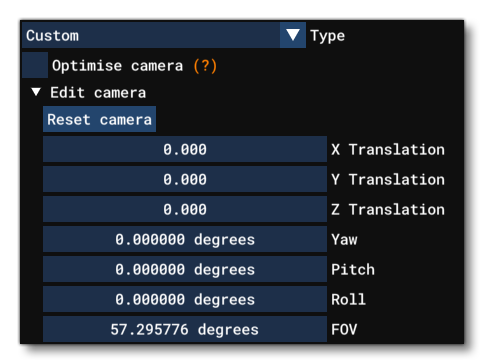
Reset Camera: Clicking this button will reset all the custom camera values to 0, resetting the camera.- X / Y / Z Translation - adjust the camera on the X / Y / Z axis
- Yaw / Pitch / Roll - Change the angle of the camera along the X / Y / Z axis
- FOV / FOV Multiplier - This setting can edit the camera field of view.
The Spawn Window
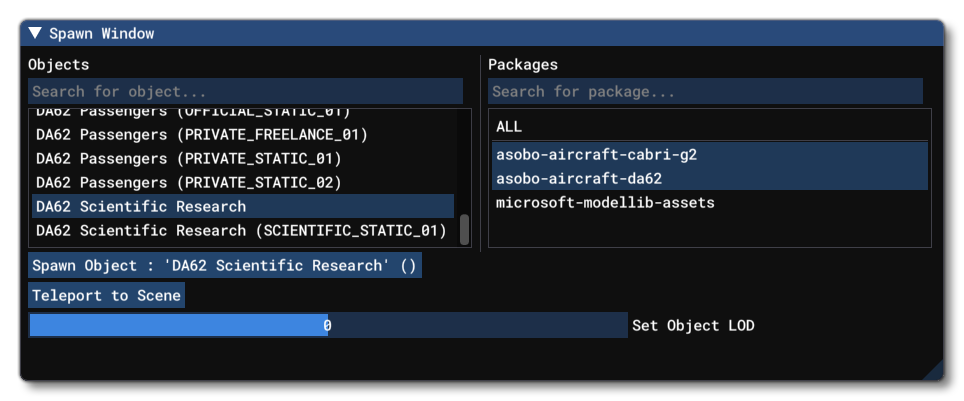
This window is used to select and spawn an aircraft into the "empty" scene used by the Capture Tool to generate screenshots. The window is split into two parts - aircraft selection, and debug options - which are explained below.
Aircraft Selection
The top half of this window is where you can select an aircraft to spawn for capture. It has the following sections and buttons:
-
Packages
From this section you can filter the available objects by package.
-
Objects
This section lists all the available objects that can be spawned by the capture tool. The list can be filtered by package (using the Package filter on the right) and by text (using the Search For Object input).
-
Spawn Object
Clicking this button will spawn the selected object in the scene.
-
Teleport To Scene
This button can be used to reset the camera and aircraft and teleport it back into the initial position. Useful if you have moved the camera to a position for a specific shot, or when you first spawn the aircraft to ensure that it's correctly positioned for a batch capture.
-
Set Object LOD
This slider can be used to change the LOD used for the capture.
Related Topics