CREATING AN HTML/JS/CSS INSTRUMENT
In this short tutorial we'll quickly go over the basics required from you to create a new glasscockpit package that will be used in a single aircraft in the simulation. In this case you will be making a new instrument that will take the place of the Backup Speed Display that is used in the DA62 sample project.
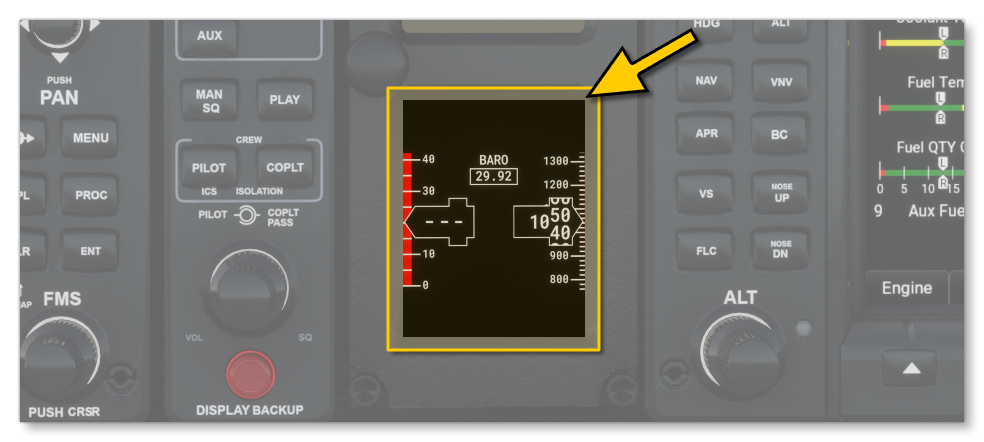
You are going to make an instrument that will simply display some text that says "Hello World!".
NOTE: This tutorial assumes you have followed the steps outlined on the page Setting Up For HTML/JS/CSS Instruments to create the instrument package that you will be using to replace an existing gauge.
Create The Instrument Package
To start with, you will need to open the DA62 sample project in the Project Editor. You will be using this as your base aircraft, so we recommend that you save the project using the Save As option (from the Project menu), so as not to change the SDK sample. Once you have the project open you can do one of two things:
- Create a new package for the instrument that you want to add.
- Import an existing instrument package and modify that so it's unique to the aircraft.
If you want to create a new package then follow the steps outlined here to create it within the DA62 project:
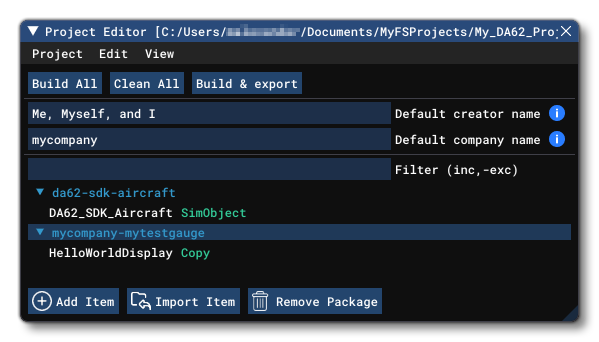
When finished you should have a single project with two packages in it, as shown below:
You can now move on to the section titled Creating The Files, below.
Importing An Instrument Package
In this section we'll explain how to import an instrument package that you have previously created and use that in the aircraft. For this example you'll be importing the package you created in the section on Replacing An HTML/JS/CSS Instrument (if you haven't done this, then you should go and do it now).
To import the instrument, you need to click on the Import Item button in the Project Editor:
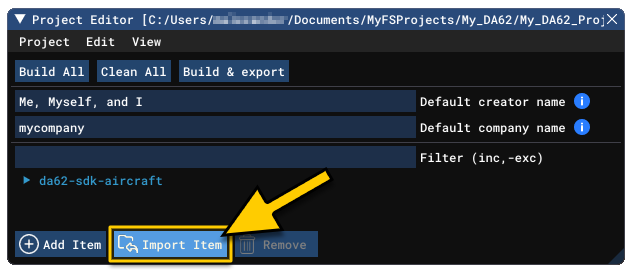
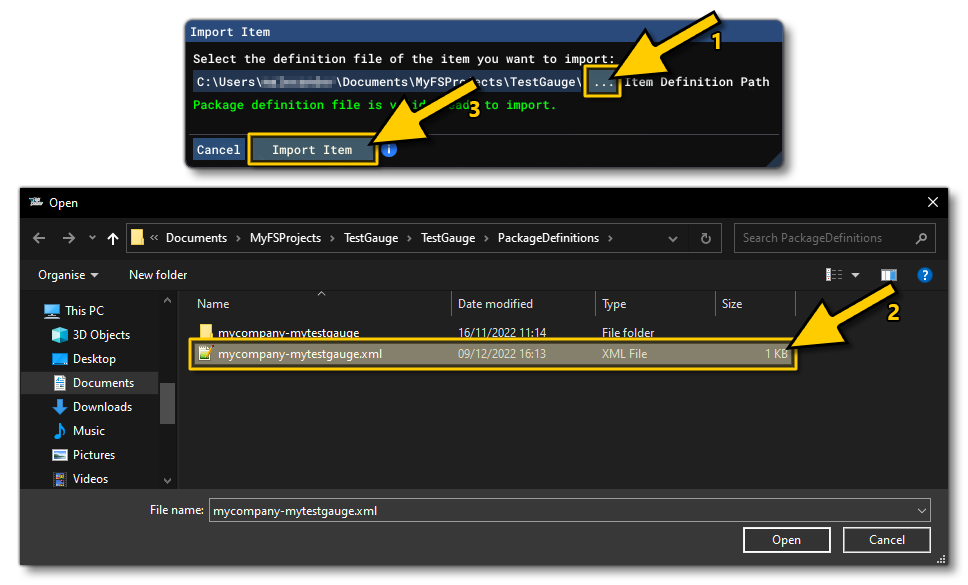
This will open the Import Item window where you should do the following:
- Click on the
...button to open the file explorer. - Browse to the Package Definitions folder for the test gauge package you made previously and select the package XML.
- Click on the
Import Itembutton.
NOTE: The Import Item window will tell you if you have selected a valid package or not, so pay attention to the messages it has after selecting a file to import. The text should be green.
Once you have the package imported, select the asset group in the Project editor and open the Inspector (if it's not already open). You should see something like this now:

Currently this package is named to replace an existing instrument, so you need to edit the AssetDir folder so that it has a unique name and won't interfere with any existing gauges (you'll edit the OutputDir later). So, you will need to open a file explorer and navigate to the "mytestgauge" folder and rename the "BackupSpeedDisplay" folder to "HelloWorldDisplay". After doing that, click the ... button in the Inspector and select this new folder. You should also change the Name of the instrument to "HelloWorldDisplay". The end result should look like this:
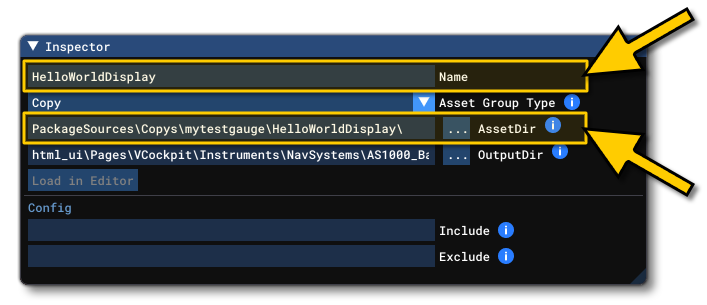
Since the instrument already contains the files that you will need, you can skip the Creating The Files section, below, and go straight to Modify The Output Directory.
Creating The Files
After creating your new package in the DA62 project, the next thing you'll need to do is create the base files. So, in your file explorer you need to navigate to the PackageSources instrument folder, specifically:
PackageSources\Copys\mytestgauge\HelloWorldDisplay
Once you are in that folder location, you need to create the following three files:
helloworld.htmlhelloworld.jshelloworld.css
Ensure that the files are named exactly as shown above, since they have to match the details you'll put in the HTML and JS files. You won't be doing anything else with these files right now, as first we want to go ahead and finish defining the folder structure for the project.
Modify The Output Directory
For your instrument to be used in the DA62 sample aircraft we will need to change the the project folder architecture, as it must use the output folder path required by Microsoft Flight Simulator for all VCockpit instruments. This path is as follows:
\html_ui\Pages\VCockpit\Instruments\[INSTRUMENT_FOLDER]\
Now, back in the Project Editor, select the "HelloWorldDisplay" instrument asset group in the package and ensure you have the Inspector open. In the Inspector you need to add in the relative path to the instrument using the above path schema. It should look something like this:
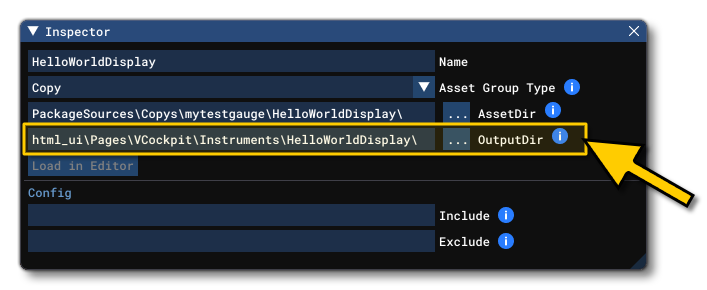
You can now go ahead and select the package then click on the Build Package button. If you go to the project folder and check in Packages you will see that the three base files have been copied to the correct location within the html_ui\...\HelloWorldDisplay folder.
The Files
Now that you've set up the project and created the base files, we can start to edit them to contain the data that will be used to create your instrument. If you've imported a previously made instrument then you may not need to edit anything other than the panel.cfg to reference the imported instrument HTML.
NOTE: If you've imported the gauge made with the Replacing An HTML/JS/CSS Instrument tutorial, you will need to edit and rename each of the relevant files, as we do not want to overwrite an existing instrument, but instead create a unique one only for this aircraft.
helloworld.html
In Visual Studio (or your IDE of choice) you can open the file and add the following:
<script type="text/html" id="HelloWorldDisplay_ID">
    <div id="Mainframe">
            <div id="Electricity" state="off">
            </div>
    </div>
</script>
<link rel="stylesheet" href="helloworld.css">
<script type="text/html" import-script="/Pages/VCockpit/Instruments/HelloWorldDisplay/helloworld.js"></script>
This short chunk of HTML is the about as basic is gets to have a functional glasscockpit. Let's briefly go over what we're doing here:
- The HTML needs to be inside of a
<script>tag identified by an ID, which in this case is "HelloWorldDisplay". - The HTML will be inserted in the DOM so there's no need to create the regular HTML boilerplate with
<html>,<head>and<body>tags. - The CSS file that will add style to the instrument is referenced as usual with a
<link>tag. - It is perfectly possible (and expected) to import other JavaScript files you require in this HTML, but the last script has to reference the instrument JS, in this case
helloworld.js. This last<script>tag also has animport-scriptattribute, which is a custom attribute that allows the simulation to load files in the correct order. - The path of your JavaScript file has to be relative to your
Pagesfolder - The "Mainframe"
<div>element is a Microsoft Flight Simulator convention for defining the highest parent in the DOM, however it's not mandatory, just recommended. - The "Electricity"
<div>element and thestateattribute are not mandatory. The element is used by BaseInstruments.js to update thestateattribute depending on the electricity received by the glasscockpit.
helloworld.js
With the HTML done, we can now open the JS file and add the following:
class HelloWorldDisplay extends BaseInstrument {
    constructor() {
        super();
    }
    get templateID() {
        return "HelloWorldDisplay_ID";
    }
    Init() {
    }
    connectedCallback() {
        super.connectedCallback();
        const electricityElement = document.getElementById("Electricity");
                const divElement = document.createElement("div");
                divElement.setAttribute("id", "HelloWorld");
                divElement.innerHTML = "Hello World!";
                electricityElement.appendChild(divElement);
    }
}
registerInstrument("simple-glasscockpit-sample", HelloWorldDisplay);NOTE: This JavaScript is actually missing a line that extends the BaseInstruments Init() function. It has been deliberately omitted since we'll be adding it in the section on Debugging HTML/JS/CSS Instruments. However it is not required at this point for the instrument to work.
A glasscockpit needs to extend from BaseInstrument and register itself so that Microsoft Flight Simulator knows it exists and can call the methods you redefine in the file (Init, Update, etc...). The JS also needs to define the instrument ID in the templateID() method. The ID you set in this method should match the ID defined in the <script> tag that we added inside of the HTML file, which in this case is simply "HelloWorldDisplay_ID".
In this chunk of code we also use connectedCallback(). This method is called when the DOM has finished to render, meaning it's safe to call other functions like document.getElementById().
At the end, we then call the registerInstrument() method. This method is used to register your "HelloWorldDisplay" class to BaseInstrument and will insert your HTML inside of a "simple-glasscockpit-sample" custom tag element. Note that this method must be the last function called in the JS file. Also note that we don't need to import BaseInstruments.js anywhere in the code as Microsoft Flight Simulator inserts the file in your context so we don't need to (along with some other "default" JS files which you can also use).
helloworld.css
Finally we can add some contents to the CSS file. This is just to give some basic styling to your simple instrument:
#Mainframe {
    width: 100%;
    height: 100%;
    background-color: black;
}
#Electricity {
    width: 100%;
    height: 100%;
}
#HelloWorld {
    width: 100%;
    height: 100%;
    display: flex;
    flex-direction: column;
    justify-content: center;
    align-items: center;
    font-size: 50px;
    background-color: blue;
}NOTE: This CSS is actually missing a line that imports the BaseInstruments.css file. It has been deliberately omitted since we'll be adding it in the section on Debugging HTML/JS/CSS Instruments, where we go into more information about importing CSS data from the default simulation files. However it is not required at this point for the instrument to work.
panel.cfg
Once you have all the instrument files created, the final step is to tell the aircraft to reference it. This is done by editing the panel.cfg file. In the case of the DA62 sample, we will be replacing the "BackupSpeedGauge" with your new "HelloWorldDisplay", and so we only actually need to change the following section:
[VCockpit04]
size_mm=400,512
pixel_size=400,512
texture=SpeedDisplay
background_color=42,42,40
htmlgauge00=NavSystems/AS1000_BackupDisplay/Speed/AS1000_SpeedBackup.html, 0,0,400,512
You can leave most of this section untouched, and really all you need to do is change the path for the htmlgauge00 parameter to point to your new instrument. It should look like this:
[VCockpit04]
size_mm=400,512
pixel_size=400,512
texture=SpeedDisplay
background_color=42,42,40
htmlgauge00=HelloWorldDisplay/helloworld.html, 0,0,400,512
You'll notice that you don't need to use the full path to the instrument. This is because the html_ui/Pages/VCockpit/Instruments/ part of the path is implicit and it's where the simulation will always look for instruments by default.
panel.xml
The DA62 has an associated panel.xml file that controls certain aspects of how the VCockpit works. If you look at the file, you'll see that it has a section that governs the electrical circuit that is used to control power to the "AS1000_SpeedBackup" instrument:
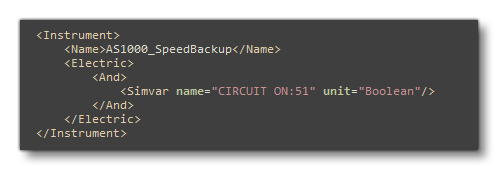
For completeness we should alter this to reference the new gauge that we've just created, as it takes the place of the AS1000 Speed Backup. For that you simply need to assign it the same ID that we gave the instrument in the helloworld.html file. So, it should now look like this:
<Instrument>
    <Name>HelloWorldDisplay_ID</Name>
    <Electric>
        <And>
            <Simvar name="CIRCUIT ON:51" unit="Boolean"/>
        </And>
    </Electric>
</Instrument>
This change will ensure that the display is connected to the appropriate circuit defined in the systems.cfg file.
Testing The New Instrument
Once you have added the appropriate code into the relevant files, it's time to test the instrument in Microsoft Flight Simulator. For this, you should ensure that you are on the start screen and not in a flight, as we'll need to build both the instrument and the aircraft, then pick the aircraft, then start the flight, for it to be visible.
To build the aircraft and the instrument, simply click the Build All button in the Project editor:
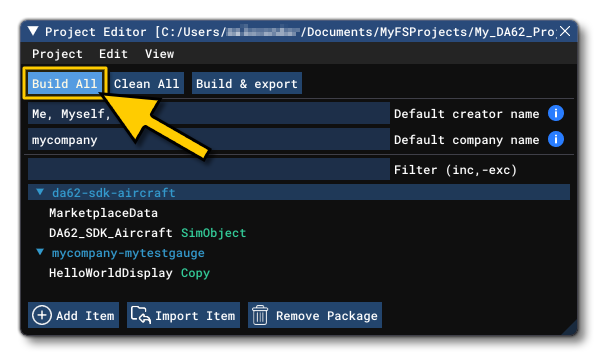
Once the instrument has been built, you can then go to the world map and select the DA62 (SDK_SAMPLE) aircraft, then start a flight. Once the flight has started, if you check where the old Backup Speed display was, you'll now see your new instrument instead:
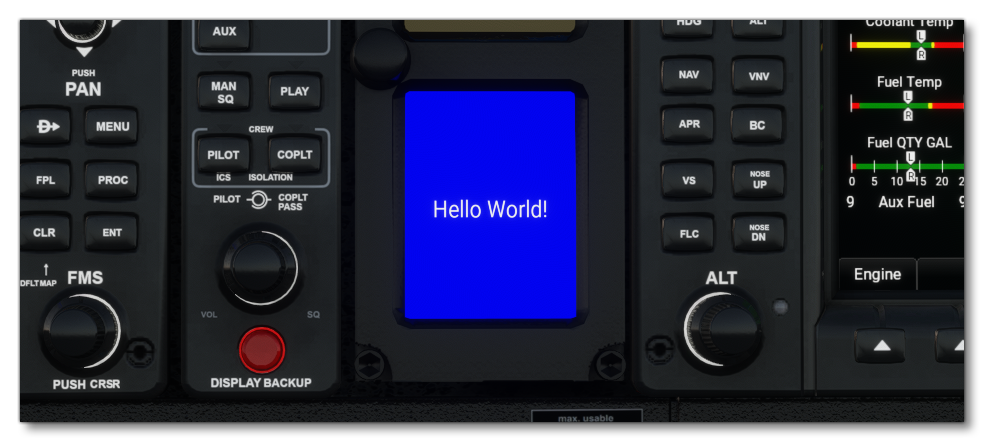
Note that if your instrument is not being displayed, then you will need to do some debugging to try and find out what the issue is and resolve it. Alternatively, it may be working perfectly but you want to edit something in how it works or change its appearance. We cover how to do both those things here: