THE AIRCRAFT TAB
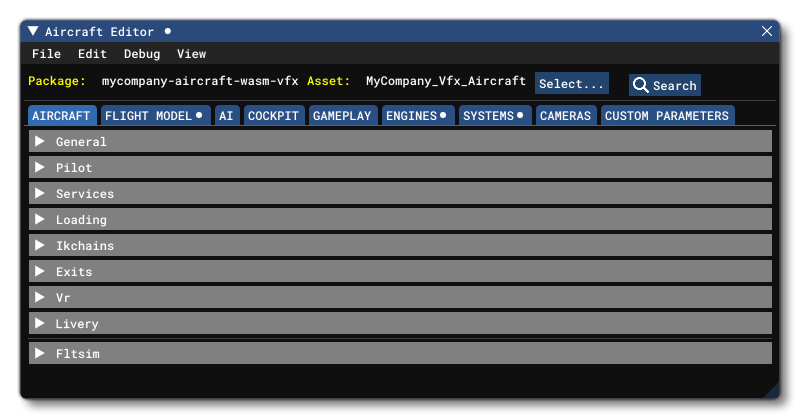 This tab of The Aircraft Editor is for setting up the more general information that is related to the aircraft that is being designed. Each section listed here can be expanded by clicking on it, and the available parameters for them are all listed below. Note that there is an additional extra section available for Effects, which is a legacy section and only visible when the Use Legacy option is checked in the Edit menu.
General
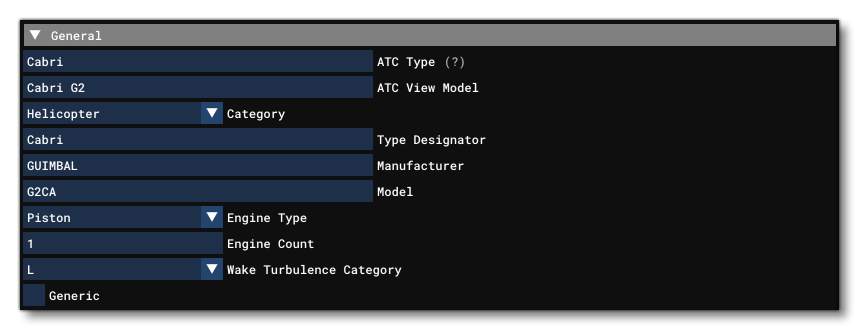
In the General section of the Aircraft tab there are multiple entries that relate to properly configuring the way an aircraft is identified in the Microsoft Flight Simulator 2020 UI. The parameters available are mostly related to how the plane is identified by the database of the ICAO.
- ATC Type: This is the "brand" name of the aircraft.
- ATC View Model: This is the model name of the aircraft.
- Category: This defines what category the aircraft will fall under, either "Airplane" or "Helicopter". Note that this setting will change other parts of the editor to show/hide options that are appropriate/inappropriate for the aircraft category that has been selected.
- Type Designator: The ICAO type designator of the plane. It can be different to the ATC Type field. All possible values are available from the ICAO official database. For example the Airbus A320 Neo you would have "A20N". Note that this is the parameter that will - in part - govern which aircraft are visible in a multiplayer scenario. Please see Note For Multiplayer Aircraft for more information.
- Manufacturer: The ICAO manufacturer of the plane. It can be different from the actual manufacturer of the plane. All possible values are available from the ICAO official database. For example the Textron 172 Skyhawk would have "CESSNA".
- Model: The ICAO model name of the plane. It can be different to the ATC View Model. For example the Textron 172 Skyhawk would have "172 Skyhawk".
- Engine Type: The ICAO designated engine type of the plane. For example the Daher TBM 930 would have "Turboprop/Turboshaft". Available options are:
- None
- Piston
- Turboprop/Turboshaft
- Jet
- Electric
- Rocket
- Engine Count: The ICAO engine count of the plane (usually a value between 1 and 8). For example the Daher TBM 930 would have a value of 1, as it only has 1 engine.
- Wake Turbulence Category: The ICAO Wake Turbulence Category of the plane. For example the Daher TBM 930 would have a category of "L". Available options are:
- L
- L/M
- M
- H
- Generic: If this box is checked, it means that the aircraft is intended to only be used as a passive/Air Traffic aircraft and that it is not identifiable as a specific real plane or helicopter. Please see the Notes On Air Traffic section for additional information related to this parameter.
Pilot
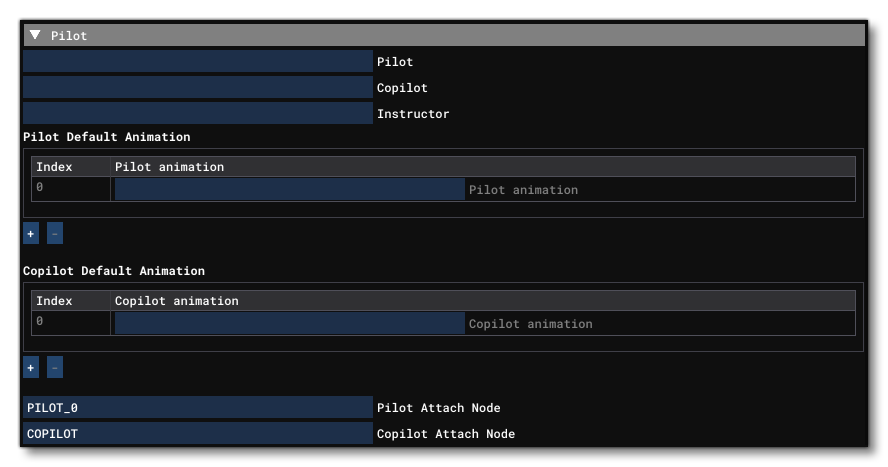
This section is for defining the pilot, copilot and instructor styles for the aircraft. Note that if you define a copilot and an instructor, only one or the other will be used (generally a copilot is for free flights and some missions like Bushtrips, while the instructor will be used for training flights and tutorial missions).
- Pilot: This is the title of the SimObject - as set in the
sim.cfgfile for a human SimObject - that is to be used as the default pilot. If you do not set this parameter then no pilot object will be spawned, although for user aircraft it may still spawn a pilot if a mission explicitly specifies one. If the player has a setting other than "Default" in the Microsoft Flight Simulator 2020 options menu, then that setting will override this one (and may also spawn a pilot if this parameter is omitted). For a list of pilots available without creating your own SimObjects, please see the List Of Included Pilot/Copilot/Instructor SimObjects.
NOTE: In "freeflight", this parameter may be ignored if the aircraft Flight Model Tab has not defined the Station Load Factory Mass for the pilot (in the Weight And Balance section).
- Copilot: This is the title of the SimObject - as set in the
sim.cfgfile for a human SimObject - that is to be used as the default co-pilot. If you do not set this parameter then no copilot object will be spawned, although for user aircraft it may still spawn a copilot if a mission explicitly specifies one. If the player has a setting other than "Default" in the Microsoft Flight Simulator 2020 options menu, then that setting will override this one (and may also spawn a copilot if this parameter is omitted). For a list of co-pilots available without creating your own SimObjects, please see the List Of Included Pilot/Copilot/Instructor SimObjects.NOTE: In "freeflight", this parameter may be ignored if the aircraft Flight Model Tab has not defined the Station Load Factory Mass for the co-pilot (in the Weight And Balance section).
- Instructor: This is the title of the SimObject - as set in the
sim.cfgfile for a human SimObject - that is to be used as the instructor in an aircraft. This title is only used for user aircraft (never AI ones) and in missions, and only then if the mission XML specifies the instructor as default in the*.fltfile. For a list of instructors available without creating your own SimObjects, please see the List Of Included Pilot/Copilot/Instructor SimObjects.
- Pilot Default Animation: This requires a string which represents the animation blend tree state that will be used by the Human Character pilot. If using one of the included pilots, you only need to have one entry here and that's for index 0 with "Idle1_PoseAirliner" or "Idle1_PosePropeller", depending on the type of aircraft. However, you may define up to 16 different animation blend tree states here if required (indexed 0 to 15) by clicking the
+button to add a new index. You may also remove indices using the-button, starting from the last one added.
- Copilot Default Animation: This requires a string which represents the animation blend tree state that will be used by the Human Character co-pilot. If using one of the included pilots, you only need to have one entry here and that's for index 0 with "Idle1_PoseAirliner" or "Idle1_PosePropeller", depending on the type of aircraft. However, you may define up to 16 different animation blend tree states here if required (indexed 0 to 15) by clicking the
+button to add a new index. You may also remove indices using the-button, starting from the last one added.
- Pilot Attach Node: A string which is the name of a Node in the model of the aircraft, where the pilot will be attached. Normally this would be something simple like "PILOT_0".
- Copilot Attach Node: A string which is the name of a Node in the model of the aircraft, where the co-pilot will be attached. Normally this would be something simple like "COPILOT".
Services
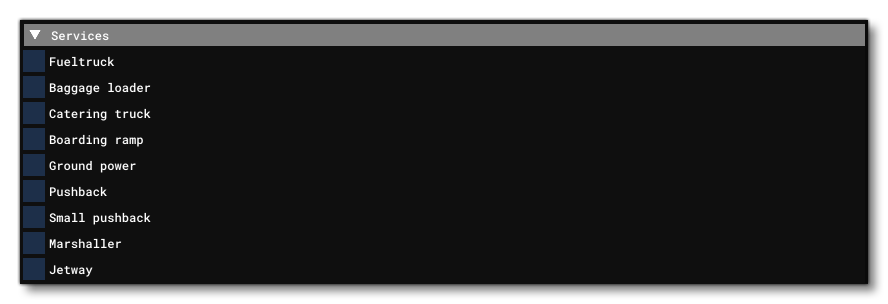
This section details which Airport Services can be made available to the aircraft. Each option in this section can be enabled by checking the box next to the name of the service, or diabled by unchecking it. The services available are:
- Fueltruck: Ability to call a FuelTruck from a parking spot. Note that even if unchecked, this does not prevent the aircraft from taxiing to a Fuel Station.
- Baggage Loader: This determines whether the entire baggage service is available or not.
- Catering Truck: This determines whether a catering truck is available or not.
- Boarding Ramp: This determines whether a boarding ramp (ie: moving stairs) is available or not.
- Ground Power: This determines whether ground power units are available or not.
- PushBack: This is for the large model of pushback, mostly used for airliners.
- Small PushBack: This is for the small model of pushback vehicle, designed for small GA aircraft and private jets. The aircraft needs to have a centered front wheel for this type of service vehicle.
- Marshaller: This determines whether a marshaller is available or not.
- Jetway: This determines whether a Jetway is available or not. If unavailable, aircraft will still be able to park at Gates, but not to connect to a jetway.
Please note that most of the services listed above will also need you to have set up correct Interactive Points in the Flight Model Tab so that they can interact correctly with the aircraft. Also note that if neither the PushBack nor the Small PushBack options are made available (for example, with aircraft having left and right front wheels instead of a centered one), then the user will still be able to pushback the aircraft with the keyboard shortcut Shift+"P", even though this may appear to be "magic" because no visible vehicle or human character will be seen pushing the aircraft.
Loading

This section is used to set an image to be used when starting a flight with the aircraft, along with one or more accompanying "tips" texts. The available parameters are:
- Image Name: The relative path and filename of the loading image to use for the aircraft when starting a free flight. Images should be PNG or JPEG format and 3840*2160px in size. Note that you can use
LOADING_FREEFLIGHTinstead of a path to get generic freeflight images instead.
-
Tips: This is a "tip" text that will be shown along with the loading image. You can have multiple tips for any image, counted from 0, and these tips can be localisable. For example:
TT:LOADING.TIPS.AIRCRAFTNAME_000
Tip texts (whether localised or not) are comprised of a comma separated list, which can be formatted in the following ways:
- "[PackageName],[text]" - The package name the text comes from comes first and is prefixed by @.
- "[text],[category]" - The text is assigned a category (categories are listed below) and will only be shown ¡f the flight is of that category.
- "[PackageName],[text],[category]" - Text comes from the specified package and will only be shown if the flight is one of the given categories.
The available categories are as follows:
- "TipsCategory_Default"
- "TipsCategory_Flight"
- "TipsCategory_Aircraft"
- "TipsCategory_Activity"
- "TipsCategory_Weather"
- "TipsCategory_Location"
IKchains

This section is used to set up the inverse kinetic chain between the pilot extremities and the yoke/stick and pedals. Here you give the nodes on the cockpit model elements that should "connect" with the relevant part of the pilot/copilot model (hands and feet). The parameters available are:
- Right Hand Target: This is the name of the node on the stick/yoke where the right hand will be "connected", eg: "Right_Hand_Ik_snap".
- Left Hand Target: This is the name of the node on the stick/yoke where the left hand will be "connected", eg: "Left_Hand_Ik_snap".
- Right Foot Target: This is the name of the node for the foot pedal where the right foot will be "connected", eg: "Right_Foot_Ik_snap".
- Left Foot Target: This is the name of the node for the foot pedal where the left foot will be "connected", eg: "Left_Foot_Ik_snap".
Exits
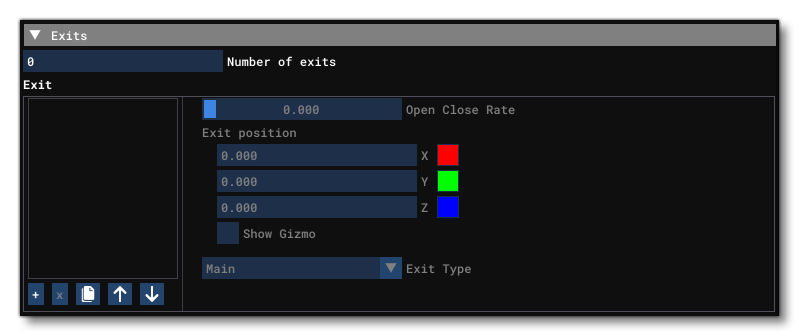
This section defines the exits for the aircraft. It has the following intial parameter:
- Number Of Exits: This value defines the number of simulated exits or doors on the aircraft.
Having given the number of exits for the aircraft, you must then go on to define certain properties of each exit in the Exit section:
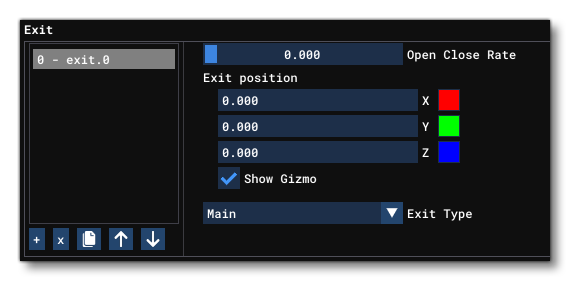
Clicking the + button will add a new exit index to the aircraft, and clicking the x button will remove the currently selected exit index, refactoring the exit definitions so that they are still indexed in ascending order to fill in the "blank" index left by the deletion. Additionally the editor has a button to duplicate 🗐 the currently selected exit, as well as re-order them using the ↑ button or ↓ button.
When you add a new exit, you will have the following parameters available:
- Open Close Rate: The open and close rate expressed as a Percent Over 100 per second (where 1.0 is fully open). You can modify this value by clicking on the field and dragging to set the slider, or by using
Ctrl+ click to input a precise value.
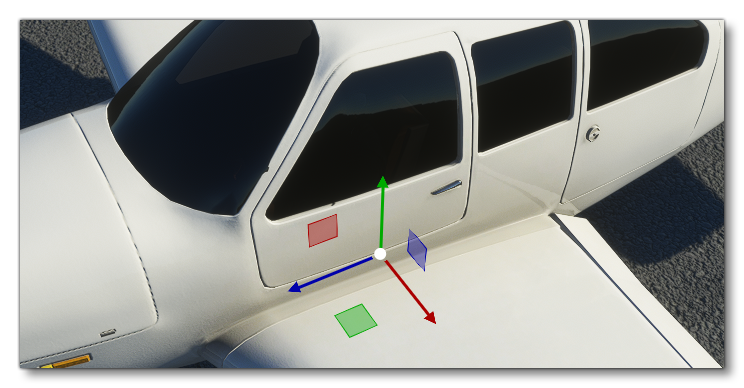
- Exit Position (X, Y, Z): This is the X/Y/Z position of the exit relative to the Datum Reference Point. Checking the Show Gizmo option will let you place this using the in-sim Gizmo tool.
- Show Gizmo: When this is enabled, the Gizmo tool will be shown in the simulation at the point defined by the X/Y/Z position values. You can then click on it and drag it to the position that you require the exit to be placed at.
- Exit Type: This parameter sets the type of exit being defined. Can be one of the following:
- Main
- Cargo
- Emergency
Vr

For each base aircraft, the VR section is used to bind node descriptors to the actual meshes or animations of the glTF file for the aircraft. This section has the following parameters:
- Yoke Anim X: This is the name of the horizontal stick animation left/right or the rotational yoke animation left/right, eg: "HANDLING_YOKE_Lever_StickLR"
- Yoke Anim Y: This is the name of the vertical (depth) yoke animation, eg: "HANDLING_YOKE_Lever_StickForeAft"
- Yoke Node: This is the name of the yoke node of the model. Note that this node - and all its children - will be highlighted when the yoke is selected by the player.
- Yoke Collision Mesh: This is the optional collision mesh added to enhance interactions with the yoke. See the section Collision Mesh For The Yoke for more information.
For more information on VR controls for the yoke and stick, please see here:
Variation
 This section is optional and only used when the aircraft being defined is a variation of an existing aircraft. The most common use case for this section is when creating liveries, but really it can be used when you want to base an aircraft off of any existing one in the simulation for any reason. The section only has one parameter:
- Base Container: This is the relative path to the aircraft package which this aircraft should be based on within the VFS when the simulation is running.
It is important to note that adding a variation does not permit you to change all the aircraft parameters, only those given in the Fltsim section.
Fltsim
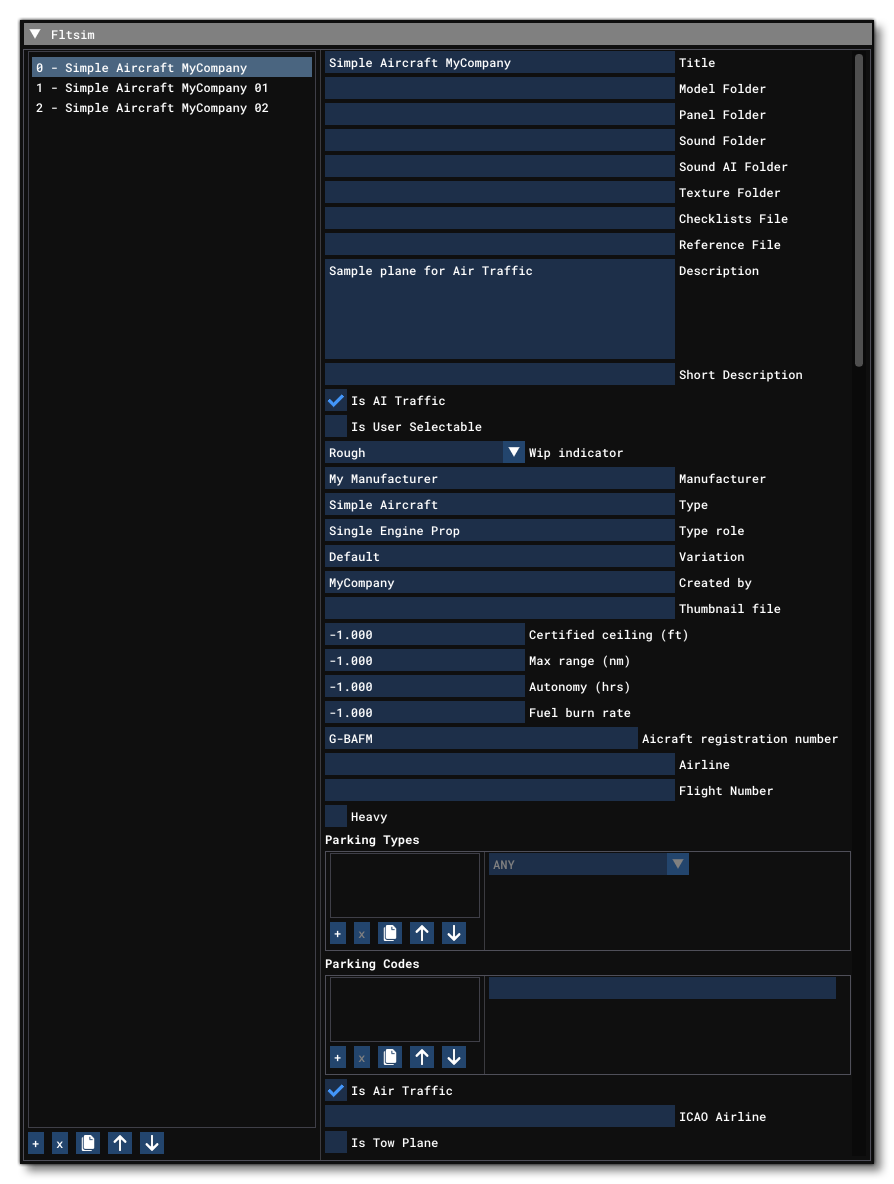
The Fltsim section is used to define the behavior of the aircraft as a SimObject, whether it is available to the user or not. You can define multiple of these sections - each one assigned a different index startuing at 0 - where each indexed section is a variation of the aircraft. The following parameters exist for an indexed variation in this section:
- Title: The aircraft variation name. Names are a unique identifier of SimObjects and their variants. We recommend using your company name as a prefix, to guarantee the uniqueness of your SimObject even when included with objects produced by other 3rd party developers.
- Model Folder: The folder for the aircraft model files (if it's the default "model" folder, leave empty).
- Panel Folder: The folder for the aircraft panel files (if it's the default "panel" folder, leave empty).
- Sound Folder: The folder for the aircraft sound files (if it's the default "sound" folder, leave empty).
- Sound AI Folder: The folder for the aircraft AI sound files (if it's the default "soundai" folder, leave empty).
- Texture Folder: The folder for the aircraft texture files (if it's the default "texture" folder, leave empty).
- Effects: The folder for the aircraft effects files (if it's the default "effects" folder, leave empty).
NOTE: This will only be visible if the Use Legacy checkbox is checked.
- Checklists File: Procedures/Checklist sibling file name.
- Reference File: Reference information sibling file name.
- Description: A full description of the aircraft variation.
- Short Description: A short description of the aircraft variation.
- Is AI Traffic: If this is checked then the aircraft will appear in AI offline AirTraffic and/or as parked aircraft. If unchecked then it won't be used for these things. Please see the Notes On Air Traffic section for additional information related to this setting.
- Is User Selectable: If this is disabled then this variation is not selectable by the user for flying. Please see the Notes On Air Traffic section for additional information related to this setting.
- WIP Indicator: Sets the current status for the variation, which can be one of the following (note that this is purely for tracking progress of the aircraft when working in a team and has influence on the final package):
- Disabled
- Rough
- First Pass
- Finished
- Manufacturer: Localisable string indicating the manufacturer.
- Type: Localisable string indicating the aircraft type.
- Type Role: This is a string indicating the typical aircraft role which is then used to filter the information shown to the user in the main UI when they are selecting an aircraft. Note that if your aircraft does not fit any of the descriptive strings available, then you should pick the one that is closest in terms of general properties. The available options are as follows -
- Commercial Airliner
- 747-400 V3
- 747-400BCF V3
- 747-400D V3
- 747-400ER V3
- 747-400ERF V3
- 747-400F V3
- 747-400M V3
- Single Engine Prop
- Twin Engine Prop
- Single Engine TurboProp
- Twin Engine TurboProp
- Twin Engine Jet
- Regional Jet
- Single Engine Jet
- Rotorcraft
- Glider
- Variation: Localisable string indicating the variation.
- Created By: Name of the person or company that created the asset.
- Thumbnail File: Relative path to the thumbnail image for the aircraft asset.
- Certified Ceiling: The service ceiling/max certified operating altitude, in ft.
- Max Range: The maximum distance the aircraft can fly between take-off and landing, in nm.
- Autonomy: The maximum duration the aircraft can fly between take-off and landing, in hours.
- Fuel Burn Rate: The average fuel consumption in lbs per hour.
- Aircraft Registration Number: This gives the registration number of the aircraft. Note that it can be modified in the simulation options by the user.
- Airline: The airline name for the aircraft.
- Flight Number: The flight number.
- Heavy: Whether the aircraft is classed as heavy (checked) or not (unchecked).
- Parking Types: This option permits you to specify one or more types of parking spaces that the aircraft can use. Clicking the
+button will add a new type for the aircraft, and clicking thexbutton will remove the currently selected type, refactoring the type definitions so that they are still indexed in ascending order to fill in the "blank" index left by the deletion. Additionally the editor has a button to duplicate🗐the currently selected type, as well as re-order them using the↑up button or↓down button. The types available are:- ANY
- RAMP
- CARGO
- MIL_CARGO
- MIL_COMBAT
- GATE
- DOCK
- Parking Codes: Used to input one or more parking codes for the aircraft. Clicking the
+button will add a new code for the parking, and clicking thexbutton will remove the currently selected code, refactoring the type definitions so that they are still indexed in ascending order to fill in the "blank" index left by the deletion. Additionally the editor has a button to duplicate🗐the currently selected code, as well as re-order them using the↑up button or↓down button.
- Is Air Traffic: If this is checked then this variation is considered to be optimized for use as a parked plane or as part of the simulation air traffic. Please see the Notes On Air Traffic section for additional information related to this setting.
- ICAO Airline: This requires a non-localized ICAO code of the airline if the variation is a livery for a real airline. Please see the Notes On Air Traffic section for additional information related to this setting.
- Is Tow Plane: This flag can be checked to tel the simulation that the aircraft is available for selection as a glider tow plane.
Effects
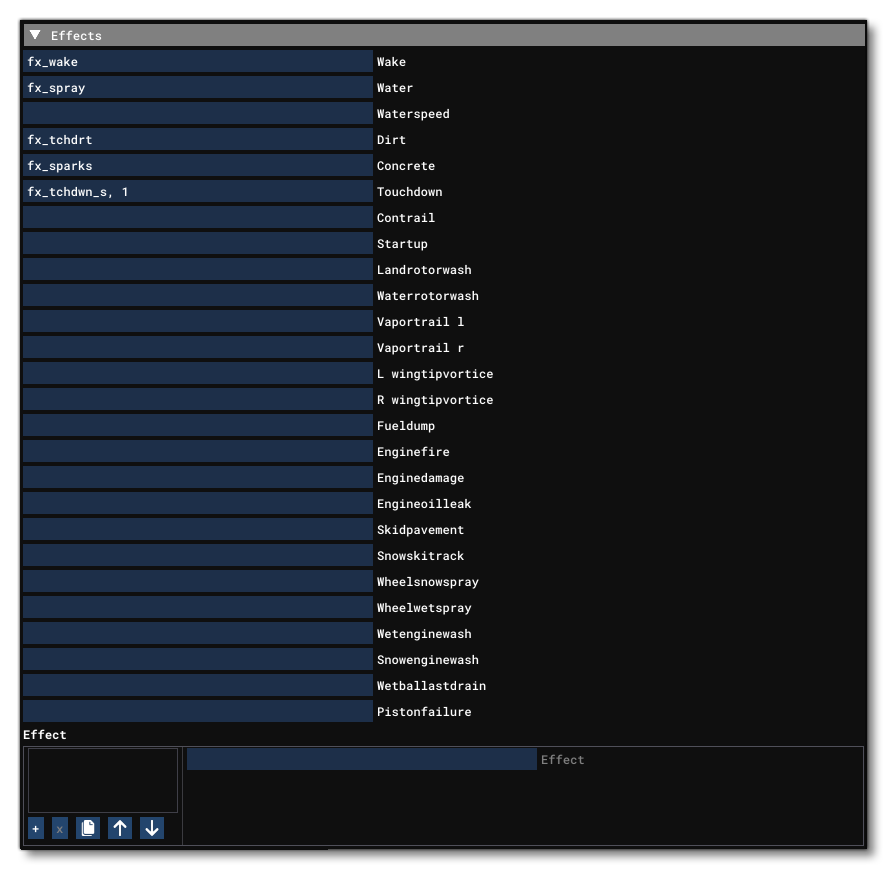
The effects section of the file refers to the visual effects that result from various systems or reactions of the aircraft. An effect file associated with a keyword in this section will be used when the corresponding action is triggered. If no entry is made a default effect file will be used.
IMPORTANT! This section relates to using legacy effects from previous versions of the product and will only be visible when the Use Legacy option is checked. For the current way of creating and using effects please see the section on Visual Effects.
Each entry can be followed by a ",1" if the effect is to be run for a single iteration. Set this number to ",0" - or leave blank - for the effect to continue as long as the respective action is active, for example:

If you make an entry in the editor for an effects type it will replace the default effects with a new one, or - to turn off the effect - add an entry that references the fx_dummy effect (which does nothing).
The table below outlines the aircraft effects parameters, although of course not all effects are supported on all aircraft:
| Parameter | Description | Single Iteration |
|---|---|---|
wake |
A wake effect for water. Default would be |
False |
water |
The landing, taxiing or taking off from water effect. Default would be |
False |
waterspeed |
Traveling at speed on the water. Default would be |
False |
dirt |
Moving on dirt. Default would be |
False |
concrete |
Moving on concrete. Default would be |
False |
touchdown |
The touchdown effect. Default would be |
True |
contrail |
Contrail effect, applies to jets flying above 29000ft. Default would be |
False |
startup |
Engine startup. Default would be |
True |
landrotorwash |
Rotor wash. Helicopters only. Default would be |
False |
waterrotorwash |
Water rotor wash. Helicopters only. Default would be |
False |
vaportrail_l |
Left wing vapor trail. Default would be |
False |
vaportrail_r |
Right wing vapor trail. Default would be |
False |
l_wingtipvortice |
Left wingtip vortice (contrails off the wingtip, usually from a jet such as the F18). Default would be |
True |
r_wingtipvortice |
Right wingtip vortice (contrails off the wingtip, usually from a jet such as the F18). Default would be |
True |
fueldump |
Fuel dump active. Default is |
False |
EngineFire |
Engine fire. Default would be |
False |
EngineDamage |
Engine damage. Default would be |
False |
EngineOilLeak |
Oil leak. Default would be |
False |
SkidPavement |
Skid on tarmac, leaves a mark. Default would be |
False |
SnowSkiTrack |
Skid on snow. Default is |
False |
WheelSnowSpray |
Taking off on snow. Default would be |
False |
WheelWetSpray |
Taking off on wet runway. Default would be |
False |
WetEngineWash |
Similar to Default would be |
False |
SnowEngineWash |
Similar to Default would be |
False |
WaterBallastDrain |
Draining the water ballast, applies only to sailplanes. Default would be |
False |
PistonFailure |
One or more pistons failed. Default would be |
True |
Effects can also be specified for an aircraft within the editor using the Effect input field at the bottom of the section:

To add an effect in this way you should click on the + button, then define the effect Hash Map, which should have the following format:
<nodename>#<SimCode>#<fxFileName>
The <nodename> is the model node that the effect will be attached to. The <SimCode> is an RPN script expression that has to return TRUE or FALSE (1 or 0), and the effect will be shown based on the return value. The <fxFileName> is the legacy *.fx file to use for the effect. Note that you can also remove any effects by selecting it from the box on the left, then clicking the x button. This will refactor the effects so that they are still numbered in ascending order to fill in the "blank" index left by the deletion.
You can find out more information on using (legacy) effects from the section on Legacy Visual Effects For Lights.