TAXIWAY POINT OBJECTS
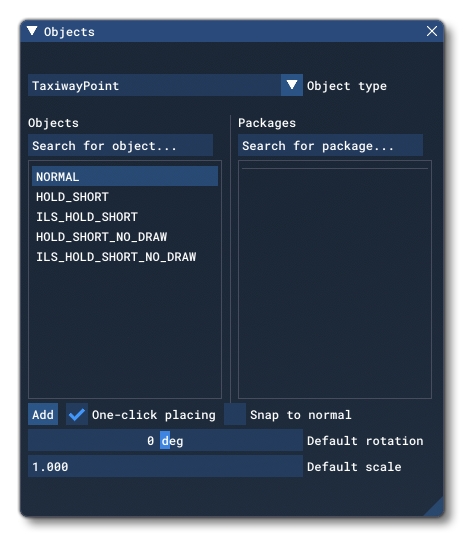
A Taxiway Point object is an object element that is used to add a taxiway point to an airport in the world. These points form the "nodes" that are then connected together to make taxiway paths throughout the airport. When you select this object type you will be presented with a list of different object elements listed in the Objects window:
Adding Points
Adding taxiway points is achieved in two different ways depending on what you want to achieve. The first, and easiest, method is to enabled the One-Click Placing option in the Objects window then start to place the points by clicking the Left Mouse Button in the world:
Adding the Taxiway Point objects in this way will also generate TaxiwayPath Objects between the points in the sequence.
NOTE: By default all taxiway path objects added in this and the other steps shown here will be created as TAXI types.
To end the current set of continuous points, simply disable One-Click Placing, click anywhere in the world, and then enable it again. The next time you click in the world a new path will be generated between the points. If you make a mistake you can use Ctrl + "Z" to undo the placement, but you will need to do it twice! The first undo will undo the taxiway path, the second will undo the placement of the point. So, essentially, when using this method to add points you're actually performing two actions for every click of the mouse: adding a point, and adding a path between the new point and the previous one.
The second way to add points is to use the Add button in the Objects window. Using this will not add any Taxiway Path objects, but instead simply add the Taxiway Point object into the world at the center of the view. When using this method you would add a point, then move the camera, then add another point, etc... To link the points with a Taxiway Path Object, you would click on the first point, then hold Ctrl and click on the second point (or hold Shift, then click and drag to select the points) and then do one of the following:
- Select a Taxiway Path object in the Objects window and click the
Addbutton - Right-click in the world view and select the Create Path option in the menu
Both of those will add a Taxiway Path Object between the two selected points.
The final method to create Taxiway Points and Path objects is to use the Add button in the Objects window - as before - to create the first point, but once you add the first point, you can place your mouse at the position you want the next point and use the Right Mouse Button menu option Create Path. This will add a new taxiway point at the mouse position, and also create a taxiway path between the new point and the previous.
IMPORTANT! Taxiway point objects require one or more Airport Objects to be present in the scene, and must be added to an airport group in The Scenery Editor. If no airport is present then they cannot be used. Also note that if they are placed too far away (ie: outside the airport Object Test Radius) then the paths they connect will not be rendered.
Removing Points
Once you have a Taxiway Point in the world, you can click on it at any time and then use the Translate Gizmo to change it's position, and you can delete the point by selecting it and using the Delete key on the keyboard. Note that if you delete a point that is between two other points - and they are all attached by Taxiway Paths - deleting the point will also delete the paths between them.
Merging Points
When you have selected two or more taxiway points, you can click the Right Mouse Button to bring up the menu and then select the Merge Points option. This will behave differently depending on whether you have selected an odd or even number of points. An odd number will remove the middle points and merge the path between the two outer points, while an even number will remove the middle points as well as one of the end points, merging the path between a previous point and the last selected point.
Aligning Points
If you have selected three or more taxiway points, then you can click the Right Mouse Button and select the Align option. What this will do is move all the points between the first and the last so that they are all aligned in a straight line.
Properties
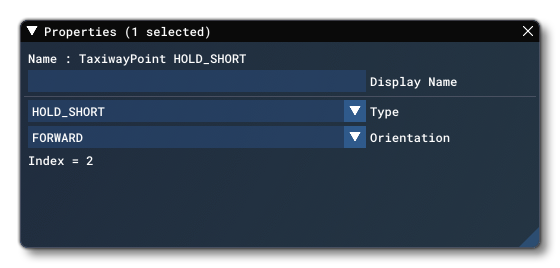
The Properties window for a Taxiway Point looks like this:
-
Name
This is the name of the element as defined by its object type properties.
-
Display Name
This is the name of the element as it will be displayed in the The Scenery Contents List. This can be edited and is helpful for identifying elements when you have a lot of items in the content list.
-
Type
This can be used to change the type of taxiway point that is being edited. You can choose one of the following types:
NOTE: The NO_DRAW options will set the point to be of the specified type, but will not render any path surface for the point, useful for when the taxiway is on gravel or grass.-
NORMAL
-
HOLD_SHORT
-
ILS_HOLD_SHORT
-
HOLD_SHORT_NO_DRAW
-
ILS_HOLD_SHORT_NO_DRAW
-
-
Orientation
This can be used to set the direction of taxiway point that is being edited. You can choose one of the following types:- FORWARD
- REVERSE
-
Index
This is the identifier index assigned to this taxiway point inside of an airport.