IMPLEMENTING CAMERAS
To keep visual consistency across aircraft, we have a set of edition guidelines for cameras - listed below per category - which we recommend that you follow when implementing cameras. These are the guidelines that the team which makes the official Microsoft Flight Simulator 2024 aircraft follow, and as such, using them will mean that your aircraft is better integrated into the simulation.
Pilot Camera
The Pilot Camera should be formatted to give to the user the same perspective as that of the pilot or copilot, and each aircraft should have defined at least the four cameras listed below:
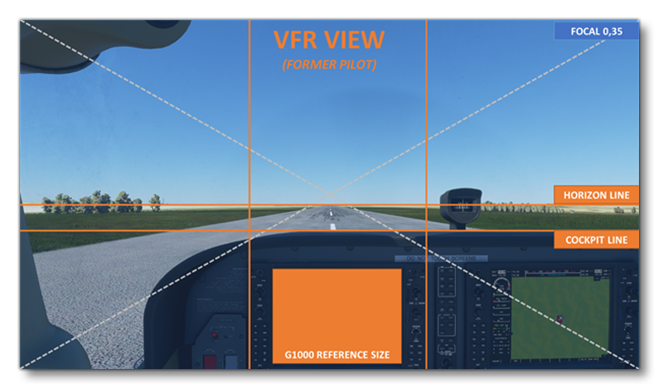
VFR

The VFR camera should follow these guidelines:
- This camera should be placed above the pilot seat
- This camera should have the horizon line centered
- For this camera the cockpit line should be approximately 2cm under the horizon line
- This camera should have a good view of the exterior
- This camera should keep the main instrument in view
- This camera should have a 0.35 FOV
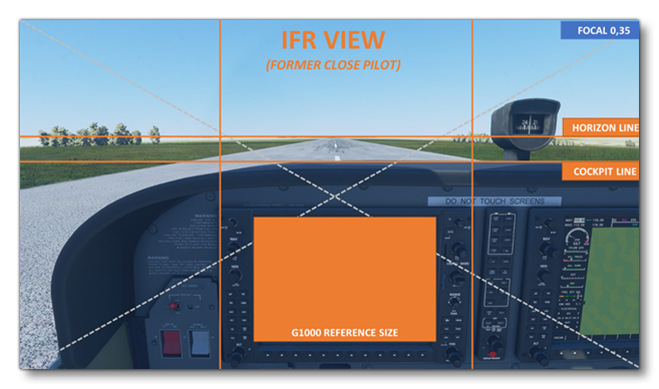
IFR

The IFR camera has the following guidelines:
- This camera should be placed above the pilot seat, but closer of the cockpit than the VFR camera view
- Focus should be on the main instruments, and those instruments should be easy to read without zooming
- The horizon line should as close to the center as possible
- For this camera the cockpit line should be approximately 2cm under the horizon line
- This camera should have a 0.35 FOV
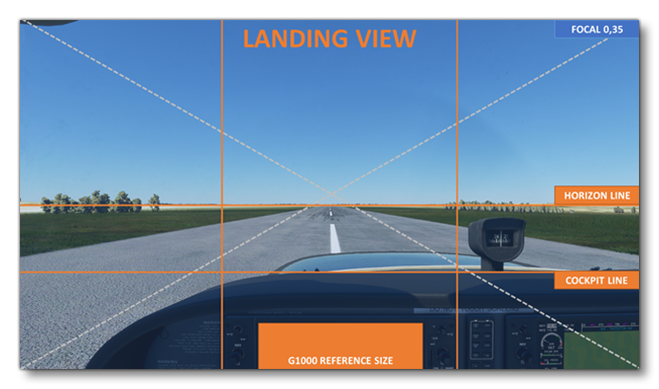
Landing

The landing view camera has the following guidelines:
- This camera should be placed above the pilot seat
- This camera should be positioned slightly higher than VFR and IFR camera views
- This camera should focus on the ground directly in front of the plane
- For this camera the cockpit line should be centered has much as possible
- This camera should have a 0.35 FOV
CoPilot
The copilot camera view should share its parameters with the VFR camera, but be placed above the copilot seat.
Quickviews
Quickviews are meant to simulate quick glances of the pilot in a given direction from the pilot seat, and as such, they should share the same parameters with the VFR camera. Only the heading or pitch should be changed to face a different direction, and there are 8 quickviews that should be edited:
NOTE: Slight adjustments can be made in some aircraft to better match its particular specifications (e.g., having the camera a bit higher to keep a window border out of the view).
- Left (1): Glance far left, heading -120°.
- Left (2): Glance left, heading -90°.
- Left (3): Glance a bit left, heading -60°.
- Right (1): Glance far right, heading +120°.
- Right (2): Glance right, heading +90°.
- Right (3): Glance a bit right, heading +60°.
- Up: Glance up, pitch +30°.
- Down (Rear): Glance back, heading between +160° and +170°.
Instruments
The instrument cameras provide focused views on some selected cockpit parts, and should follow these guidelines:
- Each instrument camera should allow the user to easily read the group of instruments being focused on.
- The focused group of instruments should be relevant to the general gameplay.
- Try to avoid instruments that are not used during Taxi or Flight.
- The instrument cameras should be arranged in a meaningful, logical way (e.g., PFD > MFD > AP > Pedestal > Lights > etc…)
- The FOV for all instrument cameras should be kept at about 0.3.
Note that while there is no technical limit to the number of instrument cameras, keep in mind that there's only 10 available shortcuts for them. Any instrument camera that is above this number won't have a dedicated access method and will only be accessible from the Camera panel in the UI.
Checklists
Checklist cameras are meant to demonstrate a focused view on instruments that are not used in general flight, and that are only situational and mandatory for some steps of the checklist (e.g., the fuel valves are not often used during flight, but are mandatory to start cold and dark).
Checklist cameras are essentially the same as the cameras for Instruments, and as such they follow more-or-less the same guidelines, ie: focused only on the relevant instruments, 0.3 FOV, etc... Note that there is no limit to the number of checklist cameras you can create.
You can find more information on creating checklists from the following page:
FixedOnPlane
The Fixed On Plane cameras are meant to simulate "GoPro" type cameras that have been placed inside or outside the plane. These are essentially "vanity views", and as such there's no strict guidelines to follow with them. However, you should avoid creating "magically flying" cameras, and they should always be placed close to the plane, as if they were attached to it.
At least 4 Fixed On Plane cameras should be created - there is no upper limit - and some general guidelines for them would be:
- One under and/or above the left wing looking at the cockpit.
- Another under and/or above the right wing looking at the tail.
- A third placed at the top of the tail, looking forward.
- The last one attached to the aircraft's belly, looking backward and showing the gears if possible.
Editing The Cameras
Actually creating and editing the cameras is a fairly straightforward process and can be done from the SimObject Editor, and the actual parameters that can be changed are listed and fully explained on the following page:
However, before going off to set up the cameras, there are a few parameters that are worthy of note and that are required for the camera to be created correctly:
- Title: The name for the camera being defined. This is not a "public" name, and is only used to identify the camera in the editor/code.
- UI title: The camera name as it will be displayed in the simulation UI.
- Category/Subcategory/Subcategory Item: These allow you to define what aircraft LOD the camera will use (whether a Cockpit or External camera), and what gameplay function this camera is part of.
- Initial Position (ZXY) and Initial Rotation (Pitch/ Head/ Bank): These define the original translations/rotations the camera will be spawned with in relation to the defined "Eyepoint". Note that you can use the "Get from game" button to get the translation or rotation values of the current developer camera position/heading in the simulation.
- Initial Zoom: Define the default focal value that the camera will be spawned with. Note that you can use the "Get from game" button to get the focal value of the current developer camera in the simulation.
- VarToggle: This section allows you to declare a Local Variable which is used to hide a given part of the plane when this camera is used.
When you're done with the edition you should select Save from the File menu, and this will save the changes you've made to the cameras.cfg file for the aircraft. Note that to see the updated cameras for the aircraft you will need to go to the Project Editor and rebuild the aircraft package.