SKYDIVING
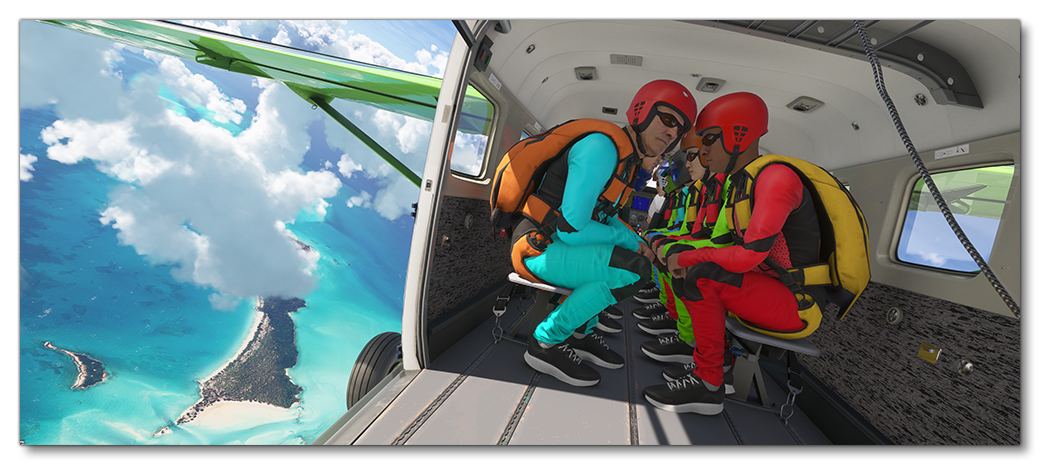
An exciting activity in Microsoft Flight Simulator 2024 career mode is the ability to take a group of people on a skydiving flight. These flights will require you to fly from exotic locations like the Swiss Alps or Hawaii taking groups of skydivers up to the correct height and let them perform their skydives. If you wish your aircraft to be used on this kind of activity you will need a preset that has been appropriately set up as part of the Modular SimObject, as explained below.

For more information on the various other career activities and how to prepare your aircraft, please see here:
Skydiving Constraints
When setting up your aircraft for skydiving flights you will need to ensure that it fulfills the requirements for such an activity. To start with these activities will require a plane and currently do not support helicopters. The plane will need to meet the following specifications:
- The plane will need to have the
navigation_graph_pilot.cfg(as explained here). - The plane will need to have both the
Apron.fltand theApronWithoutCovers.fltfiles (as explained below). - The
object_classmust be "Airplane". - The
operating_statusmust be either "in_service" or "experimental". - The
targeted_specializationsmust include theSKP-PLNdressing code. - The plane cannot be flagged as military.
- The plane cannot be flagged as premium.
- The plane
ui_max_rangemust be greater than 1. - The payload mass must be greater than 1kg (see Note On Payload Mass for more information).
- The plane can have wheels or big wheels, for landing gear.
- The plane cannot have skis or floats for landing gear.
- There must be one or more navigation graphs called
navigation_graph_skydive.cfgwith the following nodes:WAIT_NEXT_TO_PLANE,JUMPMASTER_WAIT_NEXT_TO_PLANE,PLANE_ENTRANCE, andJUMP. There must also be seating nodes that spawn seat logic objects with the following nodes:SIT, andJUMPMASTER_SIT, These are explained in more detail below.
Following these constraints will give the aircraft the SKP_Cabin type. See here for more information:
Mission Flow
The flow for a skydiving mission is as follows:

This flow will also require the aircraft to be setup for - and follow - the General Career Mode Requirements.
SimVars
The SimVars given below are those that will be used and checked to ensure that the skydiving mission is performed correctly. Some of the SimVars are flagged as "blockers" ( ) to the mission, which means that if the aircraft is not setup correctly such that these SimVars give the requested information or work correctly, then the mission flow at that point is blocked and cannot continue.
| Penalty | SimVar | Blocker | Description |
|---|---|---|---|
| Smoothness Score | PLANE BANK DEGREES |
This is used to check the banking angle of the aircraft while performing the skydiving mission. | |
PLANE PITCH DEGREES |
This is used to check the pitch angle of the aircraft while performing various parts of the skydiving mission. | ||
DESIGN SPEED VS1 |
This is needed to compute the best speed to do the skydiving part of the mission. | ||
PLANE TOUCHDOWN NORMAL VELOCITY |
This is used to check the vertical speed at touchdown of the aircraft when landing. | ||
| N/A | HAS ANY CABIN SIGNAL LIGHT |
Check if the aircraft has a three-state red/off/green light system to let the skydivers know when to jump. | |
CIRCUIT CABIN SIGNAL STOP |
Should be true when the light is red. | ||
CIRCUIT CABIN SIGNAL GO |
Should be true when the light is green. |
Navigation Graph Setup
The basic navigation graph setup for a skydiving activity requires multiple tagged nodes, which we've separated into internal node and external nodes, since they are two disconnected groups, even though they are all created in the same file. The file should be called navigation_graph_skydive.cfg and it should be placed in either the common configs folder, or in the skydive preset.
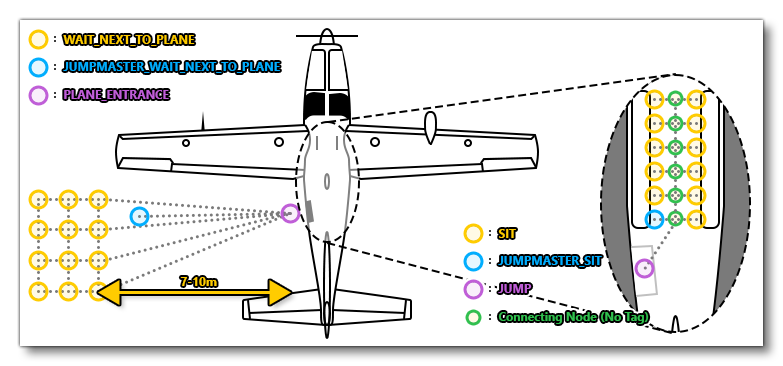
To help you understand how the nodes mentioned below should be placed in the world, you can reference the image below, which illustrates an "ideal" placement for them (note that the illustration shows a door on the left, but this can be on the right iof required, just mirror the setup shown):

External Nodes
The following set of nodes should be placed outside the aircraft and will be used for the introduction to the skydiving activity to show the passengers and "jumpmaster" moving to and entering the aircraft in a short cut scene:
-
WAIT_NEXT_TO_PLANE
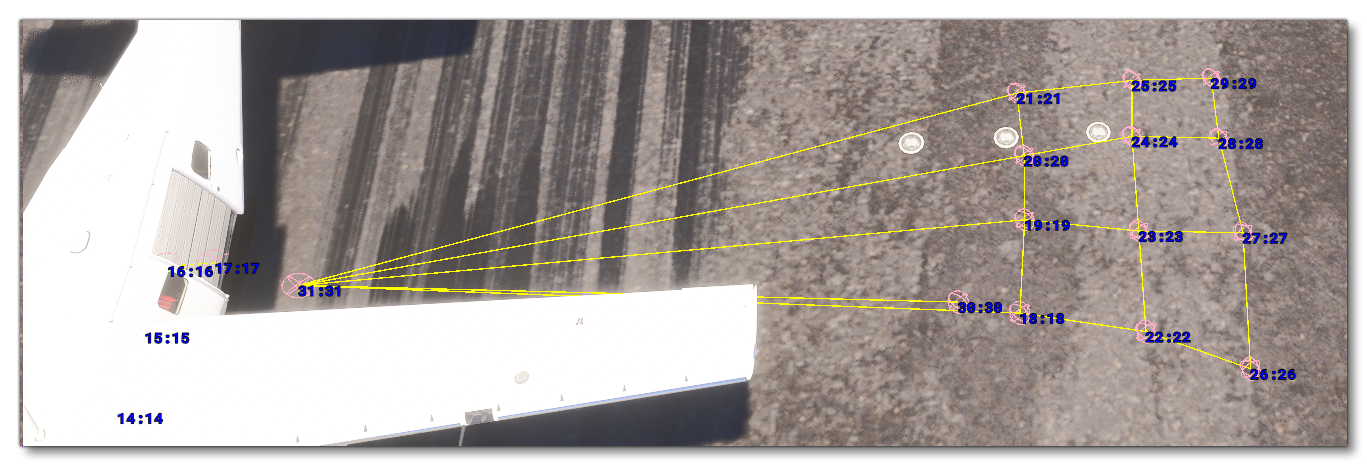
This node is the node where the skydiver passengers will spawn into the world at the start of the activity. For skydiving flights there is a short RTC animation that will play of the passengers moving from this point to thePLANE_ENTRANCEnode, before entering and taking a seat. As such there should be one of these nodes for every passengerSITnode, and the nodes should be placed close together but not on top of each other, preferably in a grid-like pattern (they don't have to all be perfectly aligned).
 These nodes should be on the side of the aircraft where the jump door is placed, approximately 7-10m away from the corresponding
 PLANE_ENTRANCEnode, and they need to be connected to that node, and each other, with various edges.
-
JUMPMASTER_WAIT_NEXT_TO_PLANE
This node defines the position where the "jumpmaster" will spawn in to the world. This node should be closer to the aircraft than theWAIT_NEXT_TO_PLANEnodes, but still be beside them, such that they can lead the passengers onto the aircraft. This node will need an edge connecting it to thePLANE_ENTRANCEnode.
-
PLANE_ENTRANCE
This node defines a point close to the aircraft entrance where the jumpmaster and passengers will move to and then board the aircraft. This node needs to be joined to all theWAIT_NEXT_TO_PLANEnodes, as well as theJUMPMASTER_WAIT_NEXT_TO_PLANEnode, but should not be joined to any of the interior nodes.
Internal Nodes
The following node should also be included in a navigation graph for the inside of the aircraft - also named navigation_graph_skydive.cfg - and is usually part of a cabin attachment or a skydiving preset:
-
JUMP
This node defines the point where each of the passengers should move to from their seats before jumping out of the aircraft. This node must be connected to the other interior nodes via sub-nodes and edges, and must have the node heading pointed outwards from the aircraft entrance.
This node would be linked via edges to the central nodes of the aircraft to create "paths" between the seating nodes and the jump node. The seating nodes can be named anything you think is appropriate, and should be set up to spawn a seat logic object, which will have its own navigation graph with the following nodes, depending on its position in the aircraft:
-
SIT
This node defines where each of the skydiving passengers will sit except the "jumpmaster". There should be as many seat nodes as there are
WAIT_NEXT_TO_PLANEnodes. The sit nodes will also need to reference some interaction files for them to properly animate and sit down. This is done by adding the followinginteractionFile.nparameters.-
For seats with seatbelts:
interactionFile.0 = FilePath: InteractionsPreset\Asobo\Seat\Seat_with_seatbelt # Param: ANIMATION_SIT:IDLES_SIT_SKYDIVE interactionFile.1 = FilePath: InteractionsPreset\Asobo\Seat\Seatbelt # Param: SEATBELT_FASTEN:SEATBELT_C208B_PAX_1_Fasten , SEATBELT_UNFASTEN:SEATBELT_C208B_PAX_1_Unfasten -
For seats without seatbelts:
interactionFile.0 = FilePath: InteractionsPreset\Asobo\Seat\Seat_without_seatbelt # Param: ANIMATION_SIT:IDLES_SIT_SKYDIVEIf the seat is more of a bench, then you can change the animation used to the
IDLES_CROUCH_Sanimation.
-
-
JUMPMASTER_SIT
This node is to specify where the "Jumpmaster" will sit, and it is setup exactly the same as the other SIT nodes. However it should always be positioned on the seat the nearest the door of the aircraft.
When setting up the interior nodes, be sure to set up the appropriate station loads and mass stations, as explained here:
Finally, you can find information about setting up the seat logic objects on the following page:
FLT Files
When a user starts a skydiving activity they will be going through the usual Preflight checks, and so they will need to have the Apron.flt setup in the activity preset as follows:
- Section
[SimVars.0]must have the parameterSimOnGroundset totrue. - All defined
[Covers]need to be set totrue(see here for more information). - Section
[Controls.0]must have the parameterParkingBrakeset to 100.00 (if the aircraft has a parking brake). - Aircraft electrics and engines must be turned off.
- The aircraft flight parameters (trim, flaps, etc...) should be set for a cold and idle aircraft.
An additional FLT file is required - the ApronWithoutCovers.flt file - for those occasions when the user may skip the preflight phase and there is an RTC event, or when something causes a Back On Track event after preflight. This file should be set up like a regular apron FLT file, however you should ensure that these changes are made:
Skydiving activities also require a correctly setup Climb.flt, which is used to setup the climb phase of the mission when the previous phase was skipped or after a Back On Track event:
- Section
[SimVars.0]must have the parameterSimOnGroundset tofalse, and thePitchparameter should be set to the appropriate angle for a climb. - All defined
[Covers]need to be set tofalse(see here for more information). - Section
[Controls.0]must have the parameterParkingBrakeset to 0.0 (if the aircraft has a parking brake). - Aircraft electrics and engines must be turned on.
- The aircraft flight parameters (trim, flaps, etc...) should be set for an aircraft in the climb state.
Additionally, it is recommended that the Climb.flt also has the following parameters, although these are not obligatory:
- Section
[Gauges.N]can have the parameterkollsmansetting, which should be set to 29.91690826416015625A, if included. - Section
[Gauges.N]can have the parameterAutoBaroSetting, which should be set totrue, if included.