COMMERCIAL FLIGHTS AND PASSENGERS
Your basic aircraft should be set up to permit passengers to board and to sit down. This page outlines the steps required for this to happen on the main types of aircraft, however it does not cover the part where passengers move through the airport to get to the aircraft boarding point. This is covered on the following page:
This page is dedicated to the setup of the aircraft to receive passengers, both as part of a commercial flight activity, and also when participating in other careers, or even when in free-flight. However, it should be noted that the constraints listed here only apply to commercial flight activities in career mode and require an aircraft of the type airliner. For other activities, their own unique constraints will be applied (except free-flight which has no constraints) and only the passenger navigation graph information - and associated interactions and weight distribution information - are relevant. This means that you have some flexibility in setting up the navigation_graph_passenger.cfg since you can have all the navigation graph data for all applicable careers in a single file in the common folder, or you may have multiple additional navigation graph files with the same file name in dedicated presets containing the data specific to the career (since these will be merged together as part of the Auto-Merge process for modular SimObjects anyway).

For more information on the various career activities and how to prepare your aircraft, please see here:
It is also worth checking the following page, as it outlines how to set up "loads" for the aircraft, which can be used to generate a visual representation of the suitcases and bags that passengers have, whether in a generic free-flight, or on a commercial flight:
Small / Medium Aircraft Setup
Small and medium aircraft cannot perform commercial flight career missions, but they can still be set up for passengers. As such, all the information on this page is still relevant, with the exception of the constraints listed in the section below. However, there are still a few things that these aircraft should have to be able to work correctly and have passengers on-board:
- The aircraft will need to have the
navigation_graph_pilot.cfg(as explained here). - The
targeted_specializationscan include theCOF-PCCdressing code. This is not required, but may be used in future updates. - The
object_classshould be "airplane". - One or more navigation graphs must be set up for less than 20 passengers (ie: 1 - 19 nodes with the
SITtag, as explained below). - The
navigation_graph_passenger.cfgnavigation graph must have aPLANE_ENTRANCEnode placed on the ground, outside the aircraft entrance.
Commercial Flight Constraints
When setting up your aircraft for passengers you will need to ensure that it fulfills the requirements for such an activity. In this case, both planes and rotorcraft can carry passengers and have the following shared constraints:
- The aircraft will need to have the
navigation_graph_pilot.cfg(as explained here). - The
operating_statusmust be either "in_service" or "experimental". - The aircraft cannot be flagged as military.
- The aircraft cannot be flagged as premium.
- The
ui_max_rangemust be greater than 1. - The aircraft cannot have floats.
There are also some specific constraints depending on the type of aircraft being set up for passengers.
- For Airliners:
- The
targeted_specializationsmust include theCOF-PCCdressing code. - The
object_classmust be "airplane". - The aircraft will need to have the
ApronWithBatteriesWithoutCovers.fltfile (as explained below). - The plane must have a copilot, and the
sharedSeatparameter for the node must be false (as explained here). - One or more navigation graphs must be set up for 20 or more passengers (ie: 20+ nodes with the
SITtag, as explained below). - The
navigation_graph_passenger.cfgnavigation graph must have aPLANE_ENTRANCEnode, placed on the cusp of the aircraft door where passengers will enter (not on the ground). - The plane can have wheels or big wheels for landing gear.
- The plane cannot have skis for landing gear.
- The aircraft must have three
[INTERACTIVE POINTS]of the following types setup:- 0 - Main entrance/exit for catering.
- 0 - Main entrance/exit for ramp or jetway.
- 1 - Cargo entrance/exit.
- The
[SERVICES]must haveBAGGAGE_LOADER,CATERING_TRUCK, andBOARDING_RAMPand/orJETWAYset to true (1). Please see the Note On Services for additional information.
- The
- For Rotorcraft:
- The
targeted_specializationsmust include theCOF-ROTdressing code. - The object_class must be either "helicopter" or "tiltrotor".
- The aircraft will need to have the
ApronWithoutCovers.fltfile (as explained below). - One or more navigation graphs must be set up for between 1 and 9 passengers (ie: between 1 and 9 nodes with the
SITtag, as explained below). - The
navigation_graph_passenger.cfgnavigation graph must have aRTC_ROTORCRAFT_PLANE_ENTRANCEnode and aRTC_ROTORCRAFT_PASSENGER_ENTRANCEnode, connected with an edge. - The rotorcraft can have skids or wheels for landing gear.
- The
Following these constraints will give the aircraft the COF_Cabin type. See here for more information:
Mission Flow - Airliners
The flow for performing commercial passenger flights using an airliner is as follows:

This flow will also require the aircraft to be setup for - and follow - the General Career Mode Requirements.
Mission Flow - Rotorcraft
The flow for performing commercial passenger flights using a rotorcraft is as follows:

This flow will also require the aircraft to be setup for - and follow - the General Career Mode Requirements.
SimVars
While not directly influencing the mission flow, the following SimVars are important for ensuring a smooth user experience without frustrations. These are what are used in the simulation code to decide whether the user should receive a penalty on their mission score or not, and as such, particular attention should be paid to ensure that these are always returning correct values.
| Penalty | SimVar | Description |
|---|---|---|
| Smoothness Score | PLANE BANK DEGREES |
This is used to check the banking angle of the aircraft while performing the first flight / tour. |
PLANE PITCH DEGREES |
This is used to check the pitch angle of the aircraft while performing the first flight / tour. | |
G FORCE |
This is used to check the G forces applied in the aircraft to passengers while performing maneuvers. | |
| Aircraft Condition | WEAR AND TEAR EXPOSED PARTS LOWEST LEVEL |
This is needed to compute aircraft damage, based on the most damaged part, at the end of the mission. |
The Passenger Navigation Graph
For an aircraft to have passengers enter and sit in their seats, you will need to have first set up the Navigation Graph for the aircraft. This graph must be called the following:
navigation_graph_passenger.cfg
This navigation graph will need to have nodes and interactions set up to enable passengers to be added to the aircraft, sit down, and have animations, and it is used both for commercial career missions and in freeflight.
Basic Setup
The passenger navigation graph can be placed in different locations depending on the use that the aircraft is being put to. If the aircraft is only for free flight or passenger transport then it can go in the common folder, but more normally it would be part of a cabin attachment or one or more aircraft presets. This file is setup in the same way as the pilot navigation graph and is used to spawn the passenger seat logic object which controls the interactions with passengers and seatbelts. This file will require the following minimal setup:
[node.0]
name = PAX_R1_1
modelNode = PAX_R1_1
interactiveObject = SEAT_DA62_Pax_R1_1
massSection = Right_pax

[masssection.2]
name = Right_pax
stationloadname = TT:MENU.PAYLOAD.MIDDLE_PAX_RIGHT
maxmass = 300
fillproportion = 1

[MainGraph.0]
nodes = PAX_R1_1
massSections = Right_pax
The two important things to note here in relation to the setup for seats and seatbelts are as follows:
modelNode- This is the name of the attach point node on the model to spawn the seat logic object on. If this is not included then you will need to position the node manually using theposparameter (not recommended).interactiveObject- This is used to register the seat logic object with the interaction manager. This name comes from thetitleparameter in the seat logic objectsim.cfgfile. Note that you may use theSEAT_DEFAULT_Paxobject if you have not created your own, but this will not include seatbelt interactions, and seating animations may "clip", depending on the seat and cockpit models.
The mass section setup is explained in the Weight Distribution section, below.
Node Setup
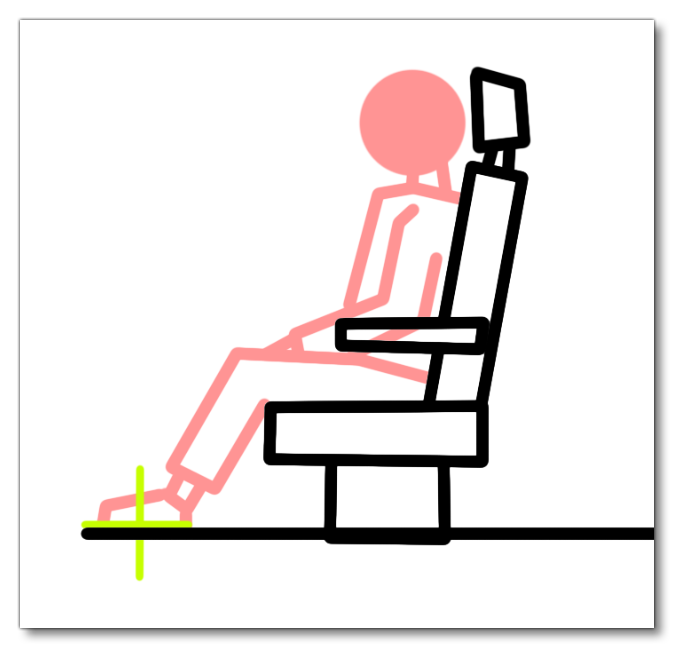
Within the passenger graph you will need to have nodes placed at the locations of each of the seats and these nodes all need to have some kind of logic to tell passengers to sit down and use any seat-belts that are available. For that the seating node should be positioned where the passenger feet would be when they are sitting (so, not on the seat itself, but on the floor in front of the seat), for example:

The normal process is to create the node on an attach point within the aircraft model, and then supply an interactive object to spawn the seat logic object which will control the passenger interactions with the seat and the seatbelt. This logic object will require the tagged node SIT. This object is explained in detail on the following page:
The navigation_graph_passenger.cfg will also require additional tagged nodes for the entrance, however the placement of these nodes will depend on whether you are setting up a plane or a rotorcraft:
- For planes (other than airliners) you will need to have the tag
PLANE_ENTRANCEin thenavigation_graph_passenger.cfg. You only need one of these tags, and it should be on the left of the aircraft, which is the side that the airport services like buses will go to. It will also need to be outside the aircraft and on the ground (you can use theprojectOnGroundparameter to ensure this), as close to the aircraft door as possible. When correctly set up, passengers from buses will move directly towards this point to enter the aircraft. If the aircraft has access to a ramp or jetway (as defined in the[SERVICES]section of the aircraft CFG file), then this node will not be used.
- For rotorcraft you will need to have the following tagged nodes in the
navigation_graph_passenger.cfg:- The
RTC_ROTORCRAFT_PASSENGER_ENTRANCEnode is the node where the passenger will spawn into the world at the start of the activity. For commercial flights with a rotorcraft there is a short RTC animation that will play of the passengers moving from this point to theRTC_ROTORCRAFT_PLANE_ENTRANCEnode, before entering the helicopter. As such there should be one of these nodes for every passengerSITnode created by the seat logic objects (or one for everySITnode plus theCOPILOTnode), and the nodes should be placed close together but not on top of each other. These nodes can be on either side of the helicopter, approximately 4m away from the correspondingRTC_ROTORCRAFT_PLANE_ENTRANCEnode, and be connected to that node with an edge. - The
RTC_ROTORCRAFT_PLANE_ENTRANCEnode defines the end point of the introduction walking animation before the passengers enter the helicopter. There should be one of these nodes for everyRTC_ROTORCRAFT_PASSENGER_ENTRANCEnode, and the nodes should be placed on the same side as the plane entrance node, close together but not on top of each other, ensuring that the edges between the nodes do not cross any other edges. It should be a straight line from the correspondingRTC_ROTORCRAFT_PASSENGER_ENTRANCEnode to this one, and this node should be placed by the side of the helicopter with enough room for the model to stand beside the apparatus without clipping into it.
- The
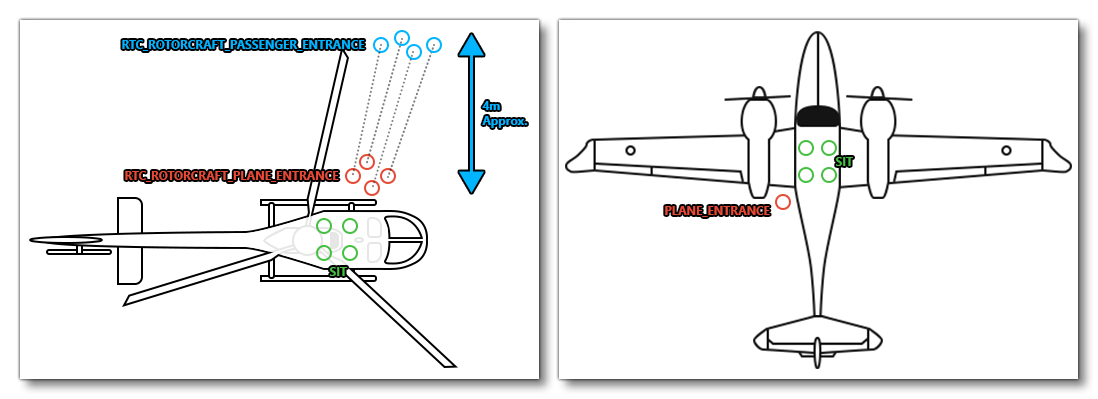
The image below illustrates an "ideal" placement for the nodes mentioned above for rotorcraft (freeflight and commercial career missions) and small/medium aircraft (freeflight only):

NOTE: The passenger navigation graph can serve multiple purposes and can contain other nodes apart from those listed here depending on the mission. For example, an aircraft that can perform both Charter Service flights and commercial flight, can have a single passenger CFG file, with all the nodes for both careers in it.
Weight Distribution
For the passenger weight to be included in the simulation and contribute to the overall weight of the aircraft, you will need to configure one or more station_load.N sections (found in the flight_model.cfg). In general you would not create a single station load per-passenger seat, but instead assign a single station load to an area of the aircraft. For example, for a small aircraft like a helicopter, you may only have a single station load that is used to contain 4 seats, while on a larger aircraft like an airliner, you may have 6 station loads representing front, middle and back sections for either side of the plane and each station may represent around 130 seats each. When creating these stations, the weight input for the station load should be set to 0, as it will be modified by the passengers themselves in the simulation to reflect the actual weight being distributed in the area. The X/Y/Z position should be in the approximate center of the area that the station represents.
Having created the station loads, these need to be assigned to Mass Sections, which are created in the Navigation Graph. Each of these mass sections should have a name that represents the station it is assigned to, and their fill proportion should be set to 1 initially (and can be tweaked later if required). When it comes to the maximum mass, you can calculate this based on the number of seats in the section and the total permitted cargo weight for the aircraft. A good general "rule of thumb" however, is that the average weight per-person would be approximately 85kg, so setting the max weight using this value (or a little more) per seat should give a decent starting point for the weight calculations. Below is a typical mass section setup for a zone with 4 seats:
[MassSection.0]
name = SEATING_PASSENGERS
stationLoadName = TT:MENU.PAYLOAD.PASSENGER
maxMass = 340
fillPriority = 1
Once the mass sections have been set up, they will need to be added into the Main Graph section of the navigation graph, and they will also need to be listed in the Mass Section parameter for each of the nodes that are placed within the section.
It should be noted that once a flight is started, the default number of passengers that are spawned is deduced automatically by the mass defined in the station loads of the flight model. The simulation will look for the mass sections of all the nodes with the appropriate tags (like SIT), get the associated station_load, add all their masses together, and then deduce the number of passengers from the average mass of a passenger. The simulation will finally force the passenger's mass to exactly match the station load's requested mass.
Testing
To test the boarding of passengers you will need to start a free-flight from an airport parking spot. This should be a spot that has access to a jetway or a ramp, but if you want to just test the passenger distribution inside the aircraft then it can be a spot with neither service.
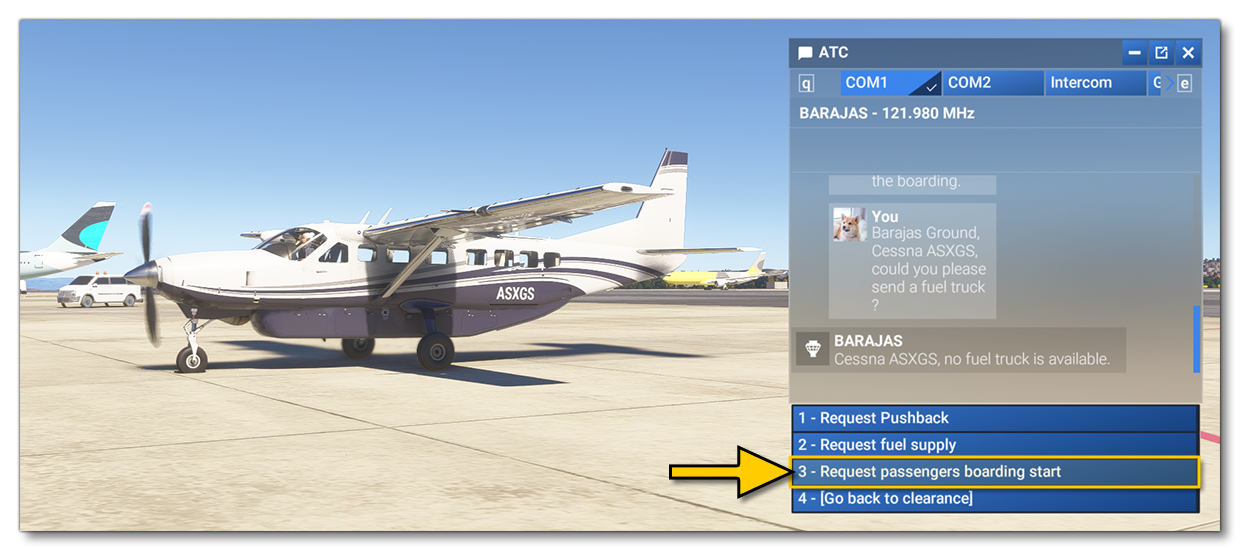
The testing is done by starting the flight and opening the ATC communications window. There you will need to select Ground Services, tune the ATC comms channel to a ground frequency, and then finally request passenger boarding.

If you want to see the passengers already in the aircraft, you should spawn outside any parking space - this means either on a runway or directly in the air. Otherwise, you'll need to ask for a boarding through the ATC (this will only be available on GATE and RAMP - medium and large only - parking spots). Note that the default number of passengers is computed depending on the mass expected by the aircraft navigation_graph_passenger.cfg, which means that your aircraft must have SIT nodes in this navigation graph file, and those nodes must be within MassSections linked to specific station_load setups. See the Weight Distribution section for more information.
If you want to change the number of passengers, you should use the EFB to configure it, through the Weight and Balance tab - either on the world map, or while in the simulation after starting outside a parking space, or having boarded the passengers. Also note that if you want to disable passengers, you can set the DISABLE_PASSENGER_BOARDING parameter to 0 (False) in the aircraft.cfg.
FLT Files
The FLT files required by the aircraft will depend on the aircraft being used, as explained below.
Airliners
When a user starts a passenger activity (not freeflight) in an airliner, they will not be going through the usual Preflight checks, and so they will need to have an ApronWithBatteriesWithoutCovers.flt file instead of the usual Apron.flt. This file should be set up like a regular apron FLT file, however you should ensure that the following parameters and sections are setup correctly, depending on the aircraft:
- Section
[SimVars.0]must have the parameterSimOnGroundset totrue. - All defined
[Covers]need to be set tofalse(see here for more information). - Section
[Controls.0]must have the parameterParkingBrakeset to 100.00 (if the aircraft has a parking brake). - Engines must be turned off.
- The communication system (and thus, the electrics system) must be turned on.
- The aircraft flight parameters (trim, flaps, etc...) should be set for an idle aircraft.
Rotorcraft (and FreeFlight Light Aircraft)
For both light planes and rotorcraft, the pilot will start by going through the usual Preflight checks, and so these aircraft will need to have the Apron.flt setup as follows:
- Section
[SimVars.0]must have the parameterSimOnGroundset totrue. - All defined
[Covers]need to be set totrue(see here for more information). - Section
[Controls.0]must have the parameterParkingBrakeset to 100.00 (if the aircraft has a parking brake). - Aircraft electrics and engines must be turned off.
- The aircraft flight parameters (trim, flaps, etc...) should be set for a cold and idle aircraft.
An additional FLT file is required - the ApronWithoutCovers.flt file - for those occasions when the user may skip the preflight phase and there is an RTC event, or when something causes a Back On Track event aftr preflight. This file should be set up like a regular apron FLT file, however you should ensure that these changes are made:
Note On Services
When it comes to setting up the aircraft [SERVICES], it should be noted that any failure to include the listed items (BAGGAGE_LOADER, CATERING_TRUCK, and BOARDING_RAMP / JETWAY) will not result in a blocker for the mission. It will mean that the whole sequence of boarding passengers, loading luggage, and unloading the catering truck just won't be played, and - after a brief pause - the mission will skip straight to the taxiing part. While this will not break the mission, it does break user immersion, and as such it is listed as a constraint for the aircraft.