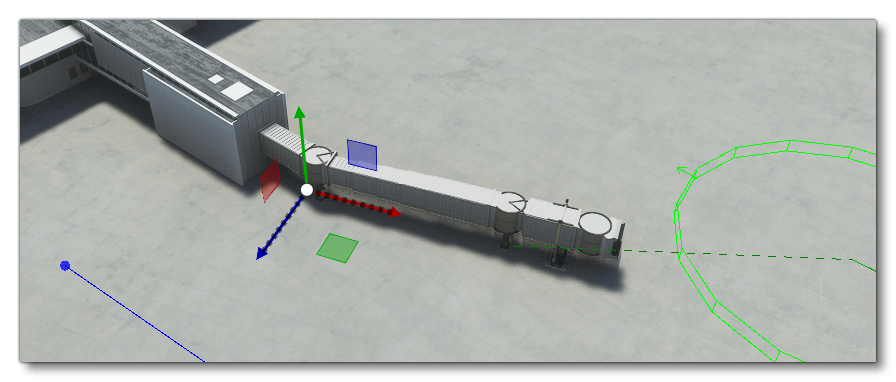
JETWAY OBJECTS
NOTE: This object can only be placed using the TaxiwayParking Objects when the Scenery Editor is in World Hub Mode.
A Jetway object is an object element that is used to add a jetway - and an optional jetway link - into the world that connects TaxiwayParking Objects with airport terminal building Scenery Objects. When you select this object type you will be presented with a list of different object elements listed in the Objects window:
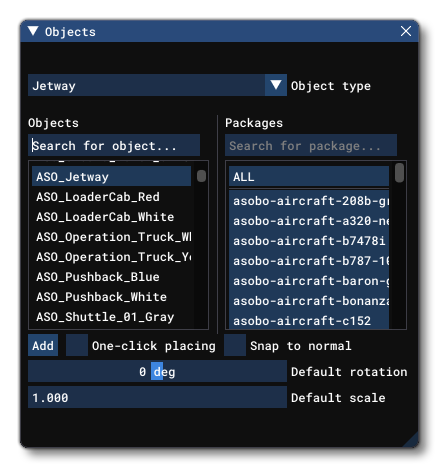
Jetways are a type of SimObj and as such, all available sim objects are shown in the object element list. You should use the filter options in the Objects window to locate the jetway that you wish to place:
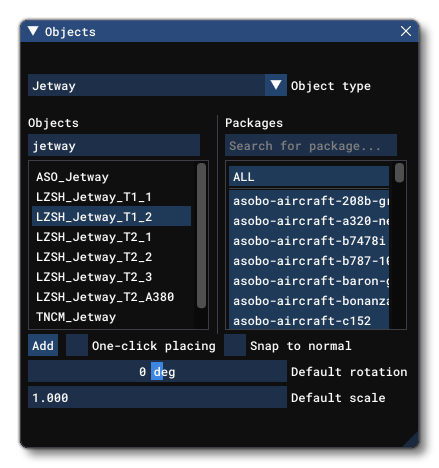
IMPORTANT! Jetway objects require one or more Airport Objects to be present in the scene, and must be added to an airport group in The Scenery Editor. If no airport is present then they cannot be used. Also note that if they are placed too far away (ie: outside the airport Object Test Radius) then they will not be rendered.
Placing A Jetway
In general you won't be using the Objects window to place a jetway, since they are dependent on TaxiwayParking Objects. When you first add a parking object to the scene that is of the GATE_* type, the Scenery Editor will automatically create a sub-group for adding a Jetway to it. Initially the Scenery Editor content list will look like this, showing an error:
 If you then click on the Jetway Group and open the Properties window (if it's not already open) you'll see that you now have two options for adding a Jetway:
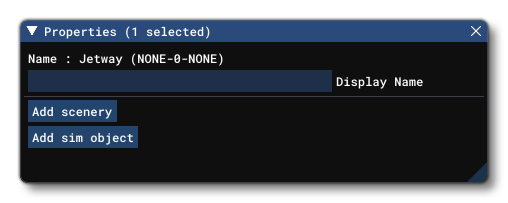 Here you can see the name of the Jetway group, which will include details of the elements it contains, along with the Display Name input field. The display name is where you can give the group a common name to make it easily identifiable in the Scenery Editor Content list. Now you can choose to add a Sim Object or a Scenery Object to be part of the jetway for the parking spot. In general you'll need to add at least the Sim Object type, as that is the type that will animate and connect to an aircraft. If you click the
 Add Sim Object button, you'll be presented with a list of all the objects available and you can use the filter at the top to narrow down the selection. Once you have found the object you want, click the Add button, and it will be added to the world:
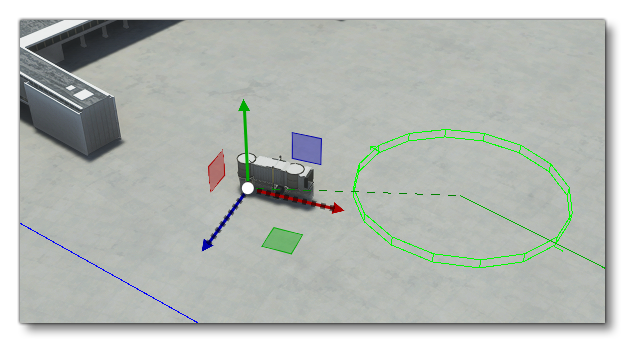 When placed in the world you can use the Gizmo to not only place the jetway sim object, but to rotate it as well as change the scale of the object.
IMPORTANT! When using the gizmo to scale JetWay sim objects, the scaling is only done on the mesh and not on the bones so that, even if the object is visually bigger, in the simulation the contact points will be the same as before. Therefor, you generally want to avoid using the scale option for JetWays, and rather scale the object in your 3D software before exporting it.
You'll want to place it close to the parking spot but not inside the circular area that it occupies. With that done, you may also want to add a Jetway Link scenery object to link the jetway to an airport terminal building. For that you'd select the jetway group in the Scenery Editor and then click the Add Scenery button in the properties and select a jetway link to Add. By default there are 4 main jetway link types, and each one only differs in the distance it will cover between the building and jetway sim object. The image below shows a regular jetway link after it's been placed in the world:
As with the Jetway sim object, you can use the Gizmo to move, rotate and scale the jetway link to match the jetway sim object. Notice that as you move the jetway link, it will always point towards the jetway and attempt to remain connected. If there is a gap between the link and the jetway, you may need to delete the object and use a longer link type.
Note that if you delete the Jetway Group in the Scenery Editor, the content list will highlight the Taxiway Parking Spot in yellow to show that it has no jetway assigned to it. This is a warning only and will not prevent the airport from being considered "valid", it just means that the parking spot will not have any jetway interactions. If you wish to add a jetway to a parking spot that is flagged in this way, then you'd do it in the following way:
- Select the Taxiway Parking object in the Scenery Editor content list
- Open the Objects Window and select the Jetway object
- Click the
Addbutton
This will create a Jetway group - as explained above - already populated with the Jetway sim object which you can then position in the world. You can then click the group in the scenery editor and add a Jetway Link if required.
Jetway Properties
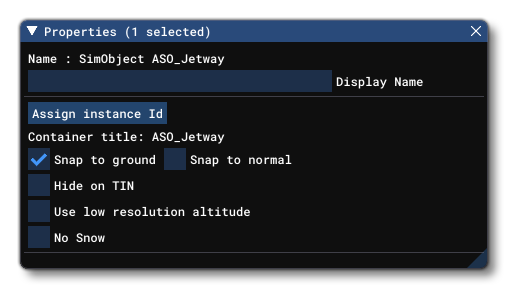
The Properties window for a Jetway looks like this:
-
Name
This is the name of the jetway as defined from its file and modifiers.
-
Display Name
This is the name of the jetway sim object as it will be displayed in the The Scenery Contents List. This can be edited and is helpful for identifying elements when you have a lot of items in the content list.
-
Assign Instance ID
Clicking this button will create a GUID-formatted Instance ID unique to the instance of the jetway element placed within the simulation. This can be useful for many things like when creating mission scripts (for example).
-
Container Title
This shows the name of the jetway "container" group as it will be shown in The Scenery Contents List.
-
Snap To Ground
This option is enabled by default, and will "snap" the jetway to the ground so that - regardless of the terrain height - the element will always be at ground level, even when moving it. Enabling this means that the altitude Gizmo does nothing, while disabling this will permit you to change the altitude. When this is disabled, you will have a new option present in the Properties window:
-
Offset To Ground
This value is the altitude from the ground for the jetway, and editing it will raise or lower the jetway (and changing the altitude using the Translate Gizmo will also change this value automatically).
-
-
Snap To Normal
When enabled, the Jetway will change orientation based on the terrain surface normal underneath the center-point of the element. When disabled, it will maintain the default orientation regardless of the terrain underneath (or the orientation which is set using the Rotation Gizmo, and note that when enabled the Rotation Gizmo will only affect the horizontal axis around the center of the element). This option is disabled by default.
-
Hide on TIN
When checked, this option will hide the Jetway unless the TIN data is unavailable, for example when the user is offline, at which point it will be visible. The option is disabled by default.
-
Use Low Resolution Altitude
This option, when checked, will force the simulation to use a lower resolution altitude calculation when calculating the placement of the object in relation to the camera. In general this option only needs to be checked when the object is placed on a slope and you can see it "bounce" up or down in altitude as the camera gets closer/farther from it. Enabling this option should stop this changing visual altitude.
-
No Snow
This option will enable or disable snow on the Jetway when appropriate. This option is disabled by default.
Jetway Link Properties
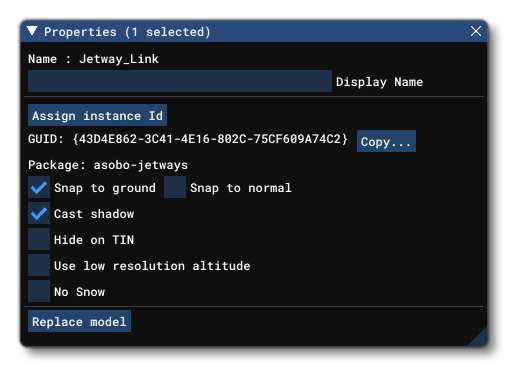
The Properties window for a Jetway Link looks like this:
-
Name
This is the name of the object element as defined from its file.
-
Display Name
This is the name of the element as it will be displayed in the The Scenery Contents List. This can be edited and is helpful for identifying elements when you have a lot of items in the content list.
-
Assign Instance ID
Clicking this button will create a GUID-formatted Instance ID unique to the instance of the object element placed within the simulation. This is distinct to the GUID value (explained below), as the GUID will be shared by all elements of the same object, while the instance ID will be unique to each instance of that object. This can be useful for many things like when creating mission scripts (for example).
-
GUID
This shows the unique GUID for the object element. This ID value is for the base object element itself, and will be shared with all instances of the element that are placed in the world. Use the
Assign Instance IDbutton if you require a unique GUID for a specific instance of the jetway link object element.
-
Package
This shows the name of the package that the currently selected object element comes from.
-
Snap To Ground
This option is enabled by default, and will "snap" the object element to the ground so that - regardless of the terrain height - the element will always be at ground level, even when moving it. Enabling this means that the altitude Gizmo does nothing, while disabling this will permit you to change the altitude. When this is disabled, you will have a new option present in the Properties window:
-
Offset To Ground
This value is the altitude from the ground for the object, and editing it will raise or lower the element (and changing the altitude using the Translate Gizmo will also change this value automatically).
-
-
Snap To Normal
When enabled, the object element will change orientation based on the terrain surface normal underneath the center-point of the element. When disabled, it will maintain the default orientation regardless of the terrain underneath (or the orientation which is set using the Rotation Gizmo, and note that when enabled the Rotation Gizmo will only affect the horizontal axis around the center of the element). This option is disabled by default.
-
Cast Shadow
This option will enable or disable the ability for the element model to cast a shadow on the terrain. This option is enabled by default.
-
Hide on TIN
When checked, this option will hide the object element unless the TIN data is unavailable, for example when the user is offline, at which point it will be visible. The option is disabled by default.
-
Use Low Resolution Altitude
This option, when checked, will force the simulation to use a lower resolution altitude calculation when calculating the placement of the object in relation to the camera. In general this option only needs to be checked when the object is placed on a slope and you can see it "bounce" up or down in altitude as the camera gets closer/farther from it. Enabling this option should stop this changing visual altitude.
-
No Snow
This option will enable or disable snow on the element (if supported). An element like an apron, for example, can have snow on it if the weather conditions and area have snow, and this option can tell the simulation to ignore that and to always display the element without snow. This option is disabled by default.
-
Replace Model
The
Replace Modelbutton permits you to select a different model for the jetway link object element. This will not change any of the properties that have been set for the element and simply change the visual model used to represent it.
