TRAVELBOOK SETUP (WORLD PHOTOGRAPHER MISSIONS)
The "travelbook" in Microsoft Flight Simulator 2024 is the collection of photographs that the user can take when flying, primarily those taken by performing the World Photographer missions.

These kinds of missions can be created by the user without too much effort, as they don't have to require any custom assets other than some XML files (although you can create additional scenery items or custom models for POI's if you wish). This page outlines how to create a travelbook package with objectives and bonus objectives that will be shown to users in the World Photographer section of the interface.
Package Setup
Before you can create any kind of mission, the first thing you will need to do is create your travelbook project, using The Project Editor:

After clicking the Create New Project button, you need to select the Package > Custom options, and setup the travelbook package, ensuring that you have selected the MISSION content-type:

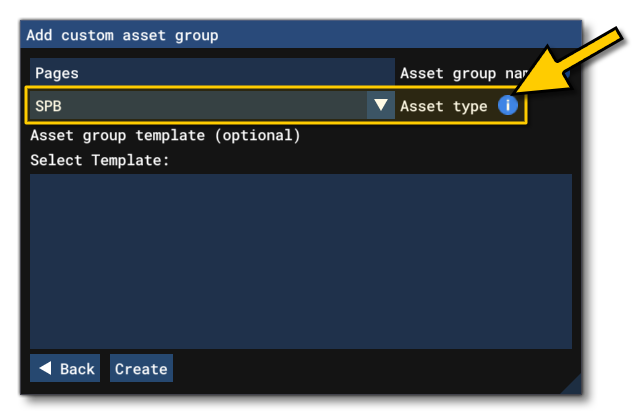
On clicking Next, you will need to select the first asset group for the package. For these kinds of world photographer missions, you will need two different asset groups, one for the "pages" and one for the "objectives". In this case we'll make the "pages" asset group first, and set the asset type to SPB:
Once this has been created, there are a couple of things to do with the project to ensure that things are exported correctly when the package is built. To start with you need to select the package and in The Project Inspector set the Package Order Hint so that it is Custom Travelbook. This is important, since travelbook packages need to be mounted after everything else, and this hint ensures that this happens:

The next step is to set the output path for the "pages" asset group. It's important to get this right so that the simulation can read the files and add the pages (and later the objectives) into the UI. For that you need to select the pages asset group, then set the path to the following:
TravelBook\Objectives\[COMPANY_NAME]\definition\

We'll also take this opportunity to add in an asset group for the page objectives. For this, you need to select the package again, and in the Inspector click the Add Asset Group button, then follow the same steps as before:
- Select Custom.
- Name the asset group "Objectives".
- Select SPB for the Asset Type.
-
Set the output path to the following:
TravelBook\Objectives\[COMPANY_NAME]\objectives\

This is the basic package setup, and you'll be adding additional folders and files into these "base" asset groups to create the travelbook page and objectives.
The Page XML
The first thing you'll need to do for your travelbook missions is create the "page" of the book where the objectives will be found. For this example, we're going to make a simple set of objectives based on the landscapes and architecture of Scotland, which will require an image, a description, and some simple XML. So, in the Pages folder of your package sources, create a new XML file and call it TravelBook.xml:

In this file you would then add the following:
<?xml version="1.0" encoding="UTF-8"?>
<SimBase.Document Type="TravelBook" version="1.0">
    <TravelBook.Definition>
        <Collection Name="$$:MAN MADE"  Picture="PICTURE_PATH_0" InstanceId="[GUID]">
            <Page Name="[TT PAGE_NAME]"  Picture="[IMAGE_PATH]" InstanceId="[GUID]">
                <WorldPosition>[Position]</WorldPosition>
                <DESCR>[TT Description]</DESCR>
                <PageCategory>[Category]</PageCategory>
                <Country>[TT Country]</Country>
                <Weight>[Order Weight]</Weight>
            </Page>
        </Collection>
    </TravelBook.Definition>
</SimBase.Document>
Once you have this "template" XML, it is simple enough to fill in using the Travelbook Page XML Properties section for reference. The most important things to pay attention to here are the <Page> GUID, which will be used by the objectives to link them to the page, and the <Page> picture path, which is not the local path in package sources, but the final path when the package is built. If you've set things up correctly as outlined above, then this path will be:
TravelBook\Objectives\[COMPANY_NAME]\Definition\Pictures\[FILENAME].jpg
Putting all this together should give you something like the following:
<?xml version="1.0" encoding="UTF-8"?>
<SimBase.Document Type="TravelBook" version="1,0">
    <TravelBook.Definition>
        <Collection Name="$$:MAN MADE"  Picture="PICTURE_PATH_0" InstanceId="{6b0070e0-1cf2-4c30-90ee-ff65f08cdc0f}">
            <Condition></Condition>
            <Page Name="Scottish Landmarks" Picture="TravelBook\Objectives\MyCompany\Definition\Pictures\ScottishLandmarks.jpg" InstanceId="{6b0070e0-1cf2-4c30-90ee-ff65f08cdc0f}">
                <WorldPosition>N56*29'26.416", W-4*12'9.525",+000500.00</WorldPosition>
                <WorldMapZoomRatio>0.5</WorldMapZoomRatio>
                <WorldMapZoomRatioFocused>0.5</WorldMapZoomRatioFocused>
                <Descr>See the breathtaking landscapes and incredible architecture of bonnie Scotland!</Descr>
                <PageCategory>Architecture</PageCategory>
                <Country>@asobo-travelbook,TT:MENU.COUNTRY.EUROPE</Country>
                <Weight>10000</Weight>
            </Page>
        </Collection>
    </TravelBook.Definition>
</SimBase.Document>
Before testing anything, you will also need to add the picture that will be used for the page in the UI. This image should go in a folder named "Pictures" which will go beside the TravelBook.XML file in the package sources:

The picture itself should be authored as a 700 x 1020px *.jpg file, with the contents taken from the simulation and showing something representative of the mission that the page will encompass. For the "Scottish Landmarks" travel book example, we'll feature the iconic Forth Rail Bridge:

The Objective XML
Once you have the page XML created, you can then start to think about adding in objectives. These objectives should follow the trend/concept of the page, and consist of a "main" objective, and - optionally - some "bonus" objectives. For example, with our "Scottish Landmarks" page, we'll be concentrating on photographing heritage architecture and monuments around Scotland, and some bonus objectives will be to do so at a specific time of day, or to including other objects in the scene, etc... The general idea is to create 5-12 objectives, and have up to 3 of them contain bonus objectives.
Each objective (and its bonus objectives if it has any) has a single XML file associated with it, and this file will be linked to the travelbook page you already created. Creating this file will be separated into three stages:
- Add the objective meta information.
- Add the main objective requirements.
- Add any bonus objectives (optional).
Objective Meta Data
To start with, you will need to make a new XML file, and save it into the "Objectives" asset group of the package sources. It should be named appropriately for the objective it will contain, for example, our first Scottish Landmarks objective will be Edinburgh Castle, so the XML will also be named this. You should also go ahead and create a new folder in the same location and call it Pictures. We'll come back to that in a moment, but for now you will have something like this

It's time to edit the XML file, and it should contain the following initially:
<?xml version="1.0" encoding="UTF-8"?>
<SimBase.Document Type="Photo Objective" version="1,0">
    <TravelBook.Objective InstanceId="[GUID]">

        <!-- Objective Meta Data-->
        <Title>[TITLE]</Title>
        <Descr>[DESCRIPTION]</Descr>
        <Trivia>[ADDITIONAL INFORMATION]</Trivia>
        <Picture>[IMAGE]</Picture>
        <PageId>[TRAVELBOOK PAGE ID]</PageId>

        <!-- Objective Location Data -->
        <ObjectiveWorldData>
            <ObjectiveWorldPosition>
                <!-- Objective Location Data -->
            </ObjectiveWorldPosition>
            <ObjectiveSubjectWorldData>
                <!-- Objective Location Data -->
            </ObjectiveSubjectWorldData>
            <ObjectiveRecommendedDeparture>
                <!-- Objective Location Data -->
            </ObjectiveRecommendedDeparture>
        </ObjectiveWorldData>

        <!-- Objective Aircraft -->
        <AircraftRecommended>
            <Name>[NAME]</Name>
            <Livery>[LIVERY]</Livery>
        </AircraftRecommended>

    </TravelBook.Objective>
</SimBase.Document>
Once you have this "template" XML, it is simple enough to fill in using the Travelbook Objective XML Properties section for reference. The most important things to pay attention to here are the <PageId> GUID, which is the one you generated for the page XML file, and the <Picture> picture path, which is not the local path in package sources where you created the Pictures folder, but the final path when the package is built. If you've set things up correctly as outlined above, then this path will be:
TravelBook\Objectives\[COMPANY_NAME]\Objectives\Pictures\[FILENAME].jpg
Putting all this together should give you something like the following:
<?xml version="1.0" encoding="UTF-8"?>
<SimBase.Document Type="Photo Objective" version="1,0">
    <TravelBook.Objective InstanceId="{8FAC1D5D-5DE8-4DBD-B389-E0C80C62911F}">

        <Title>Edinburgh Castle</Title>
        <Descr>Take in the sights of Edinburgh, by flying over the iconic castle! </Descr>

        <Picture>TravelBook\Objectives\MyCompany\Objectives\Pictures\EdinburghCastle.jpg</Picture>

        <PageId>{6b0070e0-1cf2-4c30-90ee-ff65f08cdc0f}</PageId>

        <ObjectiveWorldData>
            <ObjectiveWorldPosition>
                <WorldPosition>N55* 56' 55.272",W3* 12' 2.9988, 000+100</WorldPosition>
                <WorldMapZoomRatio>0.0001</WorldMapZoomRatio>
            </ObjectiveWorldPosition>
            <ObjectiveSubjectWorldData>
                <Name>Edinburgh Castle</Name>
                <WorldPosition>N55* 56' 55.272",W3* 12' 2.9988, 000+100</WorldPosition>
            </ObjectiveSubjectWorldData>
            <ObjectiveRecommendedDeparture>
                <WorldPosition>N55* 58' 33.906",W3* 16' 21.272",+005000</WorldPosition>
                <AltitudeIsAGL>FALSE</AltitudeIsAGL>
                <LocalOrientation>6, 0, 135</LocalOrientation>
                <LocalOffsetXYZ>0,0,0</LocalOffsetXYZ>
            </ObjectiveRecommendedDeparture>
        </ObjectiveWorldData>

        <AircraftRecommended>
            <Name>Cessna C152</Name>
        </AircraftRecommended>

    </TravelBook.Objective>
</SimBase.Document>
It's worth noting that you can find a list of the different aircraft names and liveries to use in the <AircraftRecommended> element from the Travelbook Lists page.
Finally you can create the image to associate with the objective, it should be authored as a 2560x1440px *.jpg file, with the contents taken from the simulation and showing an image of the objective itself. It should then be saved to the Pictures folder in the objectives package sources. For an example, here is the image we'll use for our Edinburgh Castle objective:

Objective Requirements
The main objective of most photographic missions is simply to take a photo of something, with few or no constraints. Any complications to the photo, like having the sun in the background, or taking the photo during a storm, etc... should be left for the bonus objectives. Objectives are set up using requirements which come down to whether a simple formula resolves as true or false. Formulas are created using parameters defined in the requirements and usually contain at least one subject (usually the object being photographed, but you can have multiple subjects used for bonus objectives), and conditions which define the constraints placed on the subject to be used in the formula. Let's look at how a main objective requirement definition is constructed:
<Requirement>
    <IsMandatory>TRUE</IsMandatory>
    <Title>[MAIN OBJECTIVE TITLE]</Title>
    <Descr>[Additional Information]</Descr>
    <Subjects>
        <!-- Additional Model/POI/etc... Data -->
    </Subjects>
</Requirement>
For our example of Edinburgh Castle, the requirements for that would look like this:
<Requirement>
<IsMandatory>TRUE</IsMandatory>
<Title>Photograph The Castle</Title>
<Descr>Take a photo of the whole castle.</Descr>
<Subjects>
<POI>
<Id>Castle_bbox</Id>
<Name>Edinburgh Castle POI</Name>
<InstanceId>{EE3FF4B1-C8CA-415B-5DC5-0EB4F5AB72F4}</InstanceId>
<ScreenSize MinSize="0.1"/>
<Conditions>
<PercentageVisible Id="PercentVisible1"/>
</Conditions>
<Formula>(X:PercentVisible1) 30 > </Formula>
</POI>
</Subjects>
</Requirement>
The important things to note in this example are that:
- The
<IsMandatory>element is used to signify that this is the main objective, and should always (and only) be used for the main objective. - The
<Title>will be what the user sees in the UI, but the<Descr>will not be used and is orientative for you to know what the objective is for. - The subject is set to use the
<POI>element which has the GUID for the Edinburgh Castle POI. There are other subjects available, and the one you use will depend on the objective you are creating. - The
<Conditions>for this subject to be validated is how much of it is visible on screen. - The
<Formula>uses the conditionIdas a parameter in some RPN to check that at least 30% of the object is on screen. This might seem odd, and you may be tempted to use 100% since you want the whole object to be visible in the photo. However, often the bounding spheres for objects are much larger than the objects themselves, and as such, this value needs to be adjusted appropriately with that in mind. It should be noted, that this is not the best way to check for an object and you should be using travel book bounding boxes instead, as explained in the Adding Scenery section, below.
Testing The Objective
Once you have the Main Objective defined, the photographic mission can be tested in the simulation. For that, simply select the Build All In Project button in the project editor, and ensure that the console has no errors. Then click on the World Photographer option in the simulation UI. If everything has gone correctly, you should now be able to see the page you created in the list:

Selecting the page you created will take you to the objectives screen, where you should also see the first main objective you have added:

Clicking on the objective will zoom in on the location and should show the appropriate information, like the objective title and the aircraft you have selected, permitting you to start flying and see if you can complete it:

Bonus Objectives
When it comes to adding bonus objectives, you have a huge amount of options for what these could be. Some typical ideas include:
- Have the sun behind the object.
- Include the user aircraft in the image.
- Take the photo while landed and outside the aircraft.
- Have some other object included in the frame along with the main objective.
- Take the photo at a specific time of day.
Whatever you decide, the setup for the bonus objectives is essentially the same as that for the main objective, with the main differences being that:
- you don't need to define a subject, since it's assumed that it's the same subject as the main objective, although you can define additional subjects to be included in the shot (for example the Sun, another aircraft, another POI, etc...).
- you don't need to use the
<IsMandatory>element. - you should include a
<Descr>if it is not immediately obvious from the title what the bonus objective requires. Keep in mind that the description for bonus objectives is to give additional information on how to achieve the objective, and not simply information about the objective.
For our example in Scotland, we'll be using the following XML to create a bonus mission:
<Requirement>
<Title>In A Low Angle Shot</Title>
<Descr>Fly low and pitch the camera up.</Descr>
<Contexts>
<Conditions>
<RotationConstraint>
<Id>LowAngle</Id>
<RelativeAxis>
<XMin>190</XMin>
<XMax>350</XMax>
</RelativeAxis>
</RotationConstraint>
<RotationConstraint>
<Id>PitchCameraDegrees</Id>
<RelativeAxis>
<XMax>-0.5</XMax>
</RelativeAxis>
</RotationConstraint>
<Formula> (A:PLANE ALTITUDE, feet) 1000 < (X:LowAngle) and (PitchCameraDegrees) and</Formula>
</Conditions>
</Contexts>
</Requirement>
Here we've included two conditions to be used in the formula that will be used to validate the objective. The first is simply checking that the angle formed between the subject and the camera falls between the given range, and the second is checking that the camera pitch does not go below the given maximum value. It is worth noting that - since formulas are RPN and can therefor use all the tools that RPN provides - the formula includes a Simulation Variable, which is used to check that the aircraft altitude is below 1000ft.
Weather And Time
You can set the weather, time of day, and even the day / month / year for a photographic mission as part of the objective XML. These can be set as initial settings so the flight will start at a certain time or with specific weather, and then they can be used in conditions for validating objectives.
IMPORTANT! Setting the date, time, or weather for the start of an objective does not mean that the mission will always start with those settings, since the user can change them from the UI before the flight starts.
Date And Time
When it comes to setting up the date and time you can use the <DateRecommended> and <TimeOfDayRecommended> elements as part of the general objective information, for example:
<?xml version="1.0" encoding="UTF-8"?>
<SimBase.Document Type="Photo Objective" version="1,0">
    <TravelBook.Objective InstanceId="{6FAC1D5D-5DE8-4DBD-B389-E0C80C62911F}">

        <!-- Objective Meta Data Here -->

        <!-- Objective Location Data Here -->

        <!-- Objective Date And Time -->
        <DateRecommended Day="1" Month="9" />
        <TimeOfDayRecommended Hour="08" Minute="49" />

        <!-- Objectives Here -->

    </TravelBook.Objective>
</SimBase.Document>
If you wish to use this information as part of an objective validation check then you use the <LocalTime> or <Period> context tags. For example, the following XML checks the date to see if the mission is being performed during the spring, and the time to see if it's being performed before 12.00 (noon):
<Contexts>
<Conditions>
<LocalTime>
<Id>TimeOfDay</Id>
</LocalTime>
<Period>
<Id>Spring</Id>
<From day="21" month="3" />
<To day="21" month="6" />
</Period>
</Conditions>
<Formula>(X:TimeOfDay) 43200 < (X:Spring) and</Formula>
</Contexts>
Weather
If you wish to be able to use weather as a recommended setup, then the first thing you need to do is create a location in the project to save the *.wpr file that will define it. For that you will need to create a Weather folder in the same location as the page definition XML:

It's in this location that you will need to save all the weather presets that you require for the various objectives in the project. For the contents of the weather *.wpr files, please see here: Weather XML (WPR File) Properties
Once you have your preset(s) set up, to use them in an objective it's simply a case of adding the <WeatherPreset> into the general objective data, and supplying the path to the file. Note that the path is not the local path in package sources, but the final path when the package is built. If you've set things up correctly as outlined above, then this path will be:
TravelBook\Objectives\MyCompany\Definition\WeatherPresets\[FILENAME].wpr
For example:
<?xml version="1.0" encoding="UTF-8"?>
<SimBase.Document Type="Photo Objective" version="1,0">
    <TravelBook.Objective InstanceId="{6FAC1D5D-5DE8-4DBD-B389-E0C80C62911F}">

        <!-- Objective Meta Data Here -->

        <!-- Objective Location Data Here -->

        <!-- Objective Date And Time -->

        <!-- Objective Weather File -->
        <WeatherPreset>
            <File>TravelBook\Objectives\MyCompany\Definition\WeatherPresets\EdinburghSunny.WPR</File>
        </WeatherPreset>

        <!-- Objectives Here -->

    </TravelBook.Objective>
</SimBase.Document>
To use the weather in an objective check, you can create a weather context or you can check a weather element. For a context check you'll need the <WeatherContext> element, along with one of the pre-defined values. Note that a context like this must be "TRUE" for the objective to be validated, and does not need to be included in the formula RPN. For example, to add a "clear skies only" validation to the objective, you would have the following context added to the XML:
<WeatherContext>
    <Id>WeatherClear</Id>
    <WeatherConditionType>WEATHER_CLEAR_SKY</WeatherConditionType>
</WeatherContext>
You can also include certain things as "weather objects" to be a subject in a photo using the <WeatherSubject> element to set the available weather objects as part of the objective validation (ie: they will have to be visible in the photograph for it to be validated. You can combine this with other elements to have a validation of "the sun must be on the left" or "the moon must be behind", etc... In the example below, we have decided to make the objective "take the photo with a sunset":
<Requirement>
    <Title>Take A Photo With The Sunset</Title>
    <Subjects>
        <Weather>
            <Id>Sun</Id>
            <WeatherSubject>Sun</WeatherSubject>
        </Weather>
    </Subjects>
    <Contexts>
        <Conditions>
            <TimeOfDay>
                <Id>Time Dusk</Id>
                <TimeOfDayType>Dusk</TimeOfDayType>
            </TimeOfDay>
        </Conditions>
    </Contexts>
</Requirement>
Subject XML
The final thing we'll cover on this page, is creating the [subject].xml file. This is actually a simple scenery file that you can create as part of a travelbook package with elements that are required to be part of the objectives (for example, custom POI scenery objects) or be used as part of the objective validation process (for example, you can create bounding box objects which can be used for framing, or for detecting an object that maybe doesn't have a point-of-interest GUID, etc...).
Adding The Subject Asset Group
When adding scenery objects to your travelbook package, the first thing to do is select the package, and in the Project Inspector click the Add Asset Group button, then select Scenery. Call the asset group "Subjects", select the "Empty Scene" template, and click Create Scenery:

We are adding the scenery into the package itself since travelbooks are loaded last and you want to ensure that any scenery you include is not being overridden by something later in the load order (which it could be if you create a separate package for your scenery). The output path should be something like this:
\Scenery\[COMPANY_NAME]\TravelBook\Subjects\

With the package set up, you can then add in the scenery elements for the different objectives using The Scenery Editor.
Adding Scenery
When it comes to adding scenery to your travelbook package, it is expected that you have a single scenery asset group, and all scenery objects for all objectives are contained within. For this, you can simply open the asset group in the scenery editor then move to the place in the world where you want to add something, add it, then save and build the project.
The two most common things you'll want to include are Polygon Objects to define specific areas for landscape feature photography, and the travelbook Bounding Box Scenery Object. This object is especially useful for creating POI missions, since - as has been mentioned above - POI bounding boxes are usually much larger than the object they are signalling, which can cause issues when it comes to validating objectives.
For an example of using one of the bounding box objects, we'll go back to our Edinburgh Castle objective. We had to modify the formula to take the large POI bounding sphere into account, leading to an overly generous margin of error for the user taking the photo. However, we can resolve this by adding in a travelbook bounding box object and using that in the checks instead.
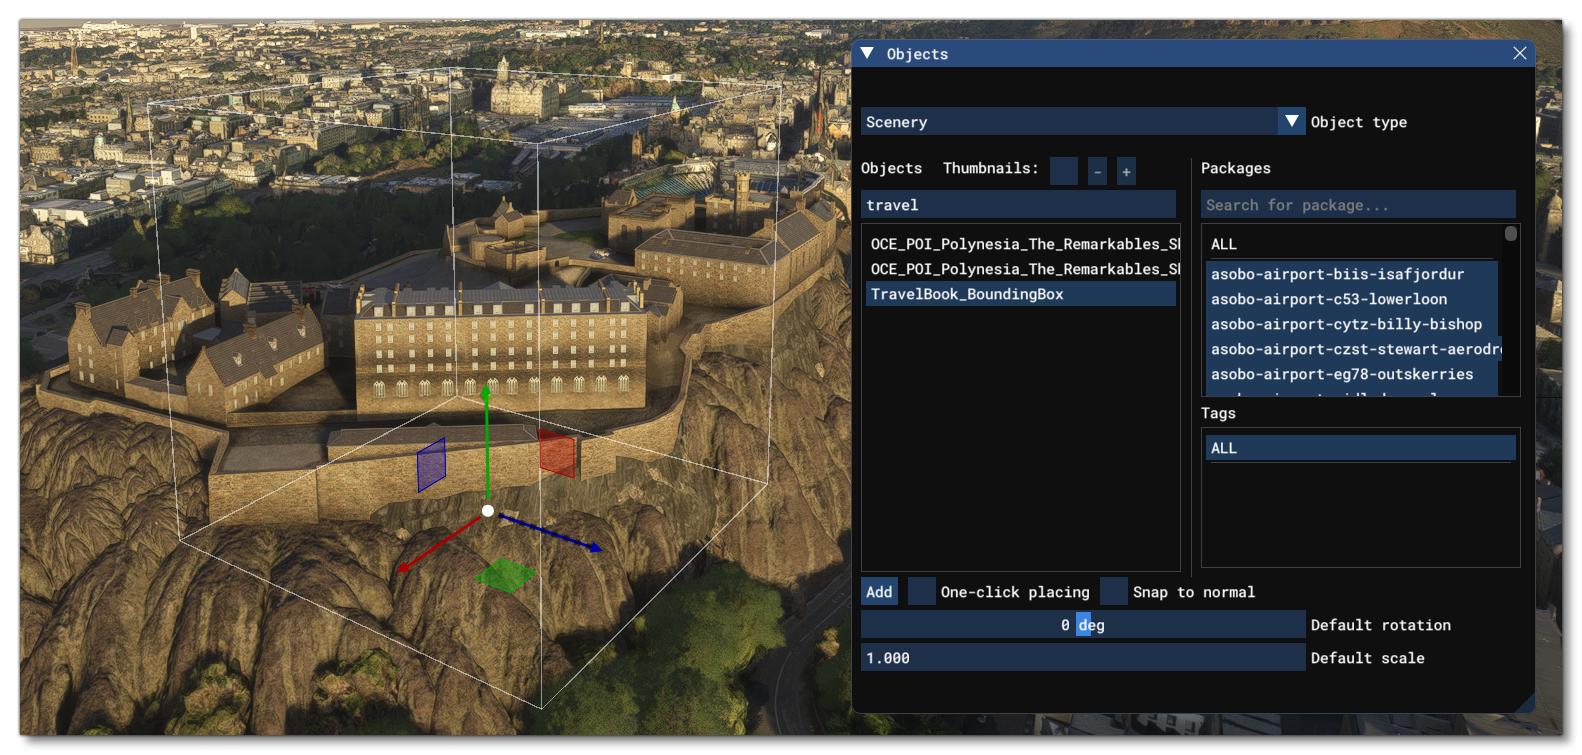
To start with, we open the asset group in the Scenery Editor and then navigate to Edinburgh Castle. Once there we select the TravelBook_BoundingBox object and add it into the world, adjusting it's size and position using the Edition Gizmo:
Once that's done, the important part is to generate an Instance ID using the scenery object Properties. This is done by simply clicking on the Assign Instance ID button in the window, then clicking the Copy button to get the ID:
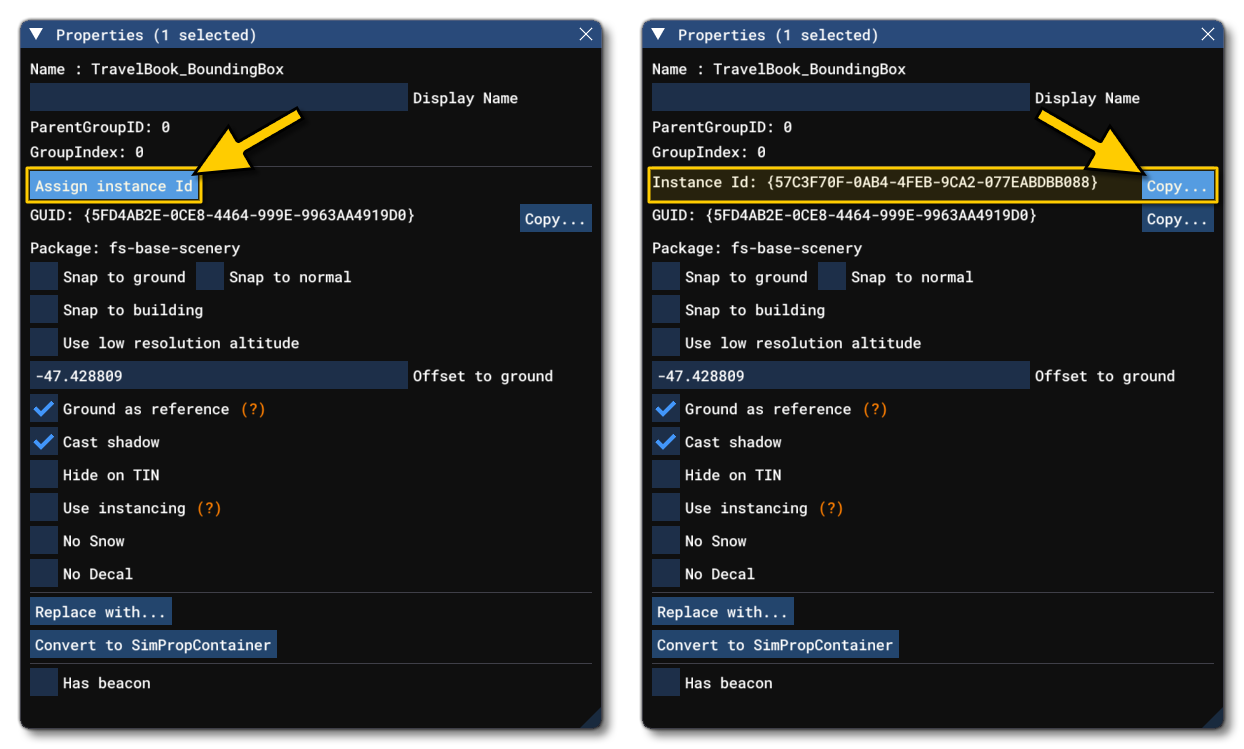
For all subjects that you create through the Scenery Editor, you must get the Instance ID, not the object GUID, since that will target all objects with the same GUID. Now you have this ID string, it can be used in the objective XML. Here's the Edinburgh Castle POI objective updated to use this now (we've made some appropriate changes to the MinSize and precentage visible values too, to match):
<Requirement>
<IsMandatory>TRUE</IsMandatory>
<Title>Photograph The Castle</Title>
<Descr>Take a photo of the whole castle.</Descr>
<Subjects>
<POI>
<Id>Castle_bbox</Id>
<Name>Edinburgh Castle POI</Name>
<InstanceId>{57C3F70F-0AB4-4FEB-9CA2-077EABDBB088}</InstanceId>
<ScreenSize MinSize="20"/>
<Conditions>
<PercentageVisible Id="PercentVisible1"/>
</Conditions>
<Formula>(X:PercentVisible1) 90 > </Formula>
</POI>
</Subjects>
</Requirement>
Using additional scenery objects in your travelbook objectives is essential to get interesting and well crafted missions. However, as you can see, it's a simple process and the only really important step to follow is to use the Instance ID and not the object GUID in your XML.
Related Topics