SEATS AND SEATBELTS
When it comes to creating seats and seatbelts in Microsoft Flight Simulator 2024, a more realistic approach has been taken than in previous versions of the simulation.
 The seats themselves should be modeled as static objects, which can be either part of the aircraft cockpit or cabin, or as single seat models which can then be merged into the aircraft at run time as part of the Modular SimObject Merging process. This is the recommended method, since it permits more flexibility and improves performance, as each seat object will be LOD scaled independently, however it all depends on the type of aircraft and seating being created.
The rest of this document is related to the creation of the seat and seatbelt models and animations, as well as the export process for these items. Actually setting them up in the simulation is a slightly more complicated process and as such has it's own page which can be found here:
Seats Overview
Seats can be split into three different parts and each one should be thought of as independent entities:
- The seat model
- The seat logic
- The seatbelt model
The model and the logic are separate to give more flexibility when it comes to the creation of the aircraft cockpit and cabin. For example, in the DA62, the passenger seats are modeled together as a single "bench" type object with three combined seats:

Since the seat logic is used to create and animate the seatbelt model, and this logic is for a single seatbelt only, you can't have the seat, logic and seatbelt, all belong to the same object in the simulation. In this case you would have the seat model, 3 seat logic objects, and 3 seatbelt models. However, when it comes to an aircraft with multiple seats that are all identical - like an airliner's passenger seats - then you can combine the seat, logic and seatbelt in a single object. Both setups are explained further down this page.
When it comes to modeling the seats, they should be as realistic as possible, while being as optimised as possible too, following the Aircraft Modeling General Principles. They should not be animated so that the seatbelt animations "fit" correctly, and they can make use of the Dynamic Liveries system to have different colours or logos depending on the variation that the user has selected in the simulation (as shown in the DA62).
Seatbelts Overview
To model the seatbelts in your aircraft, they will initially need to have two different states:

Unfastened
When it comes to creating the unfastened seatbelt model there are no special constraints or rules to follow, other than it should use the same materials and have the visual same characteristics as the fastened version. This will be simply a static model.

Fastened
For the fastened seatbelt, it should be modeled as an animated skin since it will have to adapt to various different body sizes. These body sizes are chosen by the simulation randomly, and as such the seatbelt will have to adapt dynamically.
The fastened seatbelt state, will additionally need 4 different sizes, and 2 different genders:
- Tall Heavy Weight Cold Male / Female
- Tall Heavy Weight Male / Female
- Tall Average Weight Male / Female
- Tall Thin Weight Male / Female
Each of these sizes corresponds to one of the body-types that can be generated for the procedural characters in the simulation.
Body Morphtypes
To start modeling the seatbelts, you will need to have modeled the seats, and then choose one the body morphotypes templates, to import into your aircraft model. These templates have been pre-prepared for you and are included as part of the SDK from the following path:
C:\MSFS 2024 SDK\SharedAssets\characters\max
The template file contains three groups of models, and in each group there are various morphotype models. These groups correspond to the three body postures:
- Lying - The models in this group are for people who are in a very reclined posture, for example when in a glider.
- Leaned - The models in this group are for people who are lightly reclined/relaxed, for example those in a small-to-mid-sized aircraft.
- Straight - The models in this group are for people who are sitting up straight, for example those people in an airliner.
Which one you actually use will depend on the shape of the seats and the size/shape of the cockpit / cabin where they will be getting used.

IMPORTANT! Even if you do not wish to use seatbelts, you should always model your seats around one of these body morphotype poses, as you will need to specify which animation to use for characters when sitting as you set up the appropriate interactions (see here for details: Aircraft Seats And Seatbelts).
Import And Place Body Morphotypes
Having chosen the model you wish to use, you can then import it and merge it into the cockpit or cabin scene of the aircraft you are working on. In 3DS Max, this is done from File > Import > Merge. Select the 8 versions of your chosen posture group and then click Ok to import them into the scene.

Once you have all 8 models imported, you should place them all on a seat and then position them (as a group) at an appropriate position, such that the back and buttocks are "resting" on the seat. When that is done, duplicate the models and repeat for every seat that requires a model.

The final step in the import process is to create attach points in the model, as these will be used to spawn the procedural characters in the simulation, and you won't be including the bodymorph models in the export. The attach points should be created at the same place as the pivot point (root) location of the bodymorph models. It is important to name these attach points logically as well, since their names are important and will be used later when setting up the navigation graph in the aircraft:

Modelling Seatbelts
At this point you can start to model the seatbelts themselves. For this you should hide all the morphotypes in each seat except for the averageweight male. This will be the "base" template for modelling around. The first thing you would normally model is the fastened seatbelt, as shown in the image below:

Once you have this "base" model, you can hide the bodymorphs and then use the base to create the unfastened states:

These "base" models can now be used to create the different LODs. In general, having 4 LODs is considered sufficient for both the fastened and unfastened states:

Animating Seatbelts
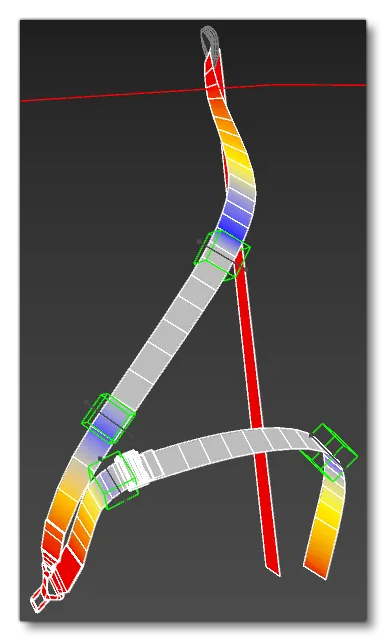
To animate the seatbelts so that they fit with the character morphotypes, you will need to create some bones to drive the skin. These bones will need to be positioned at the places where you want the seatbelts to deform and follow the different body types. In general you want to have as few bones as possible, so as to maintain good performance and make animating them simple and smooth. For example, in the image below you can see the DA62 pilot seatbelt, which only has 5 bones: four for animation, and one which is static (the root).

It is very important to note that the root must be placed at the same position as the pivot point for the bodymorphs and the attach points that were previously created. The other important thing to note is that the root must be the common parent of the all the animated bones and seatbelts meshes, otherwise the seatbelt system will not work correctly when incorporated into the simulation.

Skinning Setup
After the bone setup, you will want to skin the seatbelts to the bones so they can be made to fit with the different body morphotypes. Normally you'd skin LOD0, but the artists for MSFS 2024 have found that the seatbelt deformations are smoother and simpler when skinning LOD1 or even LOD2, and as such, this would be the recommended method.
The image to the right is an example of the LOD1 seatbelt of the DA62, after skinning.
The skin you create should then be applied to the others LODs - for example, using the skin wrap modifier in 3DS Max - and you can even copy then mirror it to have left and right handed animations from the same skin. Later, when the initial animation is actually finished, you can tweak everything so that it's perfect.
Bone Animation
Once all the LODs are skinned, you can go ahead and animate the bones so that they fit the different body morphotypes. For this process, each morphotype needs two static frames, ie: for each morphotype, position the seatbelt such that it "fits" the morphotype template, and assign it to two frames. Frames should be assigned according to the following table:

| Body Morphotype | Frames |
|---|---|
| "Base" | 0 |
| Tall Thinweight Male | 1 - 2 |
| Tall Averageweight Male | 3 - 4 |
| Tall Heavyweight Male | 5 - 6 |
| Tall Heavyweight Cold Male | 7 - 8 |
| Tall Thinweight Female | 9 - 10 |
| Tall Averageweight Female | 11 - 12 |
| Tall Heavyweight Female | 13 - 14 |
| Tall Heavyweight Cold Female | 15 - 16 |
Having created the animations, you will have to add them into where there is one group for each seatbelt and animation, and in each group you need to add the bones of all the seatbelts for each seat. The image below shows an ideal animation group setup:

Note that you can name things how you want here, but the names will be used later so it's a good idea to keep them consistent and unique for each animation, for example: SEATBELT_Tall_Thinweight_Male, SEATBELT_Tall_Averageweight_Male, etc... Also note that the animation options Keep Static Animation, and Keep Non-Animated Node, must be checked, otherwise the animations will not work correctly in the simulation.
Texture Setup
When it comes to texturing the seatbelts, there are no hard-and-fast rules other than you should be keeping the texture size to a maximum of 1024px. An example of the textures used in the MSFS 2024 aircraft for seatbelts is shown below, along with some information overlaid on how the different parts of the texture are used:

In the example above, the texture is divided into the following parts:
- Tileable and not the seatbelt mechanism itself (like the strap or leather)
- Seams and stitching for the strip elements
- Buckle and other mechanism props
If you have multiple strips to create and the Texel Ratio is too low, you can use Details Maps on one of them and tweak the alpha to apply it in your modeling program. On the other hand, you can combine the texture with other meshes if you want to save pixel ratio.
Exporting The Seatbelts
When it comes time to export the seatbelts, you will need to ensure that they are positioned correctly within the scene, which means that the ROOT node needs to be at (0, 0, 0). In 3DS Max this can be achieved by opening the Object Properties and adding the following line into the User Defined tab (In Blender use the Reset Origin Node Export Process option - other modeling programs may require that you re-position the origins and ROOT nodes manually):
flightsim_export_transform=false

Once that has been done, you can go ahead and setup the Multi-Exporter. There you will need to create a group for each of the seatbelts (fastened and unfasten, separately), and each group should contain all LODs you have created, as well as the corrects bones:

You will also need to ensure that the Export Options are correctly setup, in particular the Animations should be set to "Export Meshes And Animation", and the Asobo Unique ID option must be checked:

When it comes to paths, a lot will depend on how you have setup the aircraft, but it should be noted that in the simulation, seatbelts are classed as Simple SimObjects, and they will not be attached as part of the modular aircraft system. Instead they will be spawned as part of the interaction system. As such, we recommend that you export them into a separate folder beside the main aircraft SimObject folder, with each seatbelt having it's own model.* folder containing all the LODs for that seatbelt. You can check the DA62 Sample Project to see this recommended folder hierarchy. The aim is to have a folder that looks something like this:

Seatbelt Files
There should be a number of files associated with the models and the seatbelt Simple SimObject within the different folders. Each seatbelt folder will need to have the following:
- The model.cfg file, which only needs to link to the model XML file, eg:
[models]
normal=SEATBELT_Copilot_Fasten.xml
- The model.xml file, which defines the different glTF for the LODs and also links to the animation XML file, eg:
<?xml version="1.0" encoding="utf-8" ?>
<ModelInfo version="1.1" guid="{2D9C1D50-2B63-4c00-8E29-D8F46C67C6D8}">
    <LODS>
        <LOD minSize="200" ModelFile="SEATBELT_Copilot_Fasten_LOD00.gltf"/>
        <LOD minSize="50" ModelFile="SEATBELT_Copilot_Fasten_LOD01.gltf"/>
        <LOD minSize="10" ModelFile="SEATBELT_Copilot_Fasten_LOD02.gltf"/>
        <LOD minSize="2" ModelFile="SEATBELT_Copilot_Fasten_LOD03.gltf"/>
    </LODS>
    <AnimationInclude>
        <Include File="..\animations.xml"/>
    </AnimationInclude>
</ModelInfo>
If the model has no animations - ie: it's for the unfastened version of the seatbelt - then the whole
<AnimationInclude>section can be omitted.
The texture folder may also need a file, the texture.cfg. This file can be used to define any fallback textures to use for the seatbelt.
Finally, you have the files that define the SimObjects themselves, as well as the animations that they use:
- The sim.cfg file lists all the different seatbelt SimObjects, and links them to the appropriate model and texture folders. This file also gives the model
title, which must be unique as it will be used to reference the SimObject in other aircraft files. Here we also define the class of all the SimObjects listed, which should be "SimpleObjectSim" (ie: Simple SimObjects). For example:[version] major = 1 minor = 0 [fltsim.0] title = SEATBELT_DA62_Pilot_Fasten model = Pilot_Fasten texture = [fltsim.1] title = SEATBELT_DA62_Pilot_Unfasten model = Pilot_Unfasten texture = [fltsim.2] title = SEATBELT_DA62_Copilot_Fasten model = Copilot_Unfasten texture = [fltsim.3] title = SEATBELT_DA62_Copilot_Unfasten model = Copilot_Fasten texture = [fltsim.4] title = SEATBELT_DA62_Pax_1_1_Fasten model = Pax_1_1_Fasten texture = [fltsim.5] title = SEATBELT_DA62_Pax_1_1_Unfasten model = Pax_1_1_Unfasten texture = ; etc... for all seatbelt objects (14 in total for the DA62) [general] category = SimpleObjectSimNote that the
modelparameter is the name of the model folder, minus themodel.prefix, and thetitleparameter is the name of the SimObject and will be used to reference the seatbelt objects in interactions.
- The last file needed is the Animation XML file, which is where you give the animations names and GUID's and then setup the blendtree states for them:
<?xml version="1.0" encoding="utf-8" ?>
<ModelInfo version="1.1" guid="{AA92BC8E-3717-4fc5-ABC5-BC9F40F8A927}">
    <Animation name="SEATBELT_Tall_Heavyweight_Cold_Morph" guid="7ABF9D98-701C-4e8b-B63B-5DBB10B62FCD" type="Standard"/>
    <Animation name="SEATBELT_Tall_Heavyweight_Morph" guid="E4AAC8A9-31FE-4431-B406-8C2A657C7997" type="Standard"/>
    <Animation name="SEATBELT_Tall_Averageweight_Morph" guid="C262328A-0433-45ba-96AC-1075DB192706" type="Standard"/>
    <Animation name="SEATBELT_Tall_Thinweight_Morph" guid="EFEA0E70-D413-4ea5-8831-5B51D4FF03B9" type="Standard"/>
    <AnimGraph>
        <DefaultState name="SEATBELT_Tall_Heavyweight_Cold_Morph"/>
        <BlendTreeState name="SEATBELT_Tall_Heavyweight_Cold_Morph">
          <Animations>
            <Animation guid="7ABF9D98-701C-4e8b-B63B-5DBB10B62FCD" loop ="True" speed="1"/>
          </Animations>
        </BlendTreeState>
        <BlendTreeState name="SEATBELT_Tall_Heavyweight_Morph">
          <Animations>
            <Animation guid="E4AAC8A9-31FE-4431-B406-8C2A657C7997" loop ="True" speed="1"/>
          </Animations>
        </BlendTreeState>
        <BlendTreeState name="SEATBELT_Tall_Averageweight_Morph">
          <Animations>
            <Animation guid="C262328A-0433-45ba-96AC-1075DB192706" loop ="True" speed="1"/>
          </Animations>
        </BlendTreeState>
        <BlendTreeState name="SEATBELT_Tall_Thinweight_Morph">
          <Animations>
            <Animation guid="EFEA0E70-D413-4ea5-8831-5B51D4FF03B9" loop ="True" speed="1"/>
          </Animations>
        </BlendTreeState>
    </AnimGraph>
</ModelInfo>
It is very important to note that the GUID's used for the animations must be unique. To help making these strings, you can use a tool like the GUID Tool which is found in Visual Studio (format No.4):

Once all the seatbelt objects are exported you can start to configure the aircraft itself, which is described in detail here: