MEDEVAC
A major challenge in Microsoft Flight Simulator 2024 is to fly medical transport mission. In these activities, you must route a patient to specialized care following strict air medical procedures, while managing in-flight emergencies with professionalism and ensuring safety every step of the way. If you wish your aircraft to be used on this kind of activity you will need a preset that has been appropriately set up as part of the Modular SimObject, as explained below.

For more information on the various other career activities and how to prepare your aircraft, please see here:
Medevac Constraints
When it comes to setting up planes for the available medevac activities, there are a few requirements that must be fulfilled:
- The plane will need to have the
navigation_graph_pilot.cfg(as explained here). - The plane will need to have the
ApronWithoutCovers.fltfile (as explained below). - The
targeted_specializationsmust include theMED-PLNdressing code. - The
object_classmust be "Airplane". - The
operating_statusmust be either "in_service" or "experimental". - The plane cannot be flagged as military.
- The plane cannot be flagged as premium.
- The plane
ui_max_rangemust be greater than 1. - The plane can have wheels or big wheels, for landing gear.
- The plane cannot have skis or floats for landing gear.
- There must be a navigation graph called
navigation_graph_medic.cfgwith the following nodes:PATIENT,SIDE,SIT,Doctor_Entrance,Nurse_Entrance,Wounded_Entrance,RTCMedic_Entrance,Stretcher_Entrance,RTC_Medic_Thumbs_Up. This is explained in more detail below.
Following these constraints will give the aircraft the MED_Cabin type. See here for more information:
Mission Flow
The flow for a medevac mission is as follows:

This flow will also require the aircraft to be setup for - and follow - the General Career Mode Requirements.
SimVars
While not directly influencing the mission flow, the following SimVars are important for ensuring a smooth user experience without frustrations. These are what are used in the simulation code to decide whether the user should receive a penalty on their mission score or not, and as such, particular attention should be paid to ensure that these are always returning correct values.
| Penalty | SimVar | Description |
|---|---|---|
| Smoothness Score | PLANE BANK DEGREES |
This is used to check the banking angle of the aircraft while performing the medevac flight. |
PLANE PITCH DEGREES |
This is used to check the pitch angle of the aircraft while performing the medevac flight. | |
G FORCE |
This is used to check the G forces applied in the aircraft to passengers while performing maneuvers. |
Navigation Graph Setup
The medevac activity requires not only the pilot navigation graph file, but also a navigation_graph_medic.cfg file. This graph can be placed within the preset being used for the activity, or within a specific activity attachment. The navigation graph requires a number of different nodes, both interior and exterior. These nodes can split over two graph files if required, depending on how your aircraft is set up, as long as the files have the same names and the modular merge auto is set to true.
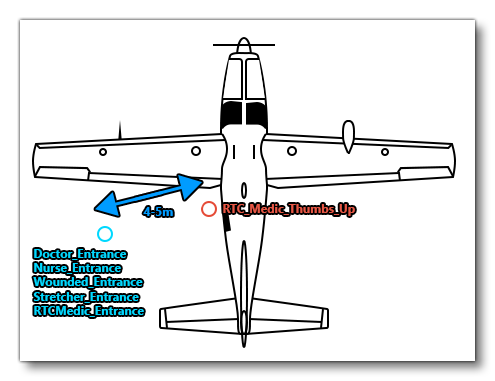
The exterior nodes should all be projected on the ground, and the node heading should be pointed towards the aircraft entrance. Note that there should only ever be one of each node:
-
Doctor_Entrance
This node is the node where the "doctor" passenger will spawn into the world at the start of the activity. It should be positioned about 4-5m away from the aircraft entrance, at the same position as the other "entrance" nodes (see the image, below).
-
Nurse_Entrance
This node is the node where the "nurse" passenger will spawn into the world at the start of the activity. It should be positioned about 4-5m away from the aircraft entrance, at the same position as the other "entrance" nodes (see the image, below).
-
Wounded_Entrance
This node is the node where the "wounded" passenger will spawn into the world at the start of the activity. It should be positioned about 4-5m away from the aircraft entrance, at the same position as the other "entrance" nodes (see the image, below).
-
Stretcher_Entrance
This node is the node where the stretcher carrying the "wounded" passenger will spawn into the world at the start of the activity. It should be positioned about 4-5m away from the aircraft entrance, at the same position as the other "entrance" nodes (see the image, below).
-
RTCMedic_Entrance
This is where another passenger that is with the "wounded" passenger will spawn (either a relative or medical personnel). It should be placed along with the nurse, stretcher, passenger and doctor nodes, about 4-5m away from the aircraft, at the same position as the other "entrance" nodes (see the image, below).
-
RTC_Medic_Thumbs_Up
This is where a worker from the takeoff location will be focused on by the real time camera, giving a thumbs up to the pilot to start the flight once the rest of the people are on the aircraft.

The interior nodes are as follows:
-
PATIENT
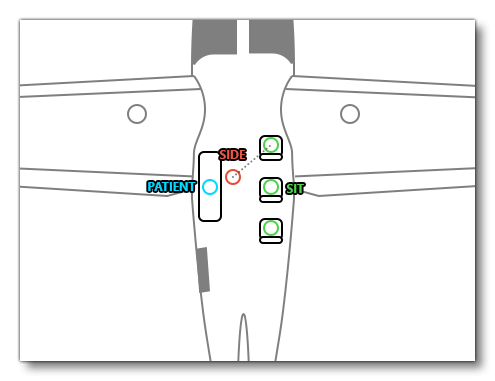
This is the node where the "wounded" passenger will be lying on a stretcher. Only one of these nodes should exist.
-
SIDE
This is a node that should be placed beside the location where the passenger stretcher appears, and the node needs to be connected by an edge to aSITnode, and the edge between the two nodes needs to be unobstructed. The nurse will sit on the connected node and then move between sitting and standing on theSIDEnode as the flight progresses, performing checks on the passenger. Only one of these nodes should exist.
-
SIT / SPAWN_SEAT
There should be at least threeSITnodes included on the medic navigation graph, and these nodes are not usually included directly in thenavigation_graph_medic.cfg, but are instead added by a seat logic object (as explained here: The Passenger Navigation Graph). So the normal procedure is to have aSPAWN_SEATnode - connected by an edge to theSIDEnode - and this node will set the interactive object to be a seat logic object with a navigation graph containing theSITnode. The nurse will sit on the connected node, while the doctor will sit on one of the other seats. These nodes need to be setup the same as those for The Passenger Navigation Graph.

When setting up the interior nodes, be sure to set up the appropriate station loads and mass stations, as explained here: Weight Distribution.
Sim Attachments
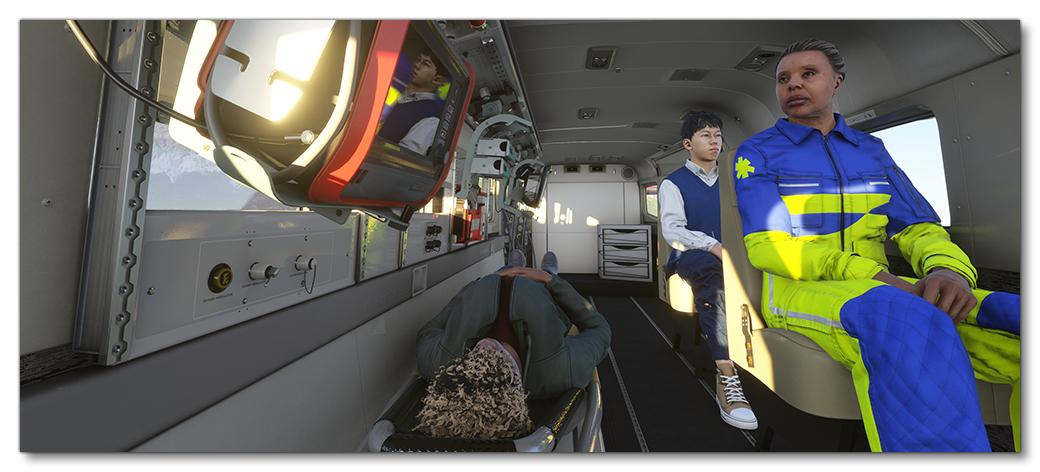
It is worth noting that the SDK includes a number of sim attachments that can be used to help make the aircraft cabin look and feel correct for a medevac mission, as well as save time generating your own artistic assets. These assets are as follows:
Asobo_Medic_Defibrillator
Asobo_Medic_Drawer
Asobo_Medic_Perfusor
Asobo_Medic_Perfusor
Asobo_Medic_ShelfSide_01
Asobo_Medic_ShelfSide_01
Asobo_Medic_ShelfSide_01
Asobo_Medic_ShelfSide_01
Asobo_Medic_ShelfStretcher_01
Asobo_Medic_ShelfStretcher_01
Asobo_Medic_ShelfStretcher_01
Asobo_Medic_Shelftop_01
Asobo_Medic_Shelftop_01
Asobo_Medic_Shelftop_01
Asobo_Medic_Shelftop_01
Asobo_Medic_Shelftop_01
Asobo_Medic_Stretcher_01
Asobo_Medic_Stretcher_Rail_01
Asobo_Medic_SuctionUnit
Asobo_Medic_Ventilator
For more information on how to use these please see the following section:
FLT Files
When a user starts a medevac activity they will be going through the usual Preflight checks, and so they will need to have the Apron.flt setup in the activity preset as follows:
- Section
[SimVars.0]must have the parameterSimOnGroundset totrue. - All defined
[Covers]need to be set totrue(see here for more information). - Section
[Controls.0]must have the parameterParkingBrakeset to 100.00 (if the aircraft has a parking brake). - Aircraft electrics and engines must be turned off.
- The aircraft flight parameters (trim, flaps, etc...) should be set for a cold and idle aircraft.
An additional FLT file is required - the ApronWithoutCovers.flt file - for those occasions when the user may skip the preflight phase and there is an RTC event, or when something causes a Back On Track event after preflight. This file should be set up like a regular apron FLT file, however you should ensure that these changes are made: