LIVERIES
As part of the modular aircraft project, you can have a liveries folder, and in that folder you can place all the liveries that will be used by the aircraft in the simulation. This includes generic liveries for free flight as well as liveries that are used by the aircraft for the various careers. The basic setup of the livery folder is explained here: Liveries. However, there are more files and folders that may be required for a livery if you have created one or more Dynamic Liveries, since these may need you to create library files, a livery.xml file for each model folder, and a general livery.cfg file. Not all of these files may be required, but it's likely you will have all of them if you want to make full use of the adaptive livery system using dynamic materials.
Dynamic Logos
If you have set up your aircraft model to make use of dynamic logos (see here: Logos And Text), then you will need some additional setup in the package for them to be displayed correctly in the simulation. The first thing you will need to do is create a TextureLib as part of the project package, since this is what will hold all the textures and also the *.lbl file that links them to the labels you'll define later in the livery.xml file.
The general flow here is:
- The
livery.xmldefines the dynamic materials for the livery decal model and assigns them labels. These labels should be enough to find a specific texture. - The labels are then parsed and checked against the labels assigned to each texture in the
texture.lblfound in the TextureLib(s) of the package (note that the name of the file isn't important and all*.lblfiles are parsed). If more than one texture is found to match the XML labels, then one will be picked at random from the matching selection. - Once a texture has been found, it will be applied to the material referenced in the
livery.xmlas the albedo texture, and then be displayed in the simulation. - If the material is also referenced as an editable color then it will be coloured based on the values given (more information on editable colours is available below).
Creating The Texture Library
A texture library for use in an aircraft livery should be included as part of the aircraft package. The process of creating it starts in The Project Editor where you will need to add a TextureLib asset group to your aircraft package. This is done by selecting the package in the main Project Editor, then selecting the add asset group button in The Project Inspector:
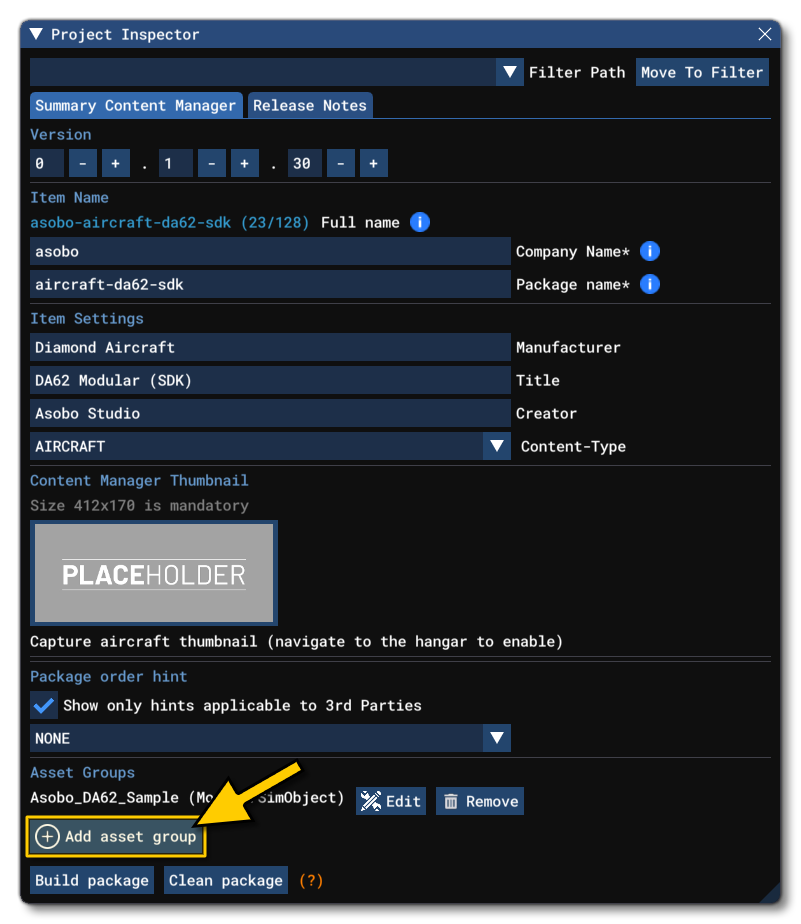
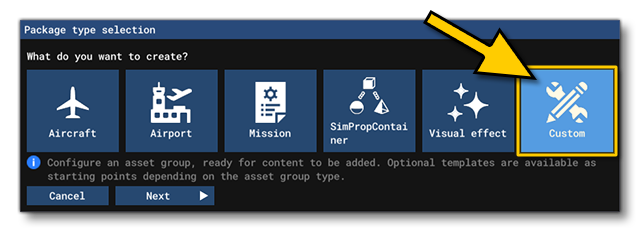
You will then be presented with a window asking what kind of asset you are wanting to create and from here you should select Custom:
After clicking on Next you can give the texture library a name, select the TextureLib asset type, and finally click on Create:
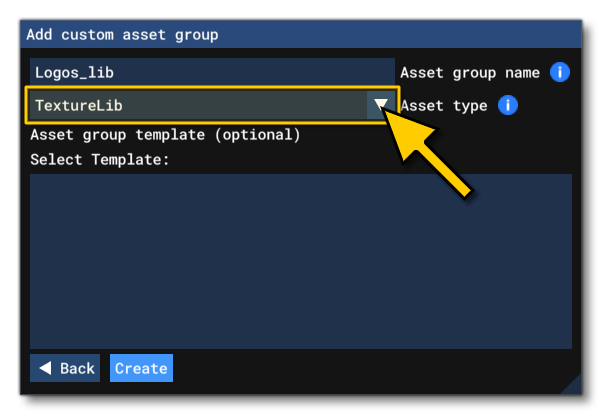
Once you have created the texture library asset in the package, you can go ahead and add in the following:
- Logo textures (PNG, TIF or DDS)
- Texture XML files (one per texture)
- Texture LBL file (one file with information on each texture in the library)
The Livery XML For Dynamic Logos
The Livery XML file is created within each of the model.* folders of a livery and in this file you will need to define the dynamic material properties to display the appropriate texture image for the livery and part. This is done using something like the following XML:
<?xml version="1.0" encoding="UTF-8"?>
<ModelInfo version="1.0" guid="<!-- GUID HERE -->">
    <LODS>
        <!-- LOD DATA HERE -->
    </LODS>
    <DynamicMaterial>
        <MatName>CUSTOM_Image_00</MatName>
        <Type>Texture</Type>
        <Labels>
            <Label Key="Category" Value="Logo"/>
            <Label Key="Activity" Value="AEA"/>
        </Labels>
    </DynamicMaterial>
</ModelInfo>
Here you give the name of the material that you wish to target with the texture with the <MatName> element - the albedo texture of this material will be replaced by the texture that is found - as well as one or more labels to set the search criteria for the texture. The labels given here will then be used as part of the search algorithm to find a matching texture in the texture LBL file you created previously. In this way you can create a single mesh and material in the aircraft model, and then change the logo that is displayed based on any number of parameters that you define using the labels system.
Dynamic Text
If you have set up your aircraft model to make use of dynamic text (see here: Logos And Text), then you will need some additional setup in the package for them to be displayed correctly in the simulation. Dynamic text relies on a text.lbl file to decide which text to use, and this is then parsed based on the the labels you'll define later in the livery.xml file.
The general flow here is:
- The
livery.xmldefines the dynamic materials for the livery decal model and assigns them labels. These labels should be enough to find a specific texture. - The labels are then parsed and checked against the labels assigned to each text string in the text.lbl found in the TextLib(s) of the package (note that the name of the file isn't important and all
*.lblfiles are parsed). If more than one string is found to match the XML labels, then one will be picked at random from the matching selection. - Once a text string has been found, it will be turned into a texture which is then assigned to the material referenced in the
livery.xmlas the albedo texture, which in turn is what gets displayed in the simulation. In general, text will always be made to fit within the mesh constraints, and will be rendered using the settings in thelivery.xmlfile. - If the material is also referenced as an editable color then the text will be coloured based on the values given (more information on editable colours is available below).
Creating The Text Library
IMPORTANT! The text.lbl file is optional and if it is not used then the text displayed on the synamic material will simply be that which is defined in the <Content> element of the livery.xml file. All text libraries for use in an aircraft livery should be included as part of the aircraft package. The process of creating it starts in The Project Editor where you will need to add a Copy asset group to your aircraft package. This is done by selecting the package in the main Project Editor, then selecting the add asset group button in The Project Inspector:

You will then be presented with a window asking what kind of asset you are wanting to create and from here you should select Custom:

After clicking on Next you can give the text library folder a name, select the Copy asset type, and finally click on Create:
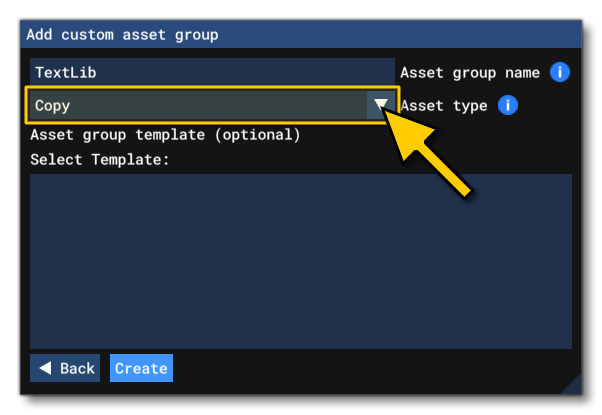
Once you have created the text library asset in the package, you can go ahead and add in one or more Text LBL Files to the folder.
The Livery XML For Dynamic Text
The Livery XML file is created within each of the model.* folders of a livery and in this file you will need to define the dynamic material properties to display the appropriate text for the livery and part. This is done using something like the following XML:
<?xml version="1.0" encoding="UTF-8"?>
<ModelInfo version="1.0" guid="<!-- GUID HERE -->">
    <LODS>
        <!-- LOD DATA HERE -->
    </LODS>
    <DynamicMaterial>
        <MatName>Custom_Text_00</MatName>
        <Type>Text</Type>
        <TextureSize Width="1024" Height="100" />
        <TextLayer>
            <Line>
                <Content>Special Air Service</Content>
                <FontFamily>Roboto</FontFamily>
                <MacStyle Bold="true" Italic="false" Underline="false"/>
                <FontSize Value="AUTO" Unit="px"/>
                <Color>#111111</Color>
                <Alignement>center</Alignement>
                <LetterSpacing Value="5" Unit="px"/>
            </Line>
        </TextLayer>
        <Labels>
            <Label Key="Category" Value="ActivityName"/>
            <Label Key="Activity" Value="TOR"/>
            <Label Key="language_code"/>
        </Labels>
    </DynamicMaterial>
</ModelInfo>
Here you give the name of the material that you wish to display the text using the <MatName> element - the albedo texture of this material will be replaced by a texture created automatically for you using the content text. You also need to supply information on how the text should be formatted, as well as one or more labels to set the search criteria for the text. The labels given here will then be used as part of the search algorithm to find a matching texture in the text LBL file you created previously. In this way you can create a single mesh and material in the aircraft model, and then change the text that is displayed based on any number of parameters that you define using the labels system. Note that if no text is found (or no LBL file is supplied) then the string given in the <Content> element will be used.
Editable Colours
Within the livery.cfg file, there is a section for [EDITABLE_COLORS]. This section is used to link one or more materials with a base colour and signal that the material can be coloured from a palette. The general concept here is that every dynamic material used by the aircraft and it's liveries are listed here and given a base colour, this base colour can then be overridden by the colours defined in a palette.lbl file, thus permitting the aircraft livery to change it's colours based on the circumstances in which the livery is being used. You can also assign a dynamic texture or dynamic text to the editable colours definition so that the image or text is coloured dynamically based on the current palette.
Here is an example of a set of editable colours being defined in the livery.cfg file:
[EDITABLE_COLORS]
editable_color.0 = color: 100, 100, 100 # materials: "cc_fuselage:CUSTOM_Color_00_Fuselage", "cc_wings:CUSTOM_Color_00_Wings", "cc_fuselage:CUSTOM_Color_01_Fuselage", "cc_wings:CUSTOM_Color_01_Wings", "nose_long:CUSTOM_COLOR_00_Fuselage_MPP"
editable_color.1 = color: 26, 26, 26 # materials: "airframe:CUSTOM_Color_01" # fallback: 0
editable_color.2 = color: 77, 77, 77 # materials: "airframe:CUSTOM_Color_02" # fallback: 1
editable_color.3 = color: 247, 147, 30 # materials: "airframe:CUSTOM_Color_03" # fallback: 2
When defining your editable colours it is important to keep in mind the order in which they are defined, and in which the materials are assigned to them. The convention used by all the aircraft in the simulation is as follows:
- Editable colours are defined in pairs where the even numbers are the "base" material and the odd numbers are the "decal" materials that on top of the base. For example:
[EDITABLE_COLORS]
editable_color.0 = color: 204, 169, 0 # materials:"common:COLOR_BASE", "tail:IMAGE_02"
editable_color.1 = color: 0, 0, 0 # materials:"TEXT_Registration"
Here, the base model mesh uses the
COLOR_BASEmaterial and so has it's editable colour defined first (index 0), and then the second colour (index 1) is used for theTEXT_Registrationmaterial because this text is on top of the base.
-
If you do not have any dynamic elements on top of a base colour, “no_material” can be used to maintain the odd/even pairs, for example:
[EDITABLE_COLORS]
editable_color.0 = color: 204, 169, 0 # materials:"common:COLOR_00", "tail:IMAGE_02"
editable_color.1 = color: 0, 0, 0 # materials:"airframe:TEXT_00", "airframe:TEXT_01"
editable_color.2 = color: 204, 169, 0 # materials:"common:COLOR_01", "airframe:CUSTOM_Fuselage"
editable_color.3 = color: 0, 0, 0 # materials:"no_material"
editable_color.4 = color: 0, 114, 206 # materials:"common:COLOR_02", "tail:CUSTOM_Tail"
editable_color.5 = color: 0, 0, 0 # materials:"no_material"
The general idea here is that you give a colour, then one or more tag / alias with a material name. This is how you tell the simulation exactly which material and which part is being coloured. If you do nothing else, then the part(s) being referenced will have the albedo colour of the material set to the given editable colour. In this way you can set specific colours for specific liveries. However this is not the whole story as you can override the colours defined in the editable colours using palettes.
Palettes
The editable colour conventions given above are important if you wish to use the included palettes for your aircraft, since all built-in palettes have an even number of colours and are designed with the convention in mind. The included palettes are used to define colours based mainly on geographic keys so that your liveries are coloured appropriately based on the location of the flight. You can also set colours based on activity as well if you supply the appropriate specialisation codes. You can find lists of available included palette key/values here:
Palette selection is done using the [PALETTE_LABELS] section of the livery.cfg. In this section you can give multiple keys and (optionally) values, which will then be used to parse the palette.lbl files and find an appropriate colour palette to use. If more than one palette is found then the one which is applied will be picked at random from the possible choices. The example code below shows how the key/value pairs are defined:
[PALETTE_LABELS]
label_key.0     = "Type"
label_value.0     = "Europe"
label_key.1     = "Country"
Creating The Palette Library
IMPORTANT! The palette.lbl file is optional and is only required if you do not wish to use the included library. All palette libraries for use in an aircraft livery should be included as part of the aircraft package. The process of creating it starts in The Project Editor where you will need to add a Copy asset group to your aircraft package. This is done by selecting the package in the main Project Editor, then selecting the add asset group button in The Project Inspector:

You will then be presented with a window asking what kind of asset you are wanting to create and from here you should select Custom:

After clicking on Next you can give the text library folder a name, select the Copy asset type, and finally click on Create:
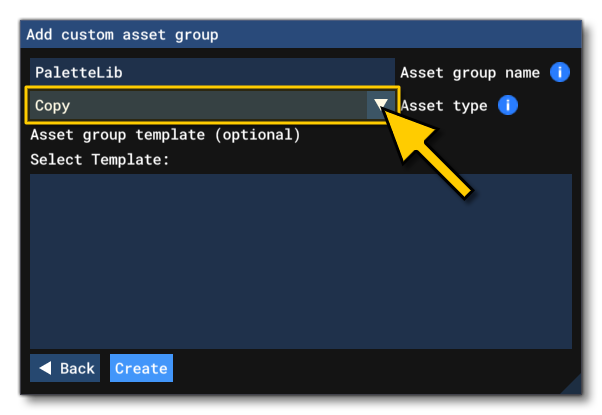
Once you have created the palette library asset in the package, you can go ahead and add in one or more Palette LBL Files to the folder.