OPTIONS

This menu controls a number of different simulator and developer mode options to help with creating your add-on content. The options available to you from this menu are listed below.
User Interface
-
Auto-Hide
This is a toggle that - when enabled - will automatically hide the Developer Mode menu unless you move the mouse cursor to the top of the screen. It is disabled by default.
-
Manage Windows
This option will show the following sub-menu: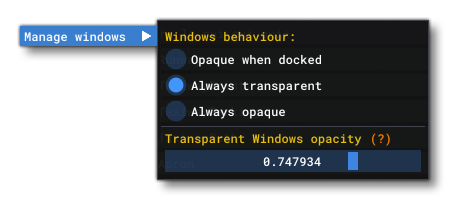 This menu controls the way that the different
 [DevMode]windows will be displayed. Note that when you select the Always Transparent option, you will be able to set the transparency level using the Transparent Window Opacity slider at the bottom of the menu.
-
Layouts
This option will show the following sub-menu:
 Here you can save the current layout (devmode window positions and some settings), load a saved layout, or load the default layout. The default layout is one which the development team feel is ideal for beginners and will enable the Smart Docking System as well.
-
Smart Docking System
With this option you can have the simulation render within the imGUI framework of windows. What this means is that instead of having the game render under the various DevMode windows, you can instead have it render within a window and so this permits you to position all the DevMode windows around it and customise the layout to suit your own preferences, all the while still seeing the entire scene unobscured by overlaid windows. It is worth noting that when this option is enabled, you won't actually be able to resize/move the simulation window. Instead, resizing or docking the other DevMode windows will automatically resize the simulation window to fill in any empty space. For this reason, while using the option, you can't dock any window in the central node as this would result in no space left for the simulation to be rendered. It is also worth noting that some UI elements of Microsoft Flight Simulator may be sized incorrectly when viewed using the dynamic docking system. This is something that may be resolved in future updates.
Simulation
-
Pause Simulation
When enabled, this will pause the entire simulation. This is not the same as the "Active Pause" available through the simulation options, as certain simulation events - like the passing of time - will still occur while in active pause, while pausing using this option will prevent anything further from occurring. This is disabled by default.
-
Disable Crashes
When enabled, this tells Microsoft Flight Simulator to ignore any collisions with the terrain that would otherwise end a flight with a crash. This means that you can slew the aircraft around and if it touches anything it will simply "bounce" off of it. By default this option is enabled.
-
Local Time
This slider controls the local time for the simulation. This is useful when you want to edit - for example - somewhere in the world that is currently in darkness.
NOTE: This option is only available when flying in the simulation.
-
Icing
This slider controls the visual icing system and when set to 1.0 all materials that show icing will be visible. If the simulation is not paused (or on active pause) the aircraft may gradually de-ice over time and this value will visually decrease. By default this is set to 0.0.
NOTE: This option is only available when flying in the simulation.
-
Windshield Rain
Much like the Visual Icing slider, this option is for visualising the windshield materials when it is raining, and as such any changes made to the options here will be best viewed from inside the cockpit (ie: with the Developer Camera off).
NOTE: This option is only available when flying in the simulation.Selecting this will open the following sub-menu: This sub-menu has the following options:
- Override Rain Rate: When enabled, the rate of actual rainfall in the simulation will be overridden for the rate given by the Rain Rate slider. By default this is disabled.
- Override Wind Speed: When enabled, the actual wind speed in the simulation will be overridden for the speed given by the Wind Speed slider. By default this is disabled.
- Rain Rate: The rate of rainfall to be simulated, where 0 is none and 100 is maximum. This slider is only valid when Override Rain Rate is enabled.
- Wind Speed: The current wind speed override, in ft per second. This value can go from -500 to 500, and is only valid when the Override Wind Speed option is enabled.
Rendering
-
Lens Distortion
This option enables or disables the lens distortion effect.
-
Volumetric Atmospheric Effects
When disabled, this will remove all the volumetric effects from the simulation scene (ie: it will disable all the clouds). This can make it easier to see what you are doing when working on scenery or using the CFD and weather tools. This option is enabled by default.
-
Ground
The ground option will open a sub-menu with the following items:
- Debug Tile: Shows debug information for the quadtile that the mouse is currently over.
- Debug Terraforming: Shows debug information for any terraformed areas in the scene.
- Enable Terraforming: When checked, you will be able to use the terraforming tools in the appropriate scenery editor objects. When unchecked (disabled) then no terraforming will be available, and this includes from other installed packages, not just the one currently open in DevMode (if any). This is checked by default.
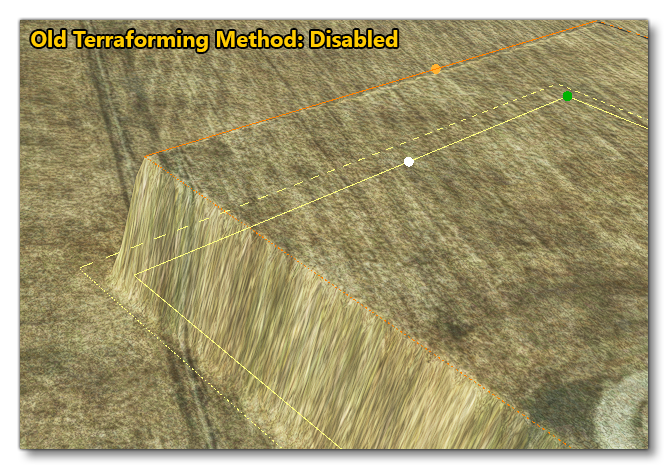
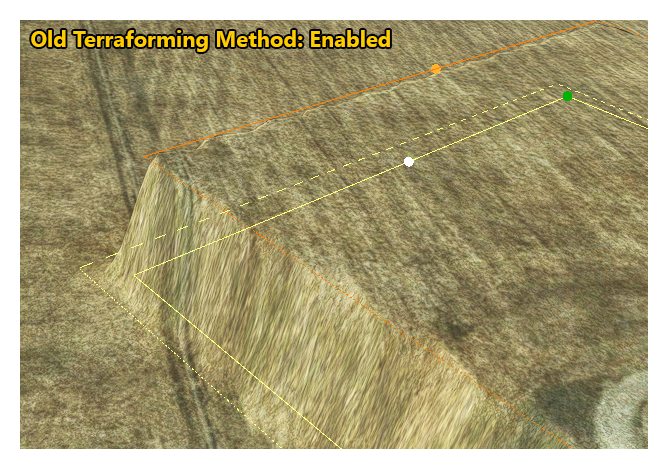
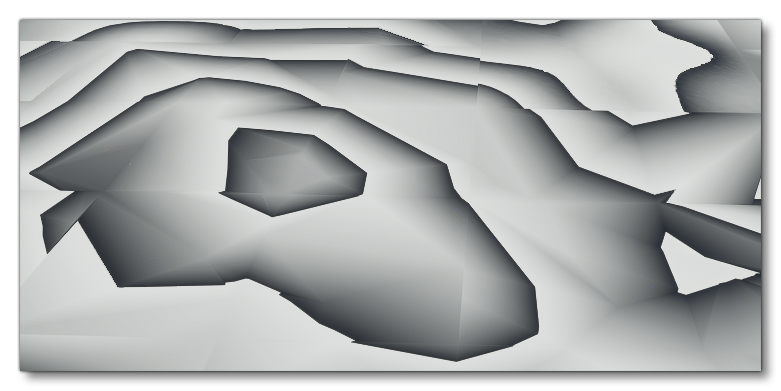
- Old Terraforming Method: This will tell the simulation to use the legacy terraforming method, which may result in "jagged" edges to terraformed areas. Mouse over the image below to see the difference (this option is off by default).
- Enable Water Flattening: When checked, some water types will first "flatten" the ground underneath (for example, oceans). When unchecked, this won't happen. The option is checked by default.
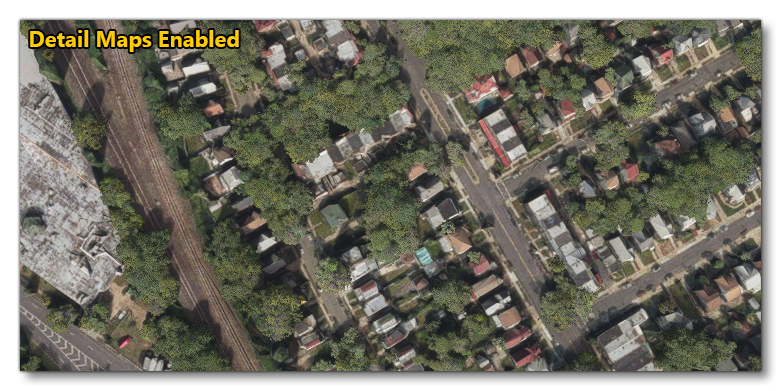
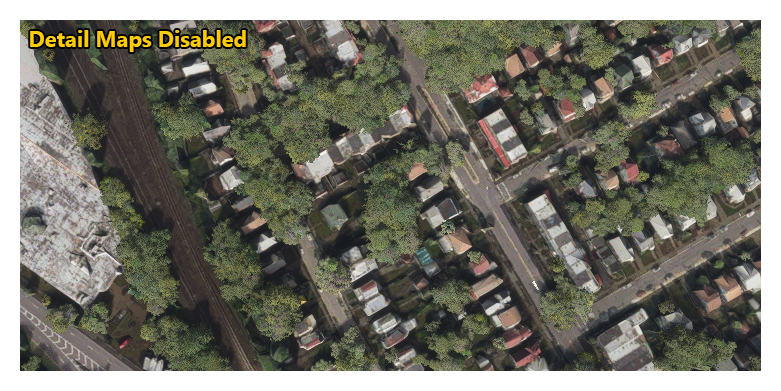
- Detail Maps: When enabled, detail maps will be added to the terrain to increase fidelity. Disabling this removes these maps. Mouse over the image below to see the difference (this option is on by default).
- Only Lighting: Disables the terrain surface materials and shows only the terrain lighting.
- Altitude Isoline: Shows the terrain textured with isolines, indicating height.
-
PBR Channel
From this option you can view the different PBR channels used in the generation of the terrain and other assets. By default this will be set to disabled, but you can select other options from the sub-menu. For full details please see here: Debug PBR.
WASM
-
Load Modules Asynchronously
This option, unlike most of the other options, would usually be enabled or disabled before actually starting a flight. The option is enabled by default, which will mean that if the chosen aircraft for the flight uses any WASM modules, the module will be compiled at the same time as the flight is loading (it will be compiled asynchronously). However, disabling this option means the module will be compiled on its own before the sim continues to load anything else. This option is only really useful for those add-on creators that are making WASM modules and want to debug them, as disabling this option may mean that Microsoft Flight Simulator will "freeze" for a time while the WASM module is compiled, before loading a flight.
-
WASM Debug Mode
Enabling this option will permit the WASM modules to be compiled a lot faster, as it basically bypasses the LLVM optimisations - which is what normally slows down compile time. Essentially it has the following effect:- No optimisations are done, and the resulting DLL literally the exact same WASM file.
- Debugging is available.
- Compilation is much faster.
- Compatible with Visual Studio Debugger Extension.
When this option is unchecked, the following will be true:- Debugging is not possible.
- Breakpoints may still work (it will depend on the configuration of Visual Studio) but variables are optimized so they are unreadable.
- Very optimised - the code will run faster (with a subsequent gain in FPS).
- Compilation is slower.
VR
-
Default VR API
This section allows you to change the default API used to communicate with the VR hardware. When selected, you will be presented with the following two options:- Fake: is a "fake" API that does not require any VR hardware to actually be connected to the computer. This can be used to simulate the presence of a VR head mounted display.
- OpenXR: is the default API that Microsoft Flight Simulator uses. It is compatible with most VR devices available currently, eg: SteamVR, Oculus, Windows Mixed Reality, Varjo.