THE MATERIAL INSPECTOR
The Material Inspector window is a window that is opened as part of The Material Editor. This window is used to specify and edit the properties of any single material. You can open this window by double-clicking on a material, or by using the right mouse button on a material and selecting "Open", or by using the View menu option.
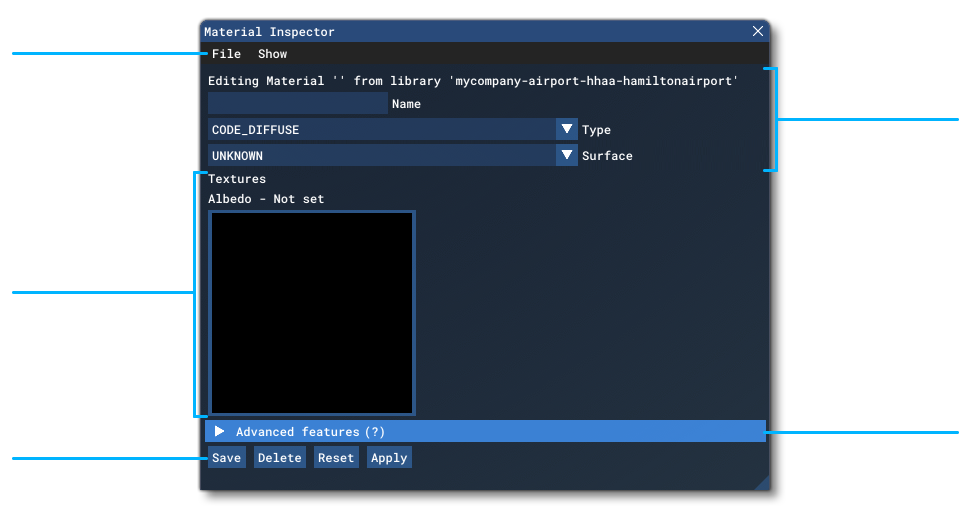
At the top of the window you have the various Menu items (explained on the Inspector Menus page), and then underneath that you have the Material Data section, with the following options:
-
Information
Here you can see the material that is currently being edited and the package that it belongs to.
-
Name
This input field permits you to give the material a name, or edit the name of an existing material. Changes must be saved to be accepted.
-
Type
This input will show a menu with different options for the material type. The available options will depend on the editor that the material is to be used in. For example, The Scenery Editor will have only theCODE_DIFFUSEtype, while The Visual Effects Editor will have others. The possible types and the bitmaps they require are:CODE_DIFFUSE- Only uses Albedo and Normal Roughness Metal (or Metal Roughness AO, depending on the context) bitmaps.CODE_WAKE,CODE_HEATDEFORM- Can use Albedo, Metal Roughness AO, Normal Map and Blend Mask bitmaps. TheCODE_HEATDEFORMmaterial will have the Deformation and Blur Additional Parameters.CODE_AFTERBURNER- Currently this material type requires no bitmaps, and any supplied with the images will not be used. This material type will also have the Additional Parameter, Power.
CODE_HEATDEFORMandCODE_AFTERBURNERtypes are only useful within The Visual Effects Editor and should not be used anywhere else.
-
Surface
This option is only available for materials that are going to be used in The Scenery Editor. It is a list of different surfaces that can be assigned to the material being defined. Each surface option can have varying effects on the final look and attributes of the material, as some of the surface types will add an additional "detail mask" to the material, while others will affect gameplay elements (like spawning VFX particles when an aircraft lands on them), and some may even affect how items in the world simulation are rendered, like vegetation.
Textures
Here you can select and preview a bitmap to use as a texture within the material you are defining. For a new material, this will be blank, and you should click on the texture to open a file explorer, which will allow you to browse to the texture image you want to use. Images should be a power of 2 in size (eg: 64x64, 256x256, etc...) and be authored as PNG, TIF, DDS or BMP files.
Initially there will only be shown an Albedo texture option, but you can use the Show menu of the Inspector window to enable other texture inputs. The inputs available will depend on the context in which the material being created is to be used.
You can mouse over any of the added textures to see the relative path to the bitmap being used as well as its size on disk.
Texture Arrays
The texture array option is used specifically for materials that will be used in Biomes And Vegetation configuration. Vegetation materials in general require a minimum of two textures: an albedo texture atlas and a normal/roughness/metal texture for the atlas. This is because vegetation is rendered using octahedral impostors, which require a very specific texture setup, as shown in the image below:
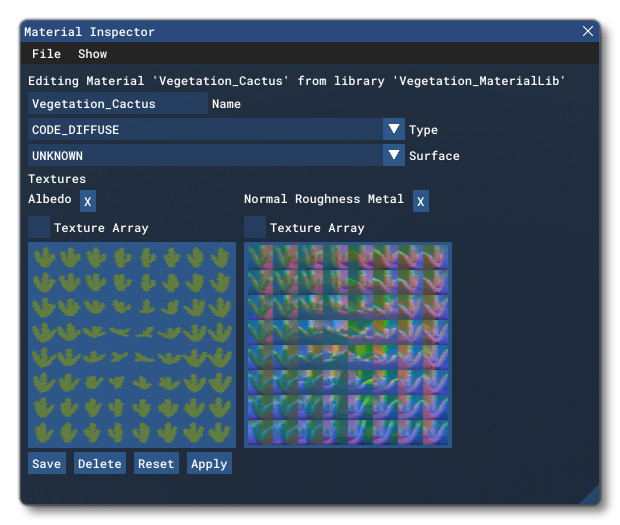
An additional feature that is unique to vegetation is the ability to specify an array of textures that can be used to generate multiple variations from a single material. To set these up, you need to select the Texture Array option, then click the texture box to open the file explorer and select 2 or more texture atlas files to use. On clicking "Open", all the textures will be added. You must do this for both the albedo and normal/roughness/metal textures, ensuring that both have the same number of textures in the array. You can then use the <Impostor /> element in the vegetation Species Definitions file to select the index of the texture array to use, permitting you to have one material with several visual variations within it.
Advanced (VFX)
The Advanced section of the material editor is only used when defining materials to be used in The Visual Effects Editor.
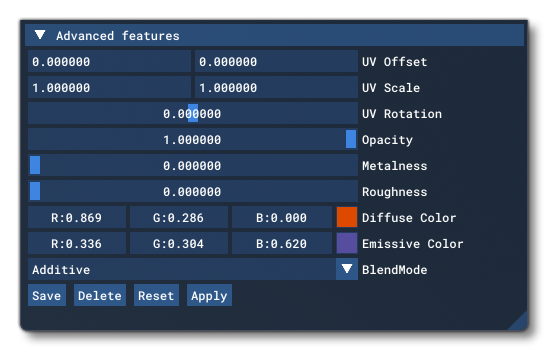 These options will be applied to the material used for each individual particle that the VFX editor emits:
-
UV Offset
Here you can offset the X and Y position of the material texture UVs for each particle. Default values are 0.0 for both axis.
-
UV Scale
Here you can scale UVs for the material texture along the X and Y axis for each particle. Default values are 1.0 for both axis.
-
UV Rotation
This option permits you to rotate the texture UVs for each particle, which will rotate the applied texture. Default is 0°.
-
Opacity
With this option you can set the base opacity (alpha) for the texture when applied to the particle. Default is 1.0.
-
Metalness
This option permits you to set the amount of "metalness" to include in the texture for each particle. This is set to 0.0 by default (which is none) and will require that the material has a Metal Roughness AO texture assigned to it.
-
Roughness
This option permits you to set the amount of "roughness" to include in the texture for each particle. This is set to 0.0 by default (which is none) and will require that the material has a Metal Roughness AO texture assigned to it.
-
Diffuse Colour
Here you can set the diffuse color for the final texture when it is applied to the particle. This option essentially "colorizes" the particle before any further effects are applied through the VFX editor. Default value is white (essentially no colorizing).
-
Emissive Colour
Here you can set the emissive color for the final texture when it is applied to the particle. Default value is black (essentially, no emissive color).
-
Blend Mode
This option permits you to select a specific blend mode for the material. The blend mode will affect how the VFX particle is rendered, and has the following options:- Transparent - In this mode, the material will take on transparency values based on the texture's alpha channel and the alpha of the tint color (if any).
- Opaque - In this mode the material will be rendered as opaque, with no transparency.
- Force Punch - This mode will perform an alpha test on each pixel of the material as it's applied to the particle. Pixels with a transparency (alpha) value below 0.5 will be discarded and pixels with a transparency over 0.5 will be made opaque.
- Additive - This will render the particles using an additive blend mode. Essentially this will add the color values for each pixel of the particle albedo texture with those of any other particle "under" the current one. The net result is that overlapping particles will become brighter and more white, and give a more "glowing" look.
- Pre-Multiplied Alpha - This will apply the pre-multiplied alpha blend mode when rendering particles. This is essentially the mode (1, 1 - alpha), which would be explained more correctly as:
DestinationColor.rgb = (SourceColor.rgb * One) + (DestinationColor.rgb * (1 - SourceColor.a))
Note that this blend mode may require that bitmaps are pre-processed to get the correct effect.
Additional Parameters
At the bottom of the materials window you may see additional parameters depending on the Type of material that you have selected, for example:
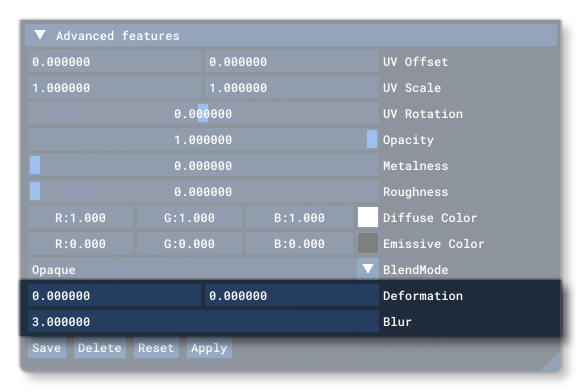
Currently this will be:
-
Deformation
This is an optional parameter that is used to deform the heat distortion material along the X and/or Y axis. This parameter is only visible when the material type isCODE_HEATDEFORM, and will be overriden by Block properties if the material is used in the The Visual Effects Editor.
-
Blur
This is an optional parameter that is used to blur the heat distortion material. This parameter is only visible when the material type isCODE_HEATDEFORM, and will be overriden by Block properties if the material is used in the The Visual Effects Editor.
-
Power
This is an optional parameter that is used to set the "power" value for the afterburner material, which controls the colour, length and scale of the afterburner effect. This parameter is only visible when the material type isCODE_AFTERBURNERand will be overriden by Block properties if the material is used in the The Visual Effects Editor.
Quick Buttons
The bottom of the Material Inspector window has the following Quick Buttons (note that these options are also available from the File menu):
-
This option will save the material being edited to the Material Editor list. If it is a previously saved material that is being edited, then this option will save any edits to the material.Save
-
This will delete the currently selected material from the Material Editor. This cannot be undone and will also attempt to remove any bitmaps that are used in the material, as long as they are not referenced anywhere else. Note that this is not guaranteed and you should check the Bitmap Manager to make sure.Delete
-
When you select this option, it will reset the Material Inspector, permitting you to create a new material. This will not delete or otherwise change any material that was previously being viewed.Reset
-
This button will apply the currently selected material to whatever other element is in focus and that requires a material. For example, if you have The Scenery Editor open and select a runway object, then using Apply will apply the currently selected material to the runway. This option will apply the material regardless of whether it has been saved or not, so you can change the material and then apply it to see how it looks as many times as required before saving it.Apply