THE VISUAL EFFECTS EDITOR
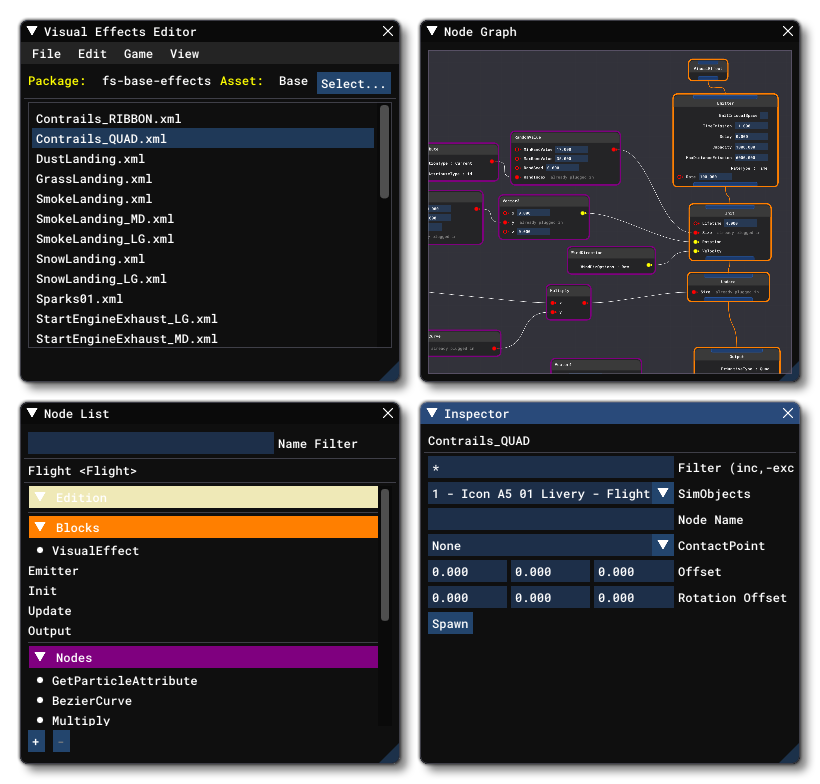
The Visual Effects Editor is a powerful tool for creating and editing visual effects that can be attached to objects in the simulation world. It can be found in the Tools menu, and when selected will open four new windows by default:
NOTE: To use the Visual Effects editor, Developer Mode must be enabled.
-
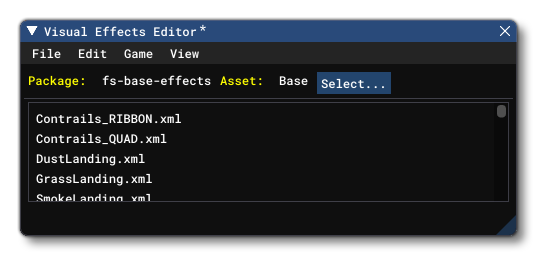
Visual Effects Editor
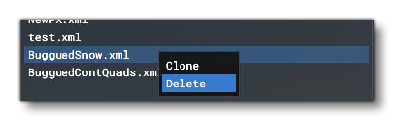
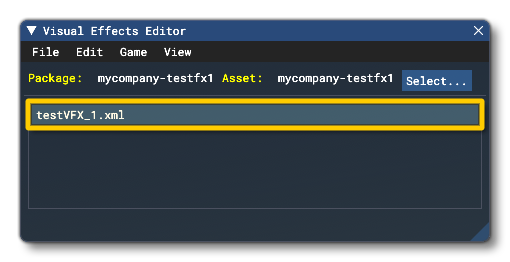
This is the main VFX Editor window where you can see the effects files you've made as well as save/delete/create files. The window will list all the effects in the current asset for the package, and you can edit any of them by simply clicking on the effect in the list. You can also change the asset container by clicking theSelectbutton and then choosing the asset to edit from the window that opens. This window also has a number of menus, more information on which can be found from the following sections: Note that you can right-click on the files in the list to open a menu where you can then Clone (duplicate) the file, or Delete it:
-
Node List
This lists all the Edition, Blocks and Nodes that comprise the currently selected effects file, as created in the Node Graph view. You can filter the list to quickly find items when you are creating complex effects, and clicking on any item in the list will focus the Node Graph on that item.
-
Node Graph
This is the graphical editor for creating effects systems. Here you can add Edition, Blocks and Nodes to the effect as well as link them together and edit their values. This is discussed in much more detail on the following page: VFX Node Graph
-
Inspector
This is a context sensitive window that is used to view information about the different items in the effect as well as edit or add parameters. The contents of this window are explained independently for each available node.
These windows - along with some others available from the View menu - will be used to visualise the different components of the visual effects that you make as well as edit their values and test them in the simulation world.
NOTE: The Visual Effects Editor will only ever be used in the simulation, so you should not attempt to open or use this editor on any of the main menu screens. Instead, you should start a flight and only open the editor when you are in the sim.
This page aims to provide a general overview of the Visual Effects Editor and how to get started using it, but we also provide in-depth explanations of the Node Graph window and the different items available to be used to create effects from the following page:
Getting Started
The Visual Effects Editor can be opened directly from the Tools menu, or - and this is the more common method for opening it - it'll be opened from Project Editor when you create or edit a package. To use this editor, you must first have created (or opened) a project in The Project Editor. Once open, you need to click the Add Package button at the bottom, and from the Add Package window that opens, select the Visual Effect option (if it is a new project, this window will open automatically after creating the project):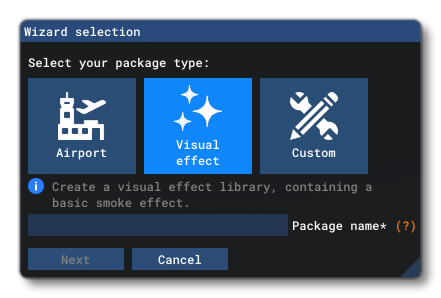 After giving the package an appropriate name you would then click the
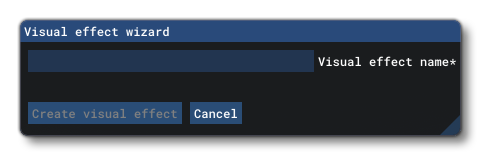
 Create button. This will open the Visual Effects Wizard where you need to give a name for the first effect that you want to create within the VFX asset group for the package:
 After naming your first effect and clicking
 Create Visual Effect, the effect will be created and the VFX Editor will open, pre-populated with some basic startup nodes, most of which will be required by every effect that you create in the future. Note that at this point you should save the project before continuing (from the Project Editor Project menu). The effect you gave as the first effect in the Visual Effects Wizard will be listed in the main Editor window:
 If you want to add further effects then would open the File menu in the Visual Effects Editor window and select the New Effect option. This will open a new window where you can give the effect a name and then hit the
 Create button to create it, adding it to the list.
You can create as many effects as you want in a single VisualEffectsLib package and each one will be listed here in this window. Selecting the effect will permit you to edit it and when you are happy with the results, it can be saved by going to the File menu and selecting Save.
VFX Assets In The Project Editor
The VFX Wizard will create all the required files and folders for you so there is generally no need to ever go into the Project Editor and change anything, however it is worth being aware of the general project folder structure and how to navigate the editor for VFX, just in case you need to make any changes to your workflow in the future.
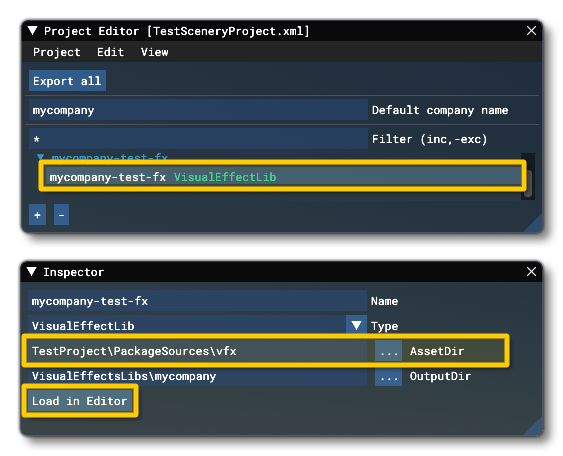
To see the VFX asset group in The Project Editor you need to click on the package to expand it and then click on the VisualEffectsLib asset group. You can then check that the Asset Directory (which is the folder where your VFX files will be saved for the project) is correct, and if you want to edit them you can click on the Load In Editor button.
If you're editing a previously made effect, you would need to select the VisualEffectsLib from the package you've opened in the Project Editor, and in the Inspector window simply click the Load In Editor button:
 When defining the Asset Directory, note that this is a directory relative to the root XML of the project, and is set automatically for you by the Project Editor, but you can edit it if required (not recommended).
Creating A Simple Effect
Having created your first Visual Effects file, you'll want to actually create the effect itself. This is done using the Node Graph window (which can be opened from the Visual Effects Editor View menu, if it's not already open). The Node Graph window provides you with a series of "nodes" that can be connected and organised in multiple ways to give you full control over the final effect, all in an intuitive and visual way:
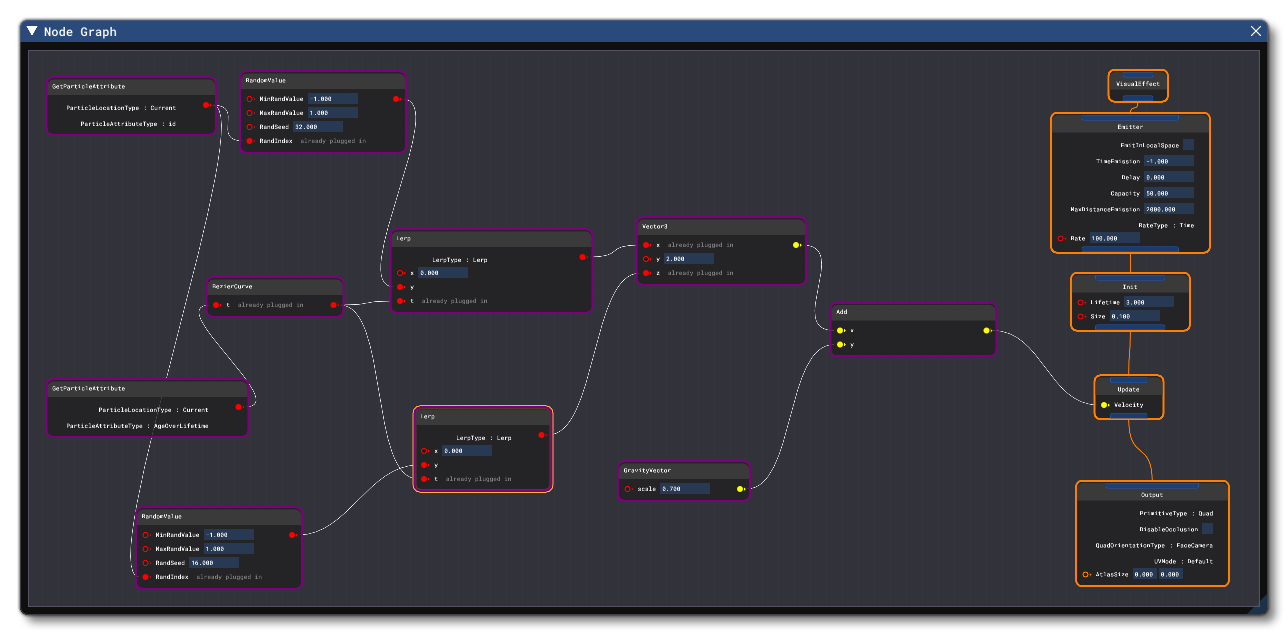
As you can see form the image above, effects are built from Blocks and Nodes. A Block (highlighted in orange) is a basic building block for the effect, while a node (highlighted in purple) is used to modify the contents of the block that it is attached to. You may also use Edition nodes (highlighted in light yellow) which are special nodes for adding comments into the Node Graph.
The Starting Blocks
All effects start with the same blocks which will be present in the Node Graph when you first create a new effect using the VFX Wizard:
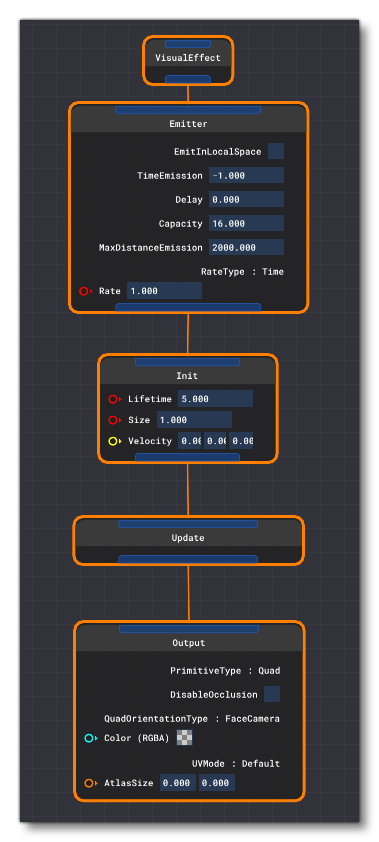
- VisualEffect - This node initialises the effect
- Emitter - This node is for defining the properties of the emitter
- Init - This node sets the initial behaviour for the particles the effect will spawn
- Update - This node defines how the particles will behave over time
- Output - This node defines how the particle will look when it is created
If these blocks aren't present or if you wish to construct the base blocks yourself you would simply do the following:
- Right Click in the Node Graph window.
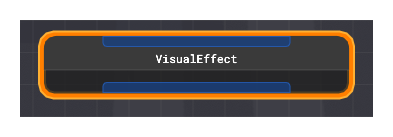
- Select Add, then select Blocks > Visual Effect.
- In the Inspector window, in the Data tab, click the
Emitter List(+)button. This will change the block to accept an emitter list as a child, and you'll see a blue bar appear under the block name (mouse over the image below to see the difference).
- Now you need to repeat the process and right click in the Node Graph window, click on Add, select the Emitter block, and then in the Inspector click on the
ParticleInit(+)button. This prepares the block for an Init block. - You would repeat this 3 more times, adding an Init block (needs a
ParticleUpdate(+)child), an Update block (needs aParticleOutput(+)child) and an Output block (needs no child). - These blocks are now all present in the Node Graph window, but they aren't connected, so to connect them you simply click on the blue bar at the bottom of the block and drag it onto the blue bar at the top of the next block:
With that you've got the core of the Visual Effects created and you can now start to edit the basic effect parameters and even include nodes to affect how the particles that comprise the effect will behave.
Changing Block Parameters
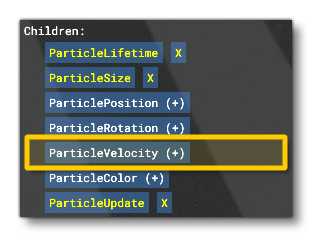
The default particle settings when you make a new particle actually permit it to be spawned in the world and be visible straight away. However before doing that let's first look at how we can change and add basic parameters. We'll start by clicking on the Init block. When we do that, we can see that there already some parameters assigned to it, and there are also a number of different "children" parameters than can be added to this block in the Inspector window. The most basic and essential of parameters here is the Lifetime parameter. This is used to decide how long the particle will "live" in the scene once the effect has spawned it, and the effects template has this set already to 5. If you wanted to remove this, you would click on the X button, or to add it again you would click on the ParticleLifetime(+) button (or any of the other child property (+) buttons):
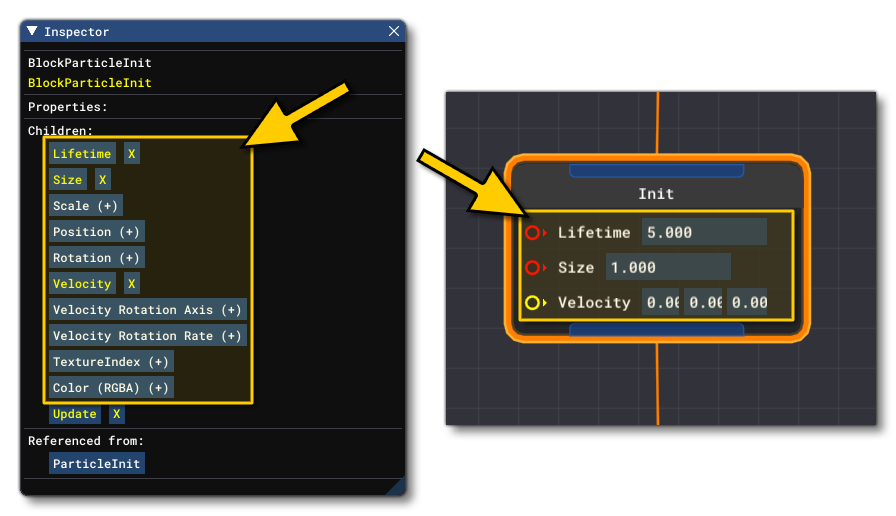
Lifetime is calculated in seconds, and for now we'll leave it set to 5.
IMPORTANT! The longer the lifetime of a particle, the larger the memory buffer required to store them when the effect is running, and the greater the processing power required to create, update and draw them. In general, you want to use the minimum number of particles - over the shortest lifetime - possible to make your effect work as efficiently as possible.
You'll also notice that the particle has a default Size defined for it, set to "1". Without this our particles would default to a size of 0m and not be visible! If you removed this at any time and want to add it back into the Init block, you'd go to the Inspector window, then click the ParticleSize(+) button which would add the size parameter back into the block.
Finally, you'll see that the Velocity child parameter has been added to the node. This doesn't actually do anything, since its default value is 0 for all axis, however it's more than likely you'll want to change this which is why it's pre-added when you create the node. You can, however, remove by clicking on the X button in the inspector beside the Velocity button.
At this point, we can actually test our effect in the world and see how it looks, but it's worth noting that the Init, Update and Output blocks can all have additional child parameters added to them, and you can also edit the Emitter parameters (which will change the whole effect, not just individual particles).
Viewing And Testing Effects In The World
Effects made with the Visual Effects Editor can only be used in the world when they are "attached" to an object. This can be a scenery object, a SimObject, or the player aircraft. To help you with testing, the editor provides a means to attach an effect to something in the world so you can see how it looks. This is done from the Template/Instance Debugger window - which you can open from the View menu - and you will need to go to the Spawner tab:
 From this window you can choose where and how to spawn an example of the effect in the simulation. Just now - and for ease of use - simply select the aircraft SimObject and then you should select a Contact Point to spawn the effect at on the aircraft. This will use the player aircraft as the spawner object, which makes it easier to find and test effects (you can quickly pan to the aircraft by enabling the Developer Camera and then pressing
 F5). Once you do that you can then click on the Spawn button and your effect will be visible in the world!
It is worth noting that these spawn options are also available in the Inspector window when you select an effect from the main VFX Editor window:

Editing The Effect
The effect we've just created is a little bit underwhelming and is simply spawning the same particle at the same position over and over, without giving much impression of movement or rotation or anything. So, to change that, let's first edit the Init block again to increase the initial movement to the particle by changing the ParticleVelocity. This parameter is already present in the template, but we'll quickly go through the process of adding it as well as setting it just so it's clear for the future when you create your own effects:
- Click on the Init block, and check that it has a ParticleVelocity parmater, and if it doesn't then click on the
ParticleVelocity(+)button.
- Once you have the input fields in the Init block you can use them to set an initial velocity along the X/Y/Z vector for the particles that are being produced.
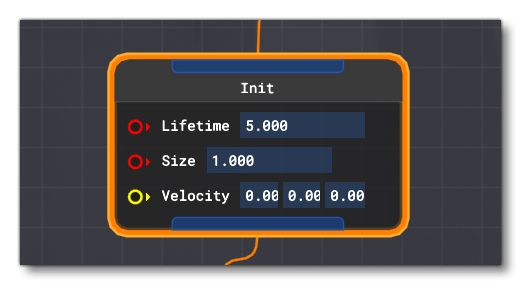
- Set the Y value to 5. The effect should now look like this:
With that you've created your first moving particle, and now you know how to add parameters to the blocks, you should take some time to play with the different ones available and see what they can do and what effect they'll have on the output particle.
IMPORTANT! If your visual effect is invisible or - after editing - becomes invisible, then check your node inputs and outputs to ensure that they are within an acceptable range. Any value that forces a floating point overflow/underflow will cause the effect not to spawn.
Adding Nodes
The basic parameters can give some interesting results, but are still rather limiting when it comes to the creation of different effects. For that reason you can use Nodes to change the basic particle parameters using a number of different methods, like using a curve over time, or a random value or even a SimVar from the Microsoft Flight Simulator 2020 engine! In this way your effects will not only be more dynamic, but they can be integrated better in the world.
To modify the base effect we created above, we're now going to make the particles in the effect change their size over time, starting small and then getting bigger. For that we'll be using two Nodes:
- GetParticleAttribute - This node is used to retrieve an attribute from the current effect
- Lerp - This node is used to interpolate between two values
To add these nodes, simply right click in the Nodes Graph window and select Effect And Environment, to add the GetParticleAttribute, then right click again and add the Lerp node from the Value Control section. Once added, click the Get Particle Attribute node and look in the Inspector window. You'll see that it has a ParticleAttributeType value, and if you select this you'll see a number of attributes that you can retrieve from the effect. In this case we want the AgeOverLifetime attribute, so select that. This will return a normalised value (from 0 - 1) that represents the "age" of the particle over its lifetime. Now we need to connect this to the Lerp node. Lerp will use linear interpolation to return a value between the min (x) and max (y) values given based on the input time (t) value (which should be from 0 - 1).
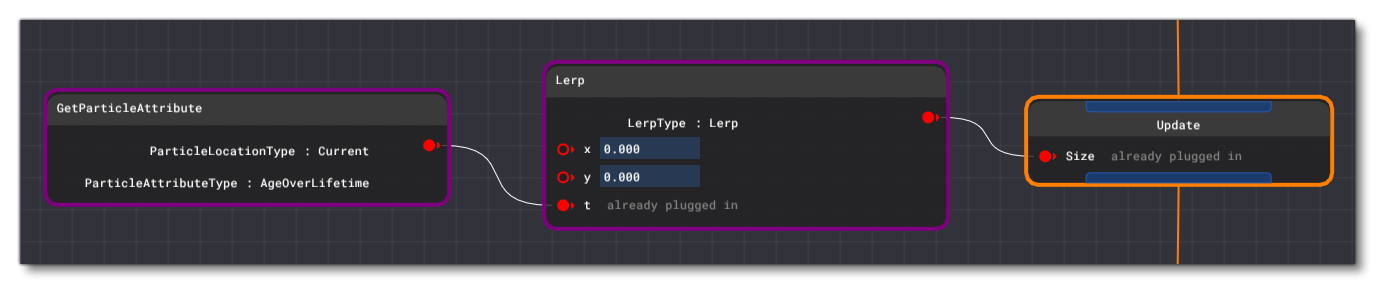
To connect the nodes, simply click on the output scalar from the Get Particle Attribute node and drag it over to the input scalar for t, then set the min and max values to 0.1 and 3 respectively:
The Lerp node will now output a value between 0.1 and 3.0, starting at 0.1 and incrementing over the particle lifetime until it reaches 3 just before the particle "dies" (is removed from the system). This now needs to be connected to the Update block, but we need to tell the Update block to accept this input. So click on the block and then in the Inspector window, click the ParticleSize(+) button. This will add a new attribute to the Update block for the particle size, overriding the base attribute set in the Init block. The final step is to connect the output scalar from the Lerp block to the input scalar for the Update block, and when finished the whole chain should look like this:
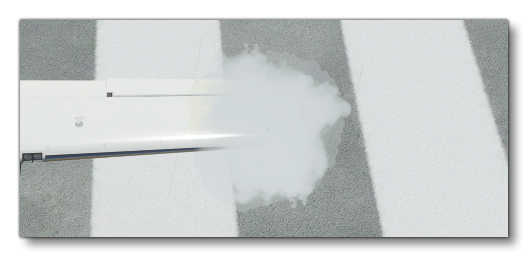
The particles that are being spawned in the world will now update their size over time based on the new nodes we've added to the effect, looking something like this:
Final Steps
Once you have the effect the way you would like it to look, you need to go to the Visual Effects Editor window and from the File menu, select Save. This will save the file as part of the currently open VisualEffectsLib package. You are now free to create a new effect and save that too, and each effect will be listed in the editor:
Once you've saved various effects, you can edit them easily at any time by simply clicking on it in this list.
So, now you know how most effects are created:
- Create the base Blocks
- Add parameters to the blocks
- Use the different Nodes to edit the parameters
- Save the effect file.
Using Effects In The World
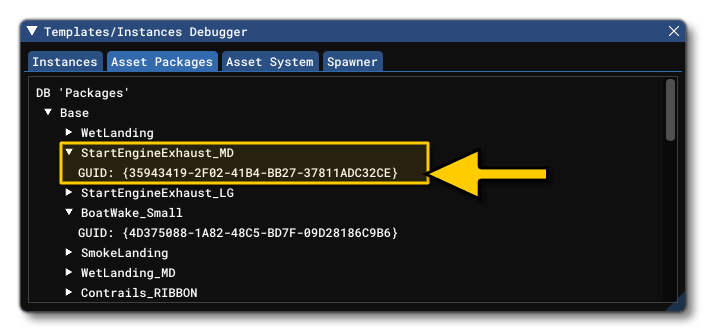
Once you have created the Visual Effect, you'll need to be able to add it to the world. Effects are added to SimObjects through the <Behaviors> element of a SimObject, and need to be attached to a node on the model mesh. For this you need to know the unique GUID of the effect, which you can find from the Asset Packages tab of the Template/Instance Debugger window:
 You can also find the GUID from the effect XML, looking at the InstanceID assigned to the
 <VisualEffect.VisualEffect> element. Once you have this GUID it can be attached to the model using correctly formatted XML. This procedure is fully explained from the following Content Configuration page: