BUNDLES AND PACKS
When publishing your projects to the Marketplace, it may be that you would like "bundle" multiple different packages together as a single project - either packages that have been published previously, or new packages that you want to publish as a single Marketplace item. This can be done from The Project Editor, and will be explained here, however first it's important to understand the difference between a pack and a bundle:
- Packs: A pack is a list of packages that have not previously been published to the Marketplace, and as such cannot be sold individually, only as part of the created pack. The individual packages that are a part of the pack do NOT need to have their own set of Marketplace Data. However this will need to be set up for the pack as a whole, as explained further down this page. It is also important to note that with packs the price will not change based on other items on the marketplace, such that if you uploaded one of the items in the pack as an individual package, the price for that item would NOT be discounted from the price of the pack (and you are strongly discouraged from adding pack items to the marketplace individually, for that you should create a bundle).
- Bundles: A bundle is a list of packages that have all been previously published to the Marketplace, and as such people can buy the individual items or the bundle. The packages supplied as part of the bundle will all need their own Marketplace Data, as will the bundle itself (see further down this page for more information). Note that if someone already owns one of the packages within a bundle, the Marketplace price will be adjusted to take this into consideration and the user will only pay for the representative price of the contents of the bundle that they don't already own.

IMPORTANT! Once you have created a Pack or a Bundle and submitted it for sale on the Marketplace, you cannot transform it into a different item. In other words, a Pack cannot be changed into a Bundle, and a Bundle cannot be changed into a pack, after the ingestion and publishing process has been started.
Creating a Pack/Bundle
Creating a pack or a bundle for the Marketplace can be done in several ways, and here we'll quickly outline them.
- New Project: To start with, when you create a new project - and after giving the initial project details - you will be asked if you want to create a Pack/Bundle or a "regular" package:
 Then you simply click on the
 Nextbutton to continue.
- Existing Projects: With an existing project already open in the Project Editor, you can click the
Add Bundle/Packto continue.
Regardless of the method of telling the Project Editor that you want to create a pack/bundle, you will be presented with the following window:

Here you need to give the following details:
- Display Title: This is the title of the pack/bundle that will be displayed to the user in the Content Manager and in the Marketplace. It can be up to 50 characters in length.
- Company Name: This is the short-name of the company you want to represent the contents of the bundle and will be used as an identifying suffix in the pack/bundle Full name. This will be all lower-case and cannot contain any special characters or spaces. Note that this will initially be filled in with the default company name from the Project Editor.
- Pack/Bundle Name: The name of the pack/bundle that will be used in the Full Name. As with the company name, this will be all lower-case and cannot contain any special characters or spaces.
- Creator: This is the name of the pack/bundle creator that will be displayed to the user in the Content Manager and in the Marketplace. It can be up to 28 characters in length, and - for bundles - it should be the same as the creator name for the packages that already exist on the marketplace included in the bundle (this permits users searching the marketplace for a given creator to find the bundle and the individual component packages).
- Type: This defines whether it's a bundle or a pack that is being created (see the top of this page for an explanation of the differences).
Once you have filled in the relevant information, you can click on the Next button.
Adding Packages
The next window to open after giving the base information for the pack/bundle is this one:

Here you simply need to give the package name of each package that you want to add. This will work in a different way depending on whether it's a pack or a bundle:
- For Bundles: The package names you input should be packages that are already on the marketplace (or at least submitted to the Marketplace and going through the ingestion process). We recommend that you add the packages to the project then select them and add them to this list here, however you you may also simply add the package names for the marketplace items without adding the packages themselves. If you do that, then ensure that you give the correct names, as there is no way for the Project Editor to validate the data, and as such, you would need to go through the submission process before discovering there is an issue.
- For Packs: All packages to include in the pack should exist in the project that you are adding the pack group to. When you start typing in the field at the top, you will be offered auto-complete options with the project packages to make things easier. The Project Editor also permits you add packages from other projects using the Importing Packages option, so if a package that you want to include in a pack was made in another project, you can use this to add it to the current project and include in the pack.
IMPORTANT! The Project Editor will not flag "erroneous" or already published packages added to a pack, and will accept any string input that you give since it cannot validate any package that is not a part of the project. So, you should ensure that the packages being added are in the project to prevent issues.
When you are adding a package, assuming that the package exists in the project, then it will be parsed and checked by the project editor and any potential issues will be flagged for you to be aware of and fix, for example:
 Note that if you are adding packages that are on the Marketplace but not included in the project then this kind of validation will not be performed, and any issues will only be flagged as part of the ingestion process when uploading to the Marketplace.
Once you have added all the items you wish to be a part of the pack/bundle you can go ahead and click on the Create Bundle button:

IMPORTANT! You can only have up to a maximum of ten items in a single bundle or pack.
This will then create the pack/bundle and add it into the Project editor:

The Inspector
Each pack/bundle that is added to a project will also need certain details added into the Inspector. This can be opened from the Project Editor View menu if you've closed it or it doesn't open automatically. The Inspector will look like this for the pack/bundle:
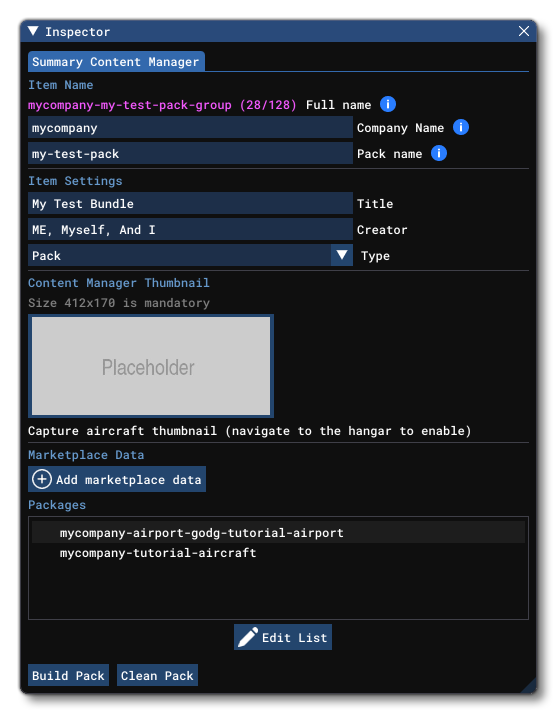
In this window you have the following options (some of which will already be filled in automatically but can be changed if required):
- Company Name: The name of the company or individual that is responsible for the project. This field cannot be left blank.
- Pack/Bundle Name: The name of the bundle/pack. Note that the given name will be suffixed with "-group" automatically by the editor.
- Title: The title of the pack/bundle, up to a maximum of 50 characters. This will be the displayed name in the Microsoft Flight Simulator 2020 Content Manager as well as on the Marketplace (for Bundles).
- Creator: The name of the company or user(s) that has created the pack/bundle.
- Type: The type of grouping that is being used, which will be either Pack or Bundle.
- Content Manager Thumbnail: This is where you must add a thumbnail image that represents the contents of the pack/bundle. You can click on the image to open a browser and select an image from a file, or - if you are creating an Aircraft pack/bundle - you can browse to the hangar and select the aircraft then click the
Capture Aircraft Thumbnailbutton to generate an image form the current hangar camera. The image should be authored at 420px * 170px using theJPGformat. Note that you can setup The Aircraft Thumbnail Capture Tool to generate this image as part of a Capture Set.
NOTE: This image is obligatory, and will lead to errors when building the package if it is not supplied.
- Marketplace Data: Clicking the
Add Marketplace Databutton this will change the Inspector to the Marketplace window, where you can add information and setup the Microsoft Marketplace meta-data. Full details of this process can be found below in the Marketplace Data section.
IMPORTANT! All packs and bundles will require the Marketplace Data to be setup before it can be submitted for ingestion to the Marketplace.
- Packages: This section lists all the packages that are to be included in the pack/bundle. This will be populated with the packages you selected when you created the pack/bundle, but can be edited at any time by clicking on the
Edit Listbutton. This button will open the following window:
 Here you can enter the name of a package to include in the pack/bundle and then click on the
 Add To Listbutton to add it. Note that the packages being added no not have to be a part of the current project if it is a bundle that is being created, permitting you to include packages at are already available on the Marketplace (or in the process of being ingested). Packages that are not part of the project will be shown in grey. Also note that you can click the "bin" icon beside any listed package to remove it from the pack/bundle.
Build Pack/Bundle: Clicking this will build the Pack/Bundle locally for you to validate. This will ONLY build the pack/bundle files and is used to check for any errors within the limits of the Project Editor. Building the package will output the base files and you can check the build process in The Console. Most issues will be highlighted in the console, and you may also get a dedicated error window for some of the most obvious issues that will need fixed. Note that getting zero errors when test building does not mean that the package will pass validation when sent to the Marketplace, as the project editor can't test all possible issues related to the Marketplace.
Clean Pack/Bundle: This button will clean the Pack/Bundle output folder, removing any previously built versions of the Pack and/or Bundle and the files contained within.
Marketplace Data
The Marketplace Data window for Packs/Bundles is almost identical to the one used for packages:
 The contents of this window (including the tabs for business data, images, etc...) are all explained in great detail on the following page:
However, for bundles and packs there are a few things worth noting:
- Category/Section: Since the pack/bundle can contain mixed content (ie: it could be an airport and several aircraft), you can add multiple categories with their own section information by clicking on the
Add Categorybutton. This permits you to add up to three categories, and the bundle will appear in each of them when users are searching on the Marketplace.
- Business Data - Seller ID: The seller ID must be the same as the one used by all the packages in the bundle/pack. If it is not then this will be flagged for you to fix.
- Business Data - Catalog Price: For a pack, the price here is at the discretion of the user, since the items in the pack are not individually on the Marketplace. However, for a bundle, the price given cannot be higher than the sum of all the items included. If you try to price a bundle higher than the sum of the items, the project will fail the ingestion process when submitted to the Marketplace. In general, bundles should offer a greater value to the user than buying the items individually would.
Build And Export
Once your bundle/pack has all the marketplace data added and the necessary packages added to it, you can build it for submission to the Marketplace using the Build & Export button in the project editor:

This will then open the Export window which will show the packages and the packs and bundles which you've created:

Here you need to select the Flight Simulator Marketplace from the bottom - as you cannot use Community Publishing - and then select the platforms that you wish to export the different items to. When selecting platforms it's important to note the following:
- Bundles: The packages that go in a bundle can be flagged as PC and/or XBox, as can the bundle itself. For example, you could create a bundle for PC and XBox with 4 aircraft, but only three of the aircraft is available for the XBox. In this case, when a user on XBox goes to buy the bundle, the price of the aircraft that is PC only will be deducted from final price (the amount deducted is proportional to any difference in price between the total of all the individual packages and the bundle price).
- Packs: The packages for a pack must be exported to the same platform(s) as the pack itself. For example, if a pack is for PC then ALL the items within must also be exported for PC. This is because the pack contents are not already available on the Marketplace and so can't be parsed to adjust the price. So, to prevent people buying packs with items that don't apply to their platform, you can only publish packs when all packages are available on the platform the pack is exported to.
Once you have selected the output(s) for the pack, you can set an Export Directory, and then click on the Build & Export button to create a ZIP file with the pack information and all the selected packages. This ZIP can then be uploaded to the Marketplace for ingestion and publishing.
IMPORTANT! You may define multiple Packs/Bundles in the Project editor, but you should only ever export ONE pack/bundle at a time and submit them to marketplace one at a time too. You should never export multiple packs/bundles at the same time.
Published Packs/Bundles
Once the pack or bundle has been accepted onto the Marketplace, it will be listed under the categories that you set and when selected the page will look something like this:
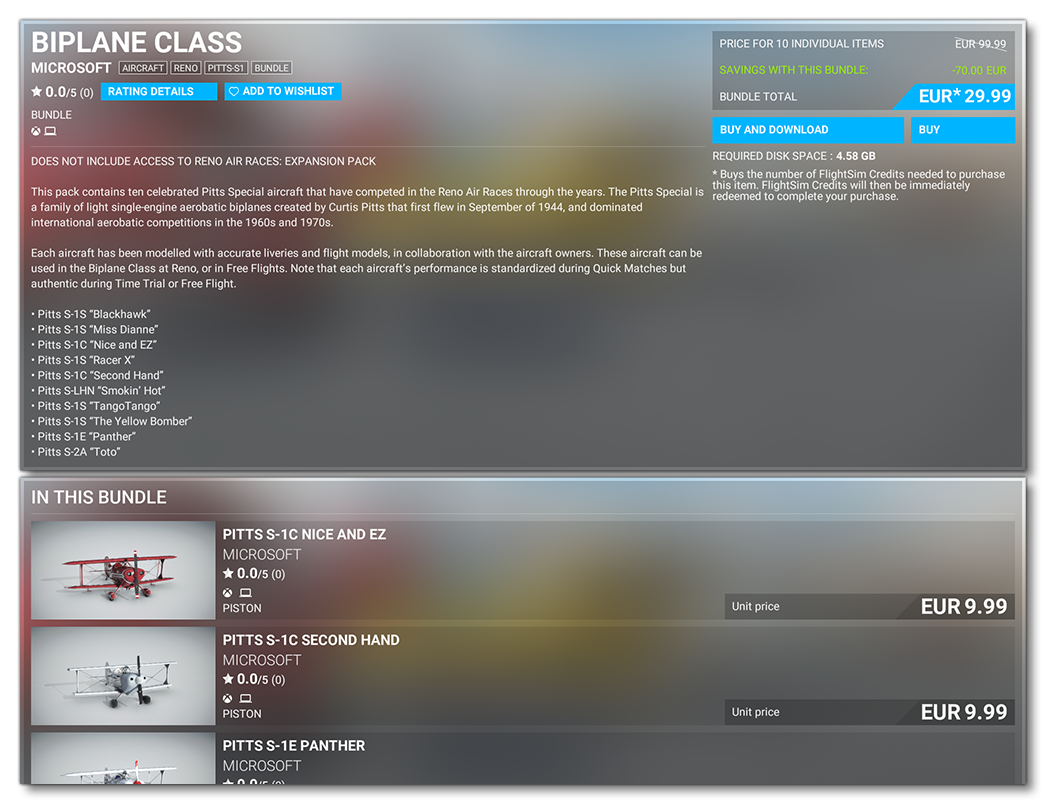
The image above shows the page for a Bundle of 10 aircraft, and shows the current price, along with a description of the bundle, and then each item in the bundle.