THE BLENDER PLUGINS
This section of the SDK documentation is for help with the support for Blender. This software is fully supported by the Microsoft Flight Simulator 2024 SDK and can be used when creating models, animations and materials for your add-ons. The SDK installation supplies two separate plugins for blender available in the following locations:
-
[SDK ROOT]\Tools\Blender\addons\io_scene_gltf2_msfs_2024
This is the core set of tools required for blender to create add-ons for MSFS 2024.
-
[SDK ROOT]\Tools\Blender\addons\wipermask_generator_msfs_2024
This is an additional tool designed to help artists create the complex Wiper Mask (RGBA) texture that is used to create realistic rain and wiper effects on aircraft windshields. You can find out how to use this tool on the following page: Wiper Mask Generator Tool
IMPORTANT!
- These plugins are only compatible with Blender 3.3.x LTS, 3.6.x LTS, 4.2.x LTS, and 4.5.x LTS. Other versions are not supported.
- You can have both the MSFS 2020 plugin and the MSFS 2024 plugins installed in Blender, however we recommend not enabling both plugins at the same time. Only enable the one required for your export/import process, based on the specific version of the simulation you are creating for (Microsoft Flight Simulator 2020 or Microsoft Flight Simulator 2024). Make sure to switch between plugins depending on which version it's intended for.
- The Blender plugins are not compatible with the legacy exporter developed for FSX and other simulations. You should remove this legacy plugin if you have it, or at least disable it (we recommend that you remove it, see here for more details: Uninstalling The Blender Add-ons).
- The
io_scene_gltf2_msfs_2024Blender plugin cannot import glTF files that have been built for a Microsoft Flight Simulator 2024 package using the Project Editor within the simulation. - While Blender permits Negative Keyframes for animations, the simulation does not, and as such the plugins will show an error when exporting animations with negative keyframe values.
Installing The Add-Ons
There are different ways you can install the SDK add-ons in Blender, however the best method - if you don't want to have uninstall / install every time there is an SDK update - is to simply link the SDK add-ons folder in the blender scripts. For this, simply do the following:
-
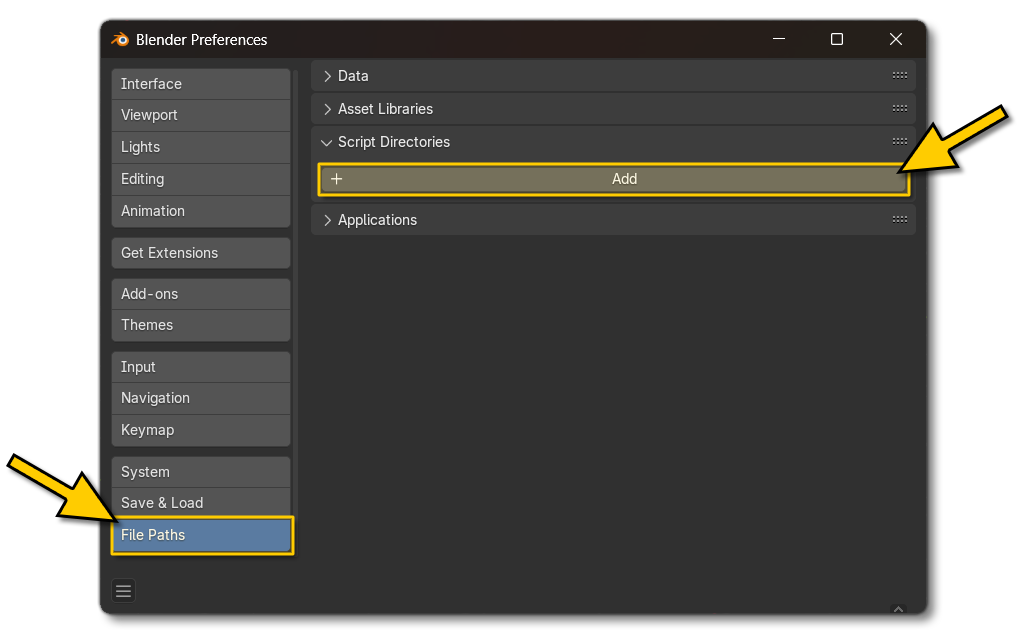
Open Blender and go to: Edit > Preferences.

- In the Preferences, you want to go to the File Paths section, then click on the
Addbutton under the Script Directories sub-section:
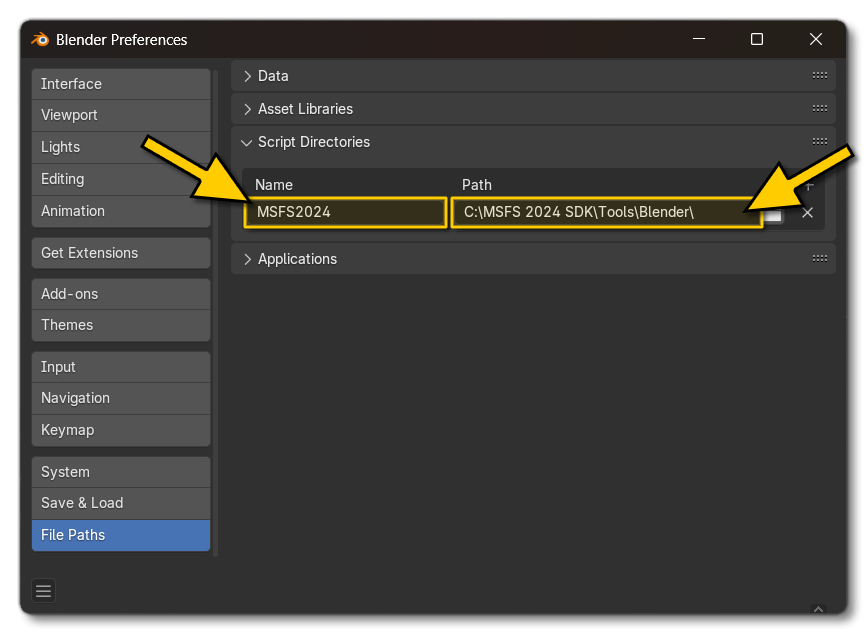
- Select the Blender folder in your SDK directory for the Path and then give it an appropriate name:
- After completing this process, you will need to start Blender and then activate the plugins. Activation is done from the Preferences (Edit > Preferences). In the Preferences window, go to the add-ons section, then click on the checkboxes beside the listed Microsoft Flight Simulator 2024 plugins to enable them.

Doing things this way will install all the Blender add-ons as well as update them automatically every time you install a new version of the MSFS 2024 SDK. Below are two alternative methods that you may use as well, however these are not recommended.
Uninstalling The Blender Add-ons
The Blender plugins will be automatically uninstalled when you uninstall the Microsoft Flight Simulator 2024 SDK. However, to "clean" Blender completely, after uninstalling the SDK you can do the following:
- Start by opening Blender and go to: Edit > Preferences.
- In the Preferences, go to the File Paths section, and then the Script Directories and simply remove the MSFS 2024 entry:

Note On The Shader Nodes Tree
Modifying the shader nodes tree doesn't impact material export. Therefor, it is important to be aware that the properties of your material must only be modified through the MSFS2024 Material Panel section. Unlike the MSFS2020 add-on, the material node tree is not used during the export process.
Add-on limitations
Below is a list of the limitations of the Blender plug-in with respect to the corresponding 3DS Max Plugin:
- XML files for the textures need to be generated from the exporter with the options Generate texturelib and Keep original checked. Texture flags can be set using the Image Flags Tool.
- Some shaders (ClearCoat, Windshield, Decal / GeoDecal BlendMasked / GeoDecal Blended Mask) do not render correctly in Blender but will be exported correctly and get the right parameters in the simulation.
- Material animations works only with some parameters listed here:
Related Topics