ENGINE AUDIO SETUP
In this section of the audio tutorial we'll be looking at setting up engine sounds. This is quite a complex topic as the sounds being played have to loop correctly and will be required to change pitch based on the engine RPM, as such we recommend that you first go through the basic Setting Up Wwise and Creating The Sound.xml tutorials before continuing with this one. Also note that this tutorial is accompanied by the following video, which we suggest you take a few moments to watch before continuing:
In this tutorial, we will show how to create the base engine sounds for a single piston engine aircraft, as well as how to play them in the simulation, and the methods shown here are also applicable for setting up the propeller sounds. Note that the workflow may be slightly different for the other types of aircraft (Airliners, jets, turboprops, etc...). However, you can check the different templates available in the WwiseSampleProject under the work unit "_Templates" of the "AIRCRAFT_PLAYER" folder.NOTE: Before doing this tutorial you may want to take a look at the section on Recording Audio, which outlines how the audio samples used here were created, as well as the recommended recording workflow.
Wwise Setup
The setup in Wwise for the engine sounds is a little different than what we did for the simple stall warning audio tutorial. In this case, we need to start by creating an Actor Mixer unit in the aircraft work unit and call it 3D. This actor mixer is required for the aircraft to have correct positional audio within Microsoft Flight Simulator, and will be used for all the audio: wind, instruments, engine, etc... As such, you should always start any project by creating this actor mixer. To create it, simply right click on the aircraft work unit in the Audio tab, and then select Actor Mixer from the New Child options and name it 3D:
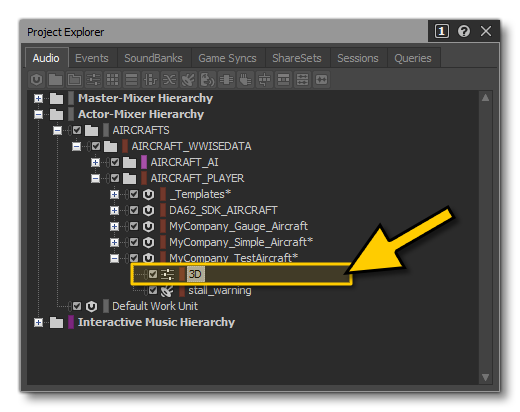
NOTE: If you've done the stall warning tutorial, you can drag the "stall_warning" audio unit onto the 3D actor mixer to add it to this mixer, since all sounds should go through this. Further images in this tutorial will show the stall_warning audio unit in this mixer unit.
The new 3D actor mixer requires some setup to make it behave the same as all the other actor mixers used by the aircraft in the simulation. In this case you need to open Property Editor for the actor mixer (easiest is to select it in the Audio tab, then go to the Layouts menu and select Designer), and then set up the following options:
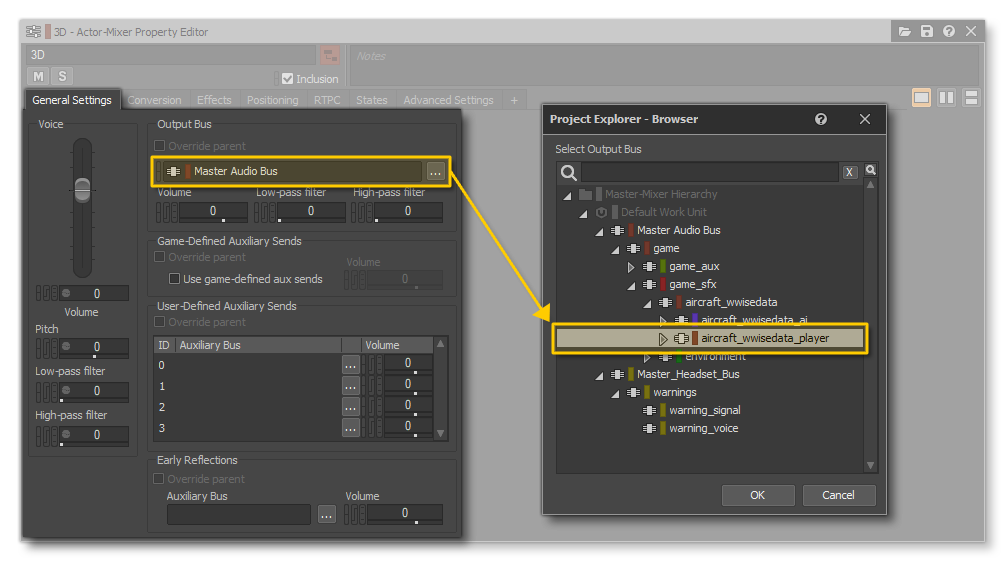
- From the General Settings tab, set the Output Bus to aircraft_wwiseData_player:
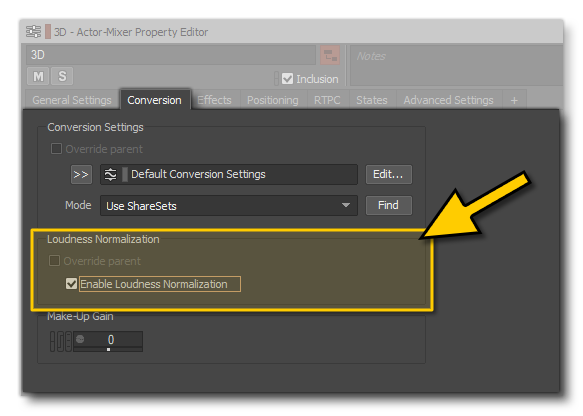
- From the Conversion tab, check the box for Enable Loudness Normalization:
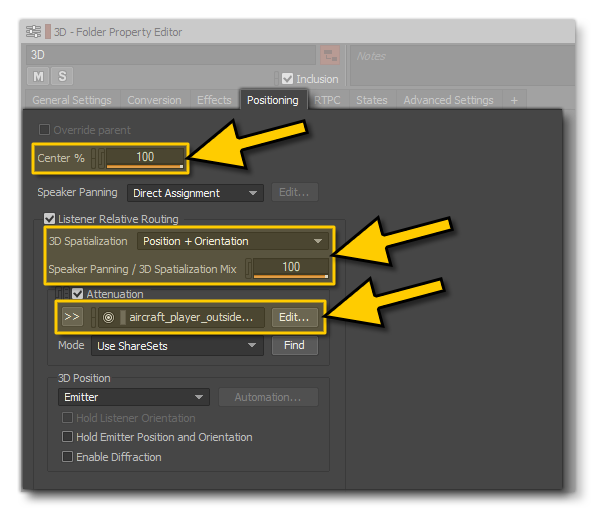
- From the Positioning tab, you will need to set:
- Center % - set this to 100
- 3D Spatialization - set this to Position + Orientation
- Speaker Panning - ensure this is set to 100
- Attenuation - click the
>>button, and set this to aircraft_player_outside_500m (from Aircraft > player_outside > generics)
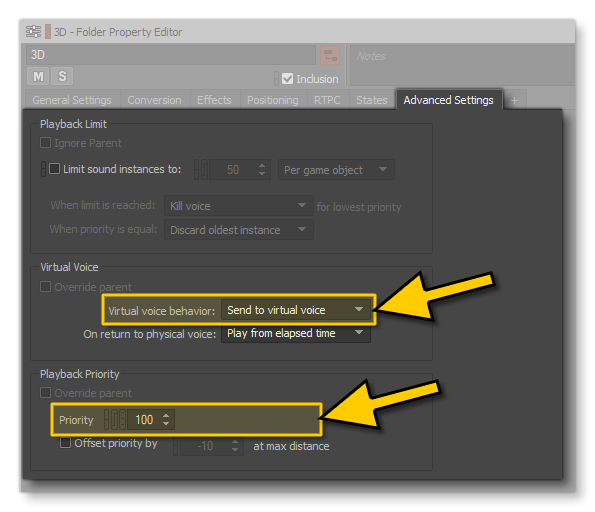
- Finally, from the Advanced Settings tab you need to set:
- Virtual Voice Behaviour - this should be set to Send to virtual voice
- Priority - this should be at 100
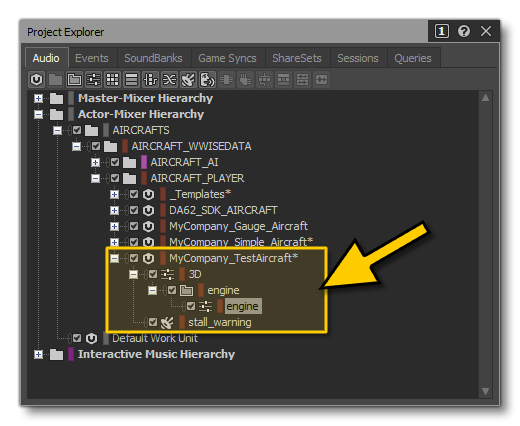
The next step would be to create a Virtual Folder unit and call it Engine (right-click on the 3D actor mixer, select New Child > Virtual Folder). This step is not absolutely necessary, but using virtual folders for the main audio components helps with the project organisation, especially on large and complex aircraft. With that done, you can then add in another Actor Mixer and call it Engine, so that the hierarchy now looks like this:
The Combustion Switch Container
The next thing we'll need is a Switch Container unit. This unit permits switching between multiple states: in this case between the "outside" and the "inside" audio for the engine (since the audio will behave differently depending on the viewpoint of the user). So, create this now by right-clicking on the Engine actor mixer and selecting New Child > Switch Container, then name it "combustion".
Once you have created this switch container unit, you need to set it's properties in the Property Editor:
- The Play Mode needs to be set to Continuous
- The Switch Group needs to be set to Viewpoint (click the
>>button, then State Groups > Aircraft)
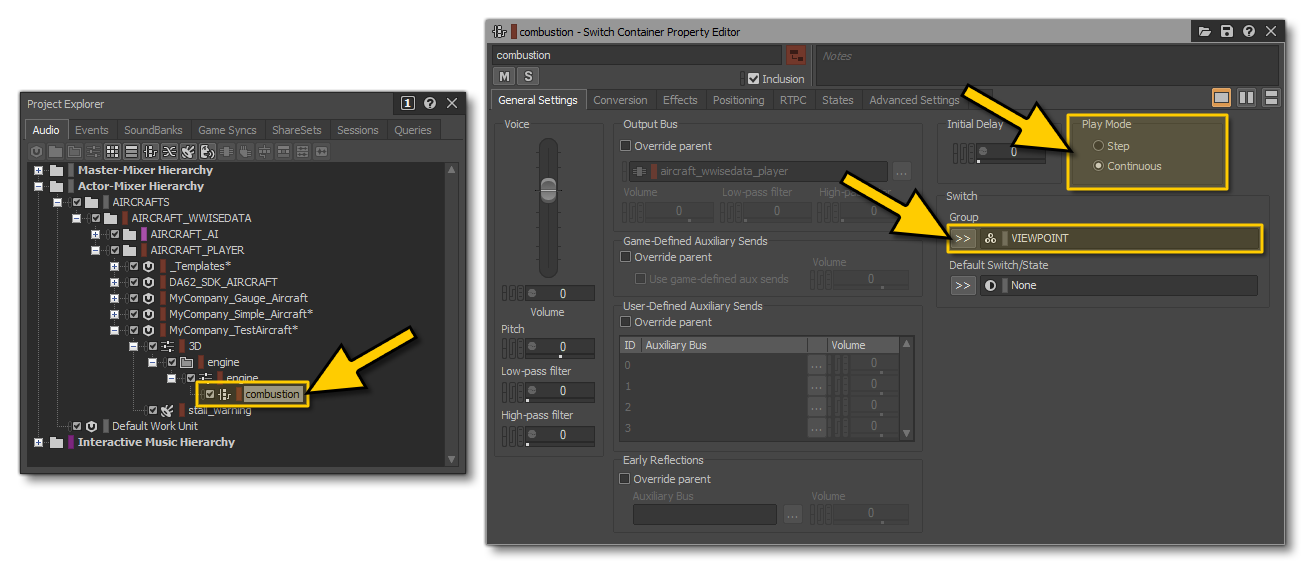
Each point of view will require it's own Blend Container, so those need to be added now by right-clicking on the combustion switch container and selecting New Child > Blend Container. Do this twice, and call the first "combustion_inside" and the second one "combustion_outside". If you then select the combustion switch and go to the Contents Editor window, you can drag these new blend containers onto the appropriate Assigned Objects:

You will need to set up the routing of each of these blend containers, which will allow your aircraft to benefit from the in-game UI audio mixers.
NOTE: You should look at the various templates in the WwiseSampleProject and also check the main documentation (Master Mixer Hierarchy) for more information on the different routing possibilities available to you.
For that, in the Audio tab, select the combustion_inside blend container and in the Property Editor check the Override Parent checkbox and then set the output bus to combustion_inside_generic:
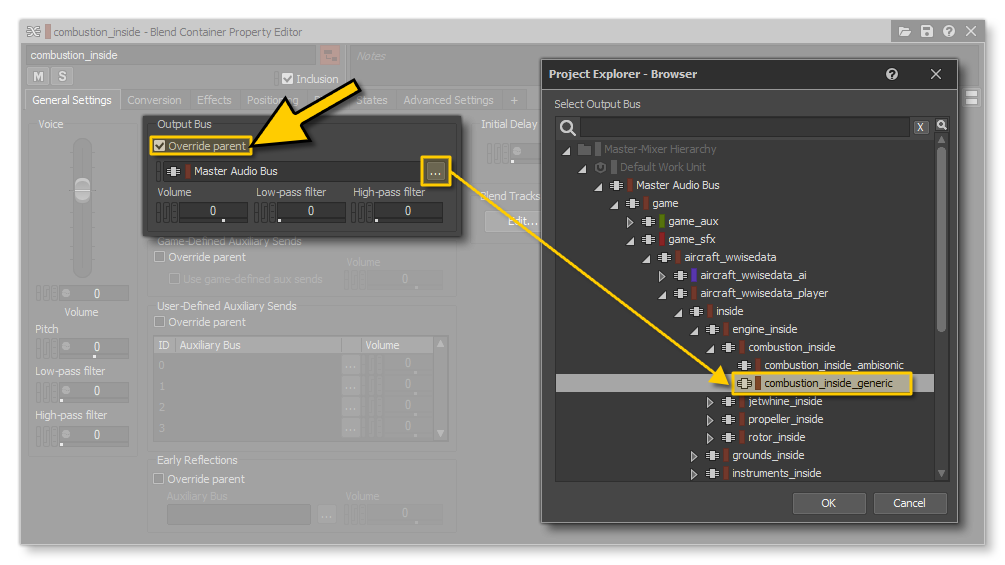
Finally, you will need to set the Play Mode to Continuous:

You should then go ahead and do the same for combustion_outside, only this time set the output bus override to combustion_outside_generic.
Audio Loops
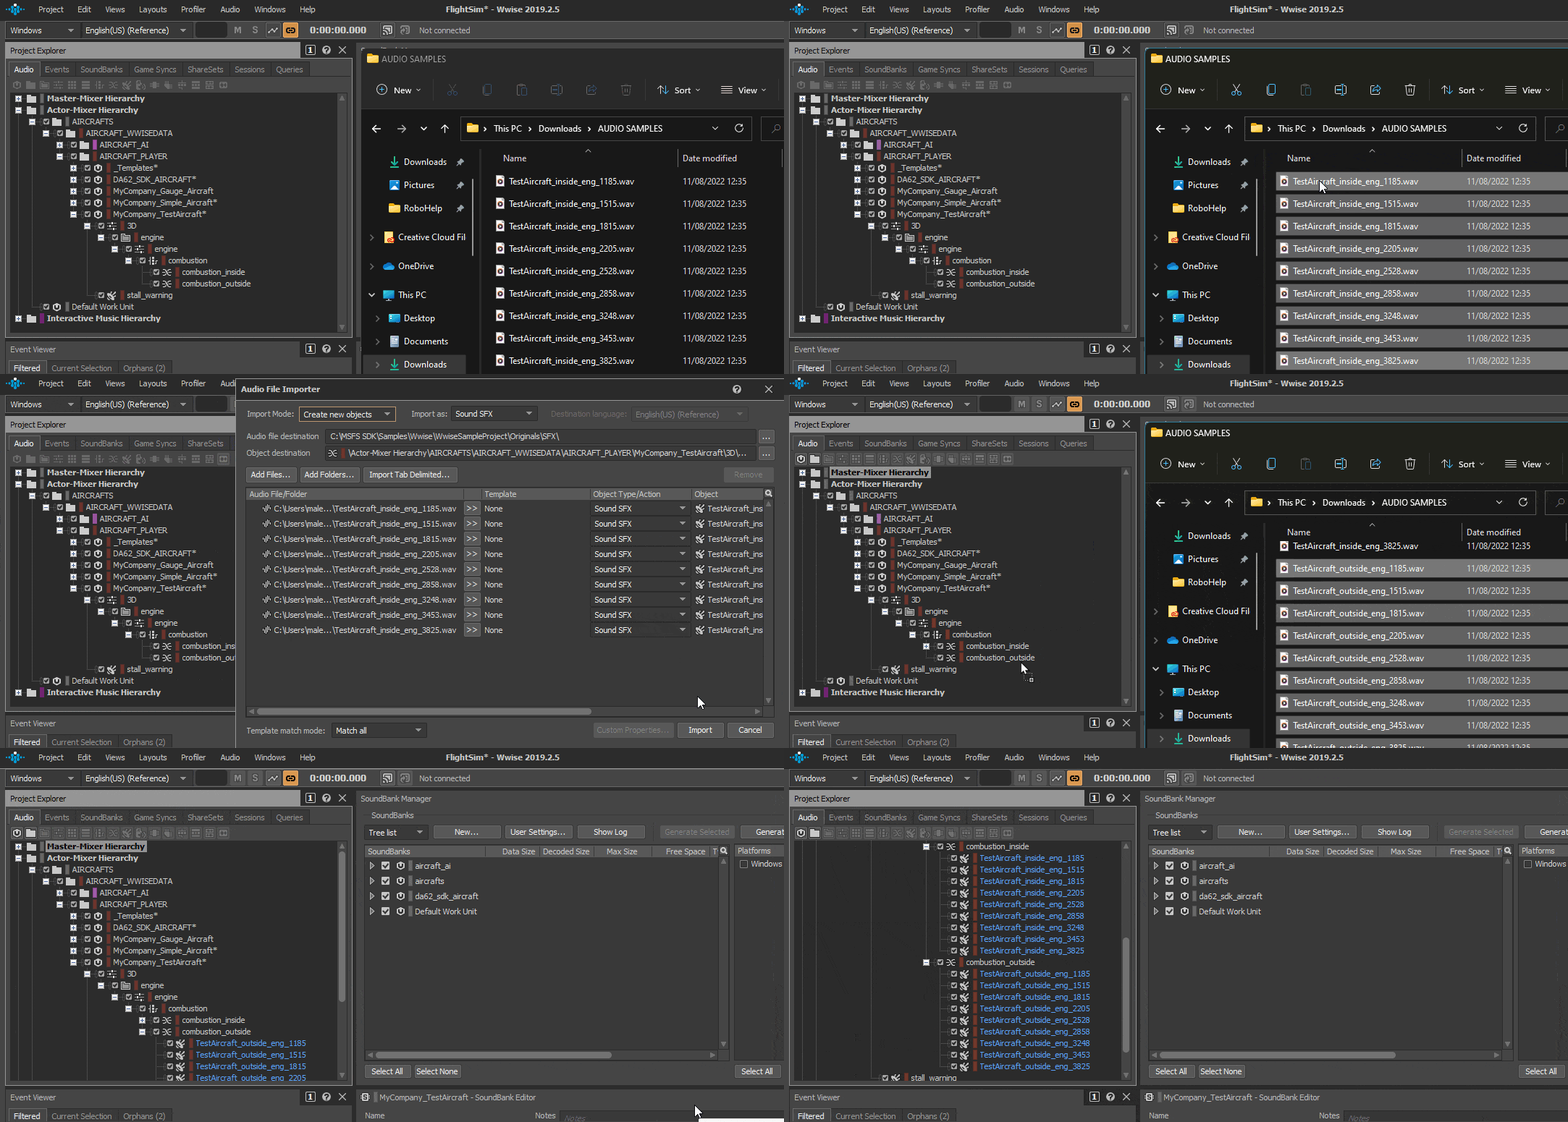
Having defined the combustion container switch and it's children (the inside and outside blend containers), it's time to add in the actual audio loops that you have recorded and prepared previously (you can find more information on recording these loops here: Recording Audio). Adding them is simply a case of opening an explorer window on them and then dragging them and dropping them onto the appropriate blend container:
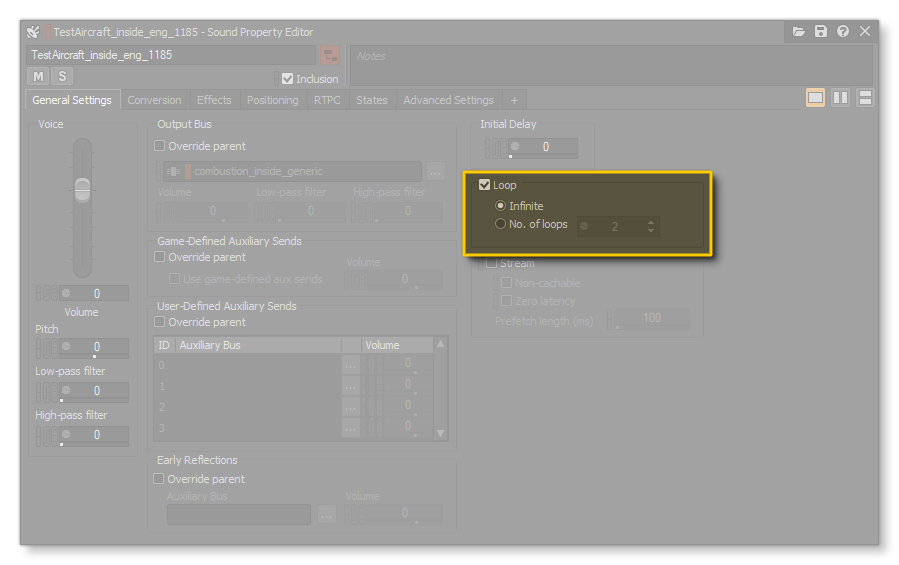
Once all the audio has been imported, you will then need to select each one and ensure that it is set to loop. For that, simply select each audio track and in the Sound Property Editor, click on Loop > Infinite (you can open this editor using the Designer layout, or from the Views > Editors menu):
Blend Tracks
You will now have to create a "Blend Track". This will allow you to perform crossfades between the different RPM engine samples and also play specific loops depending on a "Game Parameter" value. To set this up is a bit complicated, but we'll take you through all the required steps for one of the containers you have created and then you can repeat the process for the others.
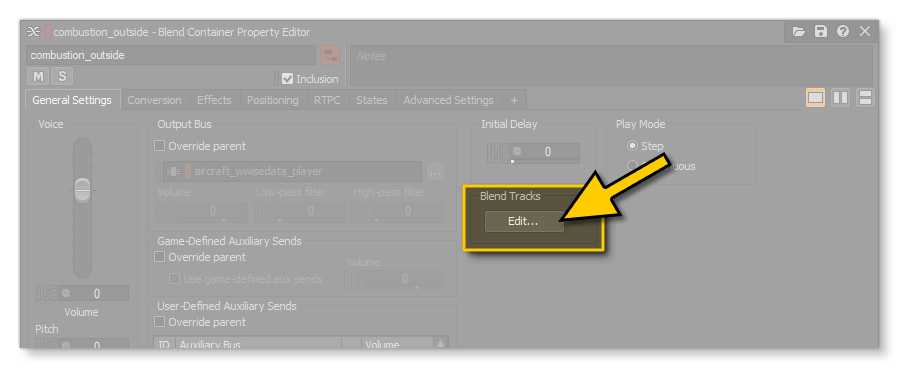
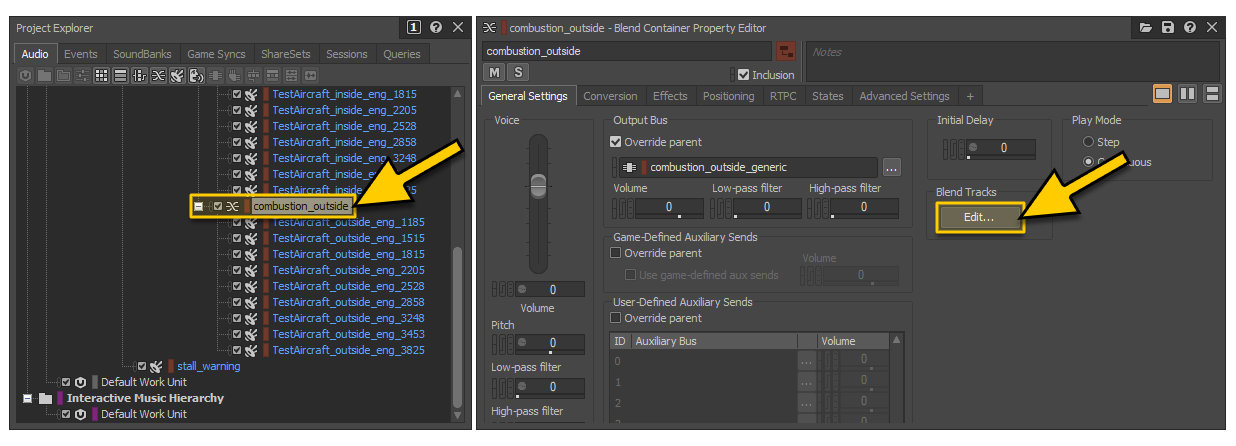
To start with, select the "combustion_outside" blend container, then click on the "Edit..." button in the Blend Tracks section of the Blend Container Properties window:
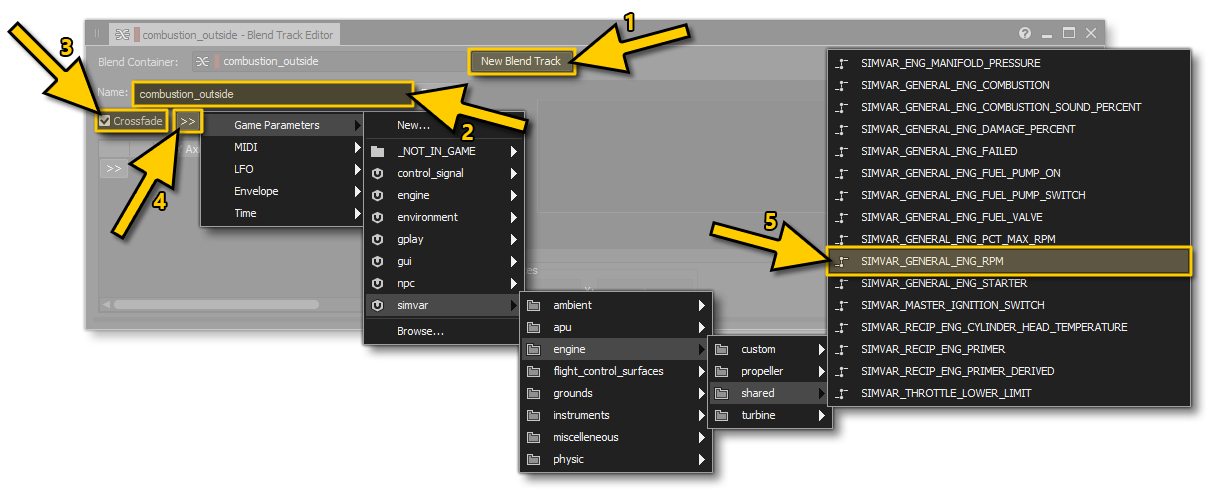
This will open the Blend Track Editor. Here you need to do the following:
- click on the New Blend Track button.
- name the track "combustion_outside".
- tick the "Crossfade" box to allow fading between the different RPM files.
- click on the
>>button to open up the parameters menu. - navigate to the Game Parameter
SIMVAR_GENERAL_ENG_RPMso that the Blend Track will play the right RPM loop depending of the simulation RPM value.
NOTE: Since we are implementing sounds for a piston aircraft, we choose to use the SIMVAR_GENERAL_ENG_RPM variable, but you actually have access to all the simulation variables available in Microsoft Flight Simulator. Each "simvar" listed in the Game Parameters section is connected to the corresponding SimVar of the simulation. For more information on SimVars, please see here: Simulation Variables.
After this you can close or minimise the Blend Track Editor (we'll be coming back to it again in a moment), and go to the Contents Editor window - ensuring that you have the combustion_outside blend track selected - and then drag and drop all the sounds onto the blend track, as shown below:

Don't forget to ensure they are ordered from minimum to maximum RPM, as this will be the reading order in your blend track.
You will want to go back to the Blend Track Editor now, and once there you will be positioning the different samples based on their RPM, applying cross-fades between them, as shown in the image below (where we've used a Sine wave for the cross-fade, selected from the RMB menu):

You now have proper cross-fades between your different loops, but you still have one last task - setting up the pitch transition so you have seamless and smooth transitions between the different RPM.
The Pitch Curve
With the sample loops set up, you also need to create a pitch curve so that the pitch of the engine sound changes over time correctly and as you would expect. Basically, just using the samples will mean that there will be a noticeable pitch shift between sounds, however by adding a pitch curve to the blend container you can create a smooth "ramp" in pitch over all the samples. We'll be creating this ramp in a two step process:
- Work out mathematically the correlation between pitch and RPM
- Create the pitch curve from these values in Wwise
Pitch and RPM Correlation
When you recorded the audio, the RPM of each sample should have been noted, based on the gauge reading in the aircraft. However this value is not 100% accurate for many reasons, and so you should do your own pitch/RPM correlation using some simple maths and a spreadsheet to get the exact RPM of the engine based on the cylinder count and sample frequency, and then the relative pitch between the different RPMs..
To start with, you can determine the RPM of a sample by using its fundamental frequency and related harmonics, along with the number of cylinders of the engine using the following formula:
$$\textrm{RPM} = \frac{(F \times 60)}{x}$$
Where:
- \(F\) is frequency of the related harmonic of the fundamental of the audio loop (in Hz)
- \(x\) is the number of cylinders of the engine
To find the fundamental frequency of the tracked harmonic (\(H\)) based on the number of cylinders you can use the following guide along with some kind tool that can analyse frequency values (for example, the free tool Sonic Visualizer):
- 2 cylinders - \(H1\)
- 3 cylinders - \(H1.5\)
- 4 cylinders - \(H2\)
- 5 cylinders - \(H2.5\)
- 6 cylinders - \(H3\)
- 8 cylinders - \(H4\)
- 10 cylinders - \(H5\)
- 12 cylinders - \(H6\)
Once you have found the real RPM values for each audio sample, you will then want to find the relative pitch interval. This is done using another formula that converts the interval frequency ratio \(f2 / f1\) to pitch cents (since Wwise uses pitch cent values):
$$P = 1200 \times log2(f2 / f1)$$
Where:
- \(f1\) is the first frequency of the interval
- \(f2\) is the second frequency of the interval
- \(P\) is the resulting relative pitch in cents
The best way to correlate the values you calculate is to create a spreadsheet, as shown in the following example:
| RPM | 1185 | 1515 | 1815 | 2205 | 2528 | 2858 | 3248 | 3453 | 3825 | |
|---|---|---|---|---|---|---|---|---|---|---|
| Harmonic Frequency (Hz) | 60 | 73 | 84 | 97 | 112 | 124 | 136 | 149 | 158 | |
| 1185 | 60 | 0 | 339.521 | 582.512 | 831.627 | 1080.56 | 1256.77 | 1416.69 | 1574.73 | 1676.27 |
| 1515 | 73 | -339.52 | 0 | 242.991 | 492.106 | 741.036 | 917.246 | 1077.17 | 1235.21 | 1336.75 |
| 1815 | 84 | -582.51 | -242.99 | 0 | 249.115 | 498.045 | 674.255 | 834.175 | 992.221 | 1093.76 |
| 2205 | 97 | -831,63 | -492,11 | -249.11 | 0 | 248.93 | 425.14 | 585.06 | 743.107 | 844.641 |
| 2528 | 112 | -1080.6 | -741.04 | -498.04 | -248.93 | 0 | 176.21 | 336.13 | 494.176 | 595.711 |
| 2858 | 124 | -1256.8 | -917.25 | -674.25 | -425.14 | -176.21 | 0 | 159.92 | 317.967 | 419.501 |
| 3248 | 136 | -1416.7 | -1077.2 | -834.17 | -585.06 | -336.13 | -159.92 | 0 | 158.047 | 259.581 |
| 3453 | 149 | -1574.7 | -1235.2 | -992.22 | -743.11 | -494.18 | -317.97 | -158.05 | 0 | 101.535 |
| 3825 | 158 | -1676.3 | -1336.7 | -1093.8 | -844.64 | -595.71 | -419.5 | -259.58 | -101.53 | 0 |
You'll notice in the sheet above that we have highlighted in green certain fields. This is because you'll need to designate an RPM as the "neutral point" of your pitch curve in Wwise, and in the example we've chosen 1815 RPM for this. You can choose whichever value you consider the most convenient as it's an arbitrary one, although generally it would be one of the middle values. The rest of the highlighted values around this neutral point indicate the relative pitch of the different RPM audio loops compared to 1815 RPM.
Creating The Curve
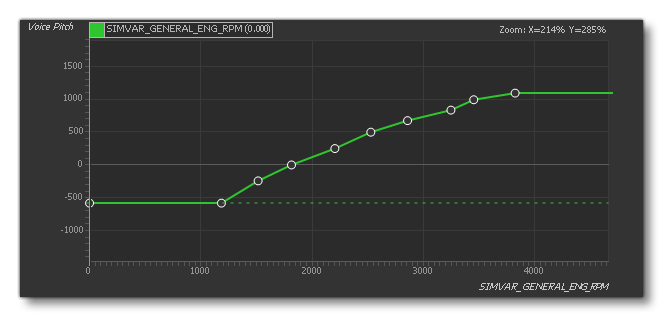
Now that we have our relative pitch cent values, we can go back to Wwise and use them to create the pitch curve. For this you will want to select the combustion switch container, and then got to the RTPC tab in the Property Editor. Once there, you will need to create an RTPC by selecting "Voice Pitch" as the Y axis and the game parameter SIMVAR_GENERAL_ENG_RPM as the X Axis:
You can now set the Voice Pitch curve to the values from the spreadsheet. This is done by double clicking on the green line (the curve) and then setting the X and Y values to the appropriate RPM and pitch, where you would be using the horizontal values from the spreadsheet. At the end of doing this you will have something that looks similar to the following image:
Adapting The Samples
There remains one final thing to do before things will actually sound as they should: adapt the pitch of the base audio samples to "fit" this pitch curve so that they still maintain their original timbre and don't sound to high or low when played. For that you will be using the vertical axis of the spreadsheet you created (as shown in the section above), and you'll be using the numbers above and below the neutral point RPM to adjust the pitch cents of each of the samples.
Modifying the sample pitch is simple. You only need to select the combustion_outside blend switch, and then open the Contents Editor window (if it's not already open). Here you will see each of the samples in this switch along with some of their associated parameters, one of which is Pitch. You can edit each of the pitch values for the samples from this window to match the values derived from the spreadsheet:

Testing In Wwise
You can test the way the pitch curve sounds over all the samples in the blend container quite easily in Wwise. For that you should select the combustion_outside container, and then open the Blend Track Editor:
With the editor open, you can then press the Play button in the Transport Control window, and drag the SIMVAR_GENERAL_ENG_RPM flag left and right in the Blend Track Editor window to simulate different values for the SimVar:
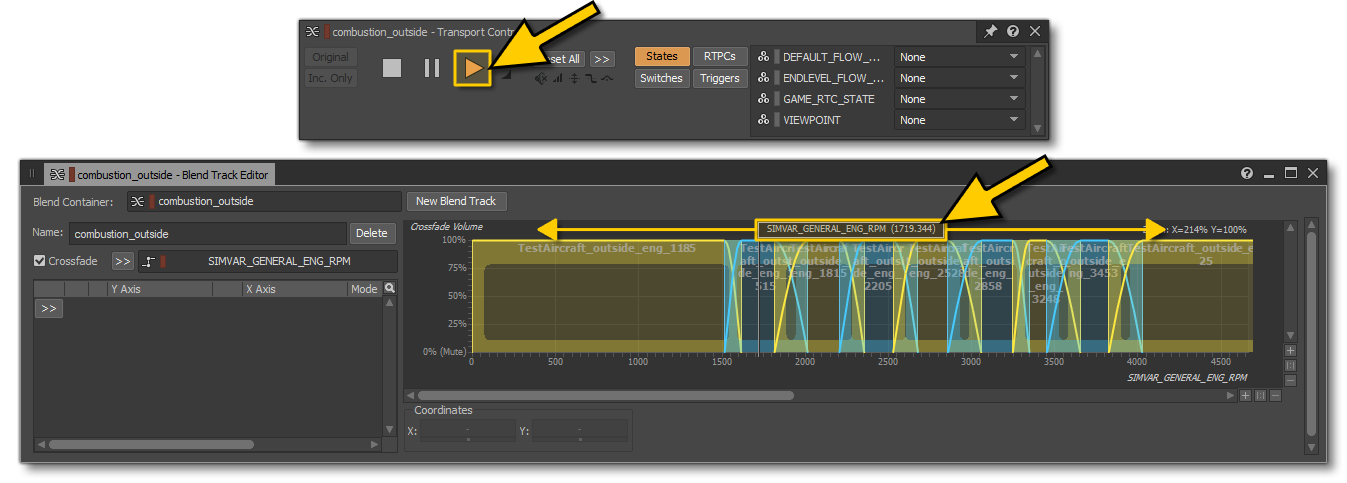
As you move the SimVar flag left and right you will hear how the samples cross-fade between each other and also how the pitch ramps and down smoothly.
Repeat
Having completed the setup, cross-fading, and pitch control for the combustion_outside container, you should now go ahead and repeat the exact same steps for the combustion_inside container, so that those audio loops behave in the exact same way as the outside ones do.
Once you have done this for the combustion_inside container, you have the basic sound loops for the engine finished. However you will normally want to repeat this process for other parts of the aircraft motor, specifically (for this example), the propeller and the exhaust. The basic work loop is:
- In the engine switch container, create a new child Switch Container for the part to add audio for
- In the new switch container, add child Blend Containers for inside and outside
- Add the appropriate samples to these blend containers
- Setup the blend container to cross-fade the samples at the correct RPMs
- Create the spreadsheet for the pitch curve
- Add the pitch curve
- Test
Note that the following SimVars should be used when creating the cross-fades and the pitch curve for the new blend containers:
- Propeller inside/outside -
SIMVAR_PROP_RPM - Exhaust inside/outside -
SIMVAR_GENERAL_ENG_RPM
NOTE: In the Wwise sample project you can check the various templates to see how they have been setup and try to match this with your own aircraft, and for a more complete and extensive example, you should definitely look at how the DA62 is setup.
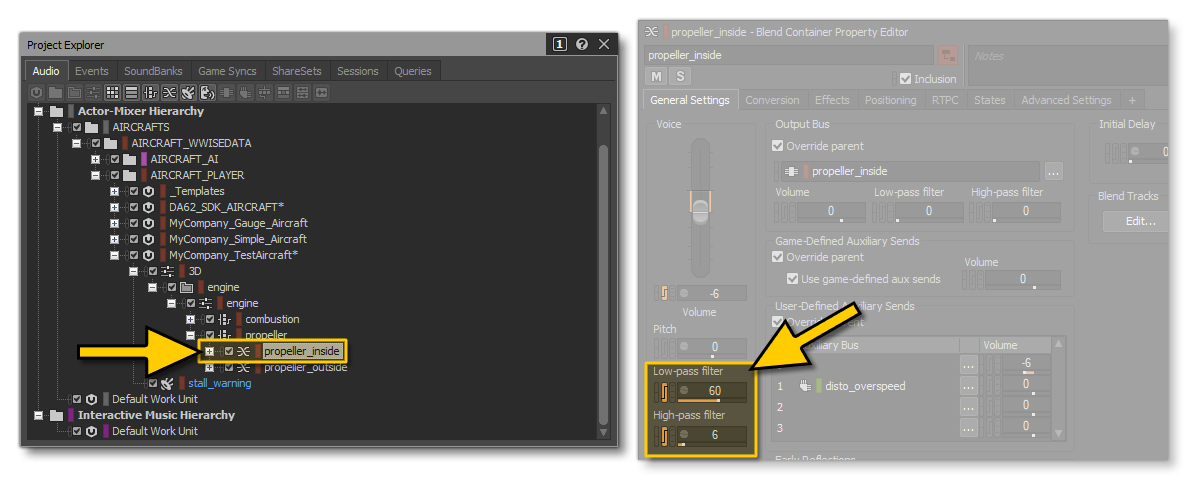
It is worth noting that for the propeller audio, you can take a shortcut and use the same audio samples that you recorded outside for the inside, and then process it slightly differently in Wwise to give the correct "tone" for an inside audio experience. For example, using the same audio, you would set the low pass and high pass filters for the propeller_inside blend container to transform the exterior audio into something very close to how it would actually sound inside the aircraft:
Additional Engine Sounds
The looping engine sounds are rather important, as they will be what the user hears constantly as they fly and maneuver their aircraft, however there are additional "one-shot" sounds that will also need to be added to complete the engine soundset and define the fully immersive audio experience. To better explain how these fit into the audio scheme, consider the following diagram:

In the above image, the blue circles represent all the engine sounds that should loop, while the lines that connect them indicate the one-off sound effects that will be used by Microsoft Flight Simulator to connect the loops together. At this point in the creation of the engine sounds you'll want to add these one-off sounds into Wwise, following this basic process:
- Right-click on the engine actor mixer and create a new child Switch Container
- Right-click the switch container and add inside and outside Blend Containers
- Finally, add the required samples for the audio into these blend containers
Engine Audio Events
The engine audio that you have added will need to be associated with corresponding Wwise events so that they can be played in the simulation. We covered this on the page about Setting Up Wwise, but we'll briefly go through it again here for you, as there are some minor differences in the process.
Once you have all the audio samples added to their appropriate blend containers, you will want to go to the Events tab in the Project Editor. From there you will want to create an "engine" Virtual Folder, which will be used to hold all the engine events that we will need. The next thing you'll do is create the Event itself - in this case for the combustion blend container - and then drag the appropriate blend container onto it:
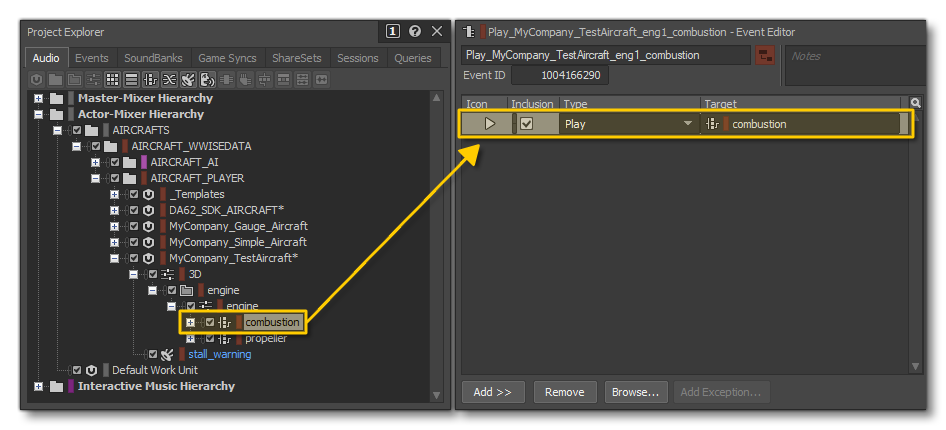
When creating the events, don't forget to follow the correct naming scheme for engine events:
Play_[SoundbankName]_engN_[WwiseEvent]
You'll notice that for engine events we have added in an extra component to the naming scheme: engN. In this case, the "N" refers to the index of the engine that the sound is for, and even if the aircraft only has one engine, this still needs to be included as the sound.xml will reference this index value (more on that here: Engine Audio Sound.xml). By the end of the process, you should have a list of named events that looks something like this:
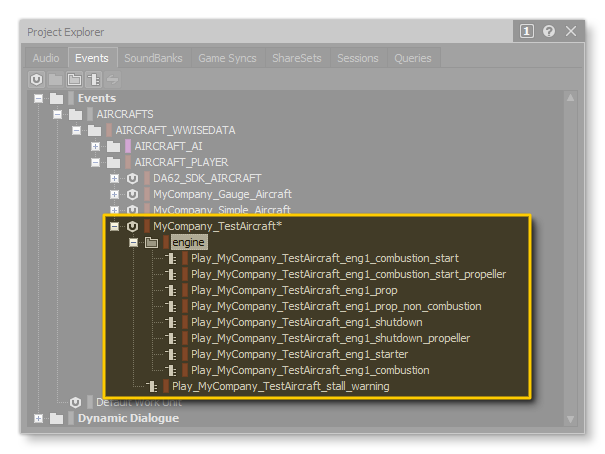
At this point you could go ahead and Generate The SoundBank and PC.PCK, then continue on and setup the Engine Audio Sound.xml. However before that there are additional effects and other Wwise features that can be used to enhance the final audio in the simulation, which we'll discuss on the following page: