USING THE SDK
This section of the SDK documentation is designed to give you an insight into the different tools available to you as well as other important information about how to use the SDK to create your Microsoft Flight Simulator 2020 add-ons. As such it is really a continuation of the SDK Overview page and, if you haven't read that yet, then we suggest you do that now then come back to this page and continue.
Projects, Packages and Asset Groups
Add-ons for Microsoft Flight Simulator 2020 are developed in the form of Projects, and a single project will have one or more independent packages within it. A package can contain any type of content supported by the simulation, for example aircraft, scenery or missions and these are defined by adding one or more Asset Groups to the package. Asset groups contain the base assets that are used to create the content, like models, or visual effects or combinations of different things.
When a package has been built it needs to be added to the simulation, and so it needs to be placed into a specific folder for it to be detected and used. The location that these packages are installed to is set upon installation of Microsoft Flight Simulator 2020, and is actually split over two locations:
- Official (for packages downloaded by the game)
- Community (where you can install your own packages)
In reality, you only need to worry about the Community folder, as that's where all user-created Add-On packages will be placed, including any that you make yourself.
NOTE: Finding the Community folder is explained in the section on The Community Folder on the SDK Overview page.
The "package" itself is a single unit of redistributable content. It consists of a directory containing the asset groups compiled and ready for direct consumption by the simulator in various formats, plus some special files at the top level:
layout.json: This file contains a list of all the other files present in the packagemanifest.json: This file contains meta-data about the package (e.g: the package name and version number).
The packages concept relies on a system called the Virtual File System (or VFS for short). In the VFS, a package has to be mounted to be accessible to the game - in which case all files present in the package become accessible and can be referenced by files present in other packages. In the case where 2 packages feature file sharing - ie: they have the same relative path inside the package - the version of the file in the package mounted last will take precedence. For example:
Packages
+-- package-01
|   |-- manifest.json
|   |-- layout.json
|   +-- MyDirectory
|       |-- myfile.cfg
+-- package-02
|   |-- manifest.json
|   |-- layout.json
|   +-- MyDirectory
|       |-- myfile.cfg
In this example, the path MyDirectory\myfile.cfg will refer to package-01\MyDirectory\myfile.cfg if package-01 was mounted last, or to package-02\MyDirectory\myfile.cfg in the case package-02 was mounted last. Note that files present in a package mounted in the VFS can also be referenced by files that are present in other packages.
Creating Your First Package
If you are starting a new project from scratch you will need to make your own package and supply the contents that go within it. For that the general workflow would be as follows:
- Open the Project Editor.
- Select Project > New Project
- Click the
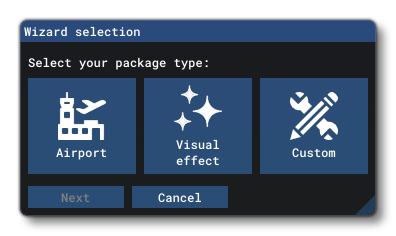
Add Packagebutton at the bottom - Select which kind of package you want to make, either an Airport or a Custom package:
- The window will update based on your selection and you can then fill in the detials for the new package:
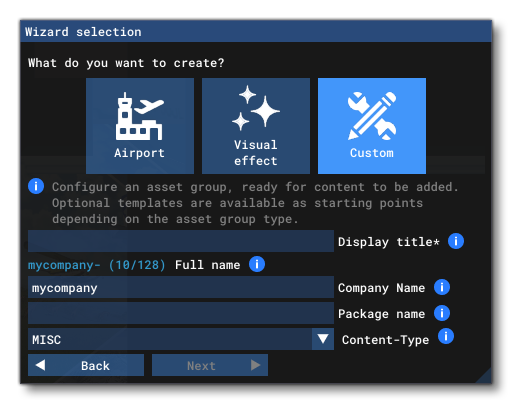
- Once you have filled in the required data and selected the package type you would click on the
Createbutton. - Next you will be prompted to add the first Asset Group to the package. Each package will require one or more asset group to be a valid package. For example, an Aircraft may have several asset groups: SimObject, ModelLib, and MaterialLib. So, you should fill in the required details and select an asset group type then click on
Create: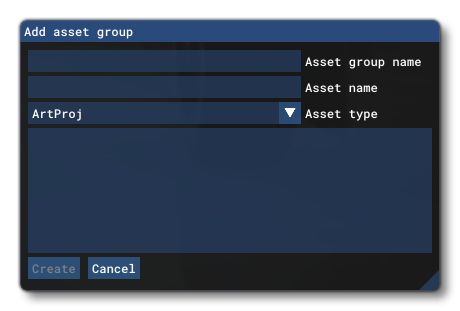
- In the Project Editor you will now see the Package listed and under the package the asset group that you've just added. Here you would select the asset group and then in the Inspector window click the
Load In Editorbutton (if available for the selected asset group).
Your new package has been created, and you can start to edit the contents of the asset group it contains, either using the built in editor, or browsing to the PackageSources location and adding the required files.
For a more in-depth explanation of creating packages and asset groups, please see the page on The Project Editor.
General Package Folder Structure
When you are creating your add-ons, it's good practice to get into the habit of maintaining a strict and organised folder hierarchy for each asset. The recommended formatting for the various folders that your package will require is as follows:
<General Packages Folder>
    + <Package Name>
        + PackageDefinitions (for package meta-data)
        + PackageSources (for the different package source files
            + data
            + scenery
            + vegetation
            + etc...
        + Sources (for code and/or art resources)
Other folders will be created within this hierarchy by the SDK when you build the Add-on package you are creating, but the above is a good general "rule of thumb" for add-on folder structure. You can see actual working examples of this general structure by examining the different Samples, Schemas, Tutorials and Primers supplied with the SDK.
Developer Tools
Microsoft Flight Simulator 2020 departs from its predecessor, Microsoft Flight Simulator X (or FSX for short), in the way that the developer tools are integrated. Where FSX used to provide separate compilers for each type of resource (eg: bglcompiler.exe, SimPropCompiler.exe etc...), the compilers for Microsoft Flight Simulator 2020 assets are integrated into the simulator executable under the umbrella of a build automation tool called the Package Tool (similar in spirit to a Makefile system).
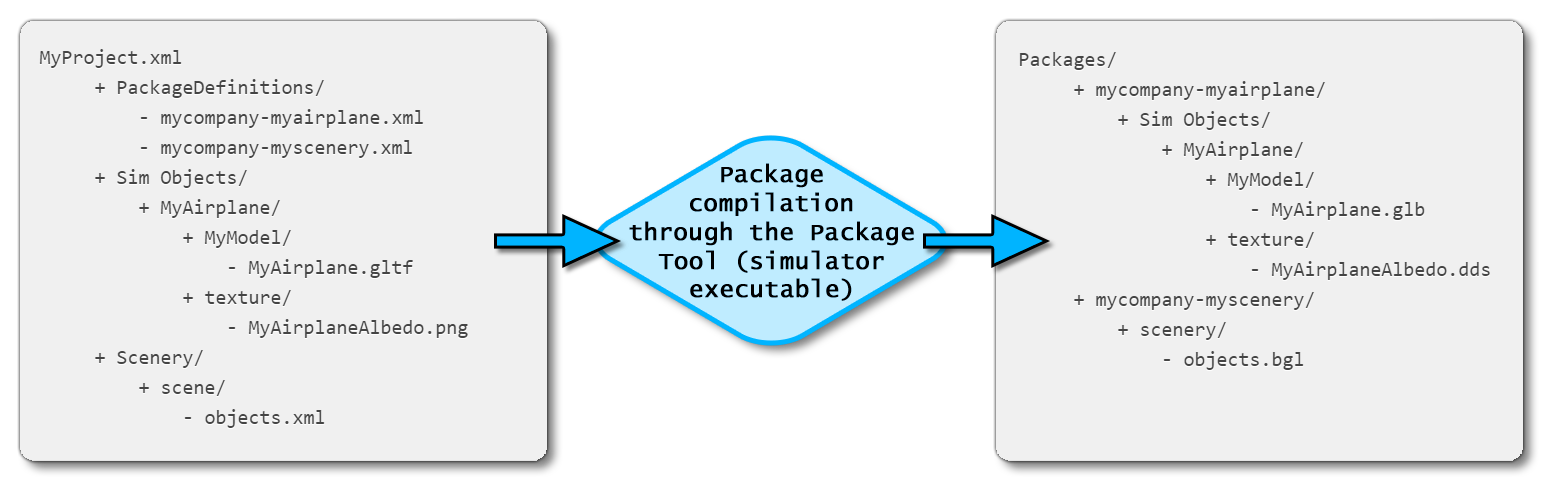
Below is an illustration of the process that goes into building two packages that are part of the same project file. Note how *.glTF files get compiled to *.glb, *.png files get compiled to *.dds and *.xml files get compiled to *.bgl:
The Package Tool is part of The Project Editor which is part of the internal Microsoft Flight Simulator 2020 tool chain. In general the tools you'll need to make Add-Ons for the sim are as follows:
- external tools: These are tools you'll need to create some of the content you'll use, like aircraft models, and there are additional tools distributed as part of the SDK (e.g. the 3D Studio Max glTF exporter plug-in - see the SDK Overview page for more information) to help you use them.
- in-sim tools: These are available under the Developer Mode (e.g. The Project Editor, The Scenery Editor, The Aircraft Editor, etc...).
GUIDs
An important part of many of the assets and files that you'll be creating for Add-Ons is the use of GUIDs for identifying them. For example, in the cameras.cfg file there is a key like this:
Guid = "{195EAB58-9E4A-1E2A-A34C-A8D9D948F078}" ; Camera definition unique identifier. This GUID must be unique.
As the comment for that key says, these are unique identifiers for each and every thing that requires it, and it's up to you to generate them.
To make things a little easier, this can be done from within Microsoft Visual Studio using the Create GUID tool:
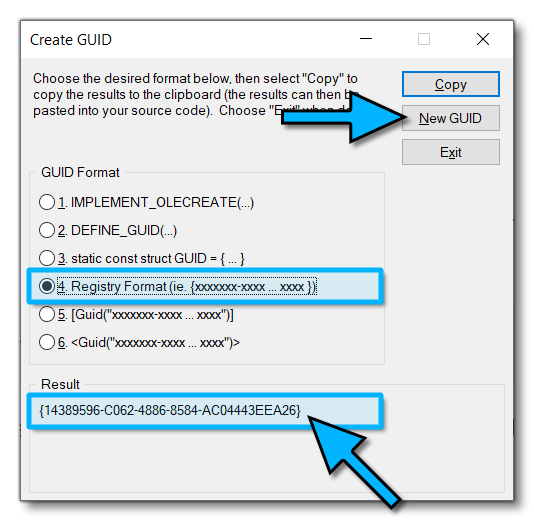
This is available from the Tools menu in Visual Studio and will generate a GUID in multiple formats each time you click the New GUID button. We recommend using the Registry Format, as you can copy and paste that into most files without having to edit anything.
3D Models
In Microsoft Flight Simulator 2020, 3D models, scenes and animations are stored following the glTF file format. glTF is a Khronos-backed standard file format consisting of a JSON file and referencing accompanying binary files. In Microsoft Flight Simulator 2020, glTF support relies on custom glTF extensions, whose schemas can be found as part of the SDK installation in the Schemas subfolder.
NOTE: The old MDL file format from FSX is now deprecated and should not be used when developing add-ons for Microsoft Flight Simulator 2020
You can find more information on the creation of 3D models from the 3D Models section of this document.
Textures And Materials
Materials for 3D models are specified in glTF files, and the referenced textures are in *.png format. The materials comply with PBR (Physically Based Rendering). Upon compilation by the glTF compiler (invoked by the Package Tool), *.gltf files get compiled to *.glb and *.png files get compiled to *.dds files. The resulting *.glb file makes use of several glTF extensions, including MSFT_texture_dds as well as Microsoft Flight Simulator 2020 specific ones.
Materials for usage in the scenery tool are edited via The Material Editor, which is part of the Developer Mode, and are stored in *.xml format. The source textures are also edited in *.png format and converted to *.dds for direct consumption by the simulator runtime.
You can find more information on the creation of Textures from the Textures section of this document.
SimObjects
In Microsoft Flight Simulator 2020 SimObjects are entities which have a simulation attached. The main use case for SimObjects is in making aircraft, but they are also used for certain other things like ground vehicles.
Structure
SimObjects are comprised of several files:
- meshes and textures, using the glTF file format
- configuration files, in the form of
*.cfgand*.xmlfiles - checklists, in the form of
*.xmlfiles
NOTE: *.air files (FSX flight model configuration files) have been removed in favor of exposing all flight model parameters in plain text *.cfg files.
Edition
Aircraft configuration files can be edited through the Aircraft Editor, which is part of the Developer Mode. You can find a tutorial on how to setup the flight model for aircraft using the Aircraft Editor or directly editing the *.cfg files here.
Model Behaviors
glTF files support animations, but those animations need to be linked to Simulation Variables. This link is done through an *.xml file which is named after the name of its accompanying *.gltf file, and the XML has various different sectiopns defining the model behavior and - for the interior of the aircraft - the different input event interactions available.
Model behaviors can reuse a library of XML templates which are stored in the ModelBehaviorDefs folder in the VFS of the package fs-base-aircrafts-common. This is included as part of the standard SDK installation, and can be found in the Official folder which resides beside the The Community Folder.
NOTE: This file is the modern equivalent to the modeldef.xml file that was distributed as part of FSX SDK, which was part of the *.mdl compilation process.
You can find more information on model behaviours and the templates available from the following section:
Scenery And Airports
Microsoft Flight Simulator 2020 add-ons can feature scenery as part of the package, which can be not only areas or POI within the world, but also airports. In general these scenery packages are comprised of the following:
- 3D models, stored in model libraries
- materials and textures
- model placement
- vector data (allowing for trees placement or removal, terra-forming, biome changes...)
- airports data
Scenery and airports are primarily edited using The Scenery Editor and The Material Editor, both of which are available as part of the Developer Mode.
Scenery object placement and airport data are saved in *.xml format and vector data is saved in the form of shapefiles ( *.shp). Both are compiled to *.bgl files using the BGL compiler invoked by the Package Tool in The Project Editor.
NOTE: *.xml and shapefiles compilation to *.bgl files is similar to how the FSX assets pipeline worked. The file formats are similar but have been extended with new features.
Missions
Missions can be edited using The Script Editor, which is available through the Developer Mode. The editor allows for real-time edition of missions, triggers placement and logic edition, and uses a node-based visual display to make it easier to create complex missions for users.
Procedural World Generation
In Microsoft Flight Simulator 2020 the world is generated using various sources of data, and the world generation supports 3 different quality levels:
- Level #1: Photogrammetry, where meshes are downloaded for each tile
- Level #2: Digital Elevation Model (DEM) + aerial imagery combination
- Level #3: Digital Elevation Model (DEM) + texture synthesized ground textures
Level #3 is used for the offline version of the world and/or in cases where the aerial image quality is judged inadequate. As a result, some data is stored locally as part of the installation of the simulator:
- Building footprints (stored in
CGLfiles) - Biome information (stored in
CGLfiles) - Vector data (e.g: water and roads, is stored in
CGLfiles) - Textures for procedural ground texture synthesis (stored in
DDSfiles) - Variations for the vegetation (stored in
XMLfiles) - etc...
At the moment this data cannot be edited by add-ons, but in the future it may be possible to edit CGL files. For more information on how the map tile data contained in CGL files is obtained, see the following Microsoft article:
NOTE: The Autogen technology from FSX has effectively been removed in Microsoft Flight Simulator 2020.
NOTE: CGL files are the Microsoft Flight Simulator 2020 equivalent of BGL files, only for storing imagery, elevation data, vector data and footprints. BGL files are still used when it comes to airport data or edited vector data (in the form of polygons).
Effects
Visual effects can be created using The Visual Effects Editor while DevMode is active. This editor uses a visual coding system of "nodes" that are connected to create the required visual effect which can then be attached to a SimObject or generated using the appropriate Model Behaviors. A sample project for the VFX editor is included with the SDK and you can find more information on it here:
For information on the XML that is generated by the VFX Editor - along with examples of each of the different VFX nodes - please see the following page:
Legacy FX
Legacy *.fx files have rudimentary support within Microsoft Flight Simulator 2020 but there is no dedicated editor for them and we recommend that you use the VFX editor to create all effects for you add-ons, and only have these legacy format files for legacy add-ons. You can find more information on these legacy effects from the following page:
NOTE: *.fx files are similar to the ones found in FSX, but the main difference is that texture links are made to materials defined by the Materials Editor instead of links to single albedo textures.
Sound
The sound engine used in Microsoft Flight Simulator 2020 is Audiokinetic Wwise, which allows for easy edition of advanced sound effects by sound designers using the Wwise editor. Sound banks are packaged and distributed as part of Wwise file packages ( *.PC.PCK).
Linking Wwise Runtime Parameter Control ( RTPC for short) to Simulation Variables is done through a file named sound.xml in the SimObject's sound folder. You can find more information on creating sound effects for the game from the following section:
UI
UI in Microsoft Flight Simulator 2020 is developed using modern HTML5 technologies (HTML, JavaScript, CSS). However, at the moment UI is not customisable as part of add-ons, although there are plans to make it possible to include UI elements as part of packages sometime in the future.
Gauges
The various aircraft instruments can be created and customised as gauges using different techniques depending on what you want to achieve. Broadly these fall into the following two categories:
- 2D gauges - Glass cockpits are developed using HTML technologies (similar to UI). HTML pages are referenced from the
panel.cfgfile in the panel folder of a SimObject. - 3D gauges - These are part of the glTF model for an aircraft and are essentially made of a mesh, textures and the accompanying animations.
NOTE: the old FSX XML gauges system is still supported but is deprecated in favor of HTML.
NOTE: Previously, in FSX, you could use CAB files to store files - primarily used for XML gauges. However, with Microsoft Flight Simulator 2020 this is not possible and has been deprecated. CAB files are not supported on Xbox and, as such, they cannot be used for any aircraft packages for that platform. If you have a legacy aircraft that you have updated for Microsoft Flight Simulator 2020 and it still uses CAB files, then you will need to resolve this before these aircraft will be available for the Xbox. The simple solution is to simply extract the files from the CAB file into a folder with the same name as the CAB file (minus the extension).
You can find the following samples included with the SDK to show you how gauges can be created as part of an aircraft package:
- GaugeAircraft - creating and building custom WASM gauges, and linking them to the aircraft
- GdiplusAircraft - using a static library to extend the graphic capabilities via a GDI+ wrapper of the low level API
- MapViewAircraft - A WASM example showing how to make glass cockpit screens showing weather/terrain.
C++ Support
C++ support is provided in the form of WASM modules. In particular, this can be used for implementing complex gauges and porting from legacy code. The following APIs are currently available:
More APIs may be authored depending on community feedback.
DRM
Digital Rights Management (DRM for short) functionality is currently applied automatically to all Marketplace packages. However it should be noted that HTML/javascript can not be encrypted and additionally, javascript can not read encrypted data at all (even if it's from your own package), only with WASM can you read encrypted data from your own package.
A more comprehensive and customisable DRM solution is in development and will be provided through the official marketplace framework when it's ready.